590808
1
Verklein
Vergroot
Pagina terug
1/2
Pagina verder
Wireless wall switch, Funk-Wandschalter,
Draadloze muurschakelaar, Commutateur
mural sans fil, Bezprzewodowy wyłącznik
ścienny, Interruptor de pared inalámbrico
Installatie zender (SH5-TSW-C)
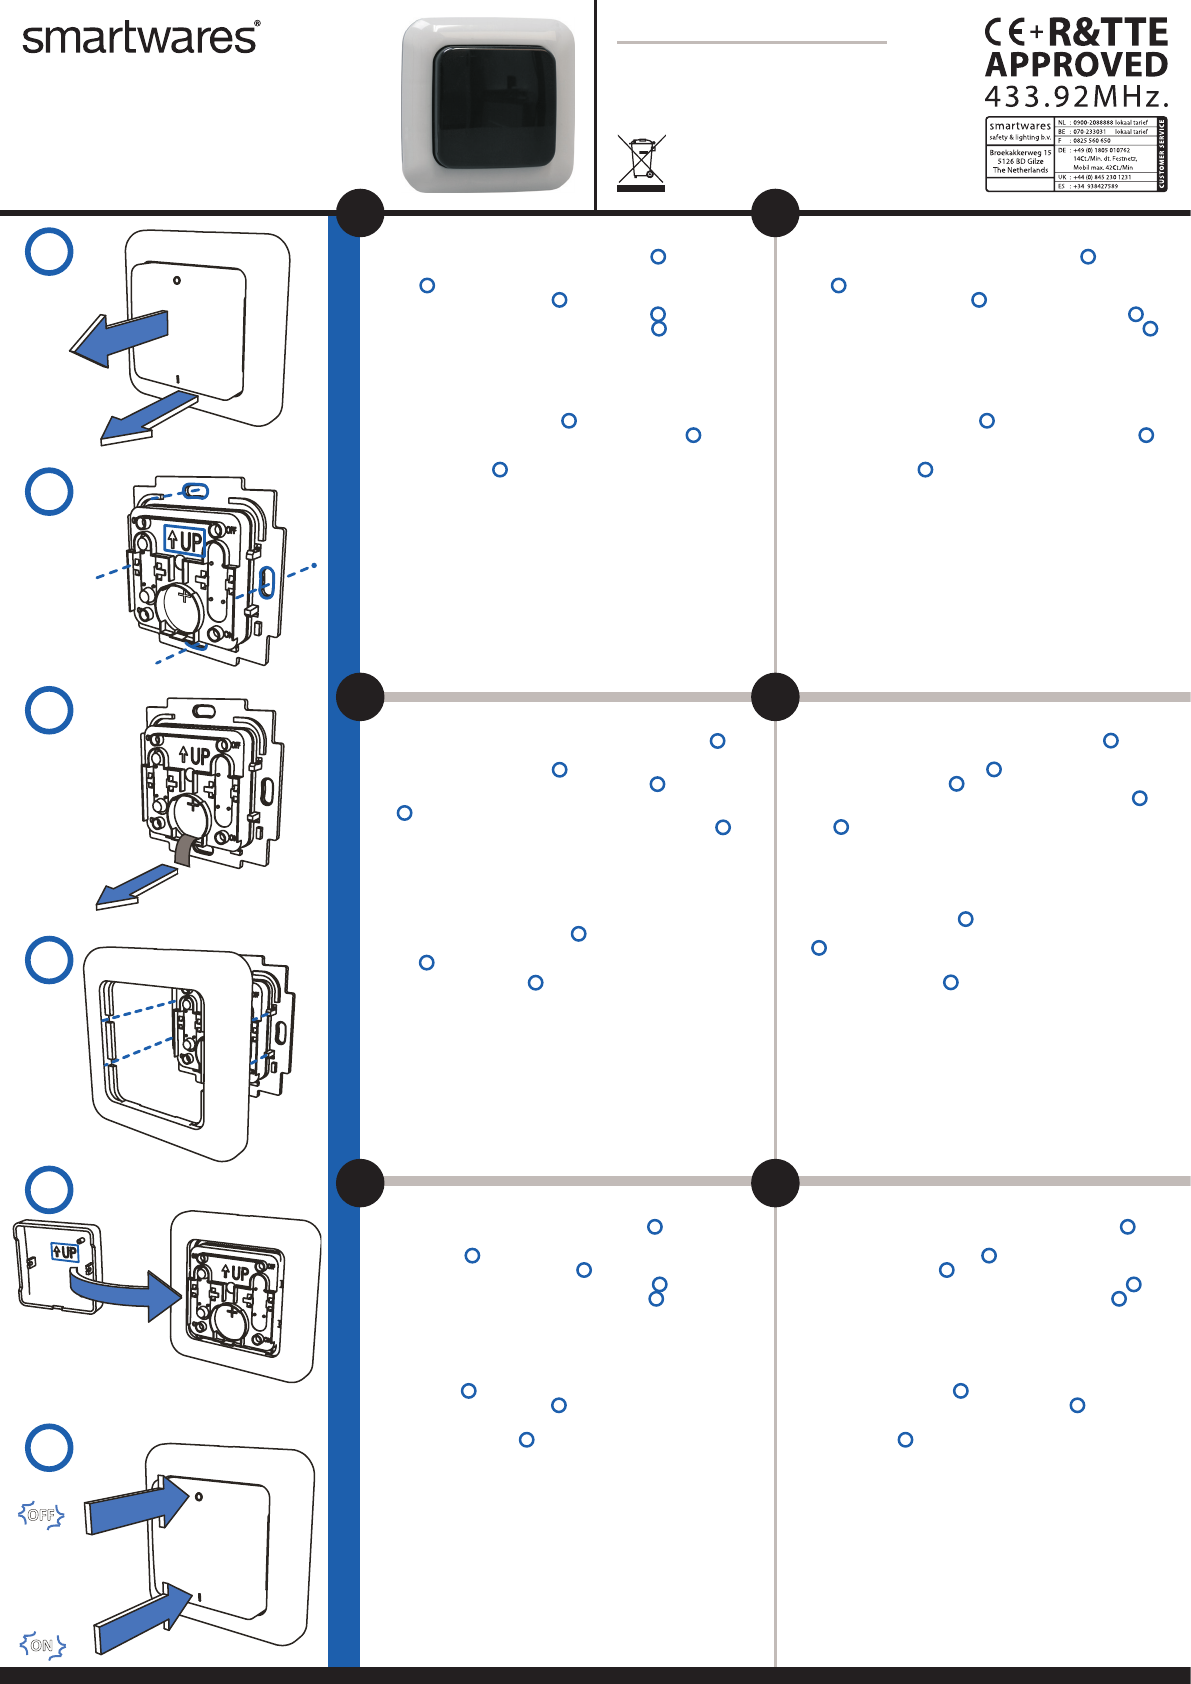
a. Verwijder eerst de drukknop en dan het frame van de montageplaat
1
.
b. Bevestig de montageplaat op de gewenste plek op de muur met de meegeleverde schroeven. Let
op de pijl omhoog
2
.
c. Activeer de batterij door het lipje eruit te trekken
3
.
d. Plaats het frame terug op de montageplaat, let op de montagenokjes
4
.
e. Plaats de drukknop terug op de montageplaat, let op de pijl omhoog
5
.
De zender met een ontvanger koppelen of ontkoppelen
a. Druk 3 seconden op de knop op de ontvanger en laat deze vervolgens los. Bij deze handeling gaat de
LED knipperen. Uw ontvanger bevindt zich nu in de koppelmodus.
Let op! De LED mag pas knipperen na het loslaten. Als de LED gaat knipperen tijdens indrukken dan
wordt er niet gekoppeld.
b. Druk op “I” / ”ON”
6
op de zender om deze te koppelen. Bij deze handeling gaat de LED op
de ontvanger branden. Druk op “0” / “OFF”
6
op de zender om deze te ontkoppelen. Bij deze
handeling dooft de LED op de ontvanger.
Een ontvanger bedienen
6
a. Druk op “I” / ”ON” op de zender om de ontvanger in te schakelen.
b. Druk op “0” / “OFF” op de zender om de ontvanger uit te schakelen.
Dimmer ontvangers bedienen
a. Druk op de zender op “I” / ”ON” om de dimmer in te schakelen op de laatst ingestelde dimstand.
b. Druk op de zender op “0” / “OFF” om de dimmer uit te schakelen.
c. Wanneer de dimmer is ingeschakeld: druk op de zender kort op “I” / “ON” om het licht te dimmen;
druk nogmaals op “I” / “ON” om het dimmen te stoppen.
Alle koppelingen ongedaan maken
a. Druk 10 seconden op de knop op de ontvanger.
b. Bij deze handeling gaat de LED knipperen.
c. Zodra de LED dooft zijn alle koppelingen ongedaan gemaakt.
Specifications:
Remote control battery: 3VDC, type CR 2032 (incl.)
Warranty: 2 years
GB
D
NL
F
PL
www.smartwares.eu
SH5-TSW-C
E
ON
OFF
1
2
3
4
5
6
Installing the transmitter (SH5-TSW-C)
a. First remove the push button and the frame from the mounting plate
1
.
b. Attach the mounting plate to the desired spot on the wall, using the supplied screws. Note the up
arrow
2
.
c. Activate the battery by pulling out the tab
3
.
d. Place the frame back on the mounting plate, note the mounting tabs
4
.
e. Place the push button back on the mounting plate, note the up arrow
5
.
Pairing/disconnecting the transmitter with/from a receiver
a. Press and hold the button on the receiver for 3 seconds and then release it. During this operation the
LED starts to blink. Your receiver is now switched into the pairing mode.
Attention: the LED should blink only after releasing the button. If the LED starts to blink while
holding the button, there will be no pairing.
b. Press the “I” / ”ON” button on the transmitter
6
to pair it with a receiver. During this operation the
LED on the receiver will light up. Press the “0” / ”OFF” button on the transmitter
6
to disconnect it
from a receiver. During this operation the LED on the receiver turns o.
Operating receivers
6
a. Press the “I” / ”ON” button on the transmitter to turn on the receiver.
b. Press the “0” / “OFF” button on the transmitter to turn o the receiver.
Operating a dimmer receiver.
a. Press the “I” / ”ON” button on the transmitter to turn on the dimmer on the last set dim level.
b. Press the “0” / “OFF” button on the transmitter to turn o the dimmer.
c. When the dimmer is turned on: briey press the “ON” button to dim the light; press the “ON” button
again to stop the dimming.
Disconnecting all links
a. Press and hold the button on the receiver for 10 seconds.
b. During this operation the LED starts to blink.
c. When the LED on the receiver turns o, all links will be disconnected.
Sender (SH5-TSW-C) installieren
a. Nehmen Sie zunächst die Tastäche und den Blendrahmen von der Montageplatte ab
1
.
b. Installieren Sie die Montageplatte mit den mitgelieferten Schrauben an der gewünschten Stelle an
der Wand. Beachten Sie den Aufwärtspfeil
2
.
c. Aktivieren Sie die Batterie, indem Sie den Trennstreifen herausziehen
3
.
d. Setzen Sie den Blendrahmen auf die Montageplatte zurück, beachten Sie die Befestigungsnasen
4
.
e. Setzen Sie die Tastäche auf die Montageplatte zurück, beachten Sie den Aufwärtspfeil
5
.
Verbindung/Trennung des Empfängers mit einem/von einem Transmitter
a. Drücken und halten Sie die Taste am Empfänger 3 Sekunden lang und lassen Sie sie wieder
los. Während dieses Vorgangs beginnt die LED zu blinken. Ihr Empfänger wurde jetzt in den
Verbindungsmodus geschaltet.
Achtung: Die LED darf erst nach der Freigabe blinken. Wenn die LED beginnt zu blinken, während
die Taste noch gedrückt wird, wird keine Verbindung aufgebaut.
b. Drücken Sie die „I“ / „EIN“-Taste am Transmitter,
6
um ihn mit dem Empfänger zu verbinden. Bei
diesem Vorgang leuchtet die LED am Empfänger auf. Drücken Sie am Transmitter die „0“ / „AUS“-
Taste,
6
um ihn vom Empfänger zu trennen. Bei diesem Vorgang erlischt die LED am Empfänger.
Bedienung der Empfänger
6
a. Drücken Sie die „I“ / „EIN“-Taste am Transmitter, um den Empfänger einzuschalten.
b. Drücken Sie die „O“ / „AUS“-Taste am Transmitter, um den Empfänger auszuschalten.
Bedienung eines Dimmer-Empfängers.
a. Drücken Sie die „I“ / „EIN“-Taste am Transmitter, um den Dimmer auf dem zuletzt eingestellten
Dimm-Niveau einzuschalten.
b. Drücken Sie die „O“ / „AUS“-Taste am Transmitter, um den Dimmer auszuschalten.
c. Wenn der Dimmer eingeschaltet wurde: Drücken Sie kurz die „EIN“-Taste, um das Licht zu dimmen,
drücken Sie die „EIN“-Taste erneut, um den Dimmvorgang zu stoppen.
Pairing löschen (alle)
a. Drücken und halten Sie die Taste am Empfänger 10 Sekunden lang.
b. Während dieses Vorgangs beginnt die LED zu blinken.
c. Wenn die LED am Empfänger erlischt, werden alle Verbindungen getrennt.
Installation de l’émetteur (SH5-TSW-C)
a. Retirez d’abord le bouton-poussoir puis le cadre de la plaque de montage
1
.
b. Fixez la plaque de montage à l’endroit voulu sur le mur avec les vis fournies. Remarquez la èche
Haut
2
.
c. Activez la batterie en tirant sur la languette
3
.
d. Remettez le cadre en place sur la plaque de montage, remarquez les pattes de xation
4
.
e. Remettez le bouton-poussoir en place sur la plaque de montage, remarquez la èche Haut
5
.
Liaison/dissociation de l’émetteur à un récepteur
a. Maintenez le bouton du récepteur enfoncé pendant 3 secondes avant de le relâcher. Pendant cette
opération, la DEL commence à clignoter. Votre récepteur est à présent en mode de connexion.
Attention : la DEL doit clignoter uniquement une fois le bouton relâché. Si la DEL commence à
clignoter lorsque le bouton est enfoncé, aucune connexion ne se produira.
b. Appuyez sur le bouton “I” / “ON” de l’émetteur
6
pour le connecter à un récepteur. Pendant cette
opération, la DEL du récepteur s’allumera. Appuyez sur le bouton “0” / “OFF” de l’émetteur
6
pour
le déconnecter d’un récepteur. Pendant cette opération, la DEL du récepteur s’éteindra.
Utiliser les récepteurs
6
a. Appuyez sur le bouton “I” / “ON” de l’émetteur pour mettre le récepteur en marche.
b. Appuyez sur le bouton “0” / “OFF” de l’émetteur pour éteindre le récepteur.
Utiliser un récepteur gradateur.
a. Appuyez sur le bouton “I” / “ON” de l’émetteur pour mettre le gradateur en marche au dernier niveau
de gradation.
b. Appuyez sur le bouton “0” / “OFF” de l’émetteur pour éteindre le gradateur.
c. Lorsque le gradateur est en marche : appuyez brièvement sur le bouton “ON” pour baisser la lumière;
appuyez à nouveau sur le bouton “ON” pour interrompre la gradation.
Déconnecter tous les liens
a. Maintenez le bouton du récepteur enfoncé pendant 10 secondes .
b. Pendant cette opération, la DEL commence à clignoter.
c. Lorsque la DEL du récepteur s’éteint, tous les liens seront déconnectés.
Montaż nadajnika (SH5-TSW-C)
a. Przede wszystkim należy wyjąć przyciski, a następnie ramkę płytki montażowej
1
.
b. Zamocować płytkę montażową w wybranym miejscu na ścianie za pomocą dołączonych wkrętów.
Zwrócić uwagę na strzałkę skierowaną ku górze
2
.
c. Uruchomić baterię wyciągając klapkę
3
.
d. Ponownie założyć ramkę na płytce montażowej zwracając uwagę na klapki montażowe
4
.
e. Ponownie założyć przyciski na płytce montażowej zwracając uwagę na strzałkę skierowaną ku
górze
5
.
Kojarzenie/Odłączanie nadajnika z/od odbiornikiem
a. Naciśnij i przytrzymaj przycisk na odbiorniku przez 3 sekundy, a następnie zwolnij go. W trakcie tej
operacji kontrolka LED zaczyna migać. Odbiornik jest teraz przełączony na tryb łączenia.
Uwaga: Kontrolka LED powinna migać tylko po zwolnieniu. Jeśli kontrolka LED zacznie migać już w
trakcie naciskania przycisku, wtedy nie będzie połączenia.
b. Naciśnij przycisk „I” / „ON” na nadajniku,
6
aby połączyć go z odbiornikiem. Podczas wykonywania
tej czynności zaświeci się kontrolka LED na odbiorniku. Naciśnij przycisk „0” / „OFF” na nadajniku,
6
aby przerwać połączenie z odbiornikiem. Podczas wykonywania tej czynności kontrolka LED
na odbiorniku zgaśnie.
Użytkowanie odbiorników
6
a. Aby włączyć odbiornik, naciśnij przycisk „I” / „ON” na nadajniku.
b. Aby wyłączyć odbiornik, naciśnij przycisk „0” / „OFF” na nadajniku.
Użytkowanie odbiornika ściemniacza.
a. Naciśnij przycisk „I” / „ON” na nadajniku, aby włączyć ściemniacz na ostatnio ustawionym poziomie
ściemnienia.
b. Naciśnij przycisk „0” „OFF” na nadajniku, aby wyłączyć ściemniacz.
c. Gdy ściemniacz jest włączony: na chwilę naciśnij przycisk „ON”, aby przyciemnić światło; naciśnij
przycisk „ON” ponownie, aby zatrzymać ściemnianie.
Rozłączanie wszystkich połączeń
a. Naciśnij i przytrzymaj przycisk na odbiorniku przez 10 sekund.
b. W trakcie tej operacji kontrolka LED zaczyna migać.
c. Gdy kontrolka LED na odbiorniku zgaśnie, wszystkie połączenia zostaną rozłączone.
Instalación del transmisor (SH5-TSW-C)
a. En primer lugar, extraiga el botón, y a continuación el marco, de la placa de montaje
1
.
b. Coloque la placa de montaje en el lugar de la pared que desee y fíjela con los tornillos
proporcionados. Observe la echa hacia arriba
2
.
c. Active la pila tirando de la pestaña
3
.
d. Vuelva a colocar el marco en la placa de montaje observando las pestañas de montaje
4
.
e. Vuelva a colocar el botón en la placa de montaje observando la echa hacia arriba
5
.
Conectar/desconectar el transmisor a un receptor
a. Presione y mantenga el botón del receptor durante 3 segundos y suéltelo. Durante esta operación el
LED comenzará a parpadear. El receptor pasará a modo conexión.
Atención: el LED solamente debe parpadear tras soltar el botón. Si el LED comienza a parpadear
durante la pulsación no se producirá la conexión.
b. Pulse el botón “I” / “ON” del transmisor
6
para conectarlo a un receptor. Durante la operación se
encenderá el LED del receptor. Pulse el botón “0” / “OFF” del transmisor
6
para desconectarlo de
un receptor. Durante la operación se apagará el LED del receptor.
Uso de receptores
6
a. Pulse el botón “I” / “ON” en el transmisor para encender el receptor.
b. Pulse el botón “0” / “OFF” en el transmisor para apagar el receptor.
Uso de un receptor regulador.
a. Pulse el botón “I” / “ON” en el transmisor para encender el regulador con el último nivel de
regulación establecido.
b. Pulse el botón “0” / “OFF” en el transmisor para apagar el receptor.
c. Cuando esté encendido el regulador: pulse brevemente el botón “ON” para suavizar la luz; pulse de
nuevo el botón “ON” para detener el suavizado.
Desconectar todas las conexiones
a. Presione y mantenga el botón del receptor durante 10 segundos.
b. Durante esta operación el LED comenzará a parpadear.
c. Cuando el LED del receptor se apague se desconectarán todas las conexiones.
1

Hulp nodig? Stel uw vraag in het forum

Spelregels

Misbruik melden

Gebruikershandleiding.com neemt misbruik van zijn services uitermate serieus. U kunt hieronder aangeven waarom deze vraag ongepast is. Wij controleren de vraag en zonodig wordt deze verwijderd.

Product:

Bijvoorbeeld antisemitische inhoud, racistische inhoud, of materiaal dat gewelddadige fysieke handelingen tot gevolg kan hebben.

Bijvoorbeeld een creditcardnummer, een persoonlijk identificatienummer, of een geheim adres. E-mailadressen en volledige namen worden niet als privégegevens beschouwd.

Spelregels forum

Om tot zinvolle vragen te komen hanteren wij de volgende spelregels:

Belangrijk! Als er een antwoord wordt gegeven op uw vraag, dan is het voor de gever van het antwoord nuttig om te weten als u er wel (of niet) mee geholpen bent! Wij vragen u dus ook te reageren op een antwoord.

Belangrijk! Antwoorden worden ook per e-mail naar abonnees gestuurd. Laat uw emailadres achter op deze site, zodat u op de hoogte blijft. U krijgt dan ook andere vragen en antwoorden te zien.

Abonneren

Abonneer u voor het ontvangen van emails voor uw Smartwares SH5-TSW-C bij:


U ontvangt een email met instructies om u voor één of beide opties in te schrijven.


Ontvang uw handleiding per email

Vul uw emailadres in en ontvang de handleiding van Smartwares SH5-TSW-C in de taal/talen: Nederlands, Duits, Engels, Frans, Spaans, Pools, Zweeds, Noors als bijlage per email.

De handleiding is 0,6 mb groot.


U ontvangt de handleiding per email binnen enkele minuten. Als u geen email heeft ontvangen, dan heeft u waarschijnlijk een verkeerd emailadres ingevuld of is uw mailbox te vol. Daarnaast kan het zijn dat uw internetprovider een maximum heeft aan de grootte per email. Omdat hier een handleiding wordt meegestuurd, kan het voorkomen dat de email groter is dan toegestaan bij uw provider.

Uw handleiding is per email verstuurd. Controleer uw email

Als u niet binnen een kwartier uw email met handleiding ontvangen heeft, kan het zijn dat u een verkeerd emailadres heeft ingevuld of dat uw emailprovider een maximum grootte per email heeft ingesteld die kleiner is dan de grootte van de handleiding.

Er is een email naar u verstuurd om uw inschrijving definitief te maken.

Controleer uw email en volg de aanwijzingen op om uw inschrijving definitief te maken

U heeft geen emailadres opgegeven

Als u de handleiding per email wilt ontvangen, vul dan een geldig emailadres in.

Uw vraag is op deze pagina toegevoegd

Wilt u een email ontvangen bij een antwoord en/of nieuwe vragen? Vul dan hier uw emailadres in.


Info