ƜƷƨƼƸŴǷǰȞȬȳǺǛƓᝰƍ൭NJƍƨƩƖƋǓƕƱƏƝƟƍLJƢŵஜᛟଢǛ
ƝችᛠƷɥŴȬȳǺƷೞᏡŴદ˺ŴӕǓৢƍɥƷදॖໜǛദƠƘྸᚐƠƯŴϙჇજࢨ
ǛƓಏƠLjƘƩƞƍŵƳƓஜᛟଢƸŴӲǫȡȩဇσဇƱƳƬƯƓǓLJƢƷưŴႸ
ƴǑǓƝ̅ဇǫȡȩƷᛆ࢘ሖǛƓᛠLjƴƳǓŴƝ̅ဇǫȡȩƷᛟଢNjƋǘƤƯƝ
ᚁƘƩƞƍŵƓᛠLjƴƳƬƨƋƱ
ӕǓৢƍǛᛚǔƱŴ̅ဇᎍƕͻǛ
ŠȬȳǺǛ˄ƚƨǫȡȩưŴٽᨗǍࢍƍήเǛᙸǔƱŴ
ƢŵཎƴȬȳǺҥ˳ưٽᨗǛႺᙸǔƱŴڂଢƷҾ׆ƱƳǓLJƢŵ
ӕǓৢƍǛᛚǔƱŴ
ŠȬȳǺŴLJƨƸȬȳǺǛ˄ƚƨǫȡȩǛŴ
ưƘƩƞƍŵٽᨗƷήƕᨼήྵᝋǛឪƜƠŴ້໎ƷҾ׆ƱƳǔئӳƕƋǓLJƢŵ
ŠȞǦȳȈᢿƸᙐᩃƳ࢟ཞǛƠƯƓǓLJƢƷưŴᒰƴৢƏƱࣴƷҾ׆ƱƳǓLJƢŵ
ŠɤᏩƸҗЎƴࢍࡇƷƋǔNjƷǛƝ̅ဇƘƩƞƍŵࢊƍNjƷǛƝ̅ဇƴƳǓLJƢƱŴ
͂ƢǔऀǕƕƋǓLJƢŵ
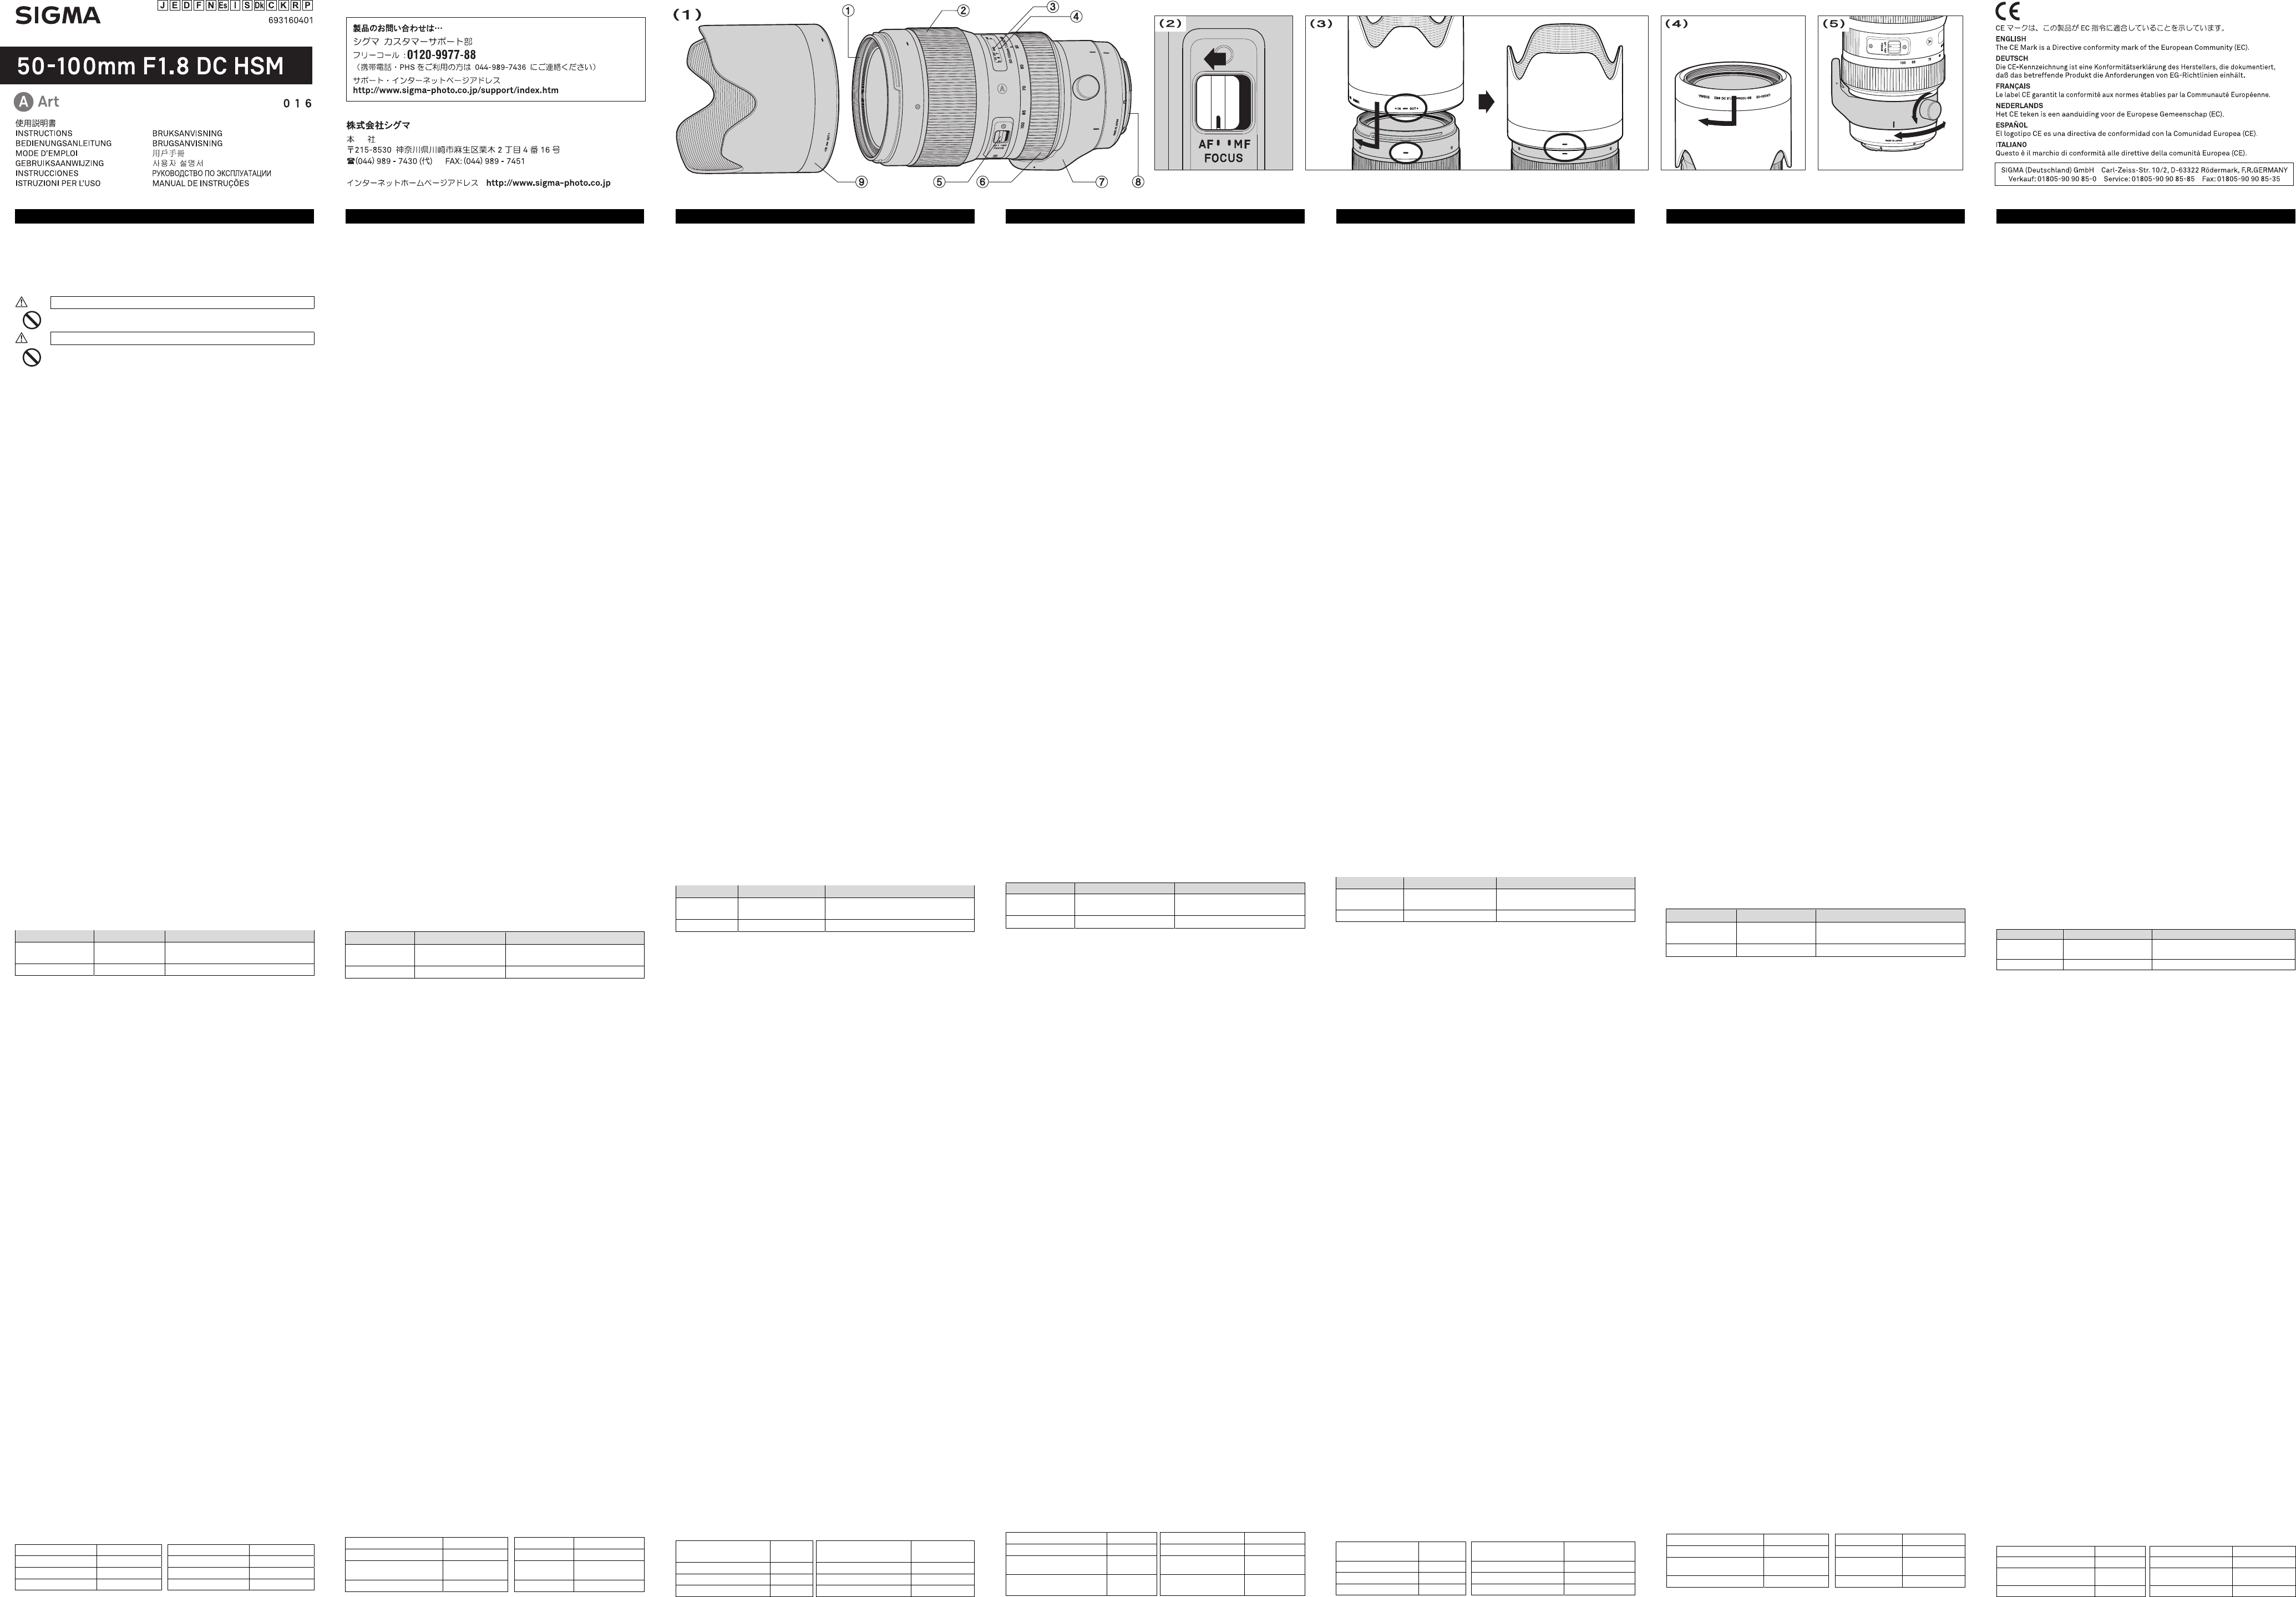
ӲᢿỉӸᆅί 1ὸ
ձȕǣȫǿȸƶơ
ղȕǩȸǫǹȪȳǰ
ճᙀяႎុᩉႸႮ
մਦዴ
յȕǩȸǫǹȢȸȉЏ੭ƑǹǤȃȁ
նǺȸȠȪȳǰ
շɤᏩࡈ
ոȞǦȳȈ
չȬȳǺȕȸȉ
DC ἾὅἌỆếẟề㻌
ǤȡȸǸǵȸǯȫǛȇǸǿȫɟა (APS-C Ⴛ࢘) ƴӳǘ
ƤƯᚨᚘƞǕƨŴȇǸǿȫɟაȬȕݦဇȬȳǺưƢŵƞǒƴŴȇǸǿȫƷཎࣱƴӳǘ
ƤƨήܖᚨᚘǛᘍƏƜƱưŴ᭗ဒ
ŦAPS-C Ⴛ࢘ƷٻƖƞǑǓNjٻƖƳજ
ဇưƖLJƤǜŵƝ̅ဇƴƳǔƱŴ
ŦǷǰȞ sd Q / SD1 / SD1 M ƴƝ̅ဇƷئӳƸŴ75-150mႻ࢘Ʒဒᚌ
ŦǷǰȞ SƴƝ̅ဇƷئӳƸŴ 85-170mm Ⴛ࢘ƷဒᚌƴƳǓLJƢŵ
ἾὅἌỉბᏮ૾ඥ
ǫȡȩǁƷბᏮ૾ඥƸŴƓਤƪ
ŦȞǦȳȈ᩿ƴƸǓᡲѣဇŴAF ᡲѣဇƷᘺፗǍŴ
ǕƕƭƘƱᛚ˺ѣǍᨦƷҾ׆Ʊ
ᩧЈỆếẟề
ᩧЈƷൿܭ૾ඥƸŴƓਤƪƷǫ
ἦὅἚӳỪẶểἌὊἱὅἂ
ẎἉἂἰဇẆỿἶἠὅဇẏ
ǪȸȈȕǩȸǫǹưજࢨƢǔئӳ AF ƴǻȃ
ȈƠLJƢᲢ 2 Უ
Ǜ M ƴǻȃȈƠŴ
ẎἝἅὅဇẏ
ǪȸȈȕǩȸǫǹưજࢨƢǔئӳ AF Ȣȸȉƴǻȃ
ȸǫǹȢȸȉЏǓ੭ƑǹǤȃȁǛ AF ƴǻȃȈƠLJƢ 2 Უ
ئӳƸŴȕǩȸǫǹȢȸȉЏǓ੭ M ƴǻȃȈƠŴȕǩȸǫ
ƠƯȔȳȈǛӳǘƤLJƢŵ
ŦǫȡȩƷȕǩ
ȸ
ǫǹȢ
ȸ
ȉƷЏǓ੭ƑƸ
Ŵ
Ɲ̅ဇƷǫȡȩƷᛟଢƴࢼ
ŦȞȋȥǢȫưȔȳȈǛӳǘƤǔᨥ ṂᲢᨂᢒᲣ
ȈƕӳǘƳƍƜƱƕƋ
ƘƩƞƍŵ
ƜƷȬȳǺƸŴ ƴǻȃȈƠƨLJLJưNjŴ
᠍ƠƯƍLJƢŵǪȸȈȕǩȸǫǹưȔȳȈǛӳǘƤŴǷȣȃǿȸȜǿȳǛҞƠƠƨ
LJLJȕǩȸǫǹȪȳǰǛׅƠƯȔ
LJƨƜƷȬȳǺƸŴǪȸȈȕǩȸǫǹƕ˺ѣƠƯƍǔưNjŴȕǩȸǫǹȪȳǰǛׅ
ƢƱȞȋȥǢȫƴЏǓஆǘǔž/( ЏǓஆƑೞᏡſᲢȞȋȥǢȫǪȸȐȸ
ƑƯƍLJƢŵ ЏǓஆƑೞᏡƷஊјᲩјƷИᚨܭƕီ
ƳǓLJƢŵ
ȞǦȳȈӸ
MF
ЏǓஆƑೞᏡ
̅ဇưƖǔ AF Ȣȸȉ
Ƿ
ǰȞဇŴȋdzȳဇ ஊј
ǷȳǰȫᲢAF-S ŴS Უ
dzȳȆǣȋǢǹᲢAF-C ŴC Უ
ǭȤȎȳဇ ј ǷȳǰȫᲢONE SHOT Უ
ŦК٥ǓƷ USB DOCK ƱǽȕȈǦǨǢžSIGMſǛဇMF Џ
ǓஆƑೞᏡƷஊјᲩјƷᚨܭŴ MF ƴЏǓஆǘǔǿǤȟȳǰƷ
ƜƱƕưƖLJƢŵᛇƠƘƸžSIGMAſƷȘȫȗǛƝᚁƘ
Ŧ
ž
SIGMA
ſ
ƸŴ
http://www.sigma-global.com/download/
ẎἌὊἱὅἂẏ
ǺȸȠȪȳǰǛׅƠƯŴஇᢘƳನ
ɤᏩࡈ
ɤᏩࡈƸܭȎȖǛǏǔNJǔƱŴ360 ࡇȕȪȸ
ቇҥƴưƖLJƢᲢ 3 Უ
ἧἻἕἉἷજࢨ
ǫȡȩƷϋᔺȕȩȃǷȥƸŴȕȩȃǷȥƷήƕȬȳǺᦟለƴƞƑƗǒǕǔƨNJŴƝ̅
ဇƴƳǕLJƤǜŵ࣏ƣٳᢿȕȩȃ
ἾὅἌἧὊἛ
ȬȳǺȕȸȉƸŴဒឋƴफࢨ᪪ǛɨƑǔஊܹήዴƷǫȃȈƴஊјưƢŵӕǓ˄ƚ૾ඥ
ƸŴȬȳǺέᇢƴȬȳǺȕȸȉǛƸNJᡂLjŴᚘ૾ӼƴഥLJǔLJưׅƠƯᄩܱƴӕǓ
˄ƚƯƘƩƞƍᲢ 4 Უ
Ŧઃ࠘ƴƸŴȬȳǺȕ
ưƖLJƢᲢ 5 Უ
ἧỵἽἑὊ
Ŧဒ᩿ԗᡀƕƚǒǕǔऀ
ƞƍŵ
Ŧ͞ήȕǣȫǿȸǛ̅ဇƢǔئӳƸŴό͞ήǿǤȗPL ᲣǛƝ̅ဇƘƩ
ƞƍŵ
̬ሥẆӕৢɥỉදॖ
ŦൢƸǫȓǍᥢƷҾ׆
ࣱƷᑣƍܾ֥ƴλǕƯ
ሥƠƳƍưƘƩƞƍŵ
ŦȬȳǺ᩿ƴƸႺਦư
ȸƔȬȳǺȖȩǷưӕ
෩ƱȬȳǺǯȪȸȋȳ
ஊೞ๋дƸዌݣƴ̅ǘƳƍưƘƩ
ŦƜƷȬȳǺƸ᧸൦ನᡯ
ƴදॖƠƯƘƩƞƍŵ
ྸɧᏡƴƳǔئӳƕƋǓLJƢŵ
Ŧ࣯ນƳภࡇ٭҄ƴǑǓ
ଡ଼ƔƍܴϋƴλǔƱƖ
ƯƔǒƝ̅ဇƘƩƞƍŵ
Լឋ̬ᚰểỴἧἑὊἇὊἥἋỆếẟề
Լឋ̬ᚰƱǢȕǿȸǵȸȓǹƴ᧙
ɼễˁಮ
ȬȳǺನᲢ፭ᲧᲣ 15 – 21 இٻજࢨ̿ྙ 1:6.7
ဒ ᚌᲢDC Უ 31.7 – 16.2° ȕǣȫǿȸǵǤǺ 82mm
இݱǓ 16 இٻࢲ X ᧈƞ 93.5x
இჺજࢨុᩉ 95cm 1,490g
ٻƖƞƞƸŴǷǰȞȞǦȳȈƷ
ŦƜƷȬȳǺƸŴȆȬdzȳȐȸǿȸ
᪥ᮏㄒ㻌
දॖ
ԓ
Thank you very muc
performance and enjoyment out of y
booklet thoroughl
DESCRIPTION OF
ձFilter Attachment
ղFocus
ճDistance Scale
մFocus
յFocus
նZoom Ring
շTr
ոMount
չLens Hood
DC LENS
These are special lenses that are designated for digital camer
image circle is d
digital SLR cameras.
for digital cameras
An image sensor element larger than those corresponding to APS-C cannot be
used in digital cameras or
vignetting will occur on the pictur
If you use sd Q / SD1 / SD1 M digital camera,
75-150mm.
If you use SD15 / SD14 / SD10 / SD9 digital camera,
will be 85-170mm.
A
When thi
same way as your no
camera body
On the lens mount surface,
contacts.
damaging the lens
while changing the lens
SET
The sigma lens fun
to the camera instr
FOCUSING AND Z
This lens featur
quick and quie
䛀SIGMA and CANO䛁
For autofocus oAF ” p
(fig.2).
“M ”
䛀NIKON 䛁
For auto
on the lens to the “AF ” position (fig
mode swiM ”
focu
Please refer
focu
When operating this lens in manual f
correc
focus be confirme
distance
scale.
temperature which cause various components in the lens to
expand and contract.
Special allowance is made for this at the infinity
This lens also permits manual ftofocus m
pressing the shutter butt
Also,
focus ring of the
Full-time MF
Mount Full-time MF Availabl
SIGMA
ON
Single AF (AF-S
Continuous AF (AF-C
CANON OFF Single AF (
When using USB DOCK (sold separate) and its dedicat
Optimization Pro
also adjust the amount of ring rotation to operat
further information,
SIGMA
website:http
żZooming Ž
Rotate the Rubber grip on the zoom ring to the desired position.
TRIPOD SOCKET
This lens is equipped with a tripod socket.
collarte freely to easily position th
horizontally or vertically (fig
FLASH PHOT
The camera
results,
LENS HOOD
A bay
prevent flare and ghosted images c
picture area.
In orderthe storage case, y
the hood, then replace it on the lens in the reverse position.
FIL
Only one filter should
thicker filters
When using a polarizi
BASIC CA
Avoid any shocks or exposur
For extended storage,
ventil
naphthalene gas.
Do not use thinner
finger prints from the lens elements.
or lens tissue.
This lens is not waterproof
it from ge
elements and electric components damaged by water
Sudden tem
surface of the lens.
advisable to keep the lens in the case until the
approaches room t
TECHNICAL
Lens construction 15 – 21 Magnification 1:6.7
Angle of 31.7 – 16.2° Filter Size 82mm
Minimum Aperture 16
Dimensions
Dia.g
en
th
93.5 x 170.7mm
(3.68g 6.72 in)
Minimum Focusing D
95cm (3.12ft) Weight 1490
Dimensions and weight include the SIGM
This lens is not compatible with
ENGLISH
Wir danken Ihnen für das Vertrauen,
Produktes erwiesen haben. Bitte lesen Sie sic
Benutzung des Gerä
BESCHREIBURUNG DER
䐟Filterg
䐠Entfernungsring
䐡Entfernungsskala
䐢Einstellindex
䐣Fokussie
䐤Brennweitenring
䐥Stativanschluß
䐦Anschluß
䐧Gege
DC OBJ
Der Bildkr
bis zum APS-C F
optimalen Eigenschaften für den Ein
es die kompakte und leichte Bauweise.
ŦWerden Objektive der DC-Serie an Digital-K
größer als das APS-C F
Vignettierungen im Bil
ŦDer sogenannte „
Eindruck äquival
Aufnahmesensors Ihrer Kamera.
ANSETZEN AN DAS KAMERA
An die Kamera ang
lhr
Normalobjektiv
zur
Kamera
ŦHalten Sie die Kontakte und Kupplungselemente am Ob
sauber
unten ab,
EINSTEL
Das SIGMA Objektiv stellt nach
automatisch zur Verfügung
Gebrauchsanleitung der Kamera.
EINSTEL
Dieses Objektiv verfügt über einen eingebauten SIGMA Hyper Sonic Motor
(HSM).
Der HSM ermöglicht die schnelle und leise automatische Scharfeinstellung.
䛀SIGMA und CANO䛁
Für die automa
Objektiv auf die “AF ”-P
wollen,M ”-Position.
können die Schärfe nun durch Drehen des Entfernungsrings einstellen.
䛀NIKON 䛁
Für die automa
und schalten Sie den FokchaltAF ”-Positi
Sollten Sie die Schärfe manuell einstellen wollen,
FokussierM ”-Position.
durch Drehen des
ŦHinweise zum Wec
bitte der Bedienungsanleitung der Kamera.
ŦBei manueller Fokussierung sollte die Schärfe auf der Mattscheibe eingestellt
werden,
Entfernungsskala auftreten können.
Einstellung.
Bei diesem Obj
Während der Auslöser halb durchgedrückt wir
Einstellen des F
Ebenso bietet dieses Objektiv die [Jederzeit-MF-
Drehen am
Fokusring des Objektivs während des Autof
Standardeinstellung
der Jederzeit-t Abhängig vom Ansc
Anschluss
Jederzeit-MF-Funkti
Verfügba
SIGMA
AN
Single AF (AF-S
Schärfenac
CANON AUS Single AF (
ŦMithilfe des USB-Dock
Software
zwischen AN/AUS
Fokusring zurt-M
Weitere Informationen entnehmen Sie bitte
Optimization Pro
Ŧ
SIGMA Optimization Pro kann kostenlos vo
werden:http:/
BRENNWEITENE
Durch Dre
ST
Das Objektiv ist mit einem Stativs
lösen,
möglich,
(Abb.3).
BLITZ
Interner Blitz der Kamera wird einen runden Schatten verursachen.
nicht den internen Kamersem Objektiv
verwenden.
GEGENLICHTBLENDE
Das Objektiv wird mit einer abnehmbaren Bajonett-Gegenlic
Diese hilft
einfallendes Licht entstehen können.
Gegenlic
die Blende korrekt einrastet (Abb.4).
ŦZum T
abgenommen und umgestülpt a
FIL
ŦBei Einsatz von Polfiltern verwenden Sie an einer Autofokuskamera bitte
ausschließlich
Zirkular
Einsatz
eines
Linear-Polfilters
können
sich
bei Autof
ŦVerwenden Sie grundsätzlich nur ein Filter
stärkere Spez
mit be
Filterfassung — k
PFLEGE UND A
ŦSetzen Sie das Objektiv nicht harten Stößen,
T
ŦWählen Sie für längere Lagerung einen kühlen,
belüfteten Ort.
Dämpfe die Vergütung angreifen könnten.
Ŧ
Verw
keines
ein sauber
ŦDas Objektiv ist nicht wa
Regen oder in der Nähe von Wasser für ausreichenden Schutz. Die R
eines Objektives mit Wasser
ŦT
Glasflächen f
empfiehlt es sich,
belassen,
TECHNISCHE D
Glieder – Linsen
15 – 21
Größter
Abbildungsmaßsta
1:6.7
Diagonaler
31.7 – 16.2°
Filterdurchmesser
82mm
Kleinste Blende
16
Abmessungen Ø ×Baulänge
93.5 x 170.7mm
Naheinstellgrenze
95cm
Gewich
1490g
Abmessungen
ŦDieses Objektiv ist nicht komp
DEUT
N
profit e
d’emploi a
DESCRIPTION DE
䐟Filetage pour filatre
䐠Bague des distances
䐡Echelle des distan
䐢Repère de dista
䐣Sélecteur de mise a
䐤Bague de zoom
䐥Attache pour trép
䐦Baïonnette
䐧Pare
OBJEC
Ces objectifs sont spécial
numériques,à
les plus courants.
idéales pour les appar
ŦCet objectif ne doit pas êtrun appareil numérique dont l
est d'une taille supérieure au f
135mm.
un vignettag
ŦEn cas d'utilisation avec les boîtiers numérique
/
SD1
/
SD1 M l'angle
de champ est équival
ŦEn cas d'utilisation avec les boîtiers numériques Sigma SD15 / SD14 / SD10 /
SD9, l'angle de c
FIXA
Lorsque l
vos objectifs habi
ŦSur la monture se trouvent plusieur
Gardez-les bien pr
jamais
l
REGLAGE D
Cet objectif Sigma fo
Veuilie
MISE AU POINT
Cet objectif est équipé
Sonic
Motor” (HSM)
䛀SIGMA et C䛁
Pour une mise az l
position “AF ”
position “M ”
䛀NIKON 䛁
Pour une mise
sélectAF ”
placez le séM ”
de mise au poin
ŦVeuillez v
au point de l'appa
ŦEn cas d’utilisa
de vérifier la qualitmise au seur
importants de tempéra
modific
composants i
au poi
particulière est prévue à ce
C
en appuyan
l'ajuster
Cet objectif dispose de la f
tournant la bague mode auto
Monture Activation par dé Mode AF di
SIGMA
ON (activé)
AF spot (AF
AF continu (AF-C
CAN
OFF(désact
AF spot (
ŦEn utilisant le dock USB (vendu séparément) et le l
Optimization Pr
Il est également possible de paramé
au point en ret
l'Aide de SIGMA Optimi
ŦLe logiciel SIGMA Optimization Pro re téléchargé gratuitement à l'adresse
Web s http:/
䛀㻌 Zooming 䛁
T
A
Cet objectif est équipé
serrage du collier
aisément le boîtier en position verticale ou horizontal
PHOT
La longueur de l'o
flash intégré du boîtier
extern
P
Un pare-soleil démontabl
pare-soleil pr
Assurez-vous qu’il se fixe convenab
ŦPour replacer l'objectif et le par
détacher d'abord
(fig.5)
FIL
ŦN’employ
très épais,
ŦSi vous souhaitez utiliser un filtr
type “c
d’ex
PREC
ŦNe pas exposer l
l’
ŦSi l’
bien ventil
anti-mit
ŦNe pas utiliser de dissolvant, d’
nettoy
ŦCet objectif nl
l
éléments optiques et/ou des éléments électriques ne sont pas toujour
possibles en cas d
ŦDes écarts soudains de température peuvent ca
buée peut apparaî
chauffé en venant d’un extérieur fr
dans un étui jusqu’
CARACTERISTIQUES
Construction de l 15 – 21
Rappo
1:6.7
Angle de champ (DC) 31.7 – 16.2° Diamétre de filtre 82mm
Ouverture minimal 16
Dimension:
diamentre×longueur
93.5 x 170.7mm
Distance min
au point
95cm P 1490g
Dimensions et poids donnés pour la monture SIGMA.
ŦCet ob
FRAN
AIS
Wij stellen he
maximaal profijt
gebruiksaanwijzing g
BESCHRIJVINS V
䐟Filterschroe
䐠Scherpstelring
䐡Afstandschaal
䐢Index teken
䐣Scherpstelkeuze schakelaar
䐤Zoomring
䐥Statief aansluiting
䐦Vatting
䐧Zonnekap
DC OBJECTIEVEN
DC objectieven zijn speciaal ontwikkeld voor het gebruik
De beeldcir
digitale sensor van de meest
ŦDe DC objectieven zijn niet geschikt voor camera
dan het APS-C formaa
optreden.
ŦBij gebruik van de DC obje
corresponder
ŦBij gebruik van de
corresponder
BEVESTIGING OP
Wanneer uw Sigm
zo functioneren als de originele opjectie
van uw camera.
ŦOp de vatting bevindt zich een aantal electrische contacten en koppelstukken.
Deze moeten goed schoon worden gehouden teneinde van een goed contact
verzeker Plaats,
voorzijde en niet met de vatting op tafel. Dit ter voorkoming van beschadiging
BELICHTINGSINS
Wanneer e
geheel automatisch. Lees hiervoor de gebr
SCHERPSTEL
Deze lens hee
maakt snel en geluidloos aut
䛀Sigma en Canon 䛁
Om de autofAF
postitie te ze
objectief op de M
draaien.
䛀Nikon 䛁
Om de autof
camera op AF positie te ze Wilt u handmatig sc
schuifje op het objM positie
de focusring te
ŦRaadpleeg a.u.b
instellingen op uw camera t
Ŧ
Wanneer .u d
correcte scherpstelling visueel in de zoeker vast te stellen.
mogelijk
scherpte
verschuivi
als
gevolg
van
extreme
temperatuurswijzi
waardoor meerdere lenscomponenten kunnen uitzett
instelling op oneindig dient hierop te worden gelet.
Dit objectief kan ook manueel worde
Om het focus
focusring verdraait te
Ook biedt dit objecunctie (M
focus ring te draaien terwijl de auto focus werkzaam is.
full-time MF
Vatting Full Beschikbare AF
SIGMA, NIK AAN
Enkelvoudige AF (
Continue AF (AF-C
CANON UIT Enkelvoudige AF (
ŦBij gebruik van het USB DOCK (los v
“SIGMA Optimization Pr
AAN / UIT
stellen om de Full-time MF functie te bedienen.
wij naar het SIGMA Optimization Pr
ŦSIGMA Optimization Pr
http:/
żZOOM Ž
Ver
ST
Dit objectief is uitgerust me
blokkeerknop op de statiefring losdraait,
ronddraaien waardoor de camera
verticaal gebruikt kan worden (fig.3)
FLITSOPNAME
Bij gebruik van camer
veroorzak
externe flit
ZONNEKAP
Bij dit objectief wordt een losse zo
De zonnekap draagt bij tot het voorkomen van lichtvl
worden veroorzaakt door sterk
objectief valt. Let erop da
geblokke
ŦOm objectief en zonnekap op te kunnen bergen in de koffer
zonnek
FIL
ŦGebruik slechts 1 filter t
filters-zoals een polarisa
ŦGebruik uitsluitend een “
autofocus camera. Wanneer een “lineair
gebruikt,
niet correct functioneren.
ONDERHOUD EN OPSLA
ŦVermijd vallen of stoten en stel het objectie
temperaturen of hoge vochtigheid.
ŦIndien het objectief voor langere tijd wordt opgeborgen,
droge en bij voorkeur goed geventileerde plaats
beschadiging van de lenscoating te voorkomen,
naftalinegas.
ŦGebruik geen thinner
vuil of vingerafdru Gebruik daarvoor
een speciaal lensdoekje of lenstissues.
ŦDit objectief is niet wat Zorg er bij regen of in de buurt van
voor dat het niet nat wordt.
electrische componenten die door water zijn aangetast
gevallen niet t
ŦPlotselinge temperatuur verandering kan condens
oppervlak van de l
buitenlucht,in de tas te houden totdat de
temperatuur van he
TECHNISCHE G
Lensconstructie
(groepen – e
15 – 21
Maximale vergr
maatst
1:6.7
Beeldhoek (DC) 31.7 – 16.2° Filtermaat 82mm
Kleinste diafragma 16
Afmetingen (diam.
g
lengte)
93.5 x 170.7mm
Kortste instelafsta 95cm Gewicht 1490
Opgegeven afme
ŦDeze lens is
NEDERLANDS
Le agradecemos la compra de este ob
resultados de su objetiv
utilizarlo.
DESCRIPCION DE L
䐟Rrosca para filatr
䐠Aro de enf
䐡Escala de distancias
䐢Linea de indice
䐣Select
䐤Aro del zoom
䐥Zapata par
䐦Montura
䐧Parasol
OBJETIVO DC
Estos objetiv
su círculo de imagen coincide conlos sensores de
digitales réfl
cámaras digitales
ŦLos sensores de imagen may
aptos para las cámar
de viñete
ŦSi emplea las cámaras digitales sd Q / SD1 / SD
del objetivo será de 75-150mm.
ŦSi emplea las cámaras digitales SD15 / SD14 / SD10 / SD
visión del objetivo será de 8
CONEXION AL C
C
objetivos originales Consulte el manual de instrucciones de su cámar
ŦEn la superficie de la montura existen una serie de contac
acopladores. Manténgalos limpios para asegurar una correcta conexión. Para
prevenir daños en el objetivo tenga especial cuidado al apo
de optica.
MODE AJUSTE
Los objetivos Sigma funcionan aut Por
favor
INTERRUPTOR DE BL
Este objetivra un
propor
䛀SIGMA y CANON䛁
PAF” (fig.2)
enfocar manualmente ponga el selector en la posición “M”
el aro de enfoque
䛀NIKON 䛁
P
óptica en la posición “AF ”
en la posición M ”
ŦPara cambiar el modo cámara,
instrucciones de la cámara.
ŦCuando utilice estos objetivos en modo de enfoque manual es recomendable
comprobar visual
a que los cambios de temperatura causan que distintos elementos internos se
expandan o contraigan (de modo que no coincida con la escala de distancias con
la medic
Este objetivo también permite el enfoque manual incluso en el modo de enfoque
automá
anillo de enfoque partar el punto de enf
Además,
anillo de enfoque del objetivo,
funcionamiento.
montura.
Montura Función MF Modo AF disponibl
SIGMA
ENCENDIDO
Single AF (AF-S
Continuous AF (AF-C
CANON AP Single AF (
ŦAl usar el USB Dock (se v
Optimization Pro"
T
MF comple
“SIGMA Optimization Pr
ŦPuede descargar el programa SIGMA Optimization Pro de forma gratuita desde el
siguiente sitio web: http:/
żOPERACION ZŽ
Gire el aro
ARO Y
Este objetiv
aro,
horizontal (fig.3)
FO
N
sombras,
PA
Se incorpora con el objetivo un partraíble de tipo bay Este par
ayuda a prevenir los destellos y reflejos pr
conectarlo compruebe que quede completamente sujeto.
ŦPara guardar el objetivo y el parasol en su caja primero tiene que sacar el parasol
y después invertirlo en el obje
FIL
ŦSolamente debe utilizarse un filtro cada ve
especialmente
ŦCuando utilice un filtro polarizador en una cámara AF
circular S tipo l
exposición automá
CUIDADOS BASICOS
ŦEvite los golpes o la e
humedad.
ŦEn caso de almacenaje por un tiempo prolongado,
preferiblemente con buena ventilación. Para evitar daños en el tratamiento de
los objetivos,
ŦNo utilice diluyente
suciedad de los objetiv Para limpiarlos utilice un paño de te
objetivos.
ŦEstos objetivos no son impermeables
agua,
mecanismos internos,
por el agua.
ŦSi hay cambios súbitos de temperatura puede haber condensación o velo en la
superficie del obje Cuando entre en una habitación
lugar frío,
temperatura se asemeje a la de la habitación.
CARACTERIS
Construcción del objetivo 15 – 21 Ampliación 1:6.7
Ángulo de visión (DC) 31.7 – 16.2° Diámetro filtr 82mm
Apertura mínima 16
Dimensiones
(diámg long)
93.5 x 170.7mm
Distancia mínima enfoque 95cm Peso 1490
Dimensiones y peso incluyen montura SIGMA.
ŦEsta lente no es co
ESP
Vi ringraziamo
obiettivo Sigma. Vi raccomandiamo di leggere attentamente le presenti istruzioni
prima di com
migliori prestazioni e soddis
ELEMENTI CONS
䐟Portafiltri frontale a vite
䐠Ghiera di messa a
䐡Scala delle distanze
䐢Indice di collimazione
䐣Selettore di fuoco
䐤Ghiera di variazione della
focale (zoom)
䐥Passo a vite per
treppiede
䐦Innesto
䐧Para
OBIET
Sono obiettivi costruiti ap
copertura corrisponde alle dimensioni dei sensori digitali usa
delle refle
macchine fot
ŦSensori d’immagine più grandi di
essere usati nelle refl
risulta
ŦNelle fotocamere digitali sd Q
/
SD1
/
SD1
di 75-150mm.
ŦNelle fotocamere digitali SD15
/
SD14
/
SD10
/
SD9,
visuale sarà di 85-170mm.
APPLICAZIONE SUL
Una volta che avrete innestato l
automaticament
della fotocamer
ŦLa superficie dell un certo numero di conta
elementi di accoppiamento.
sono molto delicati.
l
la part
lente frontale per evitare di dan
IMPOST
Una volta montato sulla foiettivo Sigma f
S
consultino le istruzioni per l'uso del corpo macc
MESSA A FUOCO E MANO
Q
veloce e silenziosa messa a fuoco aut
䛀SIGMA e CANON䛁
Per attivar
posizione “AF ”
sullM”
messa a fuoco.
䛀NIKON 䛁
Per attivar
sullAF ”
manualmente,M ”
fuoco ruotando la ghiera di
ŦConsultare il libretto d’istr
messa a fuoco.
ŦSe usate l
quadro mediante osservazione diretta dell
L
quall il piano di messa a fuoco psoggetto in caso di t
tempera
dilatarsi fino a entr
prevista una compensazione speciale.
L
l
scatto e ruotate l
L
ruotare l
impostazioni di default della funzione MF continua,
d’innesto.
Innesto
Funzione MF continuo
Modalità AF disponibili
SIGMA ON
AF singolo (AF
AF continuo (AF-C
CAN OFF AF Singolo (
ŦGrazie al DOCK USB (venduto separa
Optimization Pr
MF continua su accesa (ON) oppure spenta (O
lssa a fuoco
consultare la voce
ŦIl software SIGMA Optimization Pr
questo si http:/
ࠓMANOVRࠔ
Fate ruotar
posizione desidera
P
L
sblocco della manopola di fissaggio del collare
fotocamer
orizzontale o verticale (fig
FO
Il flash incorporato può ca
obiettivo non si deve
PA
Il vostro obie Il
paraluce previene e
possono prodursi con unluce
sinceratevi che sia perfe
Ŧ
Per ri
FIL
ŦSi può usare un solo filtrl’impieg
molto spessi (come i polarizzatori) è facile incorrere in vignettature.
ŦSe volete adoperare un polarizza
“c
funzionamento sia delldel sistema di esp
CURA E CONSERV
ŦProteggete l
o umidità eccessiva.
ŦIn previsione di un pr
posto fresco Evitate di esporlo a vapori
di canfora o
antiriflessi.
ŦNon usate solventi,
eliminare dagli elementi ottici tracce di spor
invece con un panno morbido inumidito o con una cartina per lenti.
ŦL
pioggia o vicino all
componenti elettrici vengono danneggiati irrimedia
renderne impossibil
ŦImprovvisi sbalzi di t
provocar
mentre fuori fa molto freddo,
custodia finché la sua temperatu
CARA
Costituzione ottica (Grupp
15 – 21
Rapporto d’
1:6.7
Angoli di campo (DC) 31.7 – 16.2° Diamentro filtri 82mm
Apertura minima 16
Dimensioni
(diametr
93.5 x 170.7mm
Distanza m
95cm P 1490g
Dimensioni e pesi s
ŦQuesto obiettivo non è compatibile c
IT