3.2.1. The unit produces a cooling effect by evaporating water which is contained in a tank in the base of the unit. Before using as a cooler, the
water tank must be filled. Ensure that the unit is unplugged from the mains supply before topping up with water. Open the water tank aperture
on the side of the unit (fig.1), and pour water into the tank. Check the level of water in the tank through the water level sight at the front of the
unit. The level should be between ‘min’ and 'max’. Close the cover. For an increased cooling effect, additionally place ice directly into the tank.
3.2.2. Plug the unit into the mains supply.
3.2.3. Switch the unit on by pressing the Power switch on the side of the unit.
3.2.4. Press the On/Off button on the control panel.
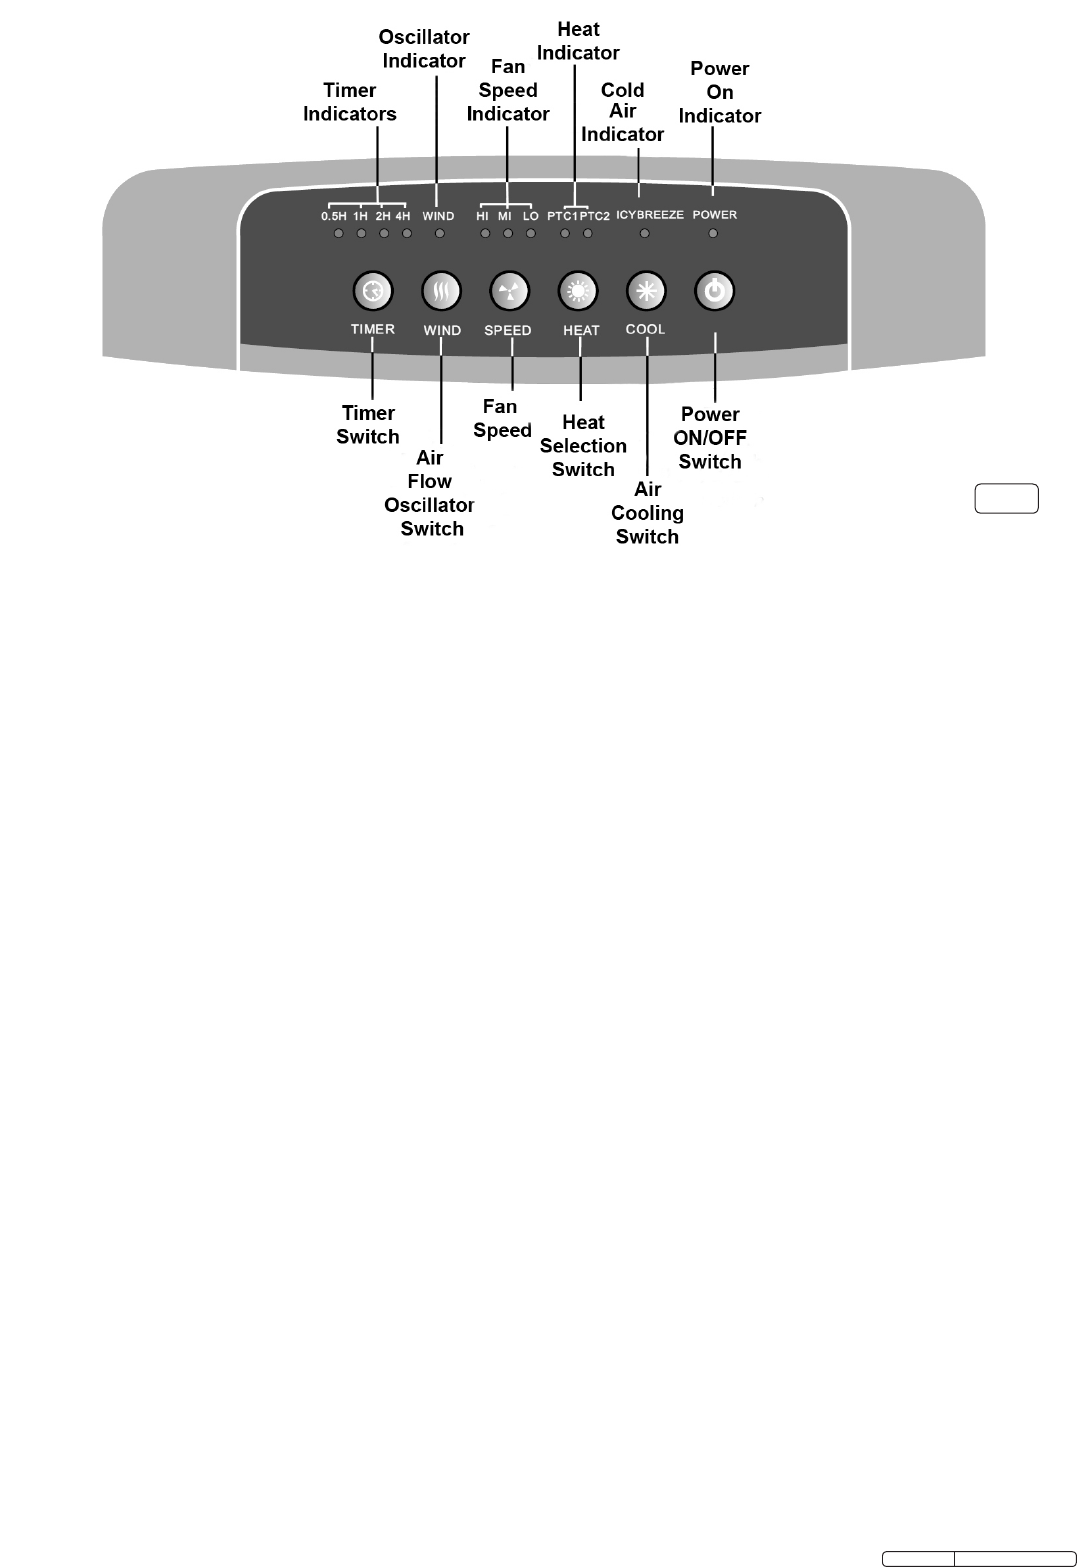
3.3.Using the unit for cooling
3.3.1. Make sure that the air flow control lever is moved to the COOL position.
3.3.2. Press the COOL button once to activate the cooling function.
The ‘Icy Breeze’ indicator light above the button will illuminate. The fan will start to run at the speed last set.
3.3.3. Adjust the speed of the fan if required using the SPEED button.
3.3.4. Activate the louvre oscillation if required using the WIND button. Adjust the airflow up or down manually via the horizontal louvres.
3.3.5. Set the timer if required using the TIMER button.
3.3.6. To stop the cooling function press the COOL button again and the indicator light will go out.
3.4.Using the unit for heating
3.4.1. Make sure that the air flow control lever is moved to the HEAT position.
3.4.2. Press the HEAT button once or twice to select the required heating level. The indicator lights above will show the heating level selected. The
fan will start to run at the speed last set.
3.4.3. Adjust the fan speed if required using the SPEED button. NOTE: Only two fan speeds are available: Medium and Low.
3.4.4. Activate the louvre side oscillation if required using the WIND button. Adjust the air flow up or down manually via the horizontal louvres.
3.4.5. Set the timer if required using the TIMER button.
3.4.6. To stop the heating function press the HEAT button until the indicator lights go out.
3.4.7. When the unit is switched OFF, using the ON/OFF button, the fan will continue to run for about 30 seconds. During this time the power light
will flash until the unit shuts down.
3.5.Using the unit to humidify
3.5.1. In a dry and warm atmosphere the cooling action of the unit naturally adds humidity to the air due to the fact that the cooling action is provided
by the evaporation of water.
3.6.Using the unit to filter and purify
3.6.1. The air for both heating and cooling is drawn into the unit through an activated carbon filterand thus cleans the air of dust and other particles.
3.6.2. The unit also contains a negative ion generator which produces cleaner, fresher air and reduces airborne odours. The ion generator starts to
work as soon as the unit is switched on and works in both heating and cooling modes.
3.7.Using the unit as a fan only
3.7.1. If neither heating or cooling is selected on the control panel the unit will act as a 3 speed fan. In this mode both the TIMER and WIND
functions can be used.
3.8.Remote control operation
The remote control handset provides the same functionality as the main control panel on the unit.
Note: the Heat/Cool Air Flow Control Lever must still be moved manually on the unit.
3.8.1. Insert two AAA batteries into the compartment in the back of the handset, ensuring that they are correctly inserted.
3.8.2. Ensure that the unit is plugged into the mains supply.
3.8.3. Set the Warm/Cool Air Flow Control lever on the unit to the desired position.
3.8.4. Point the handset at the main control panel on the unit.
3.8.5. Turn the unit on by pressing the ON/OFF button on the handset, and then control from the handset as per the normal settings above.
Gebruikershandleiding.com neemt misbruik van zijn services uitermate serieus. U kunt hieronder aangeven waarom deze vraag ongepast is. Wij controleren de vraag en zonodig wordt deze verwijderd.
Product:
Spelregels forum
Om tot zinvolle vragen te komen hanteren wij de volgende spelregels:
lees eerst de handleiding door;
controleer of uw vraag al eerder door iemand anders is gesteld;
probeer uw vraag zo duidelijk mogelijk te stellen;
heeft u een probleem en al geprobeerd om dit op te lossen, vermeld dit erbij aub;
heeft u een oplossing gekregen van een bezoeker dan horen wij dat graag in dit forum;
wilt u een reactie geven op een vraag of antwoord, gebruik dan niet dit formulier maar klik op de knop 'reageer op deze vraag';
uw vraag wordt direct op de website gezet; vermijd daarom persoonlijke gegevens in te vullen;
Belangrijk! Als er een antwoord wordt gegeven op uw vraag, dan is het voor de gever van het antwoord nuttig om te weten als u er wel (of niet) mee geholpen bent! Wij vragen u dus ook te reageren op een antwoord.
Belangrijk! Antwoorden worden ook per e-mail naar abonnees gestuurd. Laat uw emailadres achter op deze site, zodat u op de hoogte blijft. U krijgt dan ook andere vragen en antwoorden te zien.
Abonneren
Abonneer u voor het ontvangen van emails voor uw Seally SAC41.V2 bij:
nieuwe vragen en antwoorden
nieuwe handleidingen
U ontvangt een email met instructies om u voor één of beide opties in te schrijven.
Ontvang uw handleiding per email
Vul uw emailadres in en ontvang de handleiding van Seally SAC41.V2 in de taal/talen: Engels als bijlage per email.
De handleiding is 1,51 mb groot.
U ontvangt de handleiding per email binnen enkele minuten. Als u geen email heeft ontvangen, dan heeft u waarschijnlijk een verkeerd emailadres ingevuld of is uw mailbox te vol. Daarnaast kan het zijn dat uw internetprovider een maximum heeft aan de grootte per email. Omdat hier een handleiding wordt meegestuurd, kan het voorkomen dat de email groter is dan toegestaan bij uw provider.
Uw handleiding is per email verstuurd. Controleer uw email
Als u niet binnen een kwartier uw email met handleiding ontvangen heeft, kan het zijn dat u een verkeerd emailadres heeft ingevuld of dat uw emailprovider een maximum grootte per email heeft ingesteld die kleiner is dan de grootte van de handleiding.
Er is een email naar u verstuurd om uw inschrijving definitief te maken.
Controleer uw email en volg de aanwijzingen op om uw inschrijving definitief te maken
U heeft geen emailadres opgegeven
Als u de handleiding per email wilt ontvangen, vul dan een geldig emailadres in.
Uw vraag is op deze pagina toegevoegd
Wilt u een email ontvangen bij een antwoord en/of nieuwe vragen? Vul dan hier uw emailadres in.