Safety Warnings
Take care not to allow
dust or other contami-
nants to come into con-
tact with your CD player.
Do not put anything other
than a CD (CD-R or CD-
RW) inside your CD player.
● Such actions will dam-
age your CD player.
Do not use broken or
scratched MP3 CDs.
Do not use your CD
player on uneven or
unstable surfaces.
● Your CD player may
not operate properly.
Do not touch the lens
with your finger or
scratch it.
● Your CD player may
not operate properly.
Do not place your CD
player in a dusty or
humid location.
Do not attempt to take
apart, repair or modify
your CD player.
● Such actions will dam-
age your CD player.
Do not apply heavy
pressure to the main
unit or remote control.
Do not leave your CD
player in direct sun-
light or near a heat
source.
Main Features
What is MP3?
MP3-CD, CD-R/RW Playback
You can play back MP3-files on CD-R or CD-RW discs.
+10 Button
One MP3-CD can contain over 100 MP3 music files. This button is used to skip
through tracks in multiples of 10, in order to find the track you want more quickly.
Shock Prevention
Even if the CD player is knocked or jolted while listening to a CD, the sound will
not skip but will continue normal playback.
MP3 means MPEG1 Layer 3, the global standard for audio signal compression technolo-
gy. It uses digital compression technology to compress original sound data by up to 12
times without sound quality degradation.
File Compatibility
● The unit will playback files created in MP3 format (Mpeg1.Layer 3) with *.mp3 as
their extension.
● Files created in MP2 format (Mpeg1.Layer2) with *.mp2 as their extension can also
be played back.
How many MP3 files can a CD-R or CD-RW disc record?
● The maximum capacity of one CD-R or CD-RW disc is 650MB.
Normally, one MP3 file has a capacity of 4MB, therefore approximately 170 files can
be recorded on a single disc.
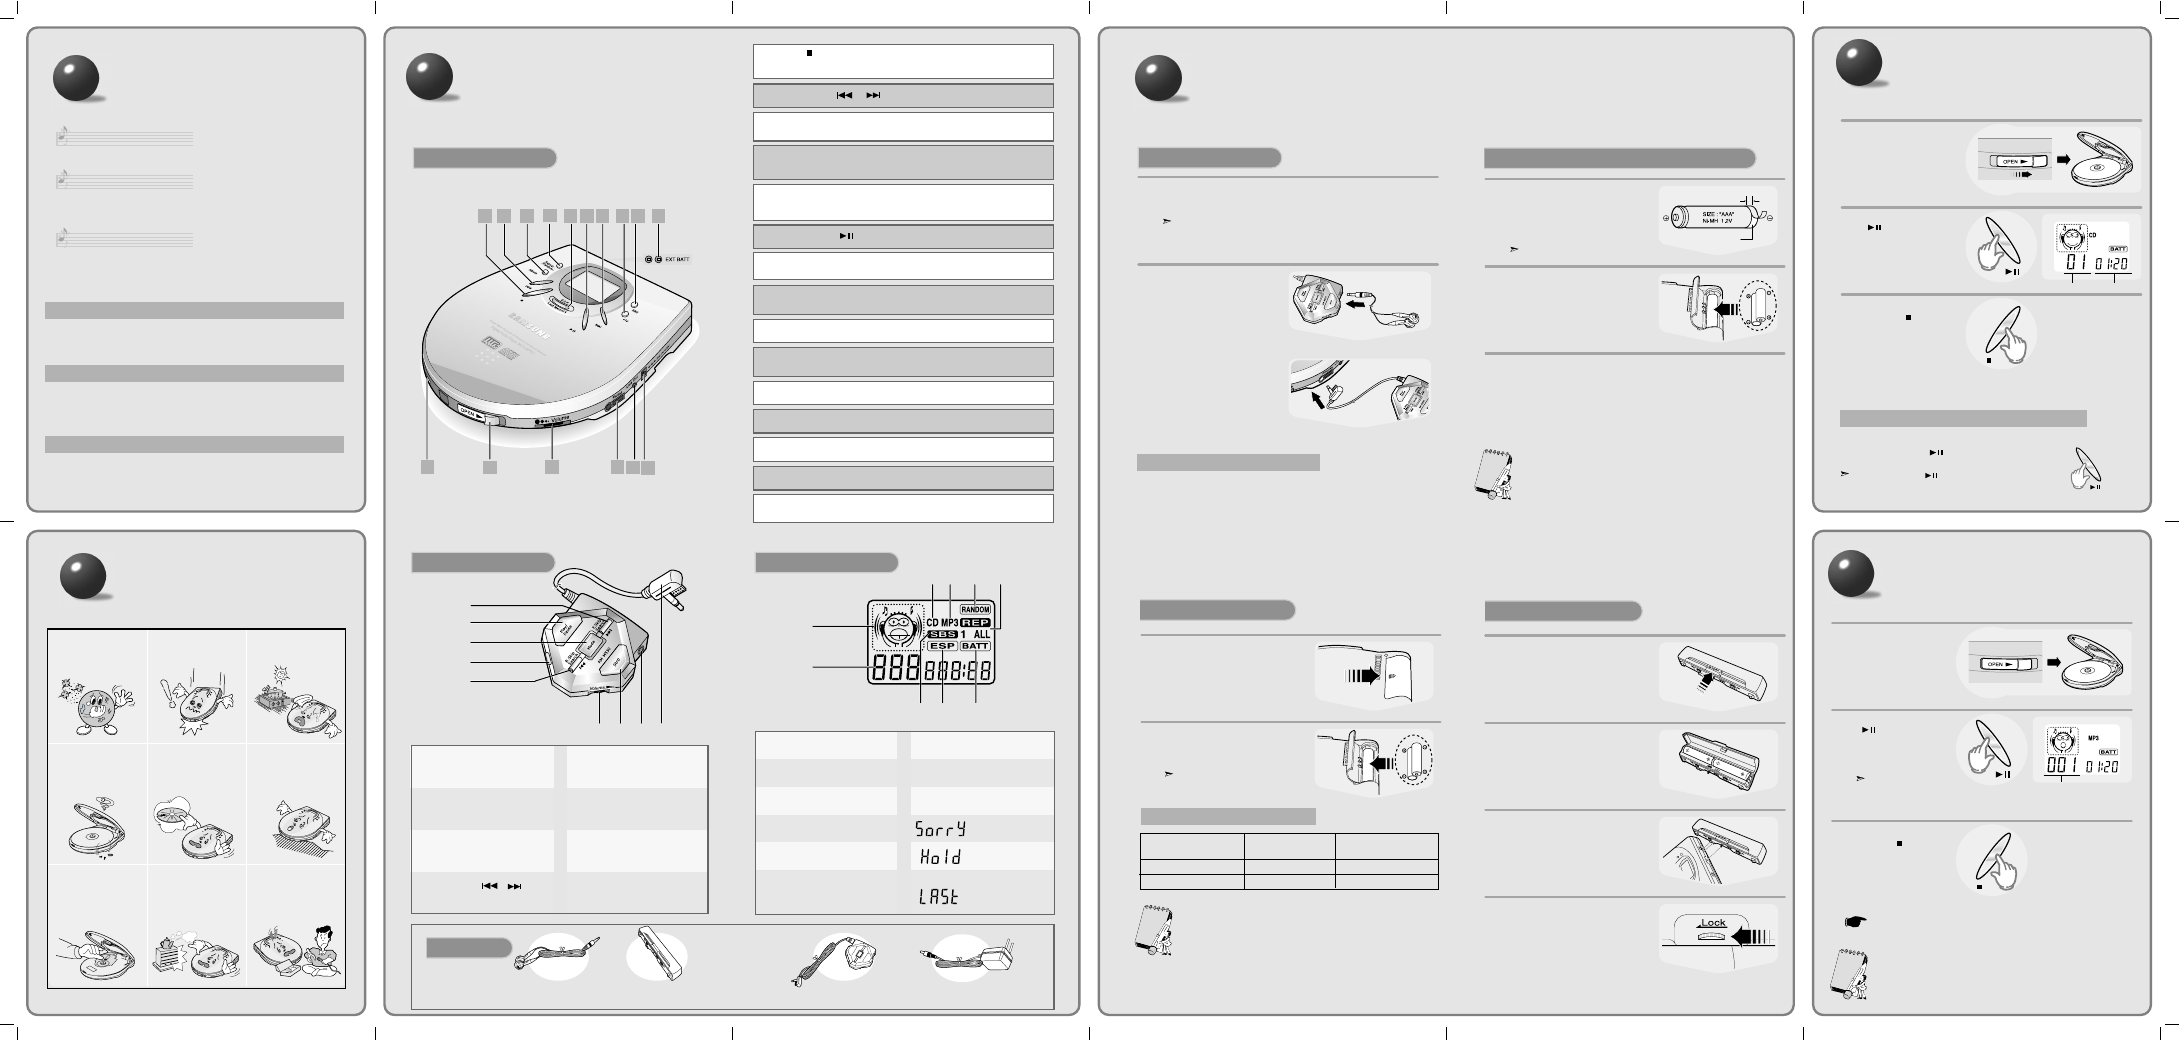
Buttons and Controls
Stop( ) button
Press once to stop playback, press twice to turn unit off.
1.
Skip/Search( / ) button
2.
Album button
Press this button to select MP3 tracks from an album as a single unit.
3.
Repeat/Random button
Press and release when you wish to repeat a track. Press button and keep it
depressed for a moment if you wish to listen to music in random order.
4.
ESP/Last Memory button
This button enables you to continue to enjoy normal CD playback even after the
player has been jolted or knocked.
5.
PLAY/PAUSE( ) button
6.
+ 10 button
This button allows you to skip through 10 tracks at a time.
7.
SBS button
This button enables you to enjoy realistic and dynamic bass sound.
8.
Battery Pack Connection Jack
9.
HOLD switch
With the HOLD function selected, you cannot operate any buttons.
10.
OPEN switch
11.
Volume control
12.
Earphone Connection Jack
13.
Line Out Connection Jack
14.
Power Input Jack
Connecting the AC adaptor.
15.
Preparation before using your unit
Main Unit
1
10
11
12 13
15
14
2
3
4
5 6
2
7
8
9
Remote
1
2
3
4
5 6 7 8
Play/Pause button
1.
Mode button
2.
HOLD switch
3.
Skip/Search( / )
button
4.
Volume control
5.
Stop button
6.
Earphone Connection Jack
7.
Unit Connection Jack
8.
Display
1
6
2 3 4 5
7 8 9
Operation Indicator.
1.
Displayed when CD is inserted.
2.
Displayed when MP3-CD is
inserted.
3.
Displayed when songs are
selected randomly.
4.
Displayed when one or all tracks
are repeated.
5.
Album number, track number
and playing time are displayed.
6.
SBS Indicator.
7.
ESP Indicator.
8.
Replace Battery Warning Indicator
(If battery is fully discharged, the
indicator will flash.)
9.
Displayed when incompatible
MP3-CD is inserted.
Flashes when any control
button is pressed while
HOLD function is activated.
When Last Memory is
selected, the display shows
ON. If the function is
cancelled, it shows OFF.
(This is displayed only when
an MP3-CD is inserted)
Connection to External Device (if necessary)
How to Connect
Using rechargeable batteries
(not supplied)
Connect the AC adaptor to the power input jack. Then, connect the AC plug
of the adaptor to the AC outlet.
● Only use the AC adaptor supplied with your product.
When you are not using this product, disconnect the AC adaptor from the AC outlet.
1
Connect the earphones to the
jack on the remote.
Then, connect the wire from
the remote to the main unit.
● Reduce the earphone volume
control on the remote while
increasing the volume on the
main unit.
2
Strip the sheath covering the ter-
minals of the rechargeable bat-teries
before charging them.
● As shown in the illustration, with a knife
carefully strip the sheath of the negative
(-) terminal by 6 mm.
If the sheath is not stripped, charging
will
not function.
1
Insert the batteries into the battery
compartment.
● Carefully check the correct orientation of
the positive and negative terminals of
the batteries.
2
Connect the AC adaptor to the AC outlet and power input jack.
● Charging of the rechargeable batteries will commence.
3
❈ Your CD Player may be connected to the AUX IN jack of an external device.
1. Reduce the volume of the external device.
2. Connect the Line Out jack to the Input jack of the device.
●
Time taken to fully charge the batteries: 6 hours
●
Battery life of fully charged batteries
MP3-CD/CD (When ESP is On): 2 hours and 40 minutes
CD(When ESP is Off): 6 hours
6mm
Sheath to be stripped
CD Playback
To temporarily pause playback
Slide the OPEN button to
open the door. Insert a CD.
● Push the door to close it.
1
Press the Play/Pause
( ) button.
● Once the CD is recog-
nized, playback com-
mences.
2
To stop playback, press
the Stop ( ) button.
3
Press the Play/Pause ( ) button.
● Playback will be temporarily suspended.
Press the Play/Pause ( ) button again to resume playback.
Track Number Indicator Play time Indicator
MP3-CD Playback
Slide the OPEN button to
open the door, and insert
an MP3-CD.
● Push the door to close it.
1
Press the Play/Pause
( ) button.
● The inserted MP3-CD will
be scanned for about 30~90
seconds. Playback will then
commence.
Your CD Player will take a few moments to
scan through all the tracks recorded on a par-
ticular MP3 CD.
2
To stop playback, press
the Stop ( ) button.
3
This product is an MP3-CD and audio CD player. It cannot record/save
mp3 files.
Track number or album number indication
Track number: Indicator stops for a moment,
and then moves to the left hand side.
Album number: Indicator will move from
the right to the left.
● When the OPEN switch is slid to open the door, playback will stop.
● Depending on the speed or format of the data written, sometimes
CD-RW discs will not be read properly.
In such instances, try to write the data again.