542079
1
Verklein
Vergroot
Pagina terug
1/1
Pagina verder
Operating and installation instructions
Features
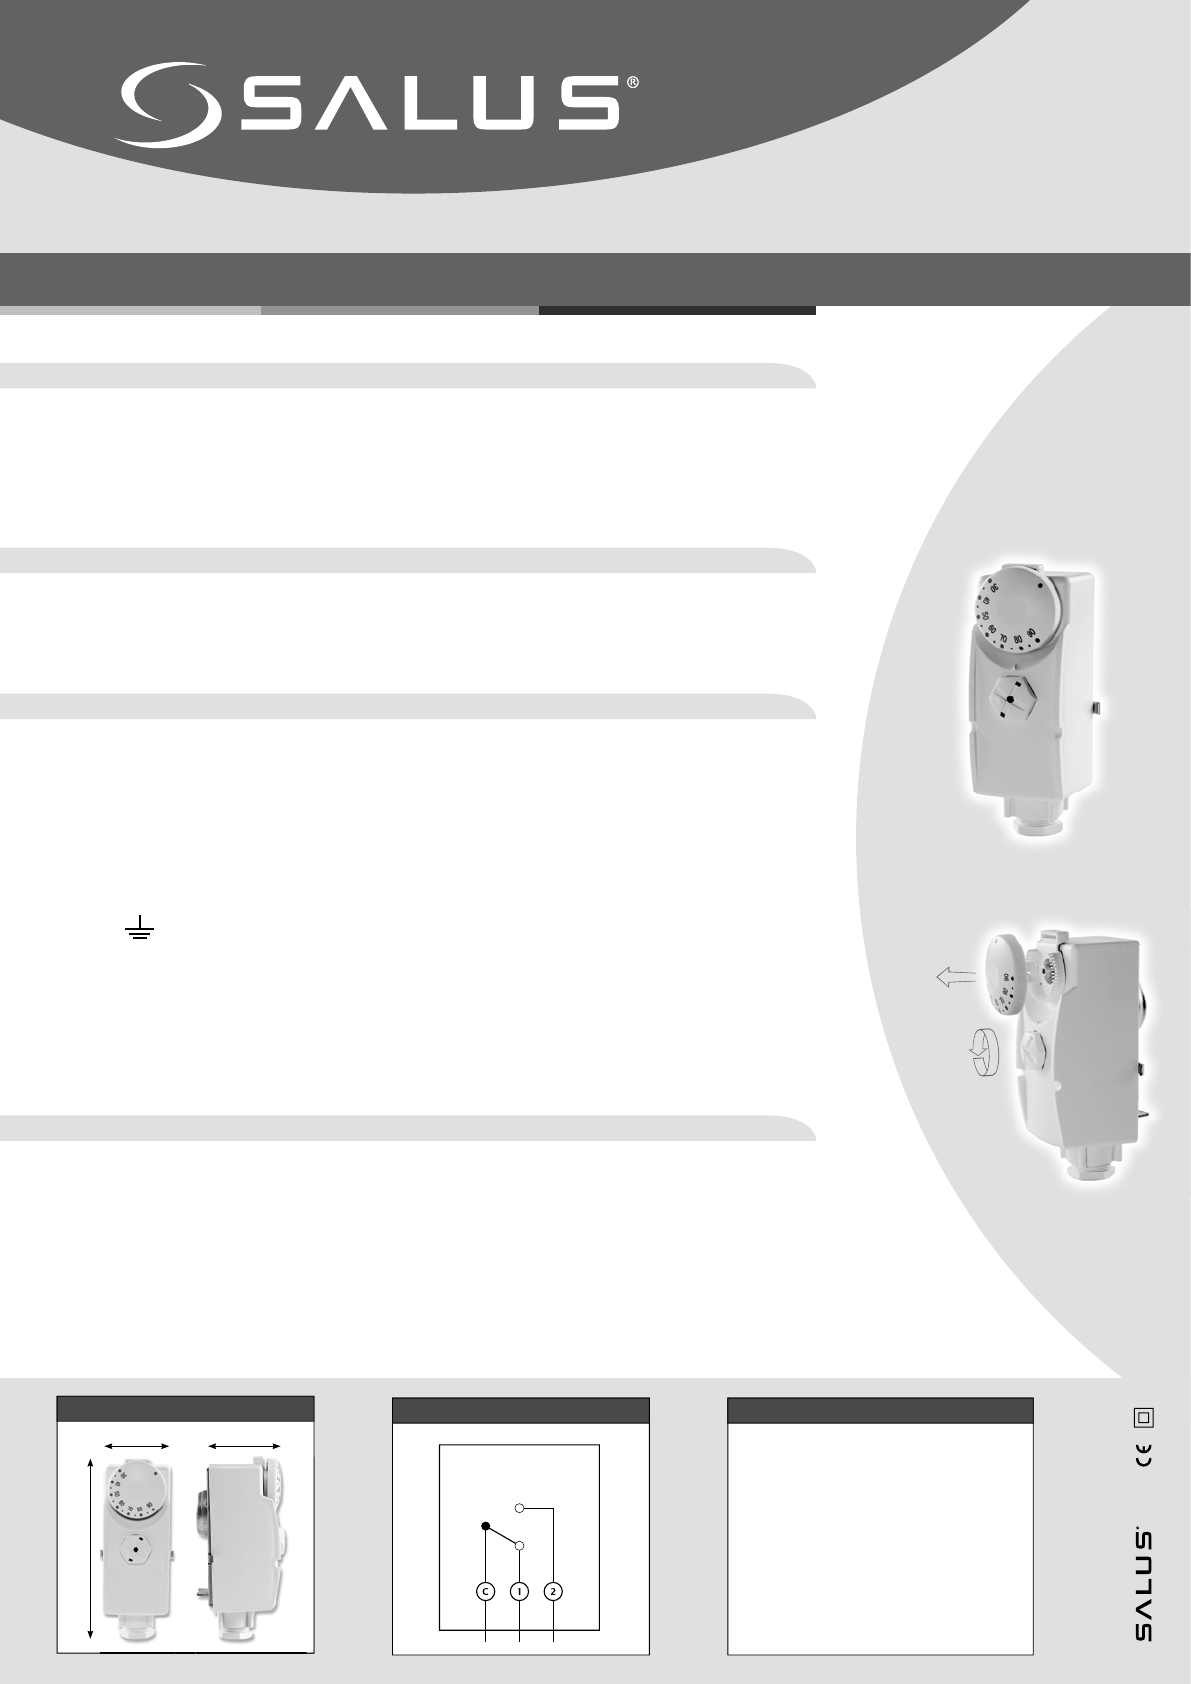
- Pipe surface mounted thermostat with visible external scale
- Simple attachment with elastic tensioning band
- Simple operation with large hand dial
- Can be locked to set temperature
- Setting range from 30°C - 90°C
- Simple electrical connection with the generously sized cable clamps
Mounting
Press the pipe surface mounted thermostat firmly against the heating pipe and secure it with
the elastic tensioning band provided, so that the thermostat is directly abutting the pipe. (Any
isolation is to be removed at the installation site before securing the sensor.) Excess tensioning
band can be trimmed off.
Electrical connection
Open the thermostat by removing the dial (1) and loosening the large plastic screw (2). Remove
the housing cover. The 4 cable clamps which are now visible are to be wired as follows:
Clamps C and 1 = opener
The thermostat opens under increasing temperature and closes in the case of sinking tem-
perature. (E.g. function = “heating”)
Clamps C and 2 = opener
The thermostat closes under increasing temperature and opens in the case of sinking tem-
perature. (E.g. function = “cooling”)
Clamp
= Earth
The installation may only be carried out by professional installers in accordance with the connec-
tion plan. Furthermore, the installation must also comply with the current VDE regulations and
the specifications of your energy supplier. The installation is always to be carried out with the
power supply disconnected, the security specifications are to be observed. The maximum switch-
ing current indicated in the technical data must be observed!
We accept no liability for any form of misuse.
Operation
The thermostat has a turnable hand dial with a temperature scale. To turn, the dial must be
pulled outwards ca. 5 mm from the housing to release it from the underlying locking mechanism
(cog-teeth). Now turn the dial until your desired temperature aligns with the marking on the
housing.
To lock the setting to the temperature chosen, press the dial downwards on the housing until the
dial engages into the locking system. If you wish to readjust the temperature at a later point in
time, release the dial from the locking mechanism (as described above) and turn it according to
the desired temperature. Then press the dial back in.
1
2
105 mm
50 mm45 mm
Dimensions:
Operating voltage: 230V AC 50Hz
Contact: 1 two-way contact
Switching current: 15 (2) A
Setting range: 30°C - 90°C
Sensor element: Liquid sensor
Protection rating: IP 20
CE approved
Technical data:Circuit diagram:
Thermostat AT 10
Surface mount thermostat
Model AT 10
Article no. 114 100

Hulp nodig? Stel uw vraag in het forum

Spelregels

Misbruik melden

Gebruikershandleiding.com neemt misbruik van zijn services uitermate serieus. U kunt hieronder aangeven waarom deze vraag ongepast is. Wij controleren de vraag en zonodig wordt deze verwijderd.

Product:

Bijvoorbeeld antisemitische inhoud, racistische inhoud, of materiaal dat gewelddadige fysieke handelingen tot gevolg kan hebben.

Bijvoorbeeld een creditcardnummer, een persoonlijk identificatienummer, of een geheim adres. E-mailadressen en volledige namen worden niet als privégegevens beschouwd.

Spelregels forum

Om tot zinvolle vragen te komen hanteren wij de volgende spelregels:

Belangrijk! Als er een antwoord wordt gegeven op uw vraag, dan is het voor de gever van het antwoord nuttig om te weten als u er wel (of niet) mee geholpen bent! Wij vragen u dus ook te reageren op een antwoord.

Belangrijk! Antwoorden worden ook per e-mail naar abonnees gestuurd. Laat uw emailadres achter op deze site, zodat u op de hoogte blijft. U krijgt dan ook andere vragen en antwoorden te zien.

Abonneren

Abonneer u voor het ontvangen van emails voor uw Salus AT10 bij:


U ontvangt een email met instructies om u voor één of beide opties in te schrijven.


Ontvang uw handleiding per email

Vul uw emailadres in en ontvang de handleiding van Salus AT10 in de taal/talen: Engels als bijlage per email.

De handleiding is 0,17 mb groot.


U ontvangt de handleiding per email binnen enkele minuten. Als u geen email heeft ontvangen, dan heeft u waarschijnlijk een verkeerd emailadres ingevuld of is uw mailbox te vol. Daarnaast kan het zijn dat uw internetprovider een maximum heeft aan de grootte per email. Omdat hier een handleiding wordt meegestuurd, kan het voorkomen dat de email groter is dan toegestaan bij uw provider.

Andere handleiding(en) van Salus AT10

Salus AT10 Gebruiksaanwijzing - Nederlands - 1 pagina's

Salus AT10 Gebruiksaanwijzing - Espanõl - 1 pagina's


Uw handleiding is per email verstuurd. Controleer uw email

Als u niet binnen een kwartier uw email met handleiding ontvangen heeft, kan het zijn dat u een verkeerd emailadres heeft ingevuld of dat uw emailprovider een maximum grootte per email heeft ingesteld die kleiner is dan de grootte van de handleiding.

Er is een email naar u verstuurd om uw inschrijving definitief te maken.

Controleer uw email en volg de aanwijzingen op om uw inschrijving definitief te maken

U heeft geen emailadres opgegeven

Als u de handleiding per email wilt ontvangen, vul dan een geldig emailadres in.

Uw vraag is op deze pagina toegevoegd

Wilt u een email ontvangen bij een antwoord en/of nieuwe vragen? Vul dan hier uw emailadres in.


Info