491244
2
Verklein
Vergroot
Pagina terug
1/24
Pagina verder
2.With a spirit level, carefully position the mirror unit on the wall at your desired height and mark a
horizontal pencil line on the wall from corner to corner along the bottom of the mirror unit (Fig 2).
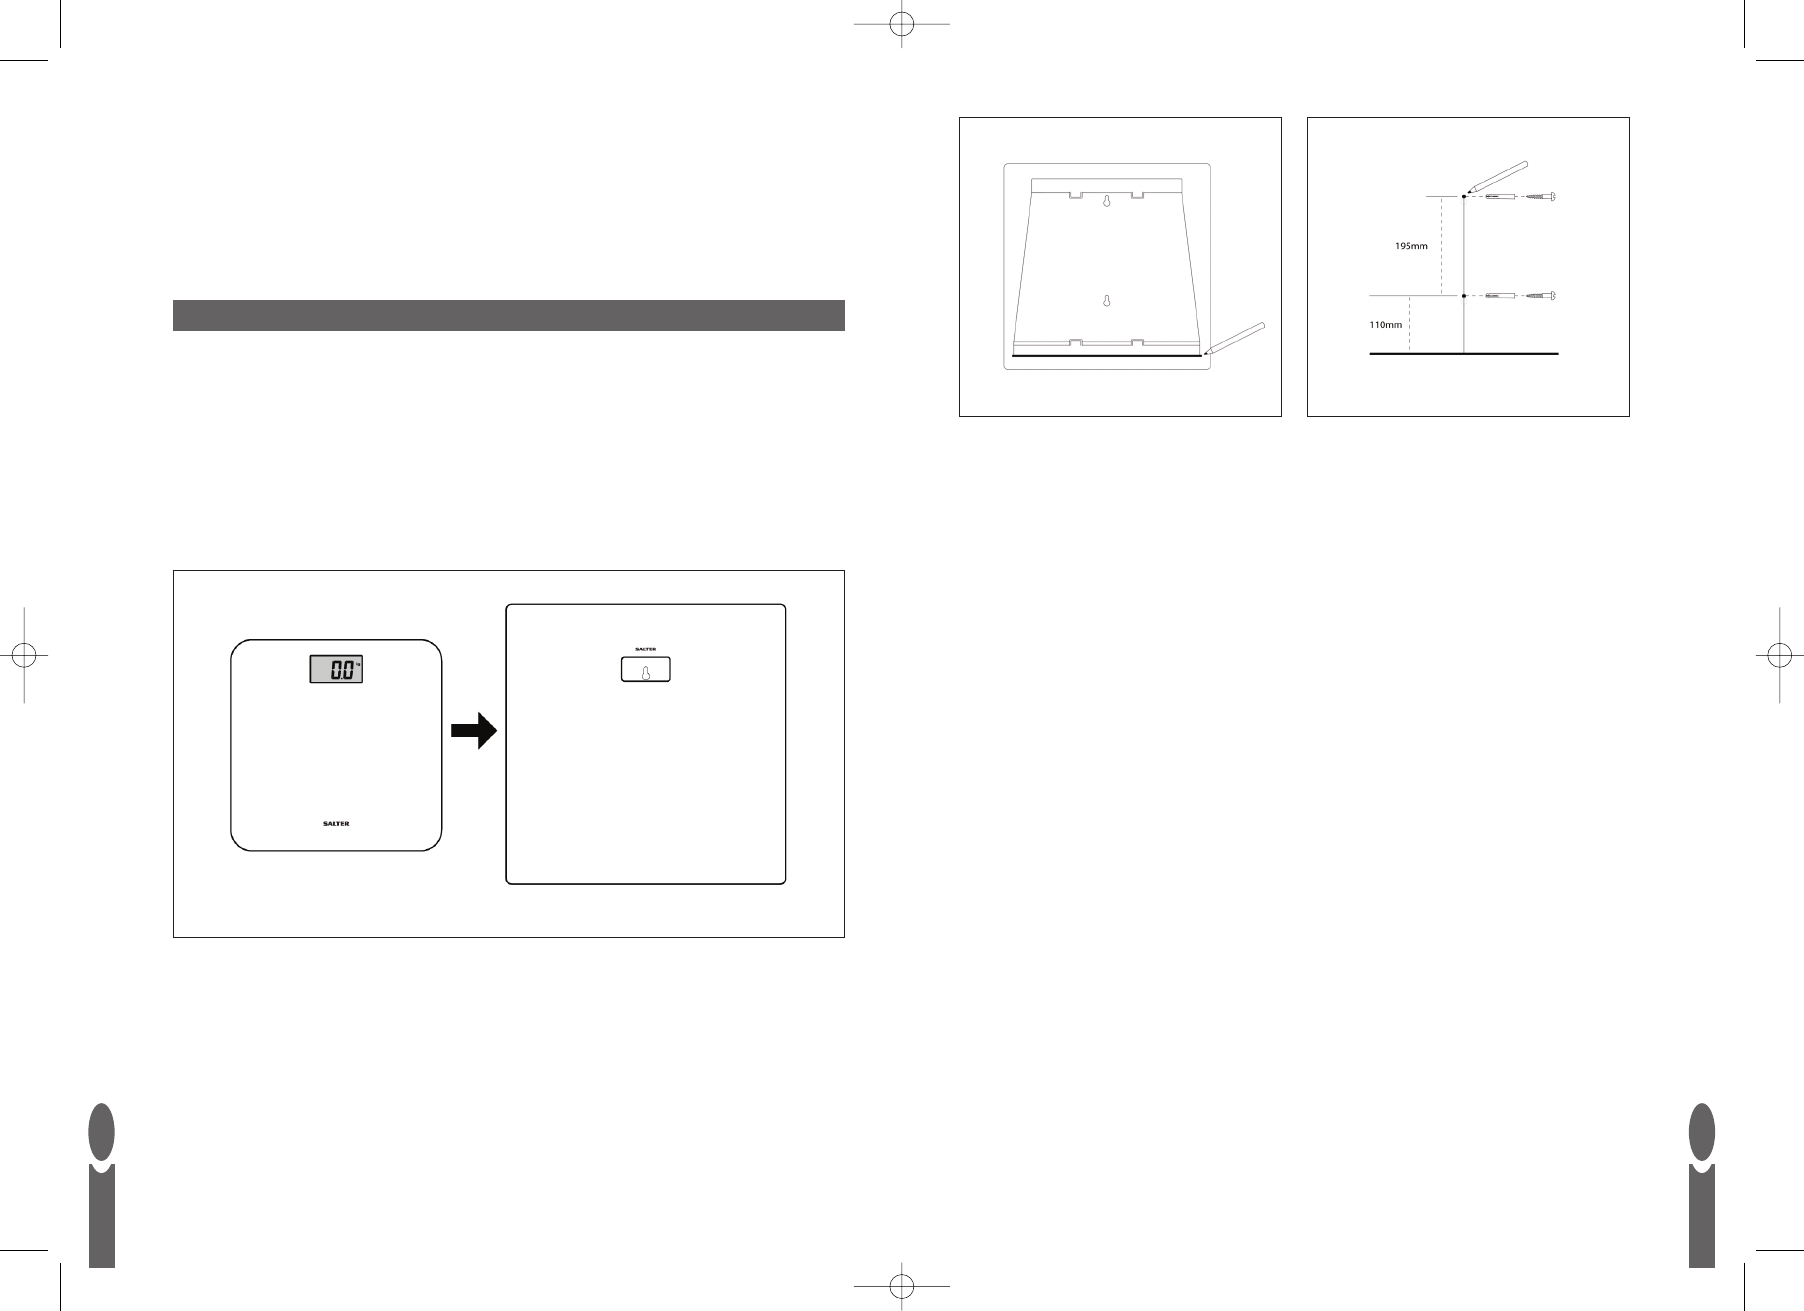
3.With a spirit level mark a vertical centreline starting from the middle of the horizontal line you have
just drawn (Fig 3).
4. Mark the screw hole positions at 110mm up and 195mm apart (Fig 3).
5. Using a suitable drill, drill holes for the wall plugs (The wall plugs provided are suitable for solid
walls and require a 6 mm diameter hole. For hollow or other wall types use a suitable alternative
fixing.).
6. Using a suitable screwdriver fit the screws, but do not fully tighten.
7.Temporarily position the mirror unit and adjust the screws until the mirror unit is held firmly against
the wall (You will need to remove the mirror unit to adjust the screws).
Tip: Look through the clock window to locate the screw heads.
8. Fit the mirror unit onto the screws and pull down to ensure it is correctly located the screws
sitting in the upper part of the keyholes.
9. Before storing the scale for the first time check the mirror unit is secure and level.
10.To remove the scale, reach behind the mirror and locate the vertical bar on the back of the scale
glass platform. Slide the scale to the edge of the mirror unit until you can firmly grasp the scale
platform. Place your other hand under the bottom edge of the scale platform and carefully remove.
To replace the scale simply slide the scale behind the mirror. The scale is guided into position and
should rest with the clock clearly visible through the mirror window.
CAUTION: For safety, the scale should only be removed from the mirror unit with clean dry hands.
GB
3
GB
2
Your quality Salter Mirror Scale has been designed especially for your convenience. The wall mounted
mirror unit provides a practical dual-purpose storage solution for your scale. When not in use the
scale becomes a useful clock.
Note: To fix the mirror unit to your bathroom wall you will need a drill, a screwdriver, a pencil and a
spirit level.
CAUTION: Please ensure the wall you wish to fit your mirror unit to does not have any cables,
pipes (or similar) behind it.
FIXINGYOUR MIRROR UNIT TO THE WALL
1. Observing the above caution, choose a suitable location for the mirror unit ensuring the scale can
be comfortably accessed. Allow sufficient space around the mirror unit for removing and replacing
the scale (Fig 1). The scale may be removed or replaced from either side.
Fig 1
Fig 2 Fig 3
9034_IB.qxd:Layout 1 28/4/09 16:58 Page 2
2

Hulp nodig? Stel uw vraag in het forum

Spelregels

Misbruik melden

Gebruikershandleiding.com neemt misbruik van zijn services uitermate serieus. U kunt hieronder aangeven waarom deze vraag ongepast is. Wij controleren de vraag en zonodig wordt deze verwijderd.

Product:

Bijvoorbeeld antisemitische inhoud, racistische inhoud, of materiaal dat gewelddadige fysieke handelingen tot gevolg kan hebben.

Bijvoorbeeld een creditcardnummer, een persoonlijk identificatienummer, of een geheim adres. E-mailadressen en volledige namen worden niet als privégegevens beschouwd.

Spelregels forum

Om tot zinvolle vragen te komen hanteren wij de volgende spelregels:

Belangrijk! Als er een antwoord wordt gegeven op uw vraag, dan is het voor de gever van het antwoord nuttig om te weten als u er wel (of niet) mee geholpen bent! Wij vragen u dus ook te reageren op een antwoord.

Belangrijk! Antwoorden worden ook per e-mail naar abonnees gestuurd. Laat uw emailadres achter op deze site, zodat u op de hoogte blijft. U krijgt dan ook andere vragen en antwoorden te zien.

Abonneren

Abonneer u voor het ontvangen van emails voor uw Salter 9034 bij:


U ontvangt een email met instructies om u voor één of beide opties in te schrijven.


Ontvang uw handleiding per email

Vul uw emailadres in en ontvang de handleiding van Salter 9034 in de taal/talen: Nederlands, Duits, Engels, Frans, Italiaans, Spaans, Deens, Zweeds, Noors, Fins als bijlage per email.

De handleiding is 0,23 mb groot.


U ontvangt de handleiding per email binnen enkele minuten. Als u geen email heeft ontvangen, dan heeft u waarschijnlijk een verkeerd emailadres ingevuld of is uw mailbox te vol. Daarnaast kan het zijn dat uw internetprovider een maximum heeft aan de grootte per email. Omdat hier een handleiding wordt meegestuurd, kan het voorkomen dat de email groter is dan toegestaan bij uw provider.

Uw handleiding is per email verstuurd. Controleer uw email

Als u niet binnen een kwartier uw email met handleiding ontvangen heeft, kan het zijn dat u een verkeerd emailadres heeft ingevuld of dat uw emailprovider een maximum grootte per email heeft ingesteld die kleiner is dan de grootte van de handleiding.

Er is een email naar u verstuurd om uw inschrijving definitief te maken.

Controleer uw email en volg de aanwijzingen op om uw inschrijving definitief te maken

U heeft geen emailadres opgegeven

Als u de handleiding per email wilt ontvangen, vul dan een geldig emailadres in.

Uw vraag is op deze pagina toegevoegd

Wilt u een email ontvangen bij een antwoord en/of nieuwe vragen? Vul dan hier uw emailadres in.


Info