1.CARREGUE
3-5 HORAS (V
2.
3.
4.
Pressione o botão ver
5.COL
Alguns segundos depois o RoboMop começara a limpeza.
6.P (V
7.
DESCARNão deit
CO
MI
página na net em:
OPERA
OPERA
FREQUENTL
THIS
1 Cleaning Robotic Ball
NOTE:
Read all operating
instructions before operating
your new R
1AC Batte r
8 Electrostatic Disposable Cloths
2
7
Q. My RoboMop g d
A. Yo RoboMop rooms
it has before. does get R will to free
itself by trdifferent d free itself, or
block any RoboMop g on o urt
problem areas been amended, pick up y RoboMop
reposition. Your R
1. It wedged o between or under narrowly
2. RoboMop r t
that an
Q. My RoboMop do?
A. Please contact the local distributor through www.robomop.net.
Q. A pets a RoboMop?
A. Children and pets around R
optimal safety
Q. Does R ners and
A. RoboMop cleans t walls, ners o tough t
reach places.
Q. Wu kickboards, niture?
A. R
been designed to under y
kitchen. If y or n mor than your
RoboMop will unde rneath.
Q. H long d it t recharge R
A. Approximately 3-5 h
Q: WR clean
A: R hardwood, linoleum, t ceramic t marble,
granite and o hard
5
RoboMop is desig
more impor
absorbing pa
watch RoboMop automat
navigates smoothly and
around walls and u
all your hard floor
The VoltaWebTM dustpads are espe
possible dur
composition of f
pad and the flo
absorb and t
textile to attract even more d
trash.
Enjoy your RoboMop!
x1
x5
x1
For o
before using a r
the floor:
or any fragile it
it cleans,
by light contact from RoboMop
access to a stairway wher
the area with either a chair
1.
FOR 3-5 HOURS (Fig.
2.(Fig.C).
3.
CENTER OF (Fig
4.
by pressing the Green ON/TIME butt
5.
Within seconds,
6.
OFF (Fig.G).
7.(Fig.H)
Do not dispose soiled pads in the toilet.
REPLA
A
5.INDSÆT ROBO
Indenfor 6 sekunder
6.SLUKKER (Figur G).
7. Brugte klude
smides i aff
ELEKTROST
DET
www
1.LADE DEN ROBO
(Figur
2.(Figur C).
3.
(Figur D).
4.VELG RENGJØRINGSTIDT
knappen.
5.PLASSER DEN ROBO
RENGJØRINGSRAMMEN. Innen noen sekunder vil
Robomop begynne å rengjøre
6.SLÅR SEG (Figur G).
7. (ikke kast papir
ELEKTROST
BESTILLES P:
GEBRUIKSAANWIJZING
MANU
INSTRUKSJONSMANU
WARNINGS:
RoboMop on wet or damp surfaces or where immersion in wat
children.
adapter specications • Use only the
indoors only
charging.
4
step
5
step
7
step
STEP BY STE
W
• Read all s and operating i b o
• Retain the s operating instructions f f
• Always be c when using y RoboMop. To reduce the risk
of injuror damage, keep safety precautions
setting up, using your
• RoboMop must used for any other purpose o t its
intended use.
• Store out o r of children.
• Do not F
• Charge the r ball only completely discharged.
• This a i device only.
• Do not RoboMop on o damp sur f o where immersion
in water is
• Operate your R f the type o power source i
in this are not sure of of p t
your home, consult y l power company.
• Plug the A BatterCharger into voltage tape AC
Product may not used with any type o p cr tr.
Any such use immediately void the Warrant y
• Use only AC Batte rCharger supplied by the m
to charge and r
this device.
• Charge indoors
• Never A Battery C with wet
• Always remove A Bry C f disconnect
RoboMop after charging.
• RoboMop is for use o carpets.
• RoboMop is d to clean r a a time.
RoboMop to the r cleaned doors.
• ObserR first time cleans a r to confirm does
not get wedged u or stuck o t o uneven sur
• The Frame should not softly with a
duster or clean soft cloth.
• Use the s designed electrostatic pads o floors only
• Protect the Frame from bending, warping o f
• When R remove RoboMop from the f
to avoid to
INSERT THE ROBOTIC
IN THE
Place the RoboMop ball
cente of the Cl Frame.
Within 6 seconds, RoboMop
will tu rn itself o automatically
(See Figure F
DISPOSAL OF P
Dispose soiled pads in the trash .
(See Figure H) Do not dispose
soiled pads in t
AUTOMATIC SHUT OFF
RoboMop will automatically shut
off when the p c
based on it to. To
stop the RoboMop at any time,
simply press the R OFF button.
When RoboMop is finished clean-
in re it fr the fl
to avoid or over it.
(See Figure G)
6
step
Figure E
Figure F
Figure G
Figure H
5
SELECT CLEANING
Press the G ON/TIME b
located on y RoboMop u
th LC scr on the l
(See Figure EThe
screen will show the a of
time the RoboMop will c y
floor. Tchoose 1 hour and 30
minutes, press the ON/TIME but-
ton once. Tc 1 hour, press
the ON/TIME button twice. T
ch 30 min pr th
ON butt thr time.
Once you have cho the time,
the ON/TIME button on the LCD
screen will b turning
on auty, al you
sufficient to place the ball in
the Cleaning Frame.
Figure G
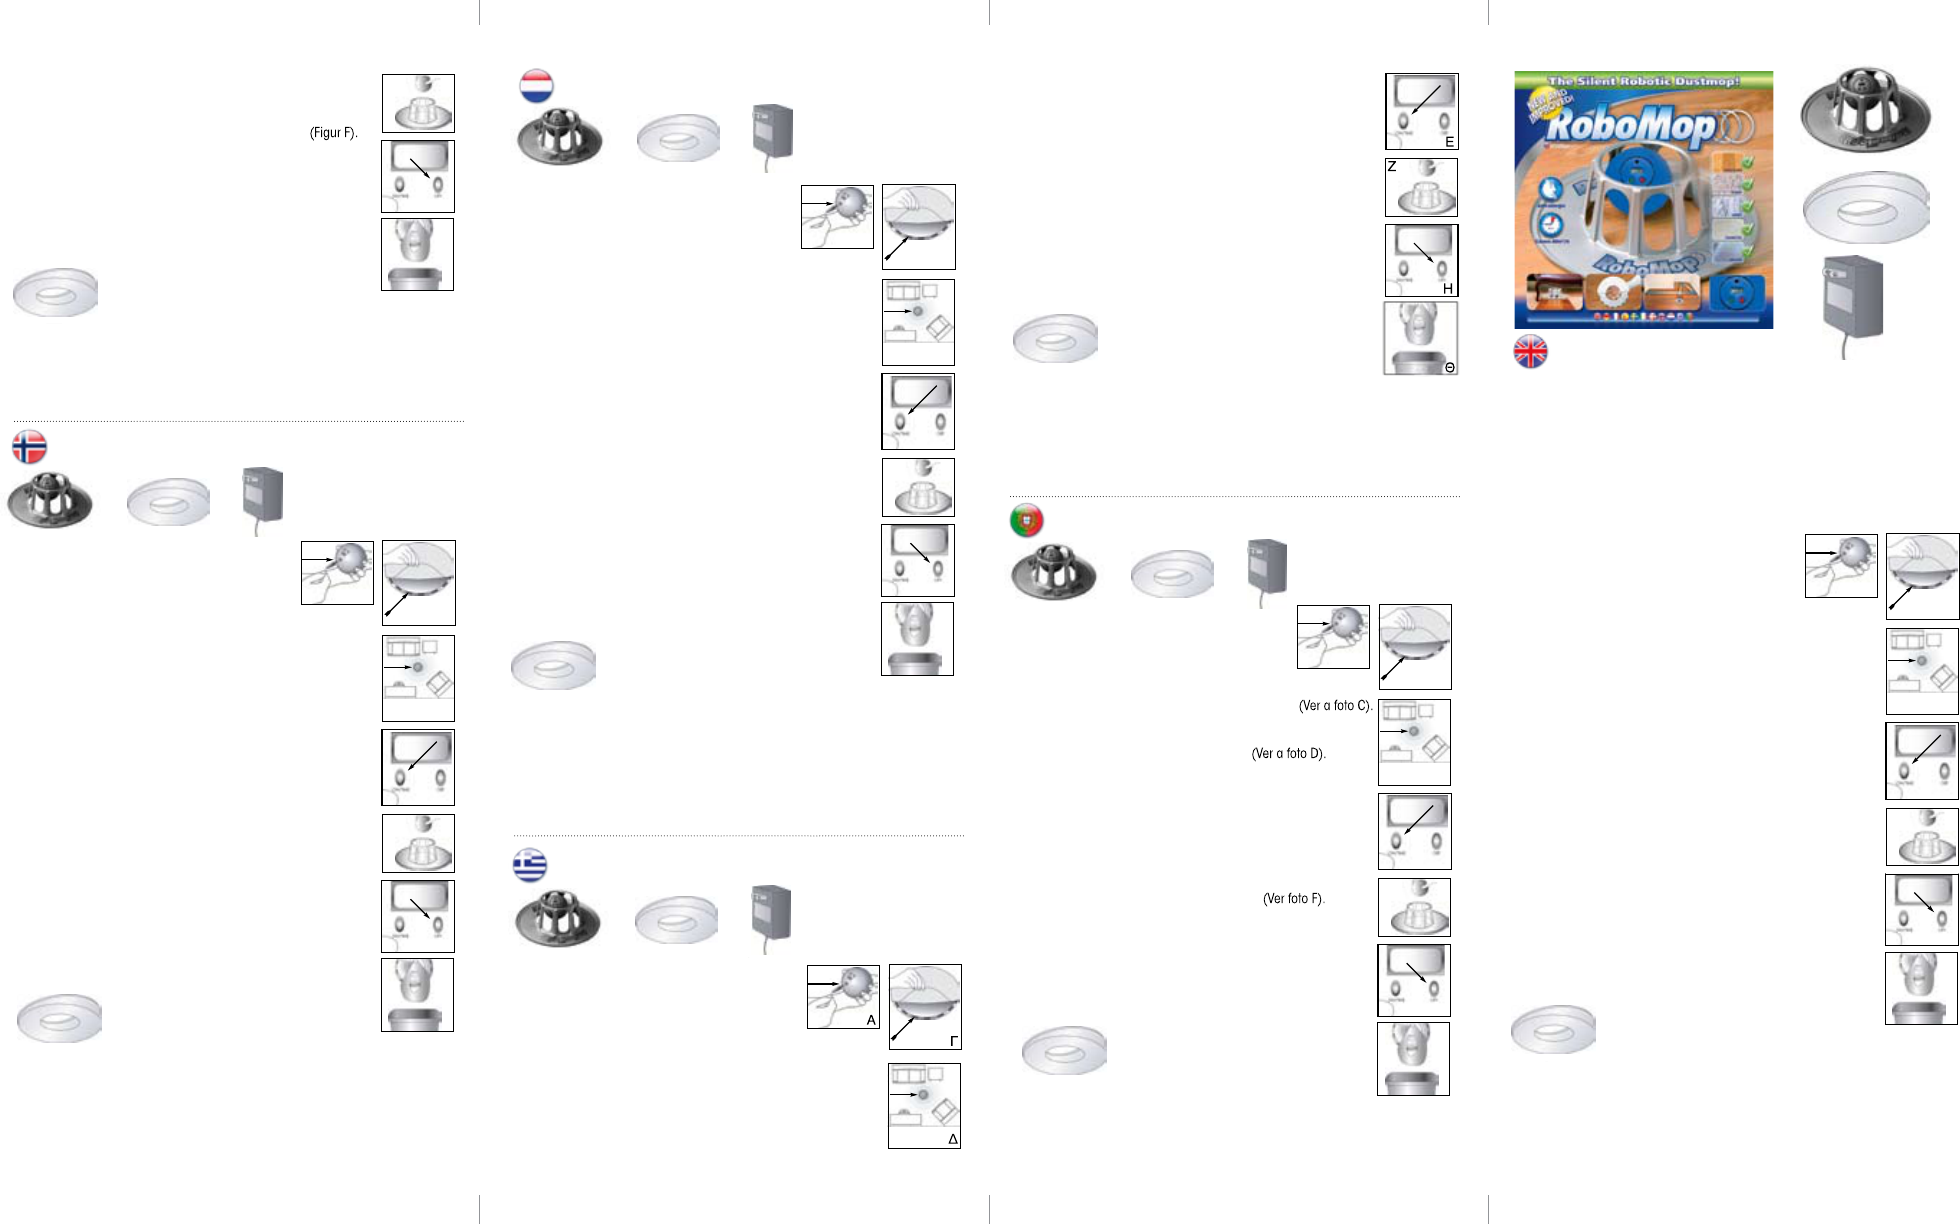
OPERAMANUAL
FREQUENTLA QUESTIONS:
THIS SET
1 Cleaning Frame and Roboti Ball
NOTE:
Read all safety o
instructions before operating
your new RoboMop.
1AC Batte ry C
8 Electrostatic Disposable Cloths
2
7
Q. My R gets stuck. What do?
A. Your RoboMop may o e rooms that
it has not c b does get stuck, RoboMop t f
itself by tu rning different directions. If cannot free i o
block any object t R g s on or the
problem areas have b a u RoboMop and
reposition. Your RoboMop might s for several
1. It is w o between or u n s
2. RoboMop bumps repositions t s
that an exit p
Q. My R Cleaning Frame do?
A. Please contact the local distributor through www.robomop.net.
Q. Are pets c s a R
A. Children p around RoboMop f
optimal safety and fo rmance.
Q. D R c cr ners and along
A. R cleans n t walls, most cr ners o tough to
reach places.
Q. Will it u k b fr niture?
A. RoboMop has been t u the kickboards
kitchen. If your o
fur niture is more t off the fr, your
RoboMop will happily c
Q. How long d t to recharge R
A. A 3-5
Q: Will RoboMop clean floor su rfaces?
A: RoboMop cleans hardwood, t c t
granite and other h f f
5
RoboMop is d
more impor
absorbing
watch RoboMop
navigates smooth
around walls
all your hard
The VoltaWebTM du
possible d
composition
pad and th
absorb and t
textile to attra
trash.
Enjoy your RoboMop!
CHARGE THE
BALL FOR
Before init use, charge ball.
Insert the plug of the AC Batte ry
Charge into the Cha Port
ja of the Ro Bal.
(See Figure A) Plug the AC
Battery Charger a tape
AC Outlet ONLY (
The c in about
3-5 hours. R the unit
when it is c discharged.
ATT
ELECTROST A TIC PAD
Attach one disposable electrostatic
pa to the und of the
Cleaning Frame and secure by
pushing the p d o the
bl velc tab on the
Cleaning Frame. (See Figure C)
STEP BY S G
2
step
1
step
FOR OPTIMAL
HELPFUL
PLACE THE CLEANING
FRAME IN
OF THE
Cl t room P te
Cleaning Frame center of the
room. (See Figure D) For prepa-
ration for c ro
see page 6 o o’s man-
ual for “For Optimal Cleaning
Perfo rmance” tips.”
Figure A
Figure B
Figure C
Figure D
Ro may come
upon a piece of fur niture
li this cou whih
Ro ca gt
wedged u a and
get s If Robp
can’t get out, just pull it
out and set back to work
again. Or you c put a
small object front of it,
so RoboMo can’t get
stuck under neath.
Ro can ge t
tr b or
be yo furnitue
because the e to
an a i b b
enough for RoboMop
to through. Placing a
chair or plant f of
the piece of fr niture,
can solve the trouble
it won’t stop working.
RoboMop may bum p
into small items t c
spill and a mess.
Tsure RoboMop
ca cl the whe
floor; pi up any
objects, just as you do
before you vacuum.
AVOID GETTING STUCK
AVOID MESSY SPILLS DON’T
3
step
For optimal fr mance, clear y floor o objects as
before using regular v cleaner leave i on
floor: clothing, loose p c f or cu rtains, p c o
fragile items. R c walls, fr niture and o objects a it
please r items that may be and knocked over conta
from RoboMop. If your room does not doo ror there is access to a stairway
where R can fall d stairs, simply block off a with either
chair, plant, gate or other
www
velcro tab
3
6
4
step
5
step
7
step
STEP BY STE
W
• Read all s and operating i b o
• Retain the s operating instructions f f
• Always be c when using y RoboMop. To reduce the risk
of injuror damage, keep safety precautions
setting up, using your
• RoboMop must used for any other purpose o t its
intended use.
• Store out o r of children.
• Do not F
• Charge the r ball only completely discharged.
• This a i device only.
• Do not RoboMop on o damp sur f o where immersion
in water is
• Operate your R from the type of power s indicated
in this are not sure of of p t
your home, consult y l power company.
• Plug the A BatterCharger into voltage tape AC
Product may not used with any type o p cr tr.
Any such use immediately void the Warrant y
• Use only AC Batte rCharger supplied by the m
to charge and r
this device.
• Charge indoors
• Never A Battery C with wet
• Always remove A Bry C f disconnect
RoboMop after charging.
• RoboMop is for use o c
• RoboMop is d to clean r a a time.
RoboMop to the r cleaned doors.
• ObserR first time cleans a r to confirm does
not get wedged u or stuck o t o uneven sur
• The Cleaning F should not softly with a
duster or clean soft cloth.
• Use the s designed electrostatic pads o floors only
• Protect the Frame from bending, warping or f
• When R remove RoboMop from the f
to avoid to
INSERT THE ROBOTIC
IN THE
Place the RoboMop ball
cente of the Cl Frame.
Within 6 seconds, RoboMop
will tu rn itself o automatically
(See Figure F
DISPOSAL OF P
Dispose soiled pads in the trash .
(See Figure H) Do not dispose
soiled pads in t
AUTOMATIC SHUT OFF
RoboMop will automatically shut
off when the p c
based on it to. To
stop the RoboMop at any time,
simply press the R OFF button.
When RoboMop is finished clean-
in re it fr the fl
to avoid or over it.
(See Figure G)
6
step
Figure E
Figure F
Figure G
Figure H
5
SELECT CLEANING
Press the G ON/TIME b
located on y RoboMop u
th LC scr on the l
(See Figure EThe
screen will show the a of
time the RoboMop will c y
floor. Tchoose 1 hour and 30
minutes, press the ON/TIME but-
ton once. Tc 1 hour, press
the ON/TIME button twice. T
ch 30 min pr th
ON butt thr time.
Once you have cho the time,
the ON/TIME button on the LCD
screen will b turning
on auty, al you
sufficient to place the ball in
the Cleaning Frame.
4
step
5
step
7
step
STEP BY STE
W
• Read all s and operating i b o
• Retain the s operating instructions f f
• Always be c when using y RoboMop. To reduce the risk
of injuror damage, keep safety precautions
setting up, using your
• RoboMop must used for any other purpose o t its
intended use.
• Store out o r of children.
• Do not F
• Charge the r ball only completely discharged.
• This a i device only.
• Do not RoboMop on o damp sur f o where immersion
in water is
• Operate your R f the type o power source i
in this are not sure of of p t
your home, consult y l power company.
• Plug the A BatterCharger into voltage tape AC
Product may not used with any type o p cr tr.
Any such use immediately void the Warrant y
• Use only AC Batte rCharger supplied by the m
to charge and r
this device.
• Charge indoors
• Never A Battery C with wet
• Always remove A Bry C f disconnect
RoboMop after charging.
• RoboMop is for use o carpets.
• RoboMop is d to clean r a a time.
RoboMop to the r cleaned doors.
• ObserR first time cleans a r to confirm does
not get wedged u or stuck o t o uneven sur
• The Frame should not softly with a
duster or clean soft cloth.
• Use the s designed electrostatic pads o floors only
• Protect the Frame from bending, warping o f
• When R remove RoboMop from the f
to avoid to
INSERT THE ROBOTIC
IN THE
Place the RoboMop ball
cente of the Cl Frame.
Within 6 seconds, RoboMop
will tu rn itself o automatically
(See Figure F
DISPOSAL OF P
Dispose soiled pads in the trash .
(See Figure H) Do not dispose
soiled pads in t
AUTOMATIC SHUT OFF
RoboMop will automatically shut
off when the p c
based on it to. To
stop the RoboMop at any time,
simply press the R OFF button.
When RoboMop is finished clean-
in re it fr the fl
to avoid or over it.
(See Figure G)
6
step
Figure E
Figure F
Figure G
Figure H
5
SELECT CLEANING
Press the G ON/TIME b
located on y RoboMop u
th LC scr on the l
(See Figure EThe
screen will show the a of
time the RoboMop will c y
floor. Tchoose 1 hour and 30
minutes, press the ON/TIME but-
ton once. Tc 1 hour, press
the ON/TIME button twice. T
ch 30 min pr th
ON butt thr time.
Once you have cho the time,
the ON/TIME button on the LCD
screen will b turning
on auty, al you
sufficient to place the ball in
the Cleaning Frame.
4
step
5
step
7
step
STEP BY STE
W
• Read all s and operating i b o
• Retain the s operating instructions f f
• Always be c when using y RoboMop. To reduce the risk
of injuror damage, keep safety precautions
setting up, using your
• RoboMop must used for any other purpose o t its
intended use.
• Store out o r of children.
• Do not F
• Charge the r ball only completely discharged.
• This a i device only.
• Do not RoboMop on o damp sur f o where immersion
in water is
• Operate your R from the type of power s indicated
in this are not sure of of p t
your home, consult y l power company.
• Plug the A BatterCharger into voltage tape AC
Product may not used with any type o p cr tr.
Any such use immediately void the Warrant y
• Use only AC Batte rCharger supplied by the m
to charge and r
this device.
• Charge indoors
• Never A Battery C with wet
• Always remove A Bry C f disconnect
RoboMop after charging.
• RoboMop is for use o c
• RoboMop is d to clean r a a time.
RoboMop to the r cleaned doors.
• ObserR first time cleans a r to confirm does
not get wedged u or stuck o t o uneven sur
• The Cleaning F should not softly with a
duster or clean soft cloth.
• Use the s designed electrostatic pads o floors only
• Protect the Frame from bending, warping or f
• When R remove RoboMop from the f
to avoid to
INSERT THE ROBOTIC
IN THE
Place the RoboMop ball
cente of the Cl Frame.
Within 6 seconds, RoboMop
will tu rn itself o automatically
(See Figure F
DISPOSAL OF P
Dispose soiled pads in the trash .
(See Figure H) Do not dispose
soiled pads in t
AUTOMATIC SHUT OFF
RoboMop will automatically shut
off when the p c
based on it to. To
stop the RoboMop at any time,
simply press the R OFF button.
When RoboMop is finished clean-
in re it fr the fl
to avoid or over it.
(See Figure G)
6
step
Figure E
Figure F
Figure G
Figure H
5
SELECT CLEANING
Press the G ON/TIME b
located on y RoboMop u
th LC scr on the l
(See Figure EThe
screen will show the a of
time the RoboMop will c y
floor. Tchoose 1 hour and 30
minutes, press the ON/TIME but-
ton once. Tc 1 hour, press
the ON/TIME button twice. T
ch 30 min pr th
ON butt thr time.
Once you have cho the time,
the ON/TIME button on the LCD
screen will b turning
on auty, al you
sufficient to place the ball in
the Cleaning Frame.
Figure E
Figure G
CHARGE THE
BALL FOR
Before init use, charge ball.
Insert the plug of the AC Batte ry
Charge into the Cha Port
ja of the Ro Bal.
(See Figure A) Plug the AC
Battery Charger a tape
AC Outlet ONLY (
The c in about
3-5 hours. R the unit
when it is c discharged.
ATT
ELECTROST A TIC PAD
Attach one disposable electrostatic
pa to the und of the
Cleaning Frame and secure by
pushing the p d o the
bl velc tab on the
Cleaning Frame. (See Figure C)
STEP BY S G
2
step
1
step
FOR OPTIMAL
HELPFUL
PLACE THE CLEANING
FRAME IN
OF THE
Cl t room P te
Cleaning Frame center of the
room. (See Figure D) For prepa-
ration for c ro
see page 6 o o’s man-
ual for “For Optimal Cleaning
Perfo rmance” tips.”
Figure A
Figure B
Figure C
Figure D
Ro may come
upon a piece of fur niture
li this cou whih
Ro ca gt
wedged u a and
get s If Robp
can’t get out, just pull it
out and set back to work
again. Or you c put a
small object front of it,
so RoboMo can’t get
stuck under neath.
Ro can ge t
tr b or
be yo furnitue
because the e to
an a i b b
enough for RoboMop
to through. Placing a
chair or plant f of
the piece of fr niture,
can solve the trouble
it won’t stop working.
RoboMop may bum p
into small items t c
spill and a mess.
Tsure RoboMop
ca cl the whe
floor; pi up any
objects, just as you do
before you vacuum.
AVOID GETTING STUCK
AVOID MESSY SPILLS DON’T
3
step
For optimal fr mance, clear y floor o objects as
before using regular v cleaner leave i on
floor: clothing, loose p c f or cu rtains, p c o
fragile items. R c walls, fr niture and o objects a it
please r items that may be and knocked over conta
from RoboMop. If your room does not doo ror there is access to a stairway
where R can fall d stairs, simply block off a with either
chair, plant, gate or other
www
velcro tab
3
6
4
step
5
step
7
step
STEP BY STE
W
• Read all s and operating i b o
• Retain the s operating instructions f f
• Always be c when using y RoboMop. To reduce the risk
of injuror damage, keep safety precautions
setting up, using your
• RoboMop must used for any other purpose o t its
intended use.
• Store out o r of children.
• Do not F
• Charge the r ball only completely discharged.
• This a i device only.
• Do not RoboMop on o damp sur f o where immersion
in water is
• Operate your R f the type o power source i
in this are not sure of of p t
your home, consult y l power company.
• Plug the A BatterCharger into voltage tape AC
Product may not used with any type o p cr tr.
Any such use immediately void the Warrant y
• Use only AC Batte rCharger supplied by the m
to charge and r
this device.
• Charge indoors
• Never A Battery C with wet
• Always remove A Bry C f disconnect
RoboMop after charging.
• RoboMop is for use o c
• RoboMop is d to clean r a a time.
RoboMop to the r cleaned doors.
• ObserR first time cleans a r to confirm does
not get wedged u or stuck o t o uneven sur
• The Cleaning F should not softly with a
duster or clean soft cloth.
• Use the s designed electrostatic pads o floors only
• Protect the Frame from bending, warping or f
• When R remove RoboMop from the f
to avoid to
INSERT THE ROBOTIC
IN THE
Place the RoboMop ball
cente of the Cl Frame.
Within 6 seconds, RoboMop
will tu rn itself o automatically
(See Figure F
DISPOSAL OF P
Dispose soiled pads in the trash .
(See Figure H) Do not dispose
soiled pads in t
AUTOMATIC SHUT OFF
RoboMop will automatically shut
off when the p c
based on it to. To
stop the RoboMop at any time,
simply press the R OFF button.
When RoboMop is finished clean-
in re it fr the fl
to avoid or over it.
(See Figure G)
6
step
Figure E
Figure F
Figure G
Figure H
5
SELECT CLEANING
Press the G ON/TIME b
located on y RoboMop u
th LC scr on the l
(See Figure EThe
screen will show the a o
time the RoboMop will c y
floor. Tchoose 1 hour and 30
minutes, press the ON/TIME but-
ton once. Tc 1 hour, press
the ON/TIME button twice. T
ch 30 min pr th
ON butt thr time.
Once you have cho the time,
the ON/TIME button on the LCD
screen will 6X before tu rning
on auty, al you
sufficient to place the ball in
the Cleaning Frame.
4
step
5
step
7
step
STEP BY STE
W
• Read all s and operating i b o
• Retain the s operating instructions f f
• Always be c when using y RoboMop. To reduce the risk
of injuror damage, keep safety precautions
setting up, using your
• RoboMop must used for any other purpose o t its
intended use.
• Store out o r of children.
• Do not F
• Charge the r ball only completely discharged.
• This a i device only.
• Do not RoboMop on o damp sur f o where immersion
in water is
• Operate your R from the type of power s indicated
in this are not sure of of p t
your home, consult y l power company.
• Plug the A BatterCharger into voltage tape AC
Product may not used with any type o p cr tr.
Any such use immediately void the Warrant y
• Use only AC Batte rCharger supplied by the m
to charge and r
this device.
• Charge indoors
• Never A Battery C with wet
• Always remove A Bry C f disconnect
RoboMop after charging.
• RoboMop is for use o c
• RoboMop is d to clean r a a time.
RoboMop to the r cleaned doors.
• ObserR first time cleans a r to confirm does
not get wedged u or stuck o t o uneven sur
• The Cleaning F should not softly with a
duster or clean soft cloth.
• Use the s designed electrostatic pads o floors only
• Protect the Frame from bending, warping or f
• When R remove RoboMop from the f
to avoid to
INSERT THE ROBOTIC
IN THE
Place the RoboMop ball
cente of the Cl Frame.
Within 6 seconds, RoboMop
will tu rn itself o automatically
(See Figure F
DISPOSAL OF P
Dispose soiled pads in the trash .
(See Figure H) Do not dispose
soiled pads in t
AUTOMATIC SHUT OFF
RoboMop will automatically shut
off when the p c
based on it to. To
stop the RoboMop at any time,
simply press the R OFF button.
When RoboMop is finished clean-
in re it fr the fl
to avoid or over it.
(See Figure G)
6
step
Figure E
Figure F
Figure G
Figure H
5
SELECT CLEANING
Press the G ON/TIME b
located on y RoboMop u
th LC scr on the l
(See Figure EThe
screen will show the a o
time the RoboMop will c y
floor. Tchoose 1 hour and 30
minutes, press the ON/TIME but-
ton once. Tc 1 hour, press
the ON/TIME button twice. T
ch 30 min pr th
ON butt thr time.
Once you have cho the time,
the ON/TIME button on the LCD
screen will 6X before tu rning
on auty, al you
sufficient to place the ball in
the Cleaning Frame.
Figure E
Figure G
CHARGE THE
BALL FOR
Before init use, charge ball.
Insert the plug of the AC Batte ry
Charge into the Cha Port
ja of the Ro Bal.
(See Figure A) Plug the AC
Battery Charger a tape
AC Outlet ONLY (
The c in about
3-5 hours. R the unit
when it is c discharged.
ATT
ELECTROST A TIC PAD
Attach one disposable electrostatic
pa to the und of the
Cleaning Frame and secure by
pushing the p d o the
bl velc tab on the
Cleaning Frame. (See Figure C)
STEP BY S G
2
step
1
step
FOR OPTIMAL
HELPFUL
PLACE THE CLEANING
FRAME IN
OF THE
Cl t room P te
Cleaning Frame center of the
room. (See Figure D) For prepa-
ration for c ro
see page 6 o o’s man-
ual for “For Optimal Cleaning
Perfo rmance” tips.”
Figure A
Figure B
Figure C
Figure D
Ro may come
upon a piece of fur niture
li this cou whih
Ro ca gt
wedged u a and
get s If Robp
can’t get out, just pull it
out and set back to work
again. Or you c put a
small object front of it,
so RoboMo can’t get
stuck under neath.
Ro can ge t
tr b or
be yo furnitue
because the e to
an a i b b
enough for RoboMop
to through. Placing a
chair or plant f of
the piece of fr niture,
can solve the trouble
it won’t stop working.
RoboMop may bum p
into small items t c
spill and a mess.
Tsure RoboMop
ca cl the whe
floor; pi up any
objects, just as you do
before you vacuum.
AVOID GETTING STUCK
AVOID MESSY SPILLS DON’T
3
step
For optimal fr mance, clear y floor o objects as
before using regular v cleaner leave i on
floor: clothing, loose p c f or cu rtains, p c o
fragile items. R c walls, fr niture and o objects a it
please r items that may be and knocked over conta
from RoboMop. If your room does not doo ror there is access to a stairway
where R can fall d stairs, simply block off a with either
chair, plant, gate or other
www
velcro tab
3
6
4
step
5
step
7
step
STEP BY STE
W
• Read all s and operating i b o
• Retain the s operating instructions f f
• Always be c when using y RoboMop. To reduce the risk
of injuror damage, keep safety precautions
setting up, using your
• RoboMop must used for any other purpose o t its
intended use.
• Store out o r of children.
• Do not F
• Charge the r ball only completely discharged.
• This a i device only.
• Do not RoboMop on o damp sur f o where immersion
in water is
• Operate your R from the type of power s indicated
in this are not sure of of p t
your home, consult y l power company.
• Plug the A BatterCharger into voltage tape AC
Product may not used with any type o p cr tr.
Any such use immediately void the Warrant y
• Use only AC Batte rCharger supplied by the m
to charge and r
this device.
• Charge indoors
• Never A Battery C with wet
• Always remove A Bry C f disconnect
RoboMop after charging.
• RoboMop is for use o c
• RoboMop is d to clean r a a time.
RoboMop to the r cleaned doors.
• ObserR first time cleans a r to confirm does
not get wedged u or stuck o t o uneven sur
• The Cleaning F should not softly with a
duster or clean soft cloth.
• Use the s designed electrostatic pads o floors only
• Protect the Frame from bending, warping or f
• When R remove RoboMop from the f
to avoid to
INSERT THE ROBOTIC
IN THE
Place the RoboMop ball
cente of the Cl Frame.
Within 6 seconds, RoboMop
will tu rn itself o automatically
(See Figure F
DISPOSAL OF P
Dispose soiled pads in the trash .
(See Figure H) Do not dispose
soiled pads in t
AUTOMATIC SHUT OFF
RoboMop will automatically shut
off when the p c
based on it to. To
stop the RoboMop at any time,
simply press the R OFF button.
When RoboMop is finished clean-
in re it fr the fl
to avoid or over it.
(See Figure G)
6
step
Figure E
Figure F
Figure G
Figure H
5
SELECT CLEANING
Press the G ON/TIME b
located on y RoboMop u
th LC scr on the l
(See Figure EThe
screen will show the a o
time the RoboMop will c y
floor. Tchoose 1 hour and 30
minutes, press the ON/TIME but-
ton once. Tc 1 hour, press
the ON/TIME button twice. T
ch 30 min pr th
ON butt thr time.
Once you have cho the time,
the ON/TIME button on the LCD
screen will b turning
on auty, al you
sufficient to place the ball in
the Cleaning Frame.
Figure E
Figure G
CHARGE THE
BALL FOR
Before init use, charge ball.
Insert the plug of the AC Batte ry
Charge into the Cha Port
ja of the Ro Bal.
(See Figure A) Plug the AC
Battery Charger a tape
AC Outlet ONLY (
The c in about
3-5 hours. R the unit
when it is c discharged.
ATT
ELECTROST A TIC PAD
Attach one disposable electrostatic
pa to the und of the
Cleaning Frame and secure by
pushing the p d o the
bl velc tab on the
Cleaning Frame. (See Figure C)
STEP BY S G
2
step
1
step
FOR OPTIMAL
HELPFUL
PLACE THE CLEANING
FRAME IN
OF THE
Cl t room P te
Cleaning Frame center of the
room. (See Figure D) For prepa-
ration for c ro
see page 6 o o’s man-
ual for “For Optimal Cleaning
Perfo rmance” tips.”
Figure A
Figure B
Figure C
Figure D
Ro may come
upon a piece of fur niture
li this cou whih
Ro ca gt
wedged u a and
get s If Robp
can’t get out, just pull it
out and set back to work
again. Or you c put a
small object front of it,
so RoboMo can’t get
stuck under neath.
Ro can ge t
tr b or
be yo furnitue
because the e to
an a i b b
enough for RoboMop
to through. Placing a
chair or plant f of
the piece of fr niture,
can solve the trouble
it won’t stop working.
RoboMop may bum p
into small items t c
spill and a mess.
Tsure RoboMop
ca cl the whe
floor; pi up any
objects, just as you do
before you vacuum.
AVOID GETTING STUCK
AVOID MESSY SPILLS DON’T
3
step
For optimal fr mance, clear y floor o objects as
before using regular v cleaner leave i on
floor: clothing, loose p c f or cu rtains, p c o
fragile items. R c walls, fr niture and o objects a it
please r items that may be and knocked over conta
from RoboMop. If your room does not doo ror there is access to a stairway
where R can fall d stairs, simply block off a with either
chair, plant, gate or other
www
velcro tab
3
6
4
step
5
step
7
step
STEP BY STE
W
• Read all s and operating i b o
• Retain the s operating instructions f f
• Always be c when using y RoboMop. To reduce the risk
of injuror damage, keep safety precautions
setting up, using your
• RoboMop must used for any other purpose o t its
intended use.
• Store out o r of children.
• Do not F
• Charge the r ball only completely discharged.
• This a i device only.
• Do not RoboMop on o damp sur f o where immersion
in water is
• Operate your R f the type o power source i
in this are not sure of of p t
your home, consult y l power company.
• Plug the A BatterCharger into voltage tape AC
Product may not used with any type o p cr tr.
Any such use immediately void the Warrant y
• Use only AC Batte rCharger supplied by the m
to charge and r
this device.
• Charge indoors
• Never A Battery C with wet
• Always remove A Bry C f disconnect
RoboMop after charging.
• RoboMop is for use o c
• RoboMop is d to clean r a a time.
RoboMop to the r cleaned doors.
• ObserR first time cleans a r to confirm does
not get wedged u or stuck o t o uneven sur
• The Cleaning F should not softly with a
duster or clean soft cloth.
• Use the s designed electrostatic pads o floors only
• Protect the Frame from bending, warping or f
• When R remove RoboMop from the f
to avoid to
INSERT THE ROBOTIC
IN THE
Place the RoboMop ball
cente of the Cl Frame.
Within 6 seconds, RoboMop
will tu rn itself o automatically
(See Figure F
DISPOSAL OF P
Dispose soiled pads in the trash .
(See Figure H) Do not dispose
soiled pads in t
AUTOMATIC SHUT OFF
RoboMop will automatically shut
off when the p c
based on it to. To
stop the RoboMop at any time,
simply press the R OFF button.
When RoboMop is finished clean-
in re it fr the fl
to avoid or over it.
(See Figure G)
6
step
Figure E
Figure F
Figure G
Figure H
5
SELECT CLEANING
Press the G ON/TIME b
located on y RoboMop u
th LC scr on the l
(See Figure EThe
screen will show the a o
time the RoboMop will c y
floor. Tchoose 1 hour and 30
minutes, press the ON/TIME but-
ton once. Tc 1 hour, press
the ON/TIME button twice. T
ch 30 min pr th
ON butt thr time.
Once you have cho the time,
the ON/TIME button on the LCD
screen will b turning
on auty, al you
sufficient to place the ball in
the Cleaning Frame.
4
step
5
step
7
step
STEP BY STE
W
• Read all s and operating i b o
• Retain the s operating instructions f f
• Always be c when using y RoboMop. To reduce the risk
of injuror damage, keep safety precautions
setting up, using your
• RoboMop must used for any other purpose o t its
intended use.
• Store out o r of children.
• Do not F
• Charge the r ball only completely discharged.
• This a i device only.
• Do not RoboMop on o damp sur f o where immersion
in water is
• Operate your R f the type o power source i
in this are not sure of of p t
your home, consult y l power company.
• Plug the A BatterCharger into voltage tape AC
Product may not used with any type o p cr tr.
Any such use immediately void the Warrant y
• Use only AC Batte rCharger supplied by the m
to charge and r
this device.
• Charge indoors
• Never A Battery C with wet
• Always remove A Bry C f disconnect
RoboMop after charging.
• RoboMop is for use o c
• RoboMop is d to clean r a a time.
RoboMop to the r cleaned doors.
• ObserR first time cleans a r to confirm does
not get wedged u or stuck o t o uneven sur
• The Cleaning F should not softly with a
duster or clean soft cloth.
• Use the s designed electrostatic pads o f
• Protect the Frame from bending, warping or f
• When R remove RoboMop from the f
to avoid to
INSERT THE ROBOTIC
IN THE
Place the RoboMop ball
cente of the Cl Frame.
Within 6 seconds, RoboMop
will tu rn itself o automatically
(See Figure F
DISPOSAL OF P
Dispose soiled pads in the trash .
(See Figure H) Do not dispose
soiled pads in t
AUTOMATIC SHUT OFF
RoboMop will automatically shut
off when the p c
based on it to. To
stop the RoboMop at any time,
simply press the R OFF button.
When RoboMop is finished clean-
in re it fr the fl
to avoid or over it.
(See Figure G)
6
step
Figure E
Figure F
Figure G
Figure H
5
SELECT CLEANING
Press the G ON/TIME b
located on y RoboMop u
th LC scr on the l
(See Figure EThe
screen will show the a o
time the RoboMop will c y
floor. Tchoose 1 hour and 30
minutes, press the ON/TIME but-
ton once. Tc 1 hour, press
the ON/TIME button twice. T
ch 30 min pr th
ON butt thr time.
Once you have cho the time,
the ON/TIME button on the LCD
screen will b turning
on auty, al you
sufficient to place the ball in
the Cleaning Frame.
Figure E
Figure G
AD
overader
batteri oplader til opladning,
utilgængeligt for børn.
Hav altid tørre hænder når du benytter oplader
WAARSCHUWINGEN:
• Gebruik de RoboMop niet op natte of vochtige oppervlakken of waar de RoboMop in wat
kan worden onder
batterijlader enkel aan op een
welke stroomomzett
het toestel te laden en top .
batterijlader altijd uit het stopcontact en schak
• De RoboMop is niet geschikt voor tapijten.
OBSERVERE:• Oppbevar
batteriet er helt utladet.
for at det kan f
skal aldribrukes med andr
batteriladeren når du er våt på hendene
x1 x5
OPERAMANUAL
FREQUENTLA QUESTIONS:
THIS SET
1 Cleaning Frame and Rob Ball
NOTE:
Read all safety o
instructions before operating
your new RoboMop.
1AC Batte ry
8 Electrostatic Disposable Cloths
2
7
Q. My R do?
A. Your RoboMop may o get r t
it has not b If it d RoboMop will to free
itself by tu rning different directions. If cannot free o
block any object t R s on or
problem areas have b a u your RoboMop a
reposition. Your RoboMop might s for several reasons.
1. It is w o betw or under n s
2. RoboMop bumps repositions s
that an exit p
Q. My R Frame has broken. d
A. Please contact the local distributor through www.robomop.net.
Q. Are pets c s a R
A. Children and a RoboMop for
optimal safety and fo rmance.
Q. DoesR c crners
A. RoboMop t walls, most crners o tough to
reach places.
Q. Will it u k b fr niture?
A. RoboMop has
been designed to u k
kitchen. If your o fr niture is more t off the fr, your
RoboMop will happily c
Q. How long d t t recharge the R
A. A 3-5 hours.
Q: Will RoboMop clean floor sur faces?
A: RoboMop cleans hardwood, c tile, marble,
granite and other h f f
5
RoboMop is
more impor t
absorbing
watch RoboMo
navigates smo t
around walls
all your ha f
The VoltaWebTM d
possible
compositio
pad and t
absorb an
textile to att
trash.
Enjoy your RoboMop!
OPERAMANUAL
FREQUENTLA QUESTIONS:
THIS SET
1 Cleaning Frame and Rob Ball
NOTE:
Read all safety o
instructions before operating
your new RoboMop.
1AC Batte ry
8 Electrostatic Disposable Cloths
2
7
Q. My R do?
A. Your RoboMop may o get r t
it has not b If it d RoboMop will to free
itself by tu rning different directions. If cannot free o
block any object t R s on or
problem areas have b a u your RoboMop a
reposition. Your RoboMop might s for several reasons.
1. It is w o betw or under n s
2. RoboMop bumps repositions s
that an exit p
Q. My R Frame has broken. d
A. Please contact the local distributor through www.robomop.net.
Q. Are pets c s a R
A. Children and a RoboMop for
optimal safety and fo rmance.
Q. DoesR c crners
A. RoboMop t walls, most crners o tough to
reach places.
Q. Will it u k b fr niture?
A. RoboMop has been t under the kickboards i
kitchen. If your o
fur niture is more t of the fr, your
RoboMop will happily c
Q. How long d t t recharge the R
A. A 3-5 hours.
Q: Will RoboMop clean floor sur faces?
A: RoboMop cleans hardwood, c tile, marble,
granite and other h f f
5
RoboMop is
more impor t
absorbing
watch RoboMo
navigates smo t
around walls
all your ha f
The VoltaWebTM d
possible
compositio
pad and t
absorb an
textile to att
trash.
Enjoy your RoboMop!
x1
x1 x5
OPERAMANUAL
FREQUENTLA QUESTIONS:
THIS SET
1 Cleaning Frame and Rob Ball
NOTE:
Read all safety o
instructions before operating
your new RoboMop.
1AC Batte ry
8 Electrostatic Disposable Cloths
2
7
Q. My R do?
A. Your RoboMop may o get r t
it has not b If it d RoboMop will to f
itself by tu rning different directions. If cannot free o
block any object t R s on or
problem areas have b a u your RoboMop a
reposition. Your RoboMop might s for several reasons.
1. It is w o betw or under n s
2. RoboMop bumps repositions s
that an exit p
Q. My R Frame has broken. d
A. Please contact the local distributor through www.robomop.net.
Q. Are pets c s a R
A. Children and a RoboMop for
optimal safety and fo rmance.
Q. DoesR c crners
A. RoboMop t walls, most crners o tough to
reach places.
Q. Will it u k b fr niture?
A. RoboMop has
been designed to u k
kitchen. If your o fr niture is more t off the fr, your
RoboMop will happily c
Q. How long d t t recharge the R
A. A 3-5 hours.
Q: Will RoboMop clean floor sur faces?
A: RoboMop cleans hardwood, c tile, marble,
granite and other h f f
5
RoboMop is
more impor t
absorbing
watch RoboMo
navigates smo t
around walls
all your ha f
The VoltaWebTM d
possible
compositio
pad and t
absorb an
textile to att
trash.
Enjoy your RoboMop!
OPERAMANUAL
FREQUENTLA QUESTIONS:
THIS SET
1 Cleaning Frame and Rob Ball
NOTE:
Read all safety o
instructions before operating
your new RoboMop.
1AC Batte ry
8 Electrostatic Disposable Cloths
2
7
Q. My R do?
A. Your RoboMop may o get r t
it has not b If it d RoboMop will to f
itself by tu rning different directions. If cannot free o
block any object t R s on or
problem areas have b a u your RoboMop a
reposition. Your RoboMop might s for several reasons.
1. It is w o betw or under n s
2. RoboMop bumps repositions s
that an exit p
Q. My R Frame has broken. d
A. Please contact the local distributor through www.robomop.net.
Q. Are pets c s a R
A. Children and a RoboMop for
optimal safety and fo rmance.
Q. DoesR c crners
A. RoboMop t walls, most crners o tough to
reach places.
Q. Will it u k b fr niture?
A. RoboMop has been t under the kickboards i
kitchen. If your o
fur niture is more t of the fr, your
RoboMop will happily c
Q. How long d t t recharge the R
A. A 3-5 hours.
Q: Will RoboMop clean floor sur faces?
A: RoboMop cleans hardwood, c tile, marble,
granite and other h f f
5
RoboMop is
more impor t
absorbing
watch RoboMo
navigates smo t
around walls
all your ha f
The VoltaWebTM d
possible
compositio
pad and t
absorb an
textile to att
trash.
Enjoy your RoboMop!
x1
x1 x5
OPERAMANUAL
FREQUENTLA QUESTIONS:
THIS SET
1 Cleaning Frame and Rob Ball
NOTE:
Read all safety o
instructions before operating
your new RoboMop.
1AC Batte ry
8 Electrostatic Disposable Cloths
2
7
Q. My R do?
A. Your RoboMop may o get r t
it has not b If it d RoboMop will to free
itself by tu rning different directions. If cannot free o
block any object t R s on or
problem areas have b a u your RoboMop a
reposition. Your RoboMop might s for several reasons.
1. It is w o betw or under n s
2. RoboMop bumps repositions s
that an exit p
Q. My R Frame has broken. d
A. Please contact the local distributor through www.robomop.net.
Q. Are pets c s a R
A. Children and a RoboMop for
optimal safety and fo rmance.
Q. DoesR c crners
A. RoboMop t walls, most crners o tough to
reach places.
Q. Will it u k b fr niture?
A. RoboMop has
been designed to u k
kitchen. If your o fr niture is more t off the fr, your
RoboMop will happily c
Q. How long d t t recharge the R
A. A 3-5 hours.
Q: Will RoboMop clean floor sur faces?
A: RoboMop cleans hardwood, c tile, marble,
granite and other h f f
5
RoboMop is
more impor t
absorbing
watch RoboMo
navigates smo t
around walls
all your ha f
The VoltaWebTM d
possible
compositio
pad and t
absorb an
textile to att
trash.
Enjoy your RoboMop!
OPERAMANUAL
FREQUENTLA QUESTIONS:
THIS SET
1 Cleaning Frame and Rob Ball
NOTE:
Read all safety o
instructions before operating
your new RoboMop.
1AC Batte ry
8 Electrostatic Disposable Cloths
2
7
Q. My R do?
A. Your RoboMop may o get r t
it has not b If it d RoboMop will to free
itself by tu rning different directions. If cannot free o
block any object t R s on or
problem areas have b a u your RoboMop a
reposition. Your RoboMop might s for several reasons.
1. It is w o betw or under n s
2. RoboMop bumps repositions s
that an exit p
Q. My R Frame has broken. d
A. Please contact the local distributor through www.robomop.net.
Q. Are pets c s a R
A. Children and a RoboMop for
optimal safety and fo rmance.
Q. DoesR c crners
A. RoboMop t walls, most crners o tough to
reach places.
Q. Will it u k b fr niture?
A. RoboMop has been t under the kickboards i
kitchen. If your o
fur niture is more t of the fr, your
RoboMop will happily c
Q. How long d t t recharge the R
A. A 3-5 hours.
Q: Will RoboMop clean floor sur faces?
A: RoboMop cleans hardwood, c tile, marble,
granite and other h f f
5
RoboMop is
more impor t
absorbing
watch RoboMo
navigates smo t
around walls
all your ha f
The VoltaWebTM d
possible
compositio
pad and t
absorb an
textile to att
trash.
Enjoy your RoboMop!
x1
1.LAAD DE ROBO(Zie fig.
2.
(Zie fig.
3.
DE RUIMTE (Zie fig.
4.STEL DE POETSTIJD IN
Druk op de groene ON/TIME toets op de RoboMop
onder het LCD-scherm (Zie fig.
5.PLAA(Zie fig.
Na zes seconden start de Robomop automatisch.
6.AUT (Zie fig.
7. (Zie fig.
Gooi de vuile pads niet in het toilet.
HOE EXTRA ELEKTROST
Via naar onze website www
AVISOS:
descarregada.
possibilidade de imersão em água.
unicamente numa tomada de 220
carregador fornecido pelo f
carga,
utilizado em superfícies têxt
4.ΕΠΙΛΟΓΗ ΧΡΟΝΟΥ ΚΑΘΑΡΙΣΜΟΥ (Δείτε Εικόνα E).
5.ΤΟ
ΜΕΣΑ ΣΤΟ ΤΕΛΑΡΟ ΚΑΘΑΡΙΣΜΟΥ (Δείτε Εικόνα Z).
6.ΑΥΤΟΜΑΤΟ ΣΤΑΜΑΤΗΜΑ (Δείτε Εικόνα H).
7.ΧΡΗΣΙΜΟΠΟΙΗΜΕΝΑ ΠΑΝΙΑ ΚΑΘΑΡΙΣΜΟΥ
(Δείτε Εικόνα Θ).
Αναλώσιμα ηλεκτροστατικά πανιά:
Μέσω Internet στην σελίδα μας
www
της περιοχής σας.
1.ΦΟΡΤΙΣΤΕ ΤΗ ΡΟΜΠΟΤΙΚΗ ΜΠΑΛΑ
ΓΙΑ 3-5 ΩΡΕΣ (Δείτε Εικόνα Α).
2.ΤΟΠΟΘΕΤΗΣΤΕ ΕΝΑ ΗΛΕΚΤΡΟΣΤΑΤΙΚΟ
ΠΑΝΙ (Δείτε Εικόνα Γ).
3.ΤΟΠΟΘΕΤΗΣΤΕ ΤΟ ΤΕΛΑΡΟ ΚΑΘΑΡΙΣΜΟΥ
ΣΤΟ ΚΕΝΤΡΟ ΤΟΥ ΔΩΜΑΤΙΟΥ (Δείτε Εικόνα Δ).
ΟΔΗΓΙΕΣ ΧΡΗΣΕΩΣ
OPERAMANUAL
FREQUENTLA QUESTIONS:
THIS SET
1 Cleaning Frame and Roboti Ball
NOTE:
Read all safety o
instructions before operating
your new RoboMop.
1AC Batte ry C
8 Electrostatic Disposable Cloths
2
7
Q. My R gets stuck. What do?
A. Your RoboMop may o e rooms that
it has not c b does get stuck, RoboMop t f
itself by tu rning different directions. If cannot free i o
block any object t R g s on or the
problem areas have b a u RoboMop and
reposition. Your RoboMop might s for several
1. It is w o between or u n s
2. RoboMop bumps repositions t s
that an exit p
Q. My R Cleaning Frame do?
A. Please contact the local distributor through www.robomop.net.
Q. Are pets c s a R
A. Children p around RoboMop f
optimal safety and fo rmance.
Q. D R c cr ners and along
A. R cleans n t walls, most cr ners o tough to
reach places.
Q. Will it u k b fr niture?
A. RoboMop has been t u the kickboards
kitchen. If your o
fur niture is more t off the fr, your
RoboMop will happily c
Q. How long d t to recharge R
A. A 3-5
Q: Will RoboMop clean floor su rfaces?
A: RoboMop cleans hardwood, t c t
granite and other h f f
5
RoboMop is d
more impor
absorbing
watch RoboMop
navigates smooth
around walls
all your hard
The VoltaWebTM du
possible d
composition
pad and th
absorb and t
textile to attra
trash.
Enjoy your RoboMop!
CHARGE THE
BALL FOR
Before init use, charge ball.
Insert the plug of the AC Batte ry
Charge into the Cha Port
ja of the Ro Bal.
(See Figure A) Plug the AC
Battery Charger a tape
AC Outlet ONLY (
The c in about
3-5 hours. R the unit
when it is c discharged.
ATT
ELECTROST A TIC PAD
Attach one disposable electrostatic
pa to the und of the
Cleaning Frame and secure by
pushing the p d o the
bl velc tab on the
Cleaning Frame. (See Figure C)
STEP BY S G
2
step
1
step
FOR OPTIMAL
HELPFUL
PLACE THE CLEANING
FRAME IN
OF THE
Cl t room P te
Cleaning Frame center of the
room. (See Figure D) For prepa-
ration for c ro
see page 6 o o’s man-
ual for “For Optimal Cleaning
Perfo rmance” tips.”
Figure A
Figure B
Figure C
Figure D
Ro may come
upon a piece of fur niture
li this cou whih
Ro ca gt
wedged u a and
get s If Robp
can’t get out, just pull it
out and set back to work
again. Or you c put a
small object front of it,
so RoboMo can’t get
stuck under neath.
Ro can ge t
tr b or
be yo furnitue
because the e to
an a i b b
enough for RoboMop
to through. Placing a
chair or plant f of
the piece of fr niture,
can solve the trouble
it won’t stop working.
RoboMop may bum p
into small items t c
spill and a mess.
Tsure RoboMop
ca cl the whe
floor; pi up any
objects, just as you do
before you vacuum.
AVOID GETTING STUCK
AVOID MESSY SPILLS DON’T
3
step
For optimal fr mance, clear y floor o objects as
before using regular v cleaner leave i on
floor: clothing, loose p c f or cu rtains, p c o
fragile items. R c walls, fr niture and o objects a it
please r items that may be and knocked over conta
from RoboMop. If your room does not doo ror there is access to a stairway
where R can fall d stairs, simply block off a with either
chair, plant, gate or other
www
velcro tab
3
6
4
step
5
step
7
step
STEP BY STE
W
• Read all s and operating i b o
• Retain the s operating instructions f f
• Always be c when using y RoboMop. To reduce the risk
of injuror damage, keep safety precautions
setting up, using your
• RoboMop must used for any other purpose o t its
intended use.
• Store out o r of children.
• Do not F
• Charge the r ball only completely discharged.
• This a i device only.
• Do not RoboMop on o damp sur f o where immersion
in water is
• Operate your R from the type of power s indicated
in this are not sure of of p t
your home, consult y l power company.
• Plug the A BatterCharger into voltage tape AC
Product may not used with any type o p cr tr.
Any such use immediately void the Warrant y
• Use only AC Batte rCharger supplied by the m
to charge and r
this device.
• Charge indoors
• Never A Battery C with wet
• Always remove A Bry C f disconnect
RoboMop after charging.
• RoboMop is for use o c
• RoboMop is d to clean r a a time.
RoboMop to the r cleaned doors.
• ObserR first time cleans a r to confirm does
not get wedged u or stuck o t o uneven sur
• The Cleaning F should not softly with a
duster or clean soft cloth.
• Use the s designed electrostatic pads o floors only
• Protect the Frame from bending, warping or f
• When R remove RoboMop from the f
to avoid to
INSERT THE ROBOTIC
IN THE
Place the RoboMop ball
cente of the Cl Frame.
Within 6 seconds, RoboMop
will tu rn itself o automatically
(See Figure F
DISPOSAL OF P
Dispose soiled pads in the trash .
(See Figure H) Do not dispose
soiled pads in t
AUTOMATIC SHUT OFF
RoboMop will automatically shut
off when the p c
based on it to. To
stop the RoboMop at any time,
simply press the R OFF button.
When RoboMop is finished clean-
in re it fr the fl
to avoid or over it.
(See Figure G)
6
step
Figure E
Figure F
Figure G
Figure H
5
SELECT CLEANING
Press the G ON/TIME b
located on y RoboMop u
th LC scr on the l
(See Figure EThe
screen will show the a o
time the RoboMop will c y
floor. Tchoose 1 hour and 30
minutes, press the ON/TIME but-
ton once. Tc 1 hour, press
the ON/TIME button twice. T
ch 30 min pr th
ON butt thr time.
Once you have cho the time,
the ON/TIME button on the LCD
screen will b turning
on auty, al you
sufficient to place the ball in
the Cleaning Frame.
x1 x5
OPERAMANUAL
FREQUENTLA QUESTIONS:
THIS SET
1 Cleaning Frame and Rob Ball
NOTE:
Read all safety o
instructions before operating
your new RoboMop.
1AC Batte ry
8 Electrostatic Disposable Cloths
2
7
Q. My R do?
A. Your RoboMop may o get r t
it has not b If it d RoboMop will to f
itself by tu rning different directions. If cannot free o
block any object t R s on or
problem areas have b a u your RoboMop a
reposition. Your RoboMop might s for several reasons.
1. It is w o betw or under n s
2. RoboMop bumps repositions s
that an exit p
Q. My R Frame has broken. d
A. Please contact the local distributor through www.robomop.net.
Q. Are pets c s a R
A. Children and a RoboMop for
optimal safety and fo rmance.
Q. DoesR c crners
A. RoboMop t walls, most crners o tough to
reach places.
Q. Will it u k b fr niture?
A. RoboMop has
been designed to u k
kitchen. If your o fr niture is more t off the fr, your
RoboMop will happily c
Q. How long d t t recharge the R
A. A 3-5 hours.
Q: Will RoboMop clean floor sur faces?
A: RoboMop cleans hardwood, c tile, marble,
granite and other h f f
5
RoboMop is
more impor t
absorbing
watch RoboMo
navigates smo t
around walls
all your ha f
The VoltaWebTM d
possible
compositio
pad and t
absorb an
textile to att
trash.
Enjoy your RoboMop!
OPERAMANUAL
FREQUENTLA QUESTIONS:
THIS SET
1 Cleaning Frame and Rob Ball
NOTE:
Read all safety o
instructions before operating
your new RoboMop.
1AC Batte ry
8 Electrostatic Disposable Cloths
2
7
Q. My R do?
A. Your RoboMop may o get r t
it has not b If it d RoboMop will to f
itself by tu rning different directions. If cannot free o
block any object t R s on or
problem areas have b a u your RoboMop a
reposition. Your RoboMop might s for several reasons.
1. It is w o betw or under n s
2. RoboMop bumps repositions s
that an exit p
Q. My R Frame has broken. d
A. Please contact the local distributor through www.robomop.net.
Q. Are pets c s a R
A. Children and a RoboMop for
optimal safety and fo rmance.
Q. DoesR c crners
A. RoboMop t walls, most crners o tough to
reach places.
Q. Will it u k b fr niture?
A. RoboMop has been t under the kickboards i
kitchen. If your o
fur niture is more t of the fr, your
RoboMop will happily c
Q. How long d t t recharge the R
A. A 3-5 hours.
Q: Will RoboMop clean floor sur faces?
A: RoboMop cleans hardwood, c tile, marble,
granite and other h f f
5
RoboMop is
more impor t
absorbing
watch RoboMo
navigates smo t
around walls
all your ha f
The VoltaWebTM d
possible
compositio
pad and t
absorb an
textile to att
trash.
Enjoy your RoboMop!
x1
ΠΡΟΣΟΧΉ: • Φορτίστε την ρομποτική μπάλα μόνο όταν είναι τελείως άδεια.
• Μην χρησιμοποιείτε το Robomop σε βρεγμένες επιφάνειες η όπου υπάρχει
η πιθανότητα νερού. • Κρατήστε το μακριά από παιδιά. • Τοποθετήστε τον
φορτιστή μπαταρίας στην κανονική ηλεκτρική πρίζα 220V
μόνο τον φορτιστή που προμηθευτήκατε από το εργοστάσιο. • Φορτίστε την
μπαταρία μόνο μέσα στο σπίτι. • Αποσυνδέστε τον φορτιστή από την πρίζα
μετά την φόρτωση. • Το Robomop δεν χρησιμοποιείτε σε χαλιά.
CHARGE THE
BALL FOR
Before init use, charge ball.
Insert the plug of the AC Batte ry
Charge into the Cha Port
ja of the Ro Bal.
(See Figure A) Plug the AC
Battery Charger a tape
AC Outlet ONLY (
The c in about
3-5 hours. R the unit
when it is c discharged.
ATT
ELECTROST A TIC PAD
Attach one disposable electrostatic
pa to the und of the
Cleaning Frame and secure by
pushing the p d o the
bl velc tab on the
Cleaning Frame. (See Figure C)
STEP BY S G
2
step
1
step
FOR OPTIMAL
HELPFUL
PLACE THE CLEANING
FRAME IN
OF THE
Cl t room P te
Cleaning Frame center of the
room. (See Figure D) For prepa-
ration for c ro
see page 6 o o’s man-
ual for “For Optimal Cleaning
Perfo rmance” tips.”
Figure A
Figure B
Figure C
Figure D
Ro may come
upon a piece of fur niture
li this cou whih
Ro ca gt
wedged u a and
get s If Robp
can’t get out, just pull it
out and set back to work
again. Or you c put a
small object front of it,
so RoboMo can’t get
stuck under neath.
Ro can ge t
tr b or
be yo furnitue
because the e to
an a i b b
enough for RoboMop
to through. Placing a
chair or plant f of
the piece of fr niture,
can solve the trouble
it won’t stop working.
RoboMop may bum p
into small items t c
spill and a mess.
Tsure RoboMop
ca cl the whe
floor; pi up any
objects, just as you do
before you vacuum.
AVOID GETTING STUCK
AVOID MESSY SPILLS DON’T
3
step
For optimal fr mance, clear y floor o objects as
before using regular v cleaner leave i on
floor: clothing, loose p c f or cu rtains, p c o
fragile items. R c walls, fr niture and o objects a it
please r items that may be and knocked over conta
from RoboMop. If your room does not doo ror there is access to a stairway
where R can fall d stairs, simply block off a with either
chair, plant, gate or other
www
velcro tab
3
6