QUINTEZZ LED SENSOR FL
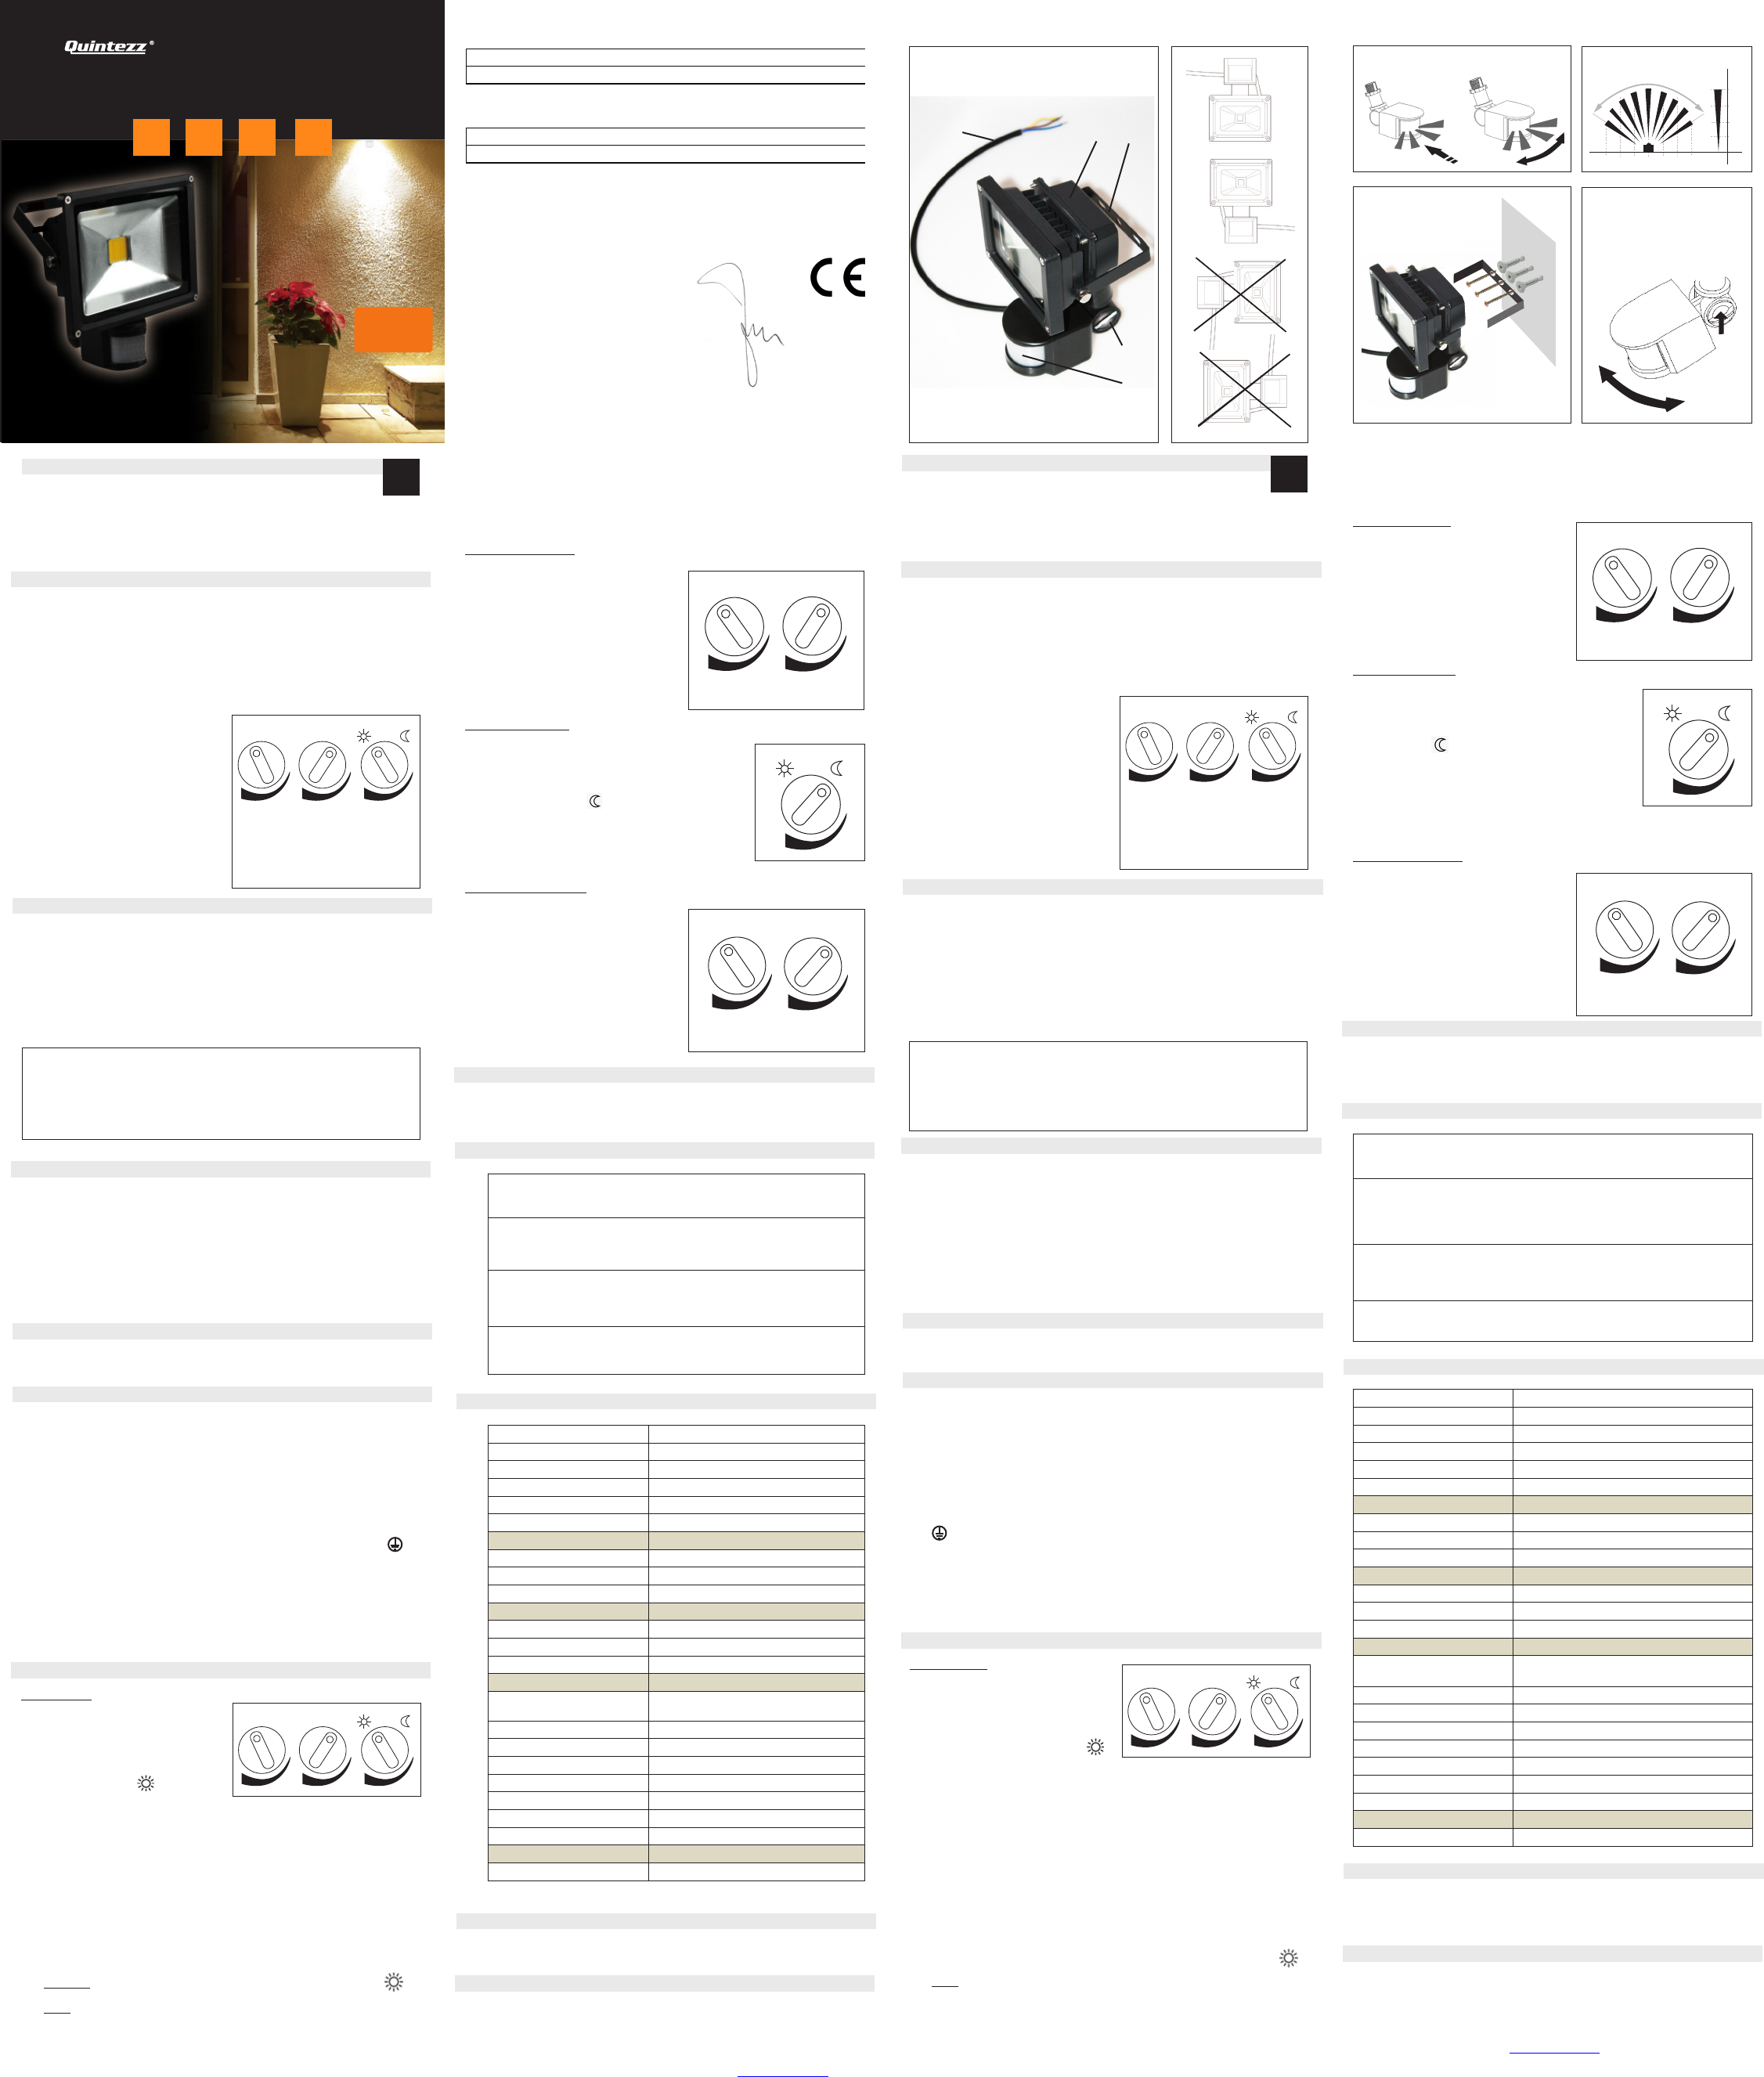
See Illustration I
1) Floodlight
2) PIR Motion Sensor
3) Wiring cabl
4) Mounting bracket
5) Adjustment knob
INTRODUCTION
Y
for your home or busines
on the Floodlight when it detects motion in its det
sensor can be activated during the day in or
timer makes you abl
activation.
A 20W LED light is install
locat
1) SENS (SENSITIVITY): SENS knob
contr
area : l
motion within 5m, highest sensitivity
= detects all motion within 12m.
2) TIME: TIME knob contr
the Floodlight will st
last motion has been detected.
The minimum TIME is 10sec., the
maximum TIME is 7min.
3) LUX: L
light lev
working, so it actually c
built-in light sensor
SAFETY PRECAUTIONS
• Do not install when it is raining
• Make sur
• Make sur
circuit br
• Make sure that ther
• Do not remo
• Do not remove the Fl
so as to avoid any r
•
The unit can only be insillustration II .
IMPORT
Some countries may r
Please check the laws and r
is of aluminum, consult with an el
Befor
CIRCUIT A
SHOCKS.
CHOOSE A MOUNTING LOC
• F
2.5 ~ 3.8 m.
• F
• Avoid aiming the motion sensor at pools, heating v
objects which may change temperatur
• T
pets may be detected
• Before mounting, pl
to all motion appearing acr
appearing directlSee Illustration III .)
INST
Make sur
based on the coverIllustration IV .
WIRING INSTRUCTION
1) Switch off the power sour
2) Remove the mounting brack
the bracket ont
Check that the bracket is securillustration V .
Note: at this stage, do NO
3) Strip appr
wire (if needed). Bef
firmly seated in its original plac
4) Connect the BROWN wir
Connect the BLUE wir
Connect the YELL
mark. (in case ther
5) Re-att
suitable clips (not included). Ensur
of the Floodlight and that ther
Floodlight to be titl
grasping the metal body of the Fl
6) Use the adjustment knob (5) to rot
position. (see illustration VI ).
SETTINGS
1) TEST MODE
• - T
the maximum setting.
- T
to the minimum setting.
- Turn the L
maximum ‘ ) setting.
• When you switch on the power
Preheating will t
Floodlight will turn on. When the Fl
when the sensor detects motion within 5~15 sec.
• Afterwar
now
• T
(dark), the light and sensor will not work when testing in daylight. If you c
the detection window by an opaque object (a towel f
turn on. When there is no motion signal, the light will turn off within 5-15 sec.
• Adjust the motion sensor to choose and set the desired det
a smaller detection field, point the sensor do
point the sensor up.
Attention: when testing in daylight, pl
position, otherwise the Floodlight will not turn on!
Note:
• Should be install
• Avoid ins
POSSIBLE PROBLEMS
When sensitivity is poor:
• Make sure that the detection window is
affect the sensitivity
• Make sur
• Make sur
• Mak
height (between 2.5 ~ 3.8 m)
• Mak
signals
SENS TIME LUX
Note: please r
manual befor
this product.
good
excell
ILLUSTRA
Illustration I
Illustration II
Illustration III
165°
meter
3
6
9
12
Illustration IV
When the Floodlight does not turn off automatic
• Make sure ther
• Make sur
• Make sur
• Make sur
caused by e.g. air condition, c
2) TIME ADJUSTMENT
The TIME adjustment determines how
long the Fl
last motion has been detected.
• Turn the motion sensor TIME knob
counter-cl
about 7 minutes) the amount of TIME
the Floodlight will st
• Turn the motion sensor TIME knob
clockwise to decr
10 seconds) the amount of TIME the
floodlight will stay on.
3) LUX AD
LUX knob det
will start working, so it actuall
sensor
• T
to the moon (dusk) ( )setting
In this pro
remains inactiv
• At dusk when you find it is the desir
start working, simpl
to become operativ
4) SENS ADJUSTMENT
SENS knob contr
detection ar
all motion within 5m, highest sensitivity =
detects all motion within 12m.
• T
counter-cl
sensitivity (lowes
meters)
• T
clockwise to decr
(highest le
OPERA
T
Floodlight will automatic
and on accor
TROUBLESHOOTING
Light does not turn on:
• Make sur
if the load is corr
Sensitivity is poor:
• Make sur
• Make sur
(also check “Settings / 1. test mode / possibl
Light remains ON:
• Make sur
• Make sur
• Make sur
Others
Consult your loc
regulations, …
SPECIFICA
Detection method Passiv
Power r 220 ~240 V / 50~60 Hz
Lighting Load Max. 20W LED
Operating Curr 600 mA
Power Cor H05RN-F, 3G, 1.0 mm²
Sensor Power
Prot Class I
W IP65
Operating
T -20° C to + 40°C
<12M at 20° C
SENSor adjustments
Swiveling Angle
Horizontal 330°
V
Detection Angle 165°
TIME Adjustment Fr
LUX adjus 3-2000 L
SENS adjustment 5~12 m
Mounting height 2,5~3.8m
Switch F SENS, TIME & LUX
Led Light Adjustments
Adjustabl V
SUPPORT
F@ quintezz.com or check
our website www
GUARANTEE
Copyright © Quintezz. Quintezz
®
is a regis
Quintezz
®
brand stands f-
vice.
®
warrants this pr
and workmanship for a period of two (2) y from the original pur
product. The t
®
under this warranty can be downl www.
Detects all
motion
within 12m
Detects all
motion
within 5m
Illustration V
Illustration VI
GB
QUINTEZZ LED SENSOR FL
Zie illustratie I
1) Floodlight
2) PIR Bewegingssensor
3) Bedradingskabel + connector
4) Bevestigingsbeugel
5) Instelknop
INLEIDING
UW QUINTEZZ LED Sensor Floodlight is een uniek indoor of outdoor
verlichtingssys
bewegingssensor schak
detectiegebied detecteert. De ingebouwde lichtsensor kan ov
wor
bepalen hoe lang de Fl
Standaar
dankzij de 3 verschill
1) SENS : de SENS instelknop r
de gevoeligheid, het detectieber
laagste gev
beweging binnen 5 meter detecteert,
hoogste gev
alle beweging binnen 12m.
2) TIME : de TIME instelknop bepaalt
hoe lang de Floodlight zal blijven
branden nadat de laatste bew
gedetecteer
is 10sec., De maximale tijd is 7min.
3)
LU : de LUX inst
lichtniveau de Floodlight zal beginnen
branden, m.a.w
ware de ingebouwde lichtsensor
.
VEILIGHEID
• Installeer het apparaat niet als het r
• Schakel de str
• Zorg ervoor dat de bedrading afk
geschikte zekering of een s
• Zor
Floodlight bevinden.
• Verwijder nooit de inst
• V
rot
• Het toest
illustratie II.
BELANGRIJK
Sommige landen ver
elektricien gebeurt. Contr
Als de bedrading in uw huis van aluminium is, dient u met een el
corr
van het verlichtingscir
schakel
KIES EEN MONT
• V
ondergr
• V
• Vermijd dat de bew
systemen, ventilatieopeningen, air
snel van temperatuur kunnen v
• Vermijd dat de Floodlight gericht is naar bomen of s
beweging van dier
• Al
bewegingssensor het mees
sensor heen begeeft en minder gevoelig is voor all
in de richting van de sensor verschijnt. Zie illustratie III
INST
Zorg erv
een locatie villustratie IV .
BEDRADINGSINSTRUCTIES
1) Schakel de str
2) V
de beugel op de wand met geschikte pluggen en schr
ControlZie illustratie V
O
pmerking: in dit stadium nooit de Fl
3) Verwijder ongeveer 6-8 mm isolatiegedeelte v
draad (indien nodig). V
oorspr
4)
V
V
V
markering. (in het gev
5) Be
muur met behulp van geschikte kl
kabel de Floodlight niet raakt en dat er v
te kunnen instell
nemen en de positie te bepalen.
6) Gebruik de instelknop (5) om de bewegins
rotzie illustr ).
INSTELLINGEN
1) TEST MODUS
• - Draai de SENS knop met de klok
mee tot de maximuminstelling.
- Dr
in tot de minimuminstelling.
-
Draai the L
tot de maximuminstelling ‘zon’
( ).
• Bij het inschakel
(passief) nog niet werk
bewegingssensor bew
W
de sensor binnen 5 ~ 15 sec beweging detecteert.
•
Laat hierna de Floodlight zichzelf aanschak
werken. Zolang er geen beweging gedet
• Draai de LUX knop tegen de kl
wer
bij daglicht. Als u het detectievens
een handdoek) bedekt, zal de lamp aanschakel
gedetecteer
• Draai/rot
V
grot
Opgelet: bij tes
(ZON), anders zal de Floodlight niet beginnen br
Nota:
• Moet wor
• V
MOGELIJKE PROBLEMEN
Indien de gevoeligheid minder of niet goed is:
• Zorg erv
en vuil aangezien deze de gevoeligheid kunnen beïnvl
• Zorg erv
• Zorg ervoor dat het te detect
detectieveld be
• Zorg ervoor dat de installatiehoogt
hoogte (tussen 2,5~3.8m).
• Zor
wer
Indien de Floodlight niet automatisch uit gaat:
• Zorg ervoor dat er zich geen c
detectieveld be
• Zorg ervoor dat de TIME-inst
• Zorg ervoor dat de str
• Zor
verander
2) TIME INSTELLEN
De TIME instelknop bepaalt hoe lang de
Floodlight zal blijven br
laatste beweging gedet
• Draai de TIME instelknop tegen de
klok in om de tijdsduur te v
(tot ong. 7 minuten)
• Draai de TIME instelknop met de klok
mee om de tijdsduur te verlagen (tot
ong. 10 sec.)
3) LUX INSTELLEN
De LUX ins
Floodlight zal beginnen branden, m.a.w
als het ware de ingebouwde lichtsensor
• Draai de LUX ins
de ‘maan’ ( )instelling (schemering).
In deze voorlopige instelling zal de bewegings
niet aanschakel
• Bij schemering wanneer u denkt dat het ideale
moment aangebrok
beginnen wor
de lamp operatief mag wor
schemeren.
4) SENS INSTELLEN
De SENS instelknop r
gevoeligheid, het detectieber
gevoeligheid = detect
binnen 5 meter
detecteert all
• Draai de SENS instelknop tegen de
klok in om de gev
(laagste niveau = binnen 5 m)
• Draai de SENS instelknop met de klok
mee om de gevoeligheid te v
(hoogste niveau= binnen 12 m)
WERKING
Schakel de wandschak
detecteert, wor
lichtsensor schakelt de sensor uit op basis van de licht en tijdniv
door de LUX en TIME knop.
PROBLEEMOPLOSSING
Floodlight gaat niet aan:
• Zorg ervoor dat u een juis
str
Slechte/v
• Zorg ervoor dat de L
• Zorg ervoor dat de SENS knop c
(zie ook “Instellingen/ 1. tes
Floodlight blijft branden:
• Zorg ervoor dat u een juis
• Zorg ervoor dat de TIME knop c
• Zorg ervoor dat de L
Andere
Raadpleeg uw plaatselijk
bescherming, regl
SPECIFICA
Detectiemethode Passief infr
Stroomv 220~240 V / 50~60 Hz
V Max. 20W LED
Normaal verbruik 600mA
Netsnoer ver H05RN-F, 3G, 1.0 mm²
Sensor Stroom
Beschermingsklasse Class I
W IP65
W
T -20° C to + 40°C
<12M bij 20° C
Sensorinstellingen
Draaibar
Horizontaal 330°
V
Detectiehoek 165°
TIME instellingen V
LUX ins 3-2000 LUX
SENS instellingen 5~12 m
Montagehoogte 2,5~3.8m
Schakelfuncties SENS, TIME & LUX
Instellingen LED lamp
Draaibar V
KLANTENONDERSTEUNING
V
support@ quintezz.com of kijk op onze websit
informatie.
GARANTIE
Copyright © Quintezz. Quintezz
®
is een gedeponeerd handelsmerk v
NV
®
staat voor pr
uitstek
®
dat dit product vrij is
van materiaal- en ftwee (2) jaar na de
oorspr
en de omvang van de ver
®
onder deze garantie kunt
u downloaden vanaf de wwww.
Opmerking: lees de voll
handleiding voor
de installatie van dit pr
NL
about
7 minutes
about
10 seconds
TIME TIME
Ongeveer
7 minuten
Ongeveer
10 seconden
SENS
SENS
Detects all
motion
within 12m
Detects all
motion
within 5m
Detecteert alle
beweging
binnen 12m
Detecteert alle
beweging
binnen 5m
LED SENSOR
FLOODLIGHT
USER’S MANUAL
DFR
DECLARA
1
2
4
5
3
complies with the essential r
2004/108/EC and 2006/95/EC on the appro
States r
The product has been t
applying ver
EN 55015:2006+A1:2007+A2:2009
EN 61547:2009
EN 61000-3-2:2006+A1:2009+A2:2009
EN 61000-3-3:2008
EN 60598-2-5:1998
EN 60598-1:2008+A11:2009
EN 62031:2008
EN 62493:2010
Joseph V
------------------ Manual/LED Sensor Fl
Copyright©Quintezz
about
7 minutes
about
10 seconds
TIME TIME
About
7 minutes
About
10 seconds
Company: TE-GROUP nv
Address: Kapelsestraat 61, 2950 Ka
declare, that the following
Product Name: Quintezz LED Sensor Floodlight
Product Type: LED Sensor Floodlight
Conforms with the followin
2006/95/EC
20W