722038
8
Verklein
Vergroot
Pagina terug
1/64
Pagina verder
8
Please Read Carefully Before Using The Device
This system is intended to be used only with 6V & 12V Lead Acid Batteries, e.g. Wet, Gel, AGM and 12.8V
4-cells LiFePO4. This charger is suitable to charge…
• 6 V batteries with a capacity of 12 - 120 Ah
• 12 V batteries with a capacity of 1.2 - 12 Ah
• 12 V batteries with a capacity of 12 - 120 Ah
• 12.8V 4-cells LiFePO4 Lithium batteries with a capacity of 8 - 50 Ah
Preparing The Battery
It is recommended to disconnect the battery from the car if possible. This will avoid possible damage to
the alternator, your car´s electronic system and damage to the bodywork from possible spillage. If you
remove the battery from the vehicle, always remove the grounded terminal from the battery at first. To
avoid sparks, make sure all accessories of the vehicle are turned off. A marine (boat) battery must be
removed and charged on shore. (To charge on-board requires special devices designed for marine use).
Follow your battery manufacturer´s precautions and preparatory measures, such as removing or not
removing cell caps while charging. Make sure the charging rate is not over your battery manufacturer´s
suggestion.
For permanently sealed batteries, it is not necessary to carry out the following checks. Don´t try to open
a sealed or maintenance-free battery.
Firstly remove the caps from each cell and check that the level of the liquid is sufficient in each cell. If it
is below the recommended level, top up with de-ionized or distilled water.
ATTENTION:
Under no circumstances should tap water be used. The cell caps should not
be replaced until charging is complete. This allows any gases formed during charging to
escape. It is inevitable that some minor escape of acid will occur during charging.
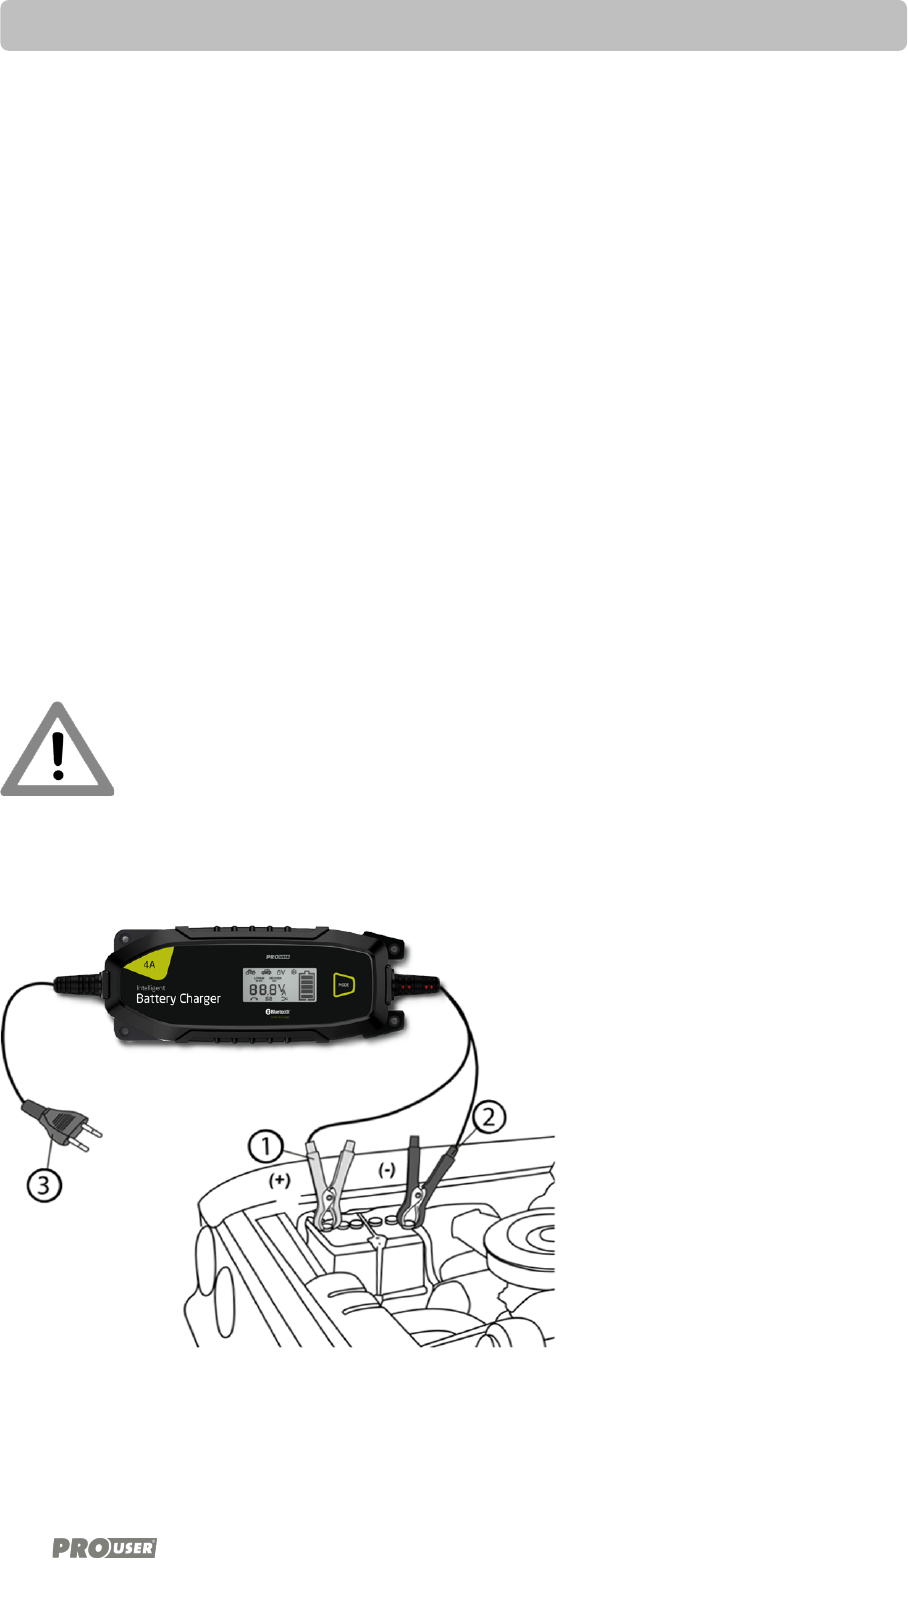
Connecting The Charging Cables
Connect the clamps to the battery in the following order:
1. Connect the positive charging lead
(RED) to the positive terminal post of
the battery (marked +).
2. Connect the negative charging lead
(BLACK) to the negative post of the
battery (marked -) or to the Chassis of
the car. Please do not connect to fuel
lineso or carburettor which are not
supposed to be connected.
It is important to ensure that all
connections are making good contact
with their respective terminal posts.
3. Now you can connect the charger to
the mains supply and start charging
by selecting the proper charging mode
as explained below.
OPERATION
8

Hulp nodig? Stel uw vraag in het forum

Spelregels

Misbruik melden

Gebruikershandleiding.com neemt misbruik van zijn services uitermate serieus. U kunt hieronder aangeven waarom deze vraag ongepast is. Wij controleren de vraag en zonodig wordt deze verwijderd.

Product:

Bijvoorbeeld antisemitische inhoud, racistische inhoud, of materiaal dat gewelddadige fysieke handelingen tot gevolg kan hebben.

Bijvoorbeeld een creditcardnummer, een persoonlijk identificatienummer, of een geheim adres. E-mailadressen en volledige namen worden niet als privégegevens beschouwd.

Spelregels forum

Om tot zinvolle vragen te komen hanteren wij de volgende spelregels:

Belangrijk! Als er een antwoord wordt gegeven op uw vraag, dan is het voor de gever van het antwoord nuttig om te weten als u er wel (of niet) mee geholpen bent! Wij vragen u dus ook te reageren op een antwoord.

Belangrijk! Antwoorden worden ook per e-mail naar abonnees gestuurd. Laat uw emailadres achter op deze site, zodat u op de hoogte blijft. U krijgt dan ook andere vragen en antwoorden te zien.

Abonneren

Abonneer u voor het ontvangen van emails voor uw Pro-User IBC4000 bij:


U ontvangt een email met instructies om u voor één of beide opties in te schrijven.


Ontvang uw handleiding per email

Vul uw emailadres in en ontvang de handleiding van Pro-User IBC4000 in de taal/talen: Nederlands, Duits, Engels, Frans als bijlage per email.

De handleiding is 3,21 mb groot.


U ontvangt de handleiding per email binnen enkele minuten. Als u geen email heeft ontvangen, dan heeft u waarschijnlijk een verkeerd emailadres ingevuld of is uw mailbox te vol. Daarnaast kan het zijn dat uw internetprovider een maximum heeft aan de grootte per email. Omdat hier een handleiding wordt meegestuurd, kan het voorkomen dat de email groter is dan toegestaan bij uw provider.

Uw handleiding is per email verstuurd. Controleer uw email

Als u niet binnen een kwartier uw email met handleiding ontvangen heeft, kan het zijn dat u een verkeerd emailadres heeft ingevuld of dat uw emailprovider een maximum grootte per email heeft ingesteld die kleiner is dan de grootte van de handleiding.

Er is een email naar u verstuurd om uw inschrijving definitief te maken.

Controleer uw email en volg de aanwijzingen op om uw inschrijving definitief te maken

U heeft geen emailadres opgegeven

Als u de handleiding per email wilt ontvangen, vul dan een geldig emailadres in.

Uw vraag is op deze pagina toegevoegd

Wilt u een email ontvangen bij een antwoord en/of nieuwe vragen? Vul dan hier uw emailadres in.


Info