● INDCE : SIGNIFICA: PREMERE IL PULSANTE N PER OL
SIGNIFICA: PREMERE IL PULSANTE N RAPIDAMENTE
{ N=NUMERO CHLIAVE: Pulsante MODE. Pulsante SET
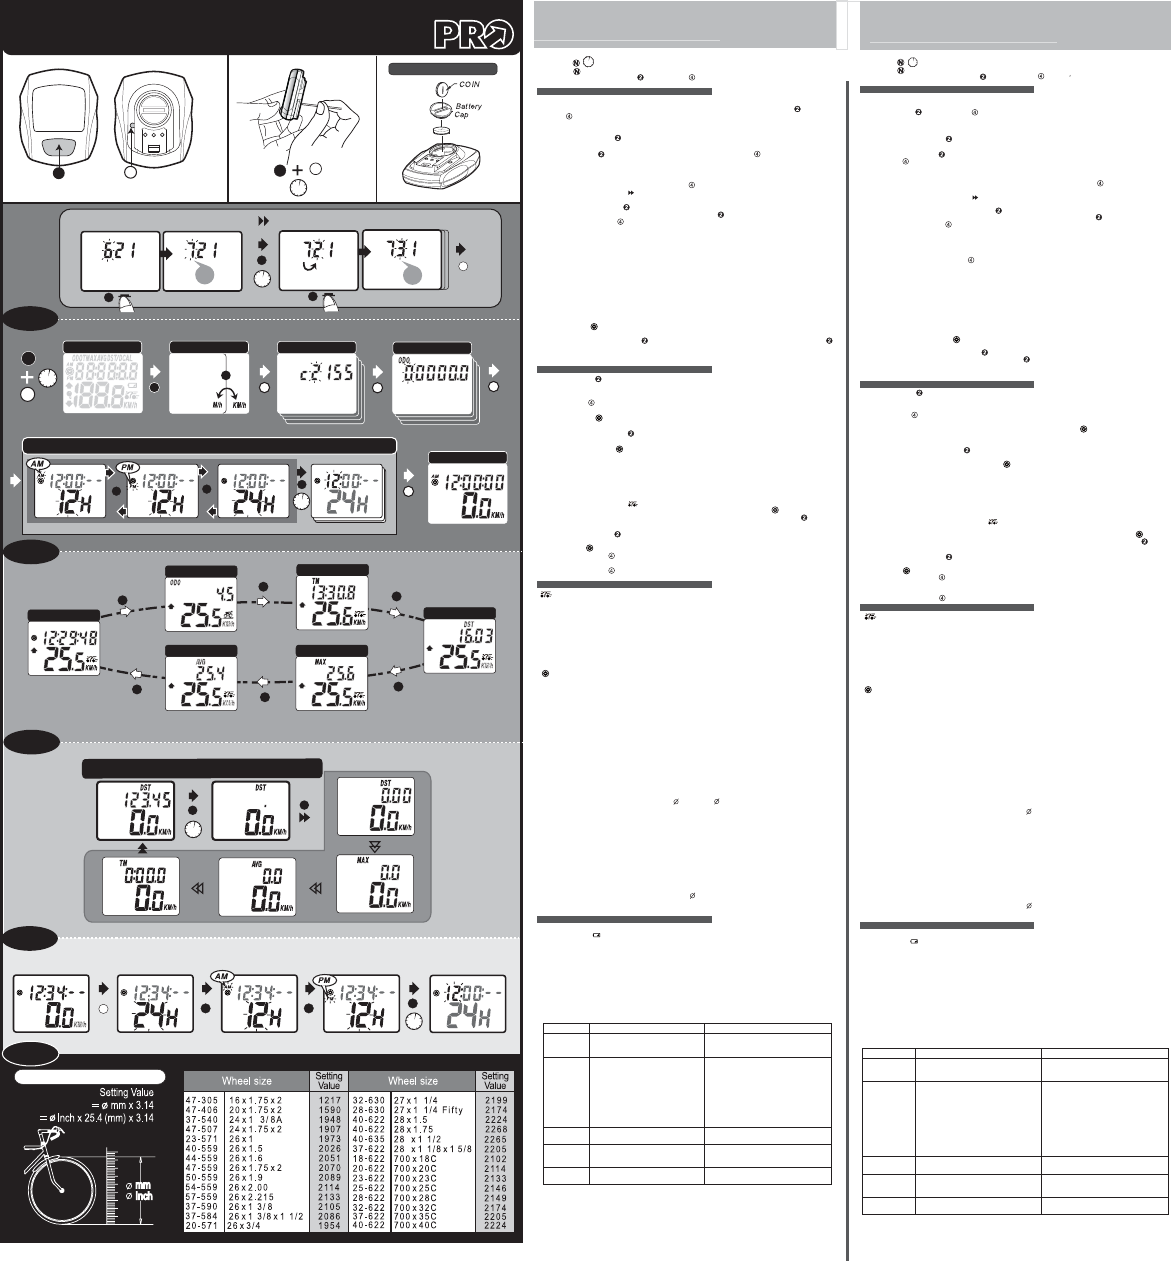
PREPARAZIONE DELL
Avvio del computer (azzeramento)
1. Al momento dell’acquisto l’unità principale è già dotata di una batteria. Premere contemporaneamente il
pulsante MODE e il pulsante SET per oltre tre secondi per avviare il computer e cancellare tutti i dati.
IMPORT
potrà fornire risultati errati.
2. Quando si avvia l’unità, viene effettuato un test automatico dei segmenti del display a cristalli liquidi (LCD).
3. Premere il pulsante MODE per interrompere il test LCD. L’indicazione “kM/h” lampeggia.
Scelta dell’unita’ di misura
Premere il pulsante MODE per selezionare km/h (chilometri all’ora) o Mile/h (miglia all’ora). Premere quindi il
pulsante SET per confermare la scelta.
Impostazione dei dati ODO
1. La funzione è stata studiata per conservare i dati di ODO quando la batteria viene sostituita. Un nuovo
utilizzatore non ha bisogno di inserire questi dati. Ogni pressione del pulsante SET avvia un processo di
impostazione dati.
2. Procedura di impostazione Dati (621 731): (Fig a)
A). Ogni elemento (cifra) dei dati viene regolato separatamente. L’elemento da modificare lampeggia.
B). Premendo rapidamente il pulsante MODE la cifra da regolare avanza di un’unità.
C). Per passare alla regolazione della cifra successiva, premere il pulsante MODE per più di due secondi.
D). Premere il pulsante SET per memorizzare i dati e passare alla regolazione successiva o al normale utilizzo.
Impostazione della circonferenza
1. Il display visualizza "c2155" che sta per il valore 2155 mm. Misurare il valore della propria ruota o fare
riferimento alla tabella riportata nel manuale della bicicletta.
2. Regolare la misura della circonferenza in base alle Procedura di impostazione Dati.
3. Dopo aver premuto il pulsante SET per memorizzare i dati desiderati, il display a cristalli liquidi (LCD)
passerà allo schermo di regolazione dell’orologio.
Circonferenza della ruota
● Misurazione precisa (Fig. 5-a.)
Posizionare la ruota di modo che la valvola si trovi nel punto più basso perpendicolare al terreno e segnare
per terra questo primo punto di contatto. Salire sulla bicicletta e farsi spingere leggermente in avanti finché la
ruota non compie un giro completo e la valvola non torna nel punto di partenza. Segnare questo secondo
punto di contatto sul terreno. Misurare la distanza tra i due punti in millimetri. Inserire questo valore come
circonferenza della ruota.
● Tabella rapida (Fig. 5-b.): Rilevare la circonferenza adeguata dalla tabella di riferimento.
Impostazione dell’orologio (Fig. b)
1. Viene visualizzato il simbolo " " sul display LCD.
2. Scelta delle opzioni 12H/AM, 12H/PM oppure 24H.
Premere velocemente il pulsante MODE per visualizzare l’orologio a 12 ore oppure 24 ore in sequenza.
T
dell’orario.(Fig. b)
3. Regolare l’orologio seguendo le Procedura di impostazione Dati.
PULSANTI e OPERAZIONI NORMALI
Pulsanti MODE (Fig. 2)
1. Premere rapidamente questo pulsante per spostarsi in sequenza dal display di una funzione all’altro.
2. Le funzioni che vengono visualizzate in sequenza durante la corsa sono: ODO.
Pulsante SET
Premere questo pulsante per entrare o uscire dagli schermi di regolazione quando si vuole reinserire la
circonferenza della ruota della bicicletta oppure si desidera regolare l’orologio " " per sincronizzarlo con l’ora
esatta.
Operazione RESET (Fig. 3)
1.T
quindi lasciare il pulsante. Il computer azzererà i dati memorizzati di DST
2. Il pulsante RESET non può azzerare i dati ODO .
Dispositivo di alloggiamento ON/OFF dell’unità principale
Questo computer è dotato di un dispositivo a scatto (brevettato) che accerta se l’unità principale è alloggiata
correttamente o meno nel supporto. Quando questa si trova fuori dal supporto, qualsiasi segnale di interferenza
senza fili viene disattivato. L’unità principale può ricevere il segnale (dalla ruota) solo quando è correttamente
alloggiata nel supporto.
START / ST
Il computer comincerà automaticamente il suo conteggio nel momento in cui si inizia la corsa, mentre smetterà
di conteggiare appena ci si ferma. Il simbolo " " lampeggiante significa che il computer si trova nello stato di
STAR
Per non consumare la batteria, il computer si spegne automaticamente e visualizza solo l’orologio " " quando
non viene utilizzato per circa 30 minuti. Si riaccenderà automaticamente premendo il pulsante MODE .
Reimpostazione di Circonferenza, Orologio(Fig. 4)
1. Premere il pulsante MODE per passare a una delle seguenti videate:
a). Passa alla videata ODO per inserire la circonferenza.
b). Passa a per regolare l’orologio. (Fig. b)
2. Premere il pulsante SET per accedere alla videata impostazioni.
3. Lo schermo visualizza il valore precedentemente impostato. Impostare il valore desiderato secondo le
Procedura di impostazione Dati.
4. Premere il pulsante SET per salvare i valori desiderati e completare l’impostazione.
FUNZIONI E SPECIFICHE
: Current Speed (velocità di corsa)--------0.0 - 199.9 km/h o 120.0 miglia/h +/- 1% (tipo)
1. La velocità di corsa viene sempre visualizzata nella parte alta del display. Esso indica la velocità di corsa fino
ad un massimo di 199,9 km/h o 120 miglia/h (per ruote con un diametro superiore a 24 pollici).
2. Quando la corsa viene interrotta, il calcolo della velocità prosegue per 4 secondi (per Bike 1) in attesa della
conferma che non sono stati inviati altri segnali dalla ruota.
ODO: ODOMETRO--------------------------------------------------------------0.0 - 99999.9 km o miglia +/- 0.1%
1. L’odometro misura la distanza totale percorsa dalla bicicletta.
2. Il dato ODO non può essere azzerato mediante l’operazione di RESET
TM: Riding time (tempo di corsa)------0M00.0S-59M59.9S,1H00M00S-99H59M59S +/- 0.003%
TM misura il tempo di corsa dall’ultima operazione di RESET
: Orologio a 12 ore o 24 ore------------0:00’00” – 12:59’59” AM/PM or 23:59’59” +/- 0.003%
Visualizza l’ora esatta. Può essere impostato a 12 o 24 ore.
DST: Trip distance (distanza del percorso)---------------------0.00 – 999.99 km o miglia +/- 0.1%
La funzione DST calcola la distanza dall’ultima operazione di RESET (azzeramento) fino a quando la bicicletta
non si ferma.
AV
1. La velocità media viene calcolata dividendo la DST (distanza del percorso) per TM. La media viene quindi
calcolata dall’ultima operazione di RESET (azzeramento) fino al punto attuale.
2. Quando TM è inferiore a 4 secondi, verrà visualizzato "0.0". Quando TM è superiore a 4 secondi, la funzione
viene aggiornata ogni secondo.
3. Quando TM è superiore alle 100 ore oppure DST è superiore a 1.000 km (o miglia), sul display compare il
simbolo "Err" (che significa Errore). Azzerare l’unità per ricominciare il conteggio.
MAX: Maximum speed (velocità massima)-------------0.0 – 199.9 Km/h o 120.0 miglia/h +/- 1%
La funzione MAX visualizza la velocità più elevata raggiunta dopo l’ultima operazione di RESET (azzeramento).
* NOTA: T
Sensore con trasmettitore: Sensore magnetico senza contatti con trasmettitore senza fili.
Dimensione della forcella: orcelle da 12 a 50 mm (da 0.5" a 2.0").
Distanza di percezione senza filo: 55 cm (1.8 piedi) tra il trasmettitore e l’unità principale
Interferenze: Fentro 40 cm (15.8"). Nessuna interferenza tra due biciclette equipaggiate
con ciclo-computer simili, quand’anche corressero l’una affianco all’altra.
Regolazione circonferenza ruota: da 1 mm a 3999 mm (incrementi di 1 mm)
Temperatura operativa: da 0°C a 50° C (da 32°F a 122°F)
Temperatura di stoccaggio: da -10°C a 60°C (da 14°F a 140°F)
Batteria dell’unità principale: 1 batteria da 3 V (tipo CR2032). La durata media della batteria è circa 2
anni, considerato un uso di 1.5 ore al giorno.
Batteria del trasmettitore: 1 batteria da 1.5 V (tipo LR44). La durata media della batteria è circa 2
anni oppure consente di percorrere 24,000 km/15,000 miglia.
(La batteria in dotazione può avere una durata inferiore, considerato il
tempo di spedizione e di stoccaggio dell’unità)
Dimensioni e Peso: Unità principale: 44.15 x 54.8 x 19.5mm/31.5g
Trasmettitore: 20.0mm x 48.0mm/14.1g
* Caratteristiche e modelli possono essere cambiati senza preavviso.
SOSTITUZIONE DELLA BA
1. Sostituzione della batteria dell’unita’ principale
a). Il simbolo " " apparirà per indicare che la batteria è quasi esaurita.
b). Sostituire la batteria vecchia con una nuova entro pochi giorni da quando è comparso il suddetto simbolo.
c). Sostituzione della batteria
Questo computer consente di richiamare i dati ODO che sono stati precedentemente registrati, dopo che la
batteria è stata sostituita. Registrare comunque per sicurezza i dati ODO prima di rimuovere la batteria
vecchia.
d). Sostituire la batteria vecchia con una nuova batteria CR2032. Avviare di nuovo l’unità principale.
2. Sostituzione della batteria del sensore (Trasmettitore)
a). Il circuito di trasmissione brevettato è studiato per ridurre il consumo di energia; una batteria da 1.5 V può
funzionare riuscendo a coprire una distanza di oltre 24,000 km (15,000 miglia) o restando in funzione per
due anni.
b). Sostituire questa batteria quando si sostituisce anche quella dell’unità principale, altrimenti la forza di
trasmissione del segnale della ruota sarà debole, e l’unità principale potrebbe riportare dei dati instabili.
c). Collocare la nuova batteria LR44 facendo attenzione che il polo positivo (+) sia rivolto verso il coperchio .
● IDENTIFICAZIONE DEI GUASTI
● PRECAUZIONI
1. Non lasciare l’unità principale sotto l’esposizione diretta dei raggi solari a meno che non si stia utilizzando la
bicicletta.
2. Non smontare l’unità principale o i suoi accessori.
3. Controllare periodicamente la posizione e la distanza tra sensore, magnete e unità principale.
4. Non utilizzare diluenti, alcool o benzina per pulire l’unità principale o i suoi accessori quando sono sporchi.
5. Ricordarsi di prestare attenzione alla strada durante la corsa.
1. Sostituire la batteria.
2. Assicurarsi che il polo positivo della batteria
sia rivolto verso il coperchio della batteria.
1. Fare riferimento alle istruzioni di effettuare
le operazioni in modo corretto.
2. Fare riferimento alle figure (Fig. C-a.)
correggere posizione e distanza.
3. Fare riferimento al paragrafo “
Circonferenza” ed inserire il dato corretto.
4. Fare riferimento alla (Fig. C-b.) per regolare
distanza o angolo tra unità principale e
sensore.
5. Sostituire la batteria.
6. Allontanarsi dalla fonte.
Fare riferimento al paragrafo “Preparazione
dell’unità principale” e riavviare il computer
Riporre l’unità principale all’ombra per
riportarla allo stato di normalità. Questo feno-
meno non compromette in alcun modo i dati.
Ritornerà allo stato normale appena la
temperatura aumenta.
PROBLEMA COSA CONTROLLARE RIMEDIO
Nessuna
indicazione sul
display
Non compare la
velocità di corsa
o i dati non sono
corretti
Visualizza- zione
irregolare
Il display è scuro
Il display è lento
1. La batteria è scarica?
2. La batteria è stata installata in modo
corretto?
1. Si è allo schermo di regolazione dell’unità
principale o dell’orologio?
2. Le posizioni relative e la distanza tra
sensore e magnete sono corrette?
3. La circonferenza impostata è corretta?
4. La distanza di percezione è troppa o
l’angolo di installazione non è corretto?
5. La batteria del sensore è quasi esaurita?
6. C’è una fonte di interferenza nelle
vicinanze?
L’unità principale è stata esposta ai raggi
diretti del sole per un periodo in cui la
bicicletta non era in movimento?
La temperatura è inferiore a 0°C (32°F)?
● INDEX: MEANS PRESS BUTTON N MORE THAN 2 SECONDS.
MEANS PRESS BUTTON N QUICKL
{N=KEYNUMBER: MODE Button. SET Button. }
MAIN UNIT SETUP (Fig. 1)
INITIATE THE COMPUTER (ALL CLEAR)
1. A
button simultaneously for more than 3 seconds to initiate the computer and clear all data.
IMPORT
errors.
2. The LCD segments will be tested automatically after the unit is initiated.
3. Press the MODE button to stop LCD test, then the flickering "KM/h".
UNIT SELECTION
Press MODE button to choose KM/h or M/h (Mile/h). Press the SET button to recognize either as
desired.
ODO DA
1. The function is designed to re-key in former data of ODO when battery is replaced. A
need to set this data. Each press of the SET button skips one setting data process.
2. Data Setting Processes (621 731): (Fig a)
A). The data is adjusted per each digit separately
B). Press the MODE button to increase the digital value by 1.
C). T
D). Press the SET button to store the data and change to the next setting.
CIRCUMFERENCE DA
1. It displays the “c2155”of the default value 2155mm. Measure the value for your wheel or refer to the
quick table provided in the manual for your bicycle.
2. Adjust the circumference data as described in the Data Setting Processes.
WHEEL CIRCUMFERENCE
● Precise Measurement (Fig. 5-a)
Roll the wheel until the valve stem is at its lowest point close to the ground, then mark this first point on
the ground. Get on the bicycle and have a helper push you until the valve stem returns to its lowest point.
Mark the second point on the ground. Measure the distance between the marks. Enter this value to set
the wheel circumference.
● Quick Table (Fig. N): Get a suitable circumference value from the table.
CLOCK SETTING (Fig. 5-b)
1. It displays the " " symbol at this clock setting.
2. 12H/AM, 12H/PM or 24H selection.
A quick press of the MODE button to select 12H/AM, 12H/PM or 24H. Hold down the MODE button
for more than 2 second to change to the clock setting screen.
3. Adjust the clock data according to the Data Setting Processes.
BUTTON and OPERA
MODE BUTTON (Fig. 2)
1. Quickly press this button to move in a loop sequence from one function screen to another.
2. It skips the ODO function data while it riding.
SET BUTTON
Press this button to get in or out the setting screens when you want to re-set to bike circumference or the
current time of the " ".
RESET OPERATION (Fig. 3)
1. Hold down the MODE button till the LCD digit is blanked, then release it. The computer will reset DST
AVG,
2. It cannot reset ODO and .
MAIN UNIT SLIDE ON/OFF DETECTION
The computer has a slide on detecting switch (patents pending) to avoid noise interference when the main
unit is removed from the bracket. The main unit can receive the wheel signal only when it is slid onto the
bracket only.
AUTOMA
The computer will automatically begin counting data upon riding and stop counting data when riding is
stopped. The flickering symbol " " indicates that the computer is at start status.
T
not been used for about 30 minutes. The power will be turned on by pressing the MODE button .
CIRCUMFERENCE, CLOCK RE-SETTING (Fig. 4)
1. Press the MODE button to change to one of the following mode displays:
a). Change to ODO screen to set Circumference.
b). Change to screen to set Clock. (Fig. b)
2. Press the SET button to enter to the relative setting screen.
3. Adjust the desired value according to the Data Setting Processes.
4. Press the SET button to store the desired data and complete the current setting.
FUNCTIONS and SPECIFICATIONS
: Current Speed-------------------------------0.0 – 199.9 Km/h or 120.0 Mile/h +/- 1% (Typical)
1. The current speed is always displayed on the Lower display when riding. It displays current speed up to
199.9 KM/h or 120.0 M/h (for wheel diameters of over 24 inches).
2. When riding is stopped, the speed will continue to count 4 seconds for Bike to confirm that no more
wheel signals have been sent.
ODO: Odometer-----------------------------------------------------------0.0 – 99999.9 Km or Miles +/- 0.1%
1. The odometer cumulates the total distance as long as the bike is running.
2. The ODO data can not be cleared to zero by RESET operation.
TM: Riding Time-------------------------0M00.0S-59M59.9S, 1H00M00S-99H59M59S +/- 0.003%
The TM totals the riding time from the last RESET operation.
: 12HR AM/PM or 24HR Clock------0:00’00” – 12:59’59” AM/PM or 23:59’59” +/- 0.003%
It can display the current time in 12HR AM/PM or 24HR clock.
DST: Trip Distance------------------------------------------------------0.00 – 999.99 Km or Miles +/- 0.1%
The DST function accumulates the distance data from the last RESET operation as long as the bike is
being ridden.
AV
1. It is calculated from the DST divided by the TM. The average data counted is from the last RESET to
current point.
2. It displays "0.0" when TM is less than 4 sec., and is updated by about one second when TM is over 4
seconds.
3. It displays an "Error" symbol when either the TM is over 100 hours or the DST is over 1,000km (or miles).
Reset the unit in order to restart.
MAX: Maximum Speed-----------------------------------------0.0 – 199.9 Km/h or 120.0 Mile/h +/- 1%
It shows the highest speed from the last RESET operation.
* Remarks: All functions’
Sensor with Transmitter: No Contact Magnet sensor with Wireless Transmitter
Suitable Fork Size: 12mm to 50mm (0.5" to 2.0" ) Forks.
Wireless Sensing Distance: 55cm (1.8 feet) between the transmitter and the main unit.
Cross-Talking Interference: Within 40 cm (15.8"), no interference by 2 bicycles carrying similar cycle
computers, even when ridden side by side.
Wheel Circumference Setting:1mm - 3999mm (1mm increment)
Operation Temperature: 0°C ~ 50°C (32°F ~ 122°F)
Storage Temperature: - 10°C ~ 60°C (14°F ~ 140°F)
Main Unit Battery Power: 3V battery x 1 (CR2032), battery operating life is about 2 years. (Based on
an average of 1.5 hours use per day)
Transmitter Battery Power: 1.5V battery x 1 (typical LR44). About 24,000km/ 15,000 miles riding
distance or 2 years battery operating life. (The original factory- attached
battery life may be shorter than this period due to shipping and storage time).
Dimensions and Weigh Main Unit: 44.15 x 54.8 x 19.5mm/31.5g
Transmitter: 20.0mm x 48.0mm/14.1g
* The specifications and designs may be changed without notice.
BATTER
1. MAIN UNIT BA
a). The symbol " " will appear to indicate the battery is nearly exhausted.
b). Replace the battery with a new battery within a few days after the symbol was appeared.
c). All data will be cleared when battery is replaced, but this computer allows you to re-key in ODO which
you had rode after replacing battery, keeping record these data before you remove the old battery
d). Replace with a new CR2032 battery and initiate the main unit.
2. BA
a). The patent-pending transmitter circuit is designed to reduce power consumption; a 1.5V battery
(typically an LR44) can operate for over 24,000km (15,000miles) riding distance or 2 years.
b). Replace a new battery when the transmitter’s battery power is nearly exhausted, otherwise the
transmission power of the wheel signal will be weak, causing the main unit to display unstable data.
c). Replace with a new LR44 battery with the positive (+) pole toward the sensor cap .
● TROUBLE SHOOTING
● PRECAUTIONS
1. Don’t leave the main unit exposed to direct sunlight when not riding the bike.
2. Don’t disassemble the main unit or its accessories.
3. Check relative position and gap of sensor, magnet and main unit periodically
4. Don’t use thinner, alcohol or benzine to clean the main unit or its accessories when they become dirty
5. Remember to pay attention to the road while riding.
1. Replace the battery.
2. Be sure that the positive pole of the
battery is facing the battery cap.
1. Refer to the setting procedure and
complete the adjustment.
2. Refer to (Fig. C-a.) and readjust
position and gap correctly.
3. Refer to "Circumference Setting" and enter
correct value.
4. Refer to (Fig. C-b.) to adjust distance or
angle between the main unit and the sensor.
5. Replace with a new battery.
6. Move away from the source of interference.
Refer to the "Main Unit Setup" and initiate the
computer again.
Place main unit in the shade to return to
normal state. No adverse effect on data.
Unit will return to normal state when the
temperature rises.
PROBLEM CHECK ITEMS REMEDY
Main unit No
display
No current
speed or
Incorrect data
Irregular
display
LCD is black
Display is slow
1. Is the battery dead?
2. Is there incorrect battery installation?
1. Is it at the MAIN UNIT SETUP or
another setting screen?
2. Are the relative positions and gap
between sensor and magnet correct?
3. Is the circumference correct?
4. Is the sensing distance too long or the
installation angle of the sensor incorrect?
5. Is the sensor battery nearly exhausted?
6. Is any strong interference source
nearby?
Did you leave main unit under direct
sunlight when not riding the bike for a long
period of time?
Is the temperature below 0°C (32°F)?
2s
2s
English
English
MAIN UNIT SETUP
WIRELESS COMPUTER
DIGI-W7
Italiano
Italiano
DIGI-W7
DIGI-W7
General Operation
OK
All Clear
Unit Selection
1-2
Circumference Setting
1-3
Odo Setting
1-4
1-5
4
2
2
2
BA
4
2
2 2
2
4
2
RIDING ST
ODO
TM
MAX
AVG
DST
2
2
2
2
2
2
ClOCK
2
MODE
4
SET
S
1.5V LR44
2
2
+1
+1
4
DA
a.
2
Ok!
621 731
4
2
4
4
4
CLOCK SETTING
b.
3s
2s
3s
Fig.1
Fig.2
Fig.3
Reset (TM=0, DST=0, MAX=0,
2s
Fig.4
WHEEL CIRCUMFERENCE
2s
2s
2
2
2
Fig.5
5-b.
5-a.
LCD
SEGMENTS
AUTO TEST
CLOCK RE-SETTING