1
Befor
What’
• AC adapter × 1
• P
• R
• Lithium
*
remote control unit.
• W
• Operating
Before using the r
The batter
casing. Remove the protective seal from the battery casing.
Note
• When you notice a decrease in the operating range, replace
the battery.
Replace the battery
When replacing the batter
Lithium CR2025 batter
1 Flip the remote contr
battery holder by pushing the tab to the
right.
2 Place a new battery in the casing.
Make sure the + side of the batter
you place it in the space provided.
3 Push back the battery holder
1
1
3
2
The batter
operations; it may not last over a long period.
WARNING
About lithium batter
• Danger of explosion if battery is incorrectly replaced.
Replace only with the same or equivalent type
recommended by the manufacturer
• Dispose of used battery cells immediately after
replacement. Keep away from children. If swallowed,
please contact a doctor immediately
• Lithium batteries may present a fire or chemical burn
hazard if misused. Do not disassemble, heat above 100 ºC,
or incinerate.
• Do not use or store batteries in direct sunlight or other
excessively hot place, such as inside a car or near a heater
This can cause batteries to leak, overheat, explode or catch
fire. It can also reduce the life or performance of batteries.
Caution
Incorrect use of batteries may result in such hazards as
leakage and bursting. Obser
• R
month or more. In the event of batter
up any fluid inside the case and install a new batter
• When disposing of used batteries, please comply with
governmental regulations or environmental public
institution’s rules that apply in your country or area.
Mounting the power plug
Slide the power plug along the guide rails in the AC adapter
unit as shown on the diagram below
click is heard.
PUSH
PUSH
Removing the power plug
While pressing the [PUSH ] button on the AC adapter unit,
slide the power plug away from the adapter as shown on the
diagram below to remove it.
Once the power plug is mounted, there is no need to remove
it.
PUSH
Power plug
This product comes with the types of power plugs shown
below
region you are in.
T T
Connect DC Power
• Connect the AC adapter’s DC plug to the DC IN jack on the
back panel. Then connect the power plug on the other end
to the power outlet.
• Use only the AC adapter included in this package. (Do not
use the power adapter of different specification.)
Power
outlet
Vol input
pairing
DC IN 14V
USB AUX IN
5V 1A
2
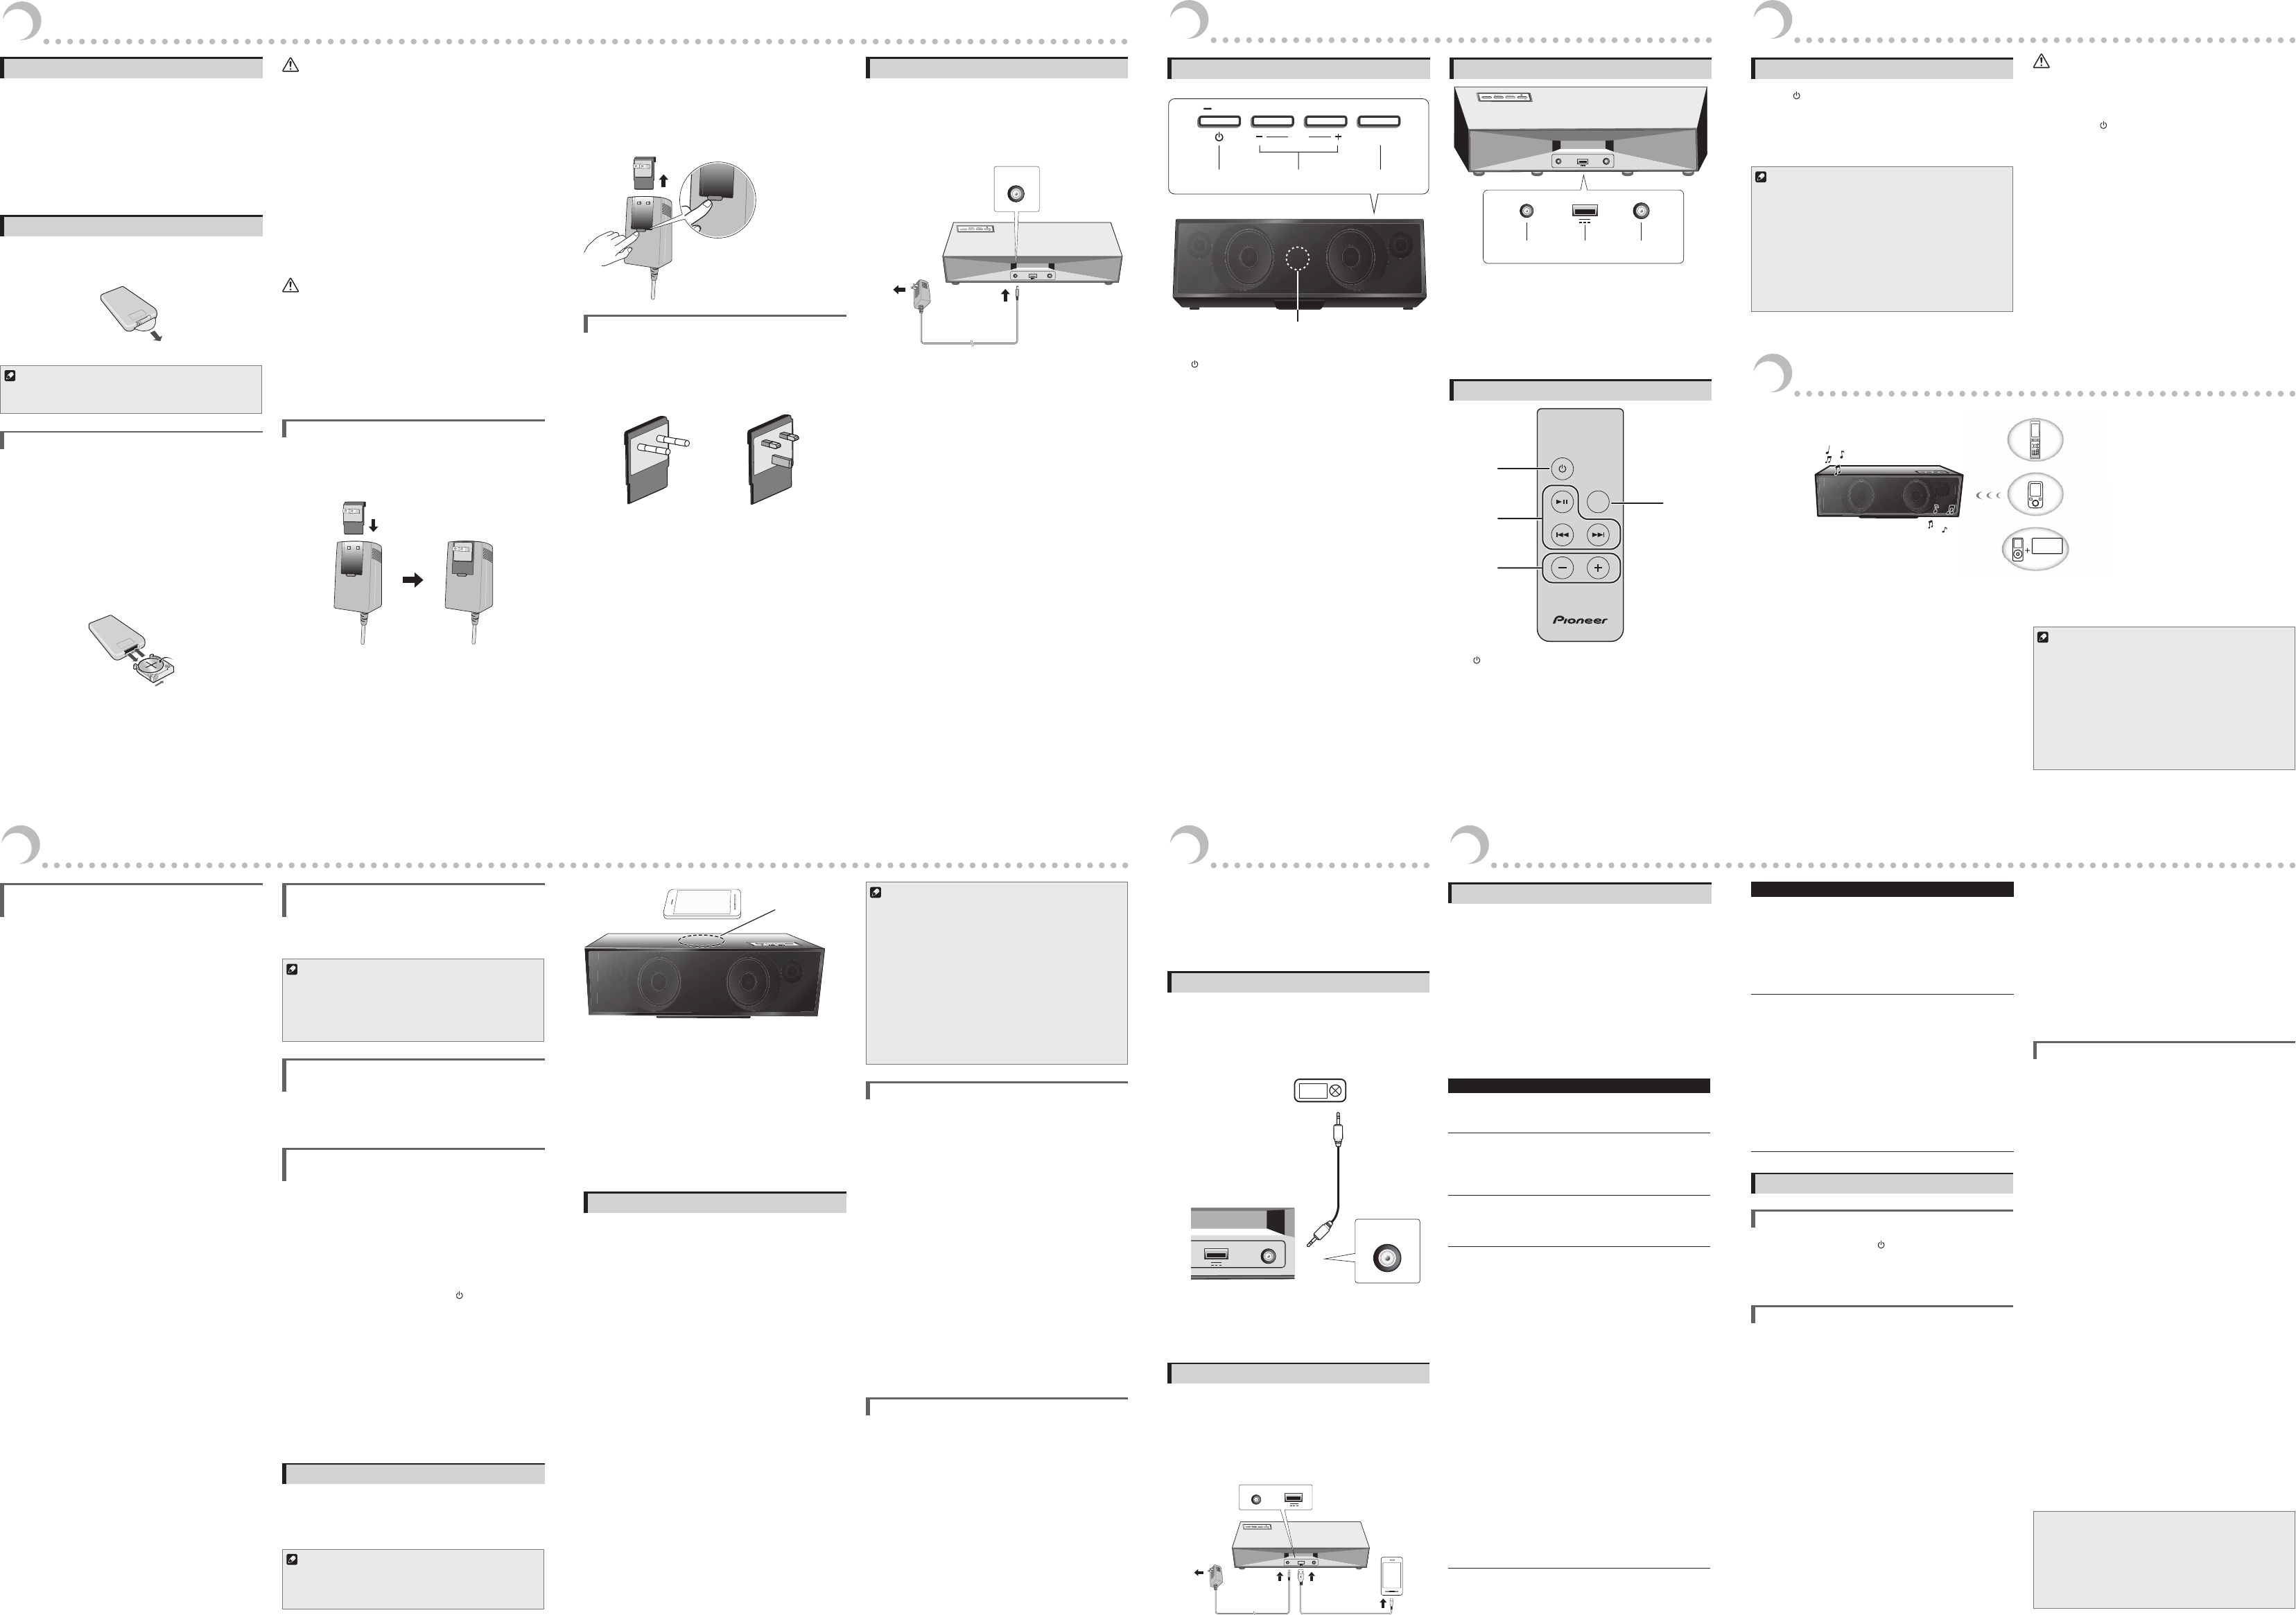
Part names and functions
T
Vol input
pairing
12 3
4
1 standby/on button
• Switches the unit between Standby and On
• PBluetooth
device.
2 V
button
Adjust the listening volume.
• The listening volume has a range from 0 to 29
(however
visually indicate the volume level).
(Default setting: 11)
• If the volume is set within the range of 23 to 29, it will
be set to 23 automatically when the unit switches
from standby mode to power on.
3 input button
Switch the mode of Bluetooth and AUX.
4 input Indicator (The LED indicator is inside
the grill on the front panel.)
• Light up Indicate green when the unit is in A
mode.
• Light up Indicate blue when the unit is in Bluetooth
mode.
• Blink blue during waiting for Bluetooth connection.
• Blink blue quickly for Bluetooth pairing.
Back Panel
1
USB AUX IN
3
Vol input
pairing
USB AUX IN
5V 1A
5V 1A
1 DC IN 14V Jack
Connect the AC adapter
2 USB connector
Use to charge the smartphone. Audio playback is not
supported. (Specification: 5V
3 AUX IN Jack
Connect auxiliar
Remote Control
input
vol
1
2
3
4
1 standby/on button
Switches the unit between Standby and On.
2 Playback control buttons
Use when operating the smartphone with this remote
control.
3 vol –/+ button
Use to adjust the listening volume.
4 input button
P
3
Getting started
T
P [standby/on ] button. The indicator would light.
• The unit switches to the mode (Bluetooth mode or AUX
mode) that was last used.
• The unit will be in Bluetooth mode when it is turned on
for the first time (when the AC adapter is connected to a
power outlet).
Note
• If no sound is output on this unit for 10 minutes or longer
power turns off automatically (switch to standby mode).
• If the sound is played at low volume, this unit may turn the
power off (switch to standby mode) automatically
the volume to prevent this from happening.
• If this unit automatically turns off (switches to standby mode)
in AUX mode, the power will automatically turn on if an audio
signal is input from an external device connected via the
AUX jack.
• If this unit automatically turns off (switches to standby mode)
in Bluetooth mode, the power will not turn on automatically
Caution
• Although the indicator light remains off while the unit’s
power is off (in standby mode), there is still power flowing
to the unit at this time.
• If
pressing the
[standby/on ] button, the power will not
automatically turn on even if an audio signal is input from
an external device connected via the AUX jack.
4
Bluetooth Audio playback
VOL
INPUT
The unit
Music
data
Bluetooth wireless technology
enabled device:
Cell phone
Bluetooth wireless technology
enabled device:
Digital music player
Device not equipped with Bluetooth
wireless technology:
Digital music player
+
Bluetooth audio transmitter
(commercially available)
This product enables you to enjoy listening to music wirelessly
from a Bluetooth wireless technology enabled device (cell
phone, digital music player
from a non-Bluetooth wireless technology enabled device
using a Bluetooth audio transmitter available in stores. For
details, refer to the user manual for the Bluetooth wireless
technology enabled device.
This unit supports the SCMS-
Music from Bluetooth wireless technology enabled devices
which support the SCMS-
played back.
Note
• The Bluetooth wireless technology enabled device must
support A2DP profiles.
• Pioneer does not guarantee proper connection and operation
of this unit with all Bluetooth wireless technology enabled
devices.
• The Bluetooth® word mark and logos are registered
trademarks owned by Bluetooth SIG, Inc. and any use of such
marks by PIONEER CORPORA
trademarks and trade names are those of their respective
owners.
Pairing this unit and Bluetooth
wireless technology device
TBluetooth wireless technology enabled
device, pairing is required with this product. Make sure to
perform pairing first time you operate the system or any time
pairing data is cleared.
P
Bluetooth wireless technology
manual of the Bluetooth wireless technology enabled device.
• PBluetooth wireless
technology device and this unit.
• Up to eight Bluetooth wireless technology devices can be
paired with the unit at one time.
• TBluetooth communication, pairing should be
done with both of your system and Bluetooth wireless
technology device.
1 Select Bluetooth mode. The input indicator
inside the grill on the front panel blinks blue
quickly and the unit will enter the pairing
mode.
2 Switch on the Bluetooth wireless technology
device that you want to perform pairing
with, place the device within 1 m of the
system, and set it to the pairing mode.
P
• “PBluetooth
wireless technology device to enable Bluetooth
communications. For more details, see also the
operating instructions of your Bluetooth wireless
technology device.
• In case of entering PIN code, use “0000”. ( Only
“0000” works for PIN code in this product. )
3 When Bluetooth wireless technology device
has connected, the input indicator will
change from blinking to lit.
4 Start playback of music contents stored in
Bluetooth wireless technology device.
Controlling devices with the
remote contr
The remote control that came with the unit can be used to
control Bluetooth -enabled devices.
Note
• In order for it to be able to be controlled using the remote
control for the unit, the Bluetooth -enabled device must
support the AVRCP profile.
• The remote control is not guaranteed to work with all
Bluetooth-enabled devices.
Connect the Latest Bluetooth
wireless technology Device
When the unit is switch on again to Bluetooth mode next
time, it will be connected automatically with equipment that
has the latest connected device already
Connect previous PairBluetooth
Device
1 If you want to connect other paired device
instead of the latest paired one, please make
sure the Bluetooth connection of the latest
device dis-connect. Then, the input indicator
inside the grill on the front panel blinks
quickly and the unit will change the waiting
for connection mode.
You can also continue pressing the [standby/on ]
button so that the unit switches to waiting for
connection mode, and then move on to the next step.
2 Switch on other paired device, and select this
unit from this device Bluetooth list.
3 Connection with other devices is successful,
the blue input indicator will change from
blinking blue to lit.
Operating range of Bluetooth audio is up to 10 m.
(Measured in open space. W
affect range of device.)
Connect with NFC / Pairing
NFC stands for “Near Field Communication” which enables
establishing Bluetooth connection and paring by simply
performing a few operations af
smartphone up close to the unit.
Note
• Supported OS: Android 4.1 and above
• This may not operate properly
or tablet device.
Volinput
pairing
N Mark
1 Check to make sure that the unit power is on
and then switch the unit to Bluetooth mode.
2 Hold the device to be connected up close to
the unit in the N Mark.
3 Pairing automatically begins.
4 When pairing is successful, the unit can be
used as Bluetooth speakers and music can be
played back wirelessly.
The NFC function on this unit can be used when the unit
is in Bluetooth mode.
Radio wave caution
This unit uses a 2.4 GHz radio wave frequency
band used by other wireless systems (see list below). T
prevent noise or interrupted communication, do not use this
unit nearby such devices, or make sure these devices are
switched off during use.
• Cordless phones
• Cordless facsimiles
• Microwave ovens
• W
• W
• W
• Microwave-based health aids
• Some baby monitors
Other
same frequency
• Anti-thef
• Amateur
• W
• Discrimination systems for train or emergency vehicles
Note
• In the event noise appears in your television image, there is
the possibility that a Bluetooth wireless technology enabled
device or this unit (including products supported by this
unit) are causing signal interference with the antenna input
connector of your television, video, satellite tuner
this event, increase the distance between the antenna input
connector and the Bluetooth wireless technology enabled
device or this unit (including products supported by this unit).
• If there is something obstructing the path between this unit
(including devices supported by this unit) and the device
equipped with Bluetooth wireless technology (such as a
metal door
you may need to change the location of your system to
prevent signal noise and interruptions.
Scope of operation
Use of this unit is limited to home use. (T
distances may be reduced depending on communication
environment.)
In the following locations, poor condition or inability to receive
radio waves may cause the audio to be interrupted or stopped:
• In reinforced concrete buildings or steel framed or
ironframed buildings.
• Near large metallic furniture.
• In a crowd of people or near a building or obstacle.
• In a location exposed to the magnetic field, static electricity
or radio wave interference from radio communication
equipment using the same frequency band (2.4 GHz)
as this unit, such as a 2.4 GHz wireless LAN device or
microwave oven.
• If
townhouse, etc.) and if your neighbor
placed near your system, you may experience radio wave
interference. If this occurs, move your unit to a different
place. When the microwave is not in use, there will be no
radio wave interference.
Radio wave reections
The radio waves received by this unit include the radio wave
coming directly from the device equipped with Bluetooth
wireless technology (direct wave) and waves coming from
various directions due to reflections by walls, furniture
and building (reflected waves). The reflected waves (due to
obstacles and reflecting objects) further produce a variety
of reflected waves as well as variation in reception condition
depending on locations. If the audio cannot be received
properly due to this phenomenon, try moving the location
of the device equipped with Bluetooth wireless technology
a little. Also note that audio may be interrupted due to the
reflected waves when a person crosses or approaches
the space between this unit and the device equipped with
Bluetooth wireless technology
5
Other Connections
• Before making or changing the connections, switch off
the power and disconnect the AC adapter from the power
outlet. Be sure to connect the AC adapter last.
• When playing music through A
volume will var
player
lower the music player
Connecting auxiliary components
1 Connecting auxiliary components
Connect the back panel AUX IN jack to the analog
output jack (or headphone output jack) of the device to
be connected using the commercially available stereo
mini-plug cable.
USBAUX IN
AUX IN
5V 1A
Digital audio player
etc.
Stereo mini-plug cable
(commercially available)
This unit’s back panel
2 Press [input] button.
Input indicator : green
3 Start playback of the auxiliary component.
Charging auxiliary components
Smartphones can be charged when they are connected to the
unit using a commercially available USB cable.
1 Turn on the unit.
2 Use the USB cable to connect the unit and
the smartphone.
The smartphone will start charging.
Vol input
pairing
USB AUX IN
5V 1A
5V 1A
USB
6
Additional Information
4
Bluetooth Audio playback
T
Incorrect operation is often mistaken for trouble or
malfunction. If you think that there is something wrong with
this component, check the points below
trouble may lie in another component. Inspect the other
components and electrical appliances being used. If the
trouble cannot be rectified even after checking the points
below
your dealer to carr
• If the unit does not operate normally due to external effects
such as static electricity
the outlet and insert it again to return to normal operating
conditions.
Problem Remedy
The power does
not turn on.
• Disconnect the power plug from the outlet,
and insert again.
gChapter 1
P
automatically
switches to
standby without
user action.
• When this unit is not operated for
10 minutes or more, power will
automatically turn OFF
gChapter 3
No sound is
output when a
AUX mode is
selected.
• Make sure the component is connected
correctly
gChapter 5
The Bluetooth
wireless
technology
device cannot
be connected
or operated.
Sound from
the Bluetooth
wireless
technology device
is not emitted
or the sound is
interrupted.
• Check that no object that emits
electromagnetic waves in the 2.4 GHz
band (microwave oven, wireless LAN
device or Bluetooth wireless technology
apparatus) is near the unit. If such an
object is near the unit, set the unit far from
it. Or
electromagnetic waves.
• Check that the Bluetooth wireless
technology device is not too far from the
unit and that obstructions are not set
between the Bluetooth wireless technology
device and the unit. Set the Bluetooth
wireless technology device and the unit
so that the distance between them is less
than about 10 m* and no obstructions
exist between them.
* The distance given is to be used as a
rough guide. The actual allowable distance
between devices may vary depending
on conditions in the surrounding
environment.
• The Bluetooth wireless technology device
may not be set to the communication
mode supporting the Bluetooth wireless
technology
Bluetooth wireless technology device.
Problem Remedy
• Check that pairing is correct. The pairing
setting was deleted from this unit or the
Bluetooth wireless technology device.
Reset the pairing.
• Check that the profile is correct. Use a
Bluetooth wireless technology device that
supports A2DP profile.
gChapter 4
P
performed using
the NFC function.
• Does the device to be connected support
NFC?
• Is the NFC function on the device to be
connected turned on?
• When pairing devices, move the N Mark
on this unit close to where the NFC
antenna on the device to be paired.
• Is the unit in Bluetooth mode?
• Use a compatible device with Android OS
4.1 or later
• This may not operate properly, depending
on the smartphone or tablet device.
gChapter 4
Cautions on use
When moving this unit
When moving this unit, press [standby/on ] button, and
then unplug the power cord.
Damage may occur when another device is connected to the
AUX IN jack.
Place of installation
• Do not place this unit on top of a TV or color monitor
install it away from cassette decks and other devices easily
affected by magnetic forces.
• Avoid the following locations:
•
•
•
•
•
•
Do not place objects on this unit.
Do not place any objects on top of this unit.
Do not attach this unit to the wall or ceiling. It may fall off and
cause injur
Do not obstruct the ventilation holes.
Do not use this unit on shaggy rugs, beds, sofas, etc., or
wrapped in cloth, etc. Doing so will prevent the heat from
dispersing, leading to damage.
Do not expose to heat.
Do not place this unit on top of an amplifier or other
components that generate heat. When rack mounting it, to
avoid the heat given off by the amplifier or other audio
components, place it on a shelf below the amplifier
T
Depending on signal conditions, striped patterns may appear
on a TV screen and noise may enter the sound of radio
broadcasts when the power of this unit is on. If this happens,
turn off the power of this unit.
Cleaning the this unit
• Unplug the power cord from the power outlet when
cleaning this unit.
• Clean this unit using a sof
some neutral detergent diluted in 5 to 6 parts water to a
soft cloth, wring out thoroughly, wipe off the dirt, and then
wipe again with a soft, dr
• Alcohol, thinner
the print or paint to peel off
products in contact with this unit for long periods of time
could mar the cabinet.
• When using chemical-impregnated wipes, etc., read the
cautions included with the wipes carefully
• © 2012 CSR plc and its group companies. The aptX® mark
and the aptX logo are trade marks of CSR plc or one of its
group companies and may be registered in one ormore
jurisdictions.
• The N Mark is a trademark or registered trademark of NFC
Forum, Inc. in the United States and in other countries.
• Android is a trademark of Google Inc.
P
outlet