.
IN.
.
.
IN.
IN.
IN.
IN.
• Prima di collegare l’apparecchio, controllate
che la tensione indicata sull’apparecchio
corrisponda a quella della rete locale.
• Non appoggiate l’apparecchio su una
superficie calda.
• Togliete immediatamente la spina dalla
presa di alimentazione:
- nel caso si verificassero problemi durante
la preparazione del caffè
- prima di procedere alla pulizia
dell’apparecchio.
• Evitate che il cavo di alimentazione venga a
contatto con superfici calde.
• Durante l’uso, tenete l’apparecchio lontano
dalla portata dei bambini.
Fate in modo che non possano tirare il cavo
di alimentazione.
• Non utilizzate l’apparecchio nel caso in cui il
cavo di alimentazione, la spina o
l’apparecchio risultassero danneggiati.
Vano del cavo di alimentazione
Potete riporre il cavo in eccesso nell'apposito
vano posto sul retro dell'apparecchio.
Quando usate la macchina del caffè per la
prima volta
- Regolate l'ora (ved. il cap. "Regolazione
dell'ora").
- Fatela funzionare per una volta senza usare il
caffè (ved. il cap. "Preparazione del caffè").
- Pulite poi le parti staccabili dell'apparecchio
come descritto nel cap. "Pulizia".
Regolazione dell'ora (fig. 2-4)
- Inserite la spina nella presa di alimentazione.
Nel display vedrete lampeggiare la parola SET
(fig. 2).
- Premete il pulsante HOUR (ora). Le ore nel
display inizieranno a scorrere (fig. 3).
Mantenete il tasto premuto per più di 2 secondi
per far scorrere le ore velocemente. Premete il
pulsante brevemente per regolare l'ora esatta.
- Ripetete l'operazione con il pulsante MIN
(minuti). I minuti nel display inizieranno a
scorrere (fig. 4).
L'orario sul display rimarrà visibile fino a quando
l'apparecchio sarà collegato alla presa di
alimentazione.
I due puntini lampeggeranno continuamente
dimostrando così che l'orologio è in funzione.
Preparazione del caffè: ved. le illustrazioni
(fig. 5-17)
- Riempite il serbatoio con acqua fredda
solamente.
I livelli posti a sinistra indicano le quantità per
le tazze grandi (125 ml).
I livelli posti a destra indicano la quantità per le
tazze piccole (85 ml).
- Usate filtri di carta mod. 1x4 o nr. 4.
Ricordatevi di piegare i bordi.
Con alcuni modelli viene fornito un filtro
permanente. In questo caso i filtri di carta non
sono più necessari.
- Per ogni tazza grande, usate un misurino ben
colmo di caffè macinato (tipo Fast Filter).
Per ogni tazza piccola, usate un misurino raso
di caffè.
Ferma gocce
Il "ferma gocce" (la valvola di fermo automatica)
evita che il caffè goccioli sulla piastra di
riscaldamento quando togliete il bricco mentre
l'apparecchio sta preparando il caffè e quando
togliete il bricco dalla piastra dopo aver preparato
il caffè.
Nota: Il "ferma gocce" permetterà al caffè di
scendere nel bricco solamente se questo avrà il
coperchio.
Importante: Non aprite mai il filtro quando
l'apparecchio sta erogando il caffè.
Spegnimento automatico
Per comodità e per la vostra sicurezza: se non
avete spento la macchina del caffè, dopo 2 ore si
spegnerà automaticamente.
Indicatore dell'ultimo caffè preparato
Nel display potrete inoltre leggere il tempo
trascorso dall'ultima erogazione di caffè.
Questo orario è preceduto dalla lettera "F"
(= fresco: appena erogato).
Avrete così la possibilità di sapere se il caffè
rimasto è ancora fresco.
Volete preparare dell'altro caffè subito dopo?
Se avete appena preparato il caffè e volete
prepararne dell'altro subito dopo, spegnete la
macchina del caffè (fig. 17) e lasciatela
raffreddare per tre minuti.
Poi procedete alla nuova preparazione
riempendo il serbatoio.
Italiano
Accensione automatica
Se avete
- messo il caffè macinato nel filtro;
- versato l'acqua nel serbatoio
- regolato l'ora ....
- ed il timer
- e premuto il pulsante AUTO (la spia luminosa
gialla sarà accesa)
la macchina del caffè erogherà
automaticamente il caffè all'ora che avrete
selezionata.
Regolazione del timer
- Controllate se sul display appare l'ora esatta
(in caso contrario, ved. il cap. "Regolazione
dell'ora").
- Premete il pulsante "AUTO". La spia luminosa
gialla si accenderà (fig. 22) e l'ora sul display
sparirà.
- Premete il pulsante HOUR (ora). Le ore nel
display inizieranno a scorrere (fig. 23).
Mantenete il tasto premuto per far scorrere le
ore velocemente. Per regolare l'ora esatta
premete il pulsante brevemente per far
scorrere le ore una alla volta.
- Con lo stesso procedimento premete il
pulsante MIN (minuti). I minuti sul display
inizieranno a scorrere (fig. 24).
N.B.se aspettate più di 10 secondi prima di
premere il pulsante MIN o HOUR, sul display
apparirà nuovamente l'ora normale.
In questo caso dovrete ripetere l'operazione
premendo nuovamente il pulsante AUTO.
- Dopo aver regolato il timer, sul display
riapparirà l'ora normale.
- Quando la macchina del caffè si accenderà
automaticamente all'ora selezionata, la spia
luminosa gialla si spegnerà e la lampada spia
rossa si accenderà.
• L'ora selezionata rimarrà in memoria. La
macchina del caffè però si riaccenderà
automaticamente solamente se avrete premuto
nuovamente il pulsante AUTO (la spia
luminosa gialla sarà accesa).
• Se venisse a mancare la luce, o se la spina
venisse tolta dalla presa di alimentazione, l'ora
esatta ed il timer dovranno essere regolati
nuovamente.
Controllo dell'ora selezionata
- Premete il pulsante AUTO. Sul display, per
10 secondi, apparirà l'ora regolata per
l'erogazione del caffè.
La spia luminosa gialla si accenderà per
indicare che l'accensione automatica è già
stata selezionata.
Come annullare la funzione "AUTO"
- Se la macchina del caffè è stata regolata
sull'accensione automatica (la spia luminosa
gialla è accesa), potete disattivare il timer
premendo una volta il pulsante ON-OFF .
La spia luminosa gialla si spegnerà.
- Se in seguito vorrete fare del caffè, premete
ancora una volta il pulsante ON-OFF.
La spia luminosa rossa si accenderà.
Pulizia
• Prima di pulire l'apparecchio togliete sempre la
spina dalla presa di alimentazione.
• Non immergete mai l'apparecchio nell'acqua,
pulitelo invece con un panno umido.
• Pulite le parti staccabili con acqua calda e
detersivo.
Risciacquatele con acqua calda ed asciugatele
poi con cura; si possono lavare anche in
lavastoviglie.
La decalcificazione
Decalcificate regolarmente la macchina del caffè.
Con un normale uso (due bricchi al giorno)
osservate queste regole:
• se la durezza dell'acqua è fino a 18° DH -
2 o 3 volte all'anno
• se la durezza dell'acqua è superiore a
18° DH - 4 o 5 volte all'anno.
Potete informarvi della durezza dell'acqua di casa
vostra rivolgendovi al vostro acquedotto.
- Fate funzionare per due volte l'apparecchio.
Riempite però il serbatoio con normale aceto
bianco e non usate il caffè.
- Per togliere il sapore di aceto ed i depositi
calcarei, ripetete ancora due volte l'operazione
usando solamente acqua.
- Lavate il bricco, il coperchio ed il porta filtro.
Sostituzione del bricco
Per ordinare un bricco supplementare, rivolgetevi
al vostro rivenditore abituale o ad uno dei
numerosi Centri di Assistenza Philips chiedendo il
mod. HD 7908 (nr. di servizio 36).
Sostituzione del cavo di alimentazione
Se il cavo di alimentazione di questo apparecchio
si dovesse rovinare, occorrerà sostituirlo con un
cavo speciale: a questo scopo rivolgetevi al
rivenditore Philips o all'organizzazione Philips del
vostro paese.
- hayan ajustado la hora normal...
- ... y puesto en marcha el cronómetro;
- y apretado también el botón AUTO (el piloto
amarillo se ilumina),
la Café Master empezará automáticamente el
proceso de la infusión en la hora ajustada de
antemano.
Para ajustar el cronómetro
- Comprueben si en la pantalla se ve la hora
correcta. (De no ser así, consulten la sección
"Para ponerlo en hora".)
- Aprieten el botón AUTO. Se iluminará el piloto
amarillo (fig. 22). La lectura de la hora
desaparecerá de la pantalla.
- Aprieten el botón HOUR. Las horas indicadas
en la pantalla empezarán a cambiar (fig. 23).
Mantener el botón oprimido para un cambio
continuo.
Para conseguir un ajuste exacto, aprieten el
botón brevemente un par de veces.
- Del mismo modo, procedan con el botón MIN.
Los minutos indicados en la pantalla
cambiarán al instante (fig. 24).
Tengan en cuenta lo siguiente: Si esperan más
de unos 10 segundos en apretar los botones
MIN u HOUR, reaparecerá la lectura de la hora
normal. Para volver a ajustar el cronómetro,
aprieten otra vez AUTO.
- Después de ajustar el cronómetro reaparecerá
la hora en la pantalla..
- Cuando la cafetera se encienda
automáticamente a la hora preajustada, el
piloto amarillo se apagará, encendiéndose el
rojo.
• El tiempo preajustado se conserva en la
memoria. Pero la cafetera sólo se volverá a
activar automáticamente si aprietan
previamente el botón AUTO de nuevo. (El
piloto amarillo se iluminará.)
• Reajusten la hora y el cronómetro si hay algún
corte de corriente o han desenchufado la
cafetera.
Cómo comprobar la hora preajustada
- Aprieten el botón AUTO. La hora preajustada
para hacer el café de manera automática
aparecerá en la pantalla durante unos
10 segundos.
El piloto amarillo se iluminará, indicando con
ello que se ha seleccionado el modo de
encendido automático.
Cómo anular la función "AUTO"
- Si se ha puesto la cafetera para encendido
automático (piloto amarillo iluminado), podrán
desactivar el cronómetro apretando una vez el
botón ON-OFF.
En ese caso, el piloto amarillo se apagará.
- Si después quieren hacer café, tendrán que
apretar ON-OFF otra vez.
El piloto rojo se iluminará.
Limpieza
• Saquen siempre la clavija de la toma de
corriente antes de limpiar el aparato.
• No lo sumerjan nunca en agua. Podrán
limpiarlo con un paño húmedo.
• Las piezas amovibles deben lavarse con agua
jabonosa caliente. Aclaren con agua caliente
limpia y sequen a continuación. Estas piezas
también pueden tratarse en los lavavajillas.
Descalcificación
Descalcifiquen la cafetera de forma regular. Con
un uso normal (dos jarras al día) podrán aplicar la
regla siguiente:
• con aguas de dureza hasta 18° DH - 2 ó 3
veces al año
• con aguas de dureza mayor de 18° DH - 4 ó 5
veces al año.
La compañía suministradora de agua de su
localidad podrá informarles de la dureza de
aquella.
- Pongan en marcha la cafetera dos veces;
pero ahora con vinagre ordinario para llenar
el depósito de agua y sin poner café en el
filtro.
- Tras la descalcificación, dejen que el aparato
vuelva a funcionar otras dos veces con agua
ordinaria, para limpiar bien los restos de
vinagre e incrustaciones que hayan podido
quedar.
- Laven la jarra, la tapa y el portafiltro.
¿Se les ha roto la jarra? ¿Necesitan otra
nueva?
Podrán pedirla al distribuidor Philips o a un centro
de Servicio Philips, con el nº de tipo HD 7908
(servicio nº 36).
Sustitución del cordón de red
Si el cable de red de este aparato es dañado,
puede ser reemplazado por un cable especial
suministrado por su distribuidor o por la
organización Philips en su país.
Español
• Antes de conectar el aparato, comprueben
si el voltaje indicado en el aparato se
corresponde con el de su hogar.
• No coloquen el aparato sobre una
superficie caliente.
• Quiten la clavija de la base de enchufe:
- si sucede algún problema durante la
preparación del café,
- antes de limpiar el aparato.
• No permitan que el cable de red entre en
contacto con superficies calientes.
• Usen el aparato lejos del alcance de los
niños y eviten que estiren del cable de red.
• No usen nunca el aparato si la clavija, el
cable de red o el aparato están
deteriorados.
Para guardar el cordón
Lo que sobre del cordón de red podrán guardarlo
en la parte posterior del aparato (fig. 1).
Antes de usarlo por primera vez
- Pongan la hora del día. (Ver la sección "Para
ponerlo en hora".)
- Pongan en marcha el aparato una vez, pero
sin llenar el filtro de café. (Ver la sección "Para
hacer café".)
- A continuación limpien las partes amovibles tal
como se indica en la sección "Limpieza".
Para ponerlo en hora (figs. 2 a 4)
- Enchufen la clavija en una toma de corriente.
En la pantalla empezará a parpadear SET
(fig. 2).
- Aprieten el botón HOUR. Las horas indicadas
en la pantalla empezarán a cambiar (fig. 3).
Mantener el botón oprimido durante más de 2
se-gundos para un cambio continuo.
Para conseguir un ajuste exacto, aprieten el
botón brevemente un par de veces.
- Del mismo modo, procedan con el botón MIN.
Los minutos indicados en la pantalla
cambiarán al instante (fig. 4).
La hora normal permanecerá visible mientras el
aparato esté conectado a la red.
Los dos puntos de la indicación horaria parpa-
dearán constantemente, mostrando con ello que
el reloj está en marcha.
Para hacer café: consulten las ilustraciones
(figs. 5 a 17)
- Para llenar el depósito de agua utilicen sólo la
corriente del grifo.
Las indicaciones de nivel de la izquierda
corresponden a tazas grandes (125 ml); las de
la derecha, a las pequeñas (85 ml).
- Usen papel de filtro del tipo "1 x 4" o del "nº 4".
No se olviden de doblar los bordes.
Con algunos modelos se suministra un filtro
permanente, en cuyo caso no son necesarios
los filtros de papel.
- Para tazas grandes: echen una cucharada de
medida llena a rebosar con café molido (del
tipo de "filtro rápido") por cada taza.
Para tazas pequeñas: una cucharada de
medida a ras por cada taza.
"Antigoteo"
El dispositivo "antigoteo" incorporado (válvula
automática de cierre) asegura que no caiga café
en la placa térmica si se quita la jarra un instante
durante el proceso de infusión o después de
haber hecho el café.
Nota: El dispositivo antigoteo sólo dejará pasar
café a la jarra si ésta tiene puesta la tapa.
Importante: No abran nunca el filtro durante el
proceso de preparación.
Corte automático
Para su comodidad y al mismo tiempo como
seguridad extra, si no han apagado la cafetera al
terminar el proceso, ella misma se desconectará
automáticamente al cabo de dos horas.
Indicador de frescor del café hecho
En la pantalla podrán leer alternativamente la
hora normal del día y el lapso de tiempo que ha
transcurrido desde que empezó el proceso de la
infusión.
Esta última indicación va precedida por la letra F
("fresco"), con lo que en todo instante podrán
comprobar si el café está aún reciente.
¿Quieren hacer más café inmediatamente?
Si acaban de hacer una jarra de café y quieren
hacer más de una manera inmediata, apaguen
primero la cafetera (fig. 17) y dejen que se enfríe
durante tres minutos.
A continuación podrán volver a llenar el depósito
de agua.
Encendido automático
En el caso en que:
- hayan echado café molido en el filtro;
- hayan puesto agua en el depósito;
English
• Before connecting the appliance, please
check if the voltage indicated on the
appliance corresponds with the mains
voltage in your home.
• Do not place the appliance on a hot surface.
• Remove the mains plug from the wall
socket:
- if problems occur during making coffee;
- before cleaning the appliance.
• Do not allow the mains cord to come into
contact with hot surfaces.
• Use the appliance out of children's reach.
Prevent them from pulling the mains cord.
• Never use the appliance if the mains plug,
the mains cord or the appliance itself is
damaged.
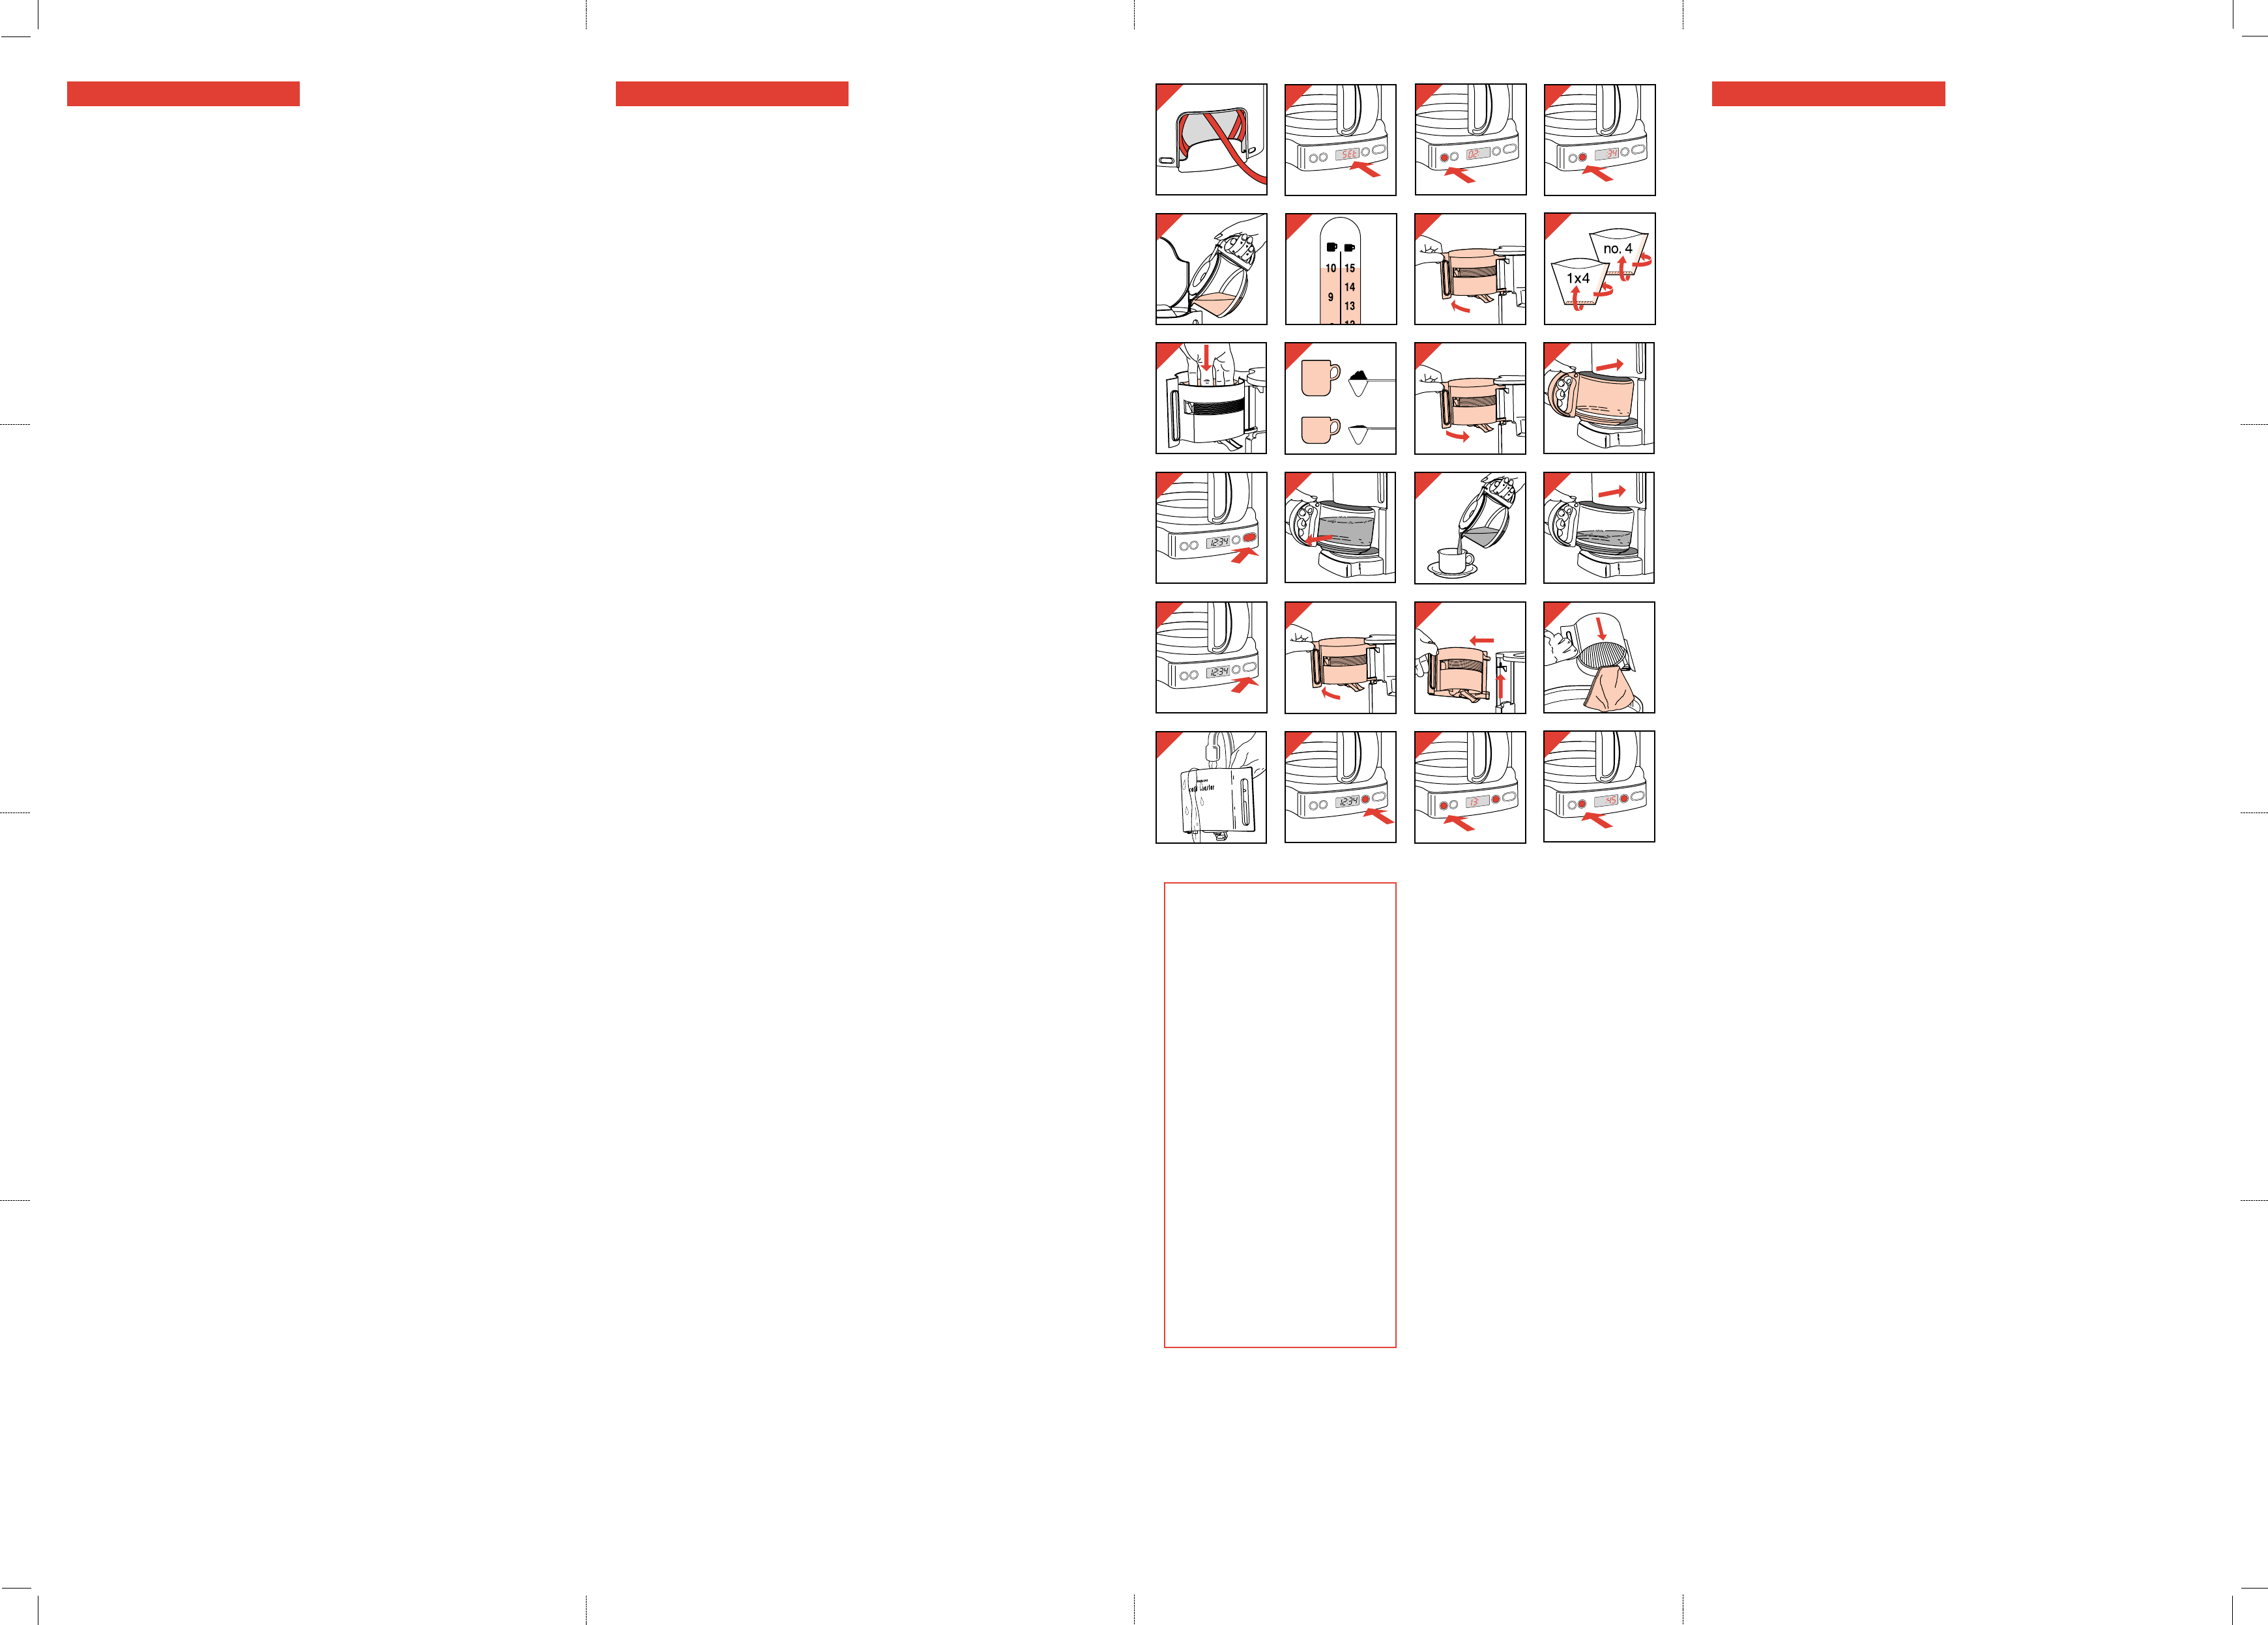
Cord storage
- You can store excess mains cord at the back of
the appliance (fig. 1).
Before first use
- Set the time of day. (See section "Setting the
time of day".)
- Operate the appliance once without filling the
filter with ground coffee. (See section "Making
coffee".)
- Next, clean the removable parts as described
in section "Cleaning".
Setting the time of day (figs. 2-4)
- Insert the mains plug into a mains outlet.
In the display SET will come on blinking (fig. 2).
- Depress button HOUR. The hours reading in
the display will now start changing (fig. 3).
Keep the button depressed for more than 2
seconds for continuous changing.
For exact setting depress the button very
shortly a couple of times.
- In the same manner depress button MIN.
The minutes reading in the display will now
change (fig. 4).
The time of day reading will remain visible for as
long as the appliance is connected to the mains
supply.
The colon in the display will blink steadily to show
that the clock is working.
Making coffee: please refer to the illustrations
(fig. 5 - 17)
- To fill the water tank use fresh cold water only.
The left hand side level indications correspond
to large cups (125 ml).
The right hand side level indications
correspond to smaller cups (85 ml).
- Use filter paper type "1x4 " or "no. 4". Do not
forget to fold the rims.
With some models a permanent filter is
supplied. Paper filters are then not required.
- For large cups: take one full (heaped)
measuring spoonful of ground coffee ("fast
filter" type) for each cup.
For smaller cups: one level measuring spoonful
for each cup.
"Drip-stop"
The integrated "drip-stop" (automatic stop-valve)
ensures that no coffee will drip on to the hotplate
if the jug is removed from the appliance for a
moment during the brewing process or if the jug
is removed after making coffee.
Note: the drip-stop will only allow coffee to
flow into the jug if the jug lid has been placed.
Important: Never open the filter during the
brewing process.
Automatic shut-off
For your convenience, and also for extra safety: if
you have not switched off the coffee maker, it will
switch off automatically after 2 hours.
Freshness indicator
In the display you can alternatively read the
normal time of day and the lapse of time since the
brewing process has started.
This time indication is preceded by the letter F
("Freshness").
So you you can check before if the coffee is still
fresh.
Making more coffee straight away?
If you have made one jug of coffee and wish to
make some more straight away, please switch
the coffee maker off (fig. 17) and allow about
three minutes for it to cool down.
Then you can refill the water tank.
Automatic switch-on
If you
- have put ground coffee into the filter;
- have put water into the water tank;
- have set both the normal time of day...
- ...and the timer;
- and you have also pressed button AUTO
(yellow pilot light illuminates);
then the Café Master will automatically start
brewing at the pre-set time.
Setting the timer
- Check if the correct time of day reading is
visible in the display. (If not, please refer to
section "Setting the time of day".)
- Depress button AUTO. The yellow pilot light
comes on (fig. 22). The time of day reading will
now disappear from the display.
- Depress button HOUR. The hours reading in
the display will now start changing (fig. 23).
Keep the button depressed for continuous
changing.
For exact setting finally depress the button very
shortly a couple of times.
- In the same manner also depress button MIN.
The minutes reading in the display will now
change (fig. 24).
Please note: If you wait longer than approx.
10 seconds before pressing buttons MIN. or
HOUR, the normal time reading will reappear.
To restart timer setting press button AUTO
again.
- After setting the timer, the normal time of day
reading will reappear in the display.
- When the coffeemaker switches on
automatically at the pre-set time, the yellow
pilot light will go out and the red pilot light will
come on.
• The pre-set time will be stored. However, the
coffeemaker will only switch on automatically
again after you have pressed button AUTO
again. (Yellow pilot light illuminating.)
• Reset the time of day and the timer after an
electricity breakdown or when the appliance
has been unplugged.
How to check the pre-set time
- Press button AUTO. The pre-set time for
automatic brewing is then displayed for approx.
10 seconds.
The yellow pilot light will come on to indicate
that the automatic switch-on mode has been
selected.
How to override function "AUTO"
- If the coffeemaker has been set to automatic
switch-on (yellow pilot light illuminating), you
can switch off the timer by pressing button ON-
OFF once.
The yellow pilot light will then go out.
- If you then want to start making coffee, press
button ON-OFF once again.
The red pilot light will then come on.
Cleaning
• Always remove the plug from the wall
socket before cleaning the appliance.
• Never immerse the appliance in water. You
should clean it with a damp cloth.
• The removable items should be washed in hot
soapy water. Rinse with clean hot water and
dry. These items can also be cleaned in a
dishwasher.
Descaling
Descale your coffee maker regularly. With normal
use (two full jugs a day) the following rule applies:
hardness up to 18 °DH (22.5 °Clarke)
- 2 or 3 times a year;
hardness over 18 °DH (22.5 °Clarke)
- 4 or 5 times a year.
Your water supply company can inform you about
the hardness of your water.
- Operate the appliance twice. However, now
use ordinary vinegar to fill the water tank and
do not fill the filter with coffee.
- After descaling, let the appliance work twice
more with only water to rinse away the vinegar
and scale remainders.
- Wash the coffee jug, lid and filter holder.
Jug broken? Extra jug wanted?
You can order a jug from your dealer or
Philips Service Centre under type nr. HD 7908
(service nr. 36).
Replacing the mains cord
If the mains cord of this appliance is damaged, it
must be replaced by the special cord.
Apply to your Philips dealer or to the Philips
organisation in your country.
Wiring Instructions U.K.
IMPORTANT
WARNING - THIS APPLIANCE MUST BE
EARTHED
The wires in this mains lead are coloured in
accordance with the following code:
GREEN AND YELLOW - EARTH
BLUE - NEUTRAL
BROWN - LIVE
As the colours of the wires in the mains lead of
this appliance may not correspond with the
coloured markings identifying the terminals in
your plug, proceed as follows:
The wire which is coloured GREEN AND
YELLOW must be connected to the terminal
which is marked with the letter "E" or by the
earth symbol E or coloured GREEN or
GREEN AND YELLOW.
The wire which is coloured BROWN must be
connected to the terminal which is marked with
the letter "L" or coloured RED.
The wire which is coloured BLUE must be
connected to the terminal which is marked with
a letter "N" or coloured BLACK.
Note: If the terminals of the plug are unmarked
or if you are in any doubt consult a qualified
electrician.
If a (BS 1363) 13 amp. plug is used this must
be fitted with a 13 amp. fuse.