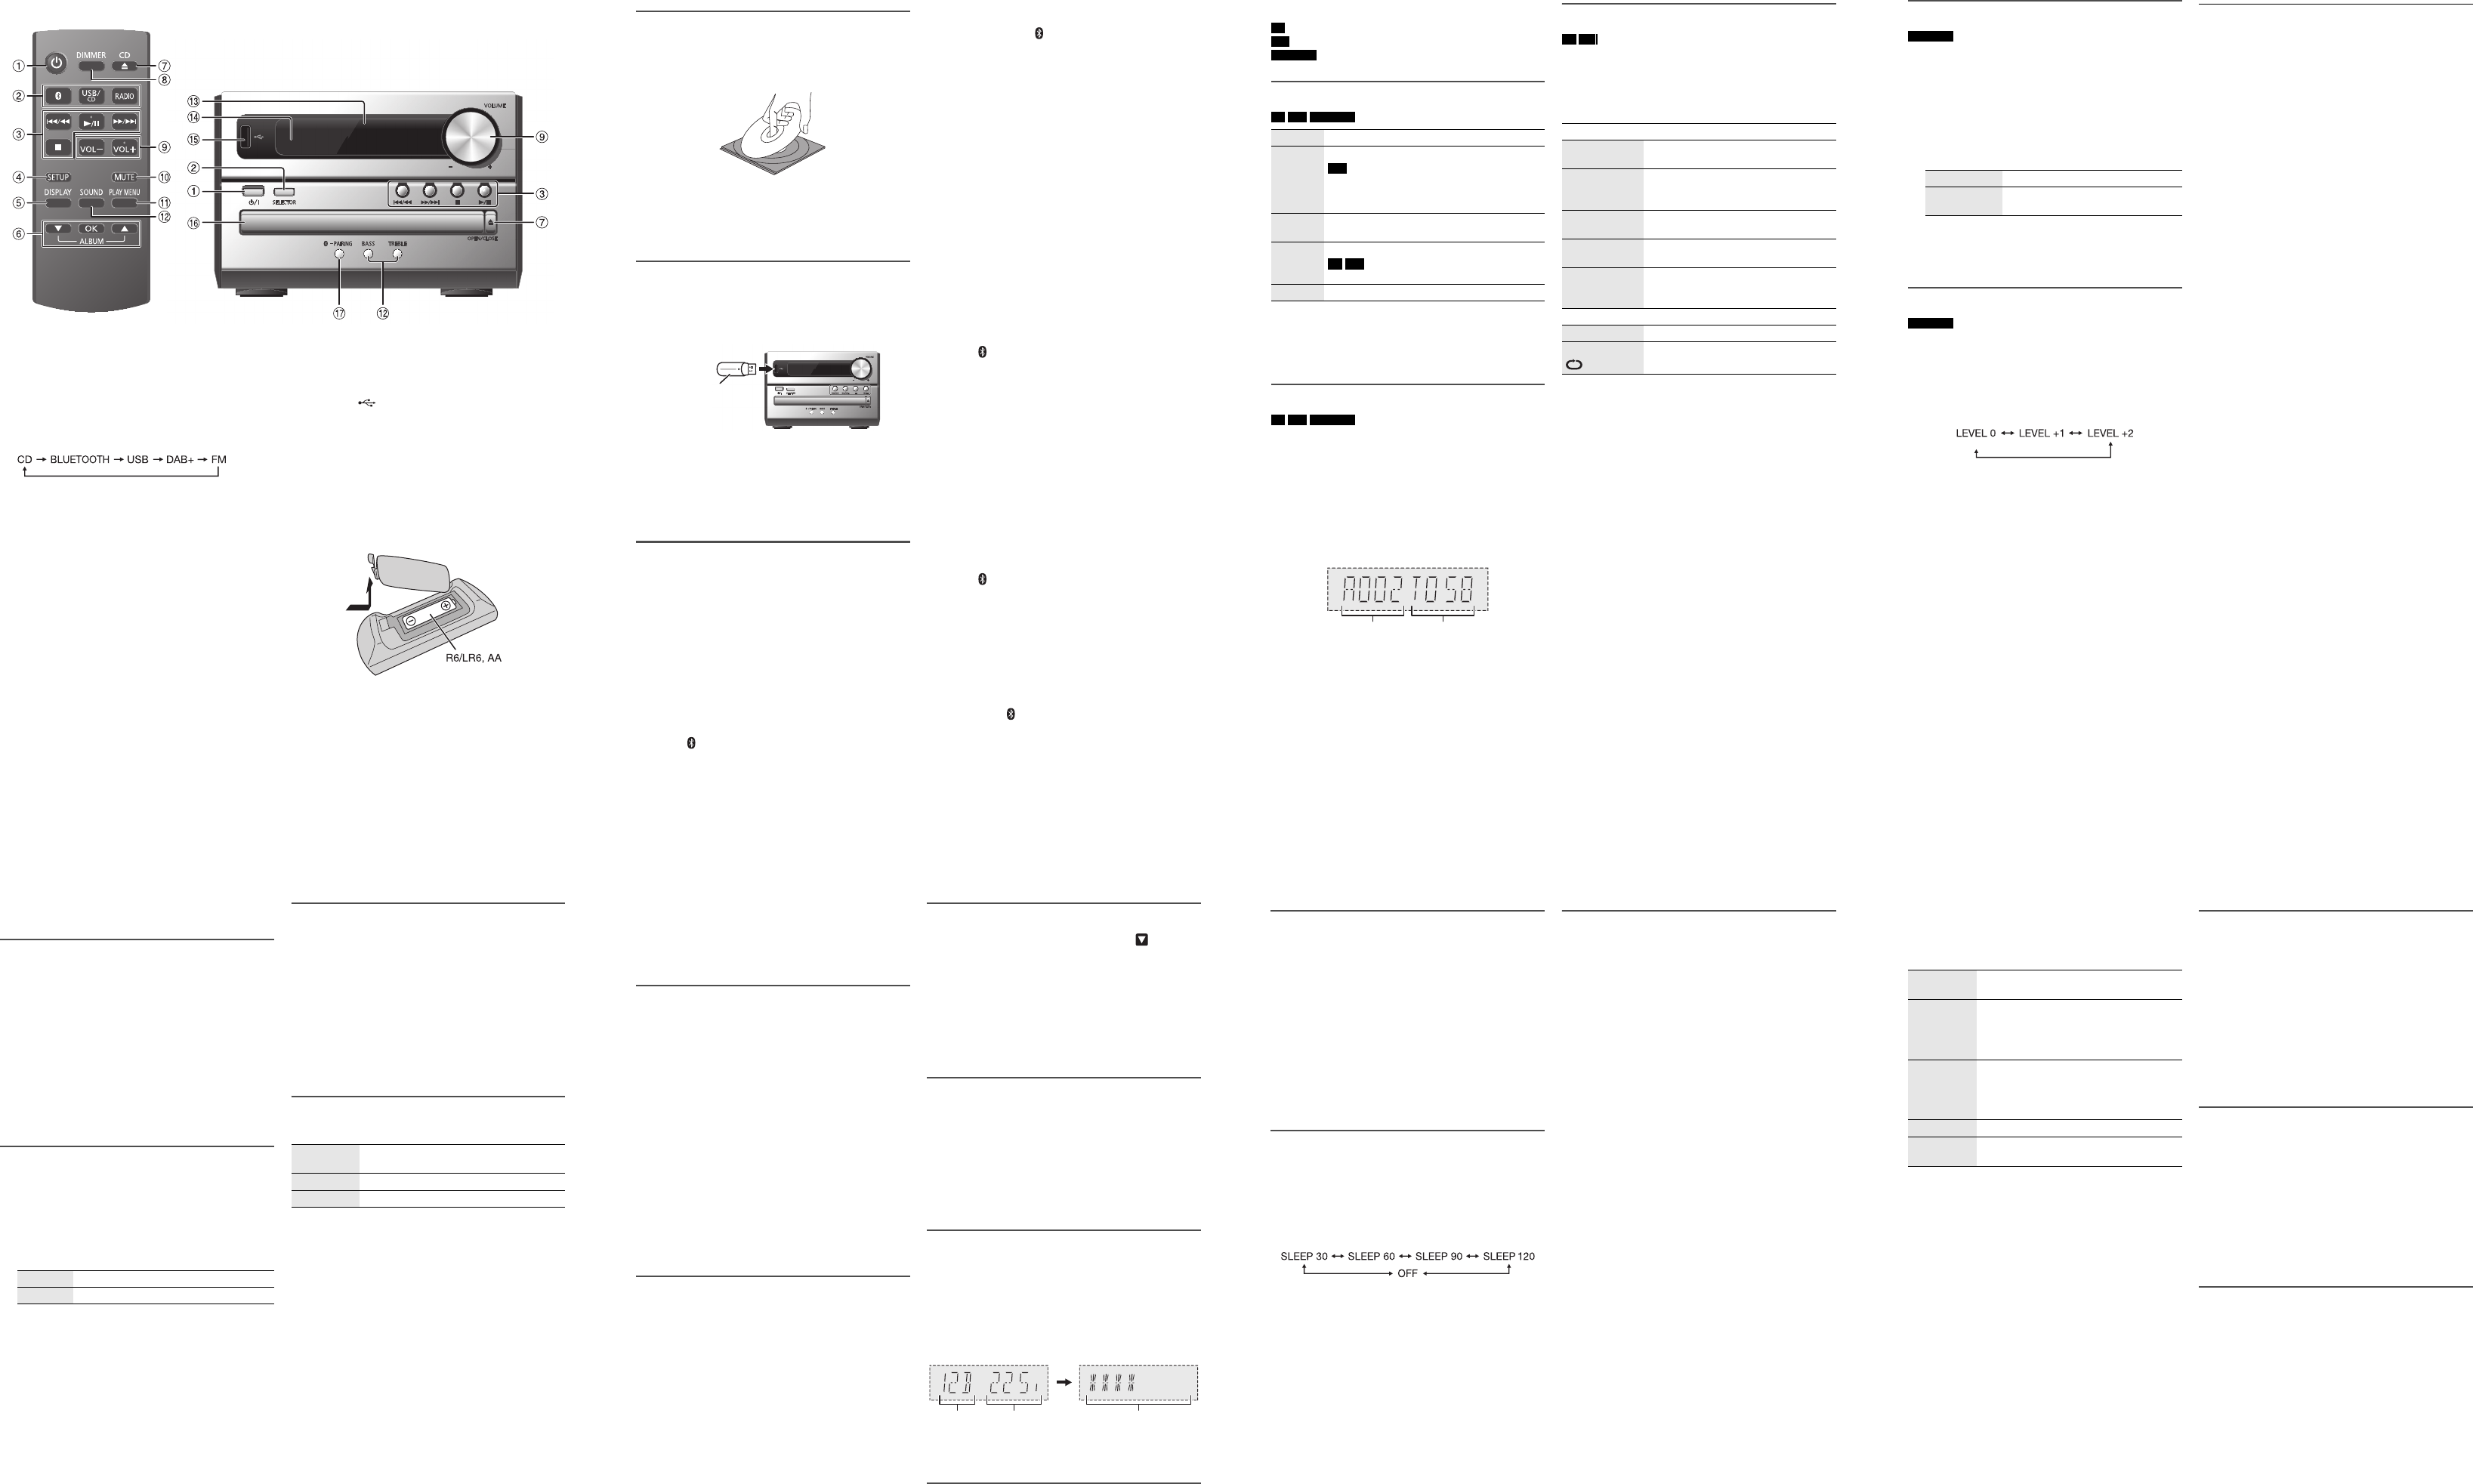
Overview of controls
Do the procedures with the
A Standby/on switch [ `], [ 1]
Press to switch the unit from on t
vice ,
a small am
B Select the audio source
On the remote control:
Press the corresponding butt
On the main unit:
C Basic playba
D View the setup menu
E View the content
F Select or confirm the
G Open or close
H Decrease the brightness of the display
To cancel, press the butt
I Adjust the volume level
J Mute the sound
To cancel, press the butt
“MUTE” is also cancelled when you adjust the volume
or when you off the system.
K View the play me
L Select the s
M Display panel
N Remote control sensor
Distance: W
Angle: Approximately 20° up and down, 30° left and
right
O USB port ( )
P Disc tray
Q Select “BLUETOOTH” as the audio source
To start Bluetooth
®
pairing, press and hold the button.
Preparing the remote control
Use alkaline
Install the batt
those in the remote control.
(not supplied)
RQT0A08-B_en.fm Page
Preparing the media
Disc
1 Press [CD x ] (main unit: [x OPEN/CLOS
the disc tray.
Put in a disc with the label fac
Press again to close
2 Press [USB/CD] to select
USB
1 Reduce the volume and connect the USB
the USB
Hold the main unit when connecting or discon
the USB
2 Press [USB/CD] to select
Note:
Do not use a USB extension cable. The system cannot
recognise USB device connected through a cable.
Bluetooth
®
You can connec
through Bluetooth
®
.
Preparation
• Switch on the Blue
®
feature
the device near t
• Read the operating instr
█ P
Preparation
If this system is connected to
®
device,
disconnect it (Z“Disconnecting a device”
1 Press [ ].
If “PAIRIN
2 Press [PLAY MENU] to select “P
Or press and hold [ –PAIRING] on the main unit until
“PAIRING” is shown. Continue with st
3 Press [R, T ] to select “OK? YES” and t
[OK].
“PAIRING” is shown.
To cancel,
4 Select “SC-PM
®
menu
devic
If prompted for a passk
The device connec
after pairing is complete.
The name of the conne
seconds.
Note:
You can
paired, the device that has not been used for the longest time
will be replaced.
█ Connecting a device
Preparation
If this syste
®
device,
disconnect it (Z “Dis
1 Press [ ].
“BLUETOOTH RE
2 Select “SC-PM
®
menu
devic
The name of the conne
seconds.
3 Start playback on the device.
Note:
• A device must be paired to connect.
• This system can only connect to one device at a time.
• When
“BLUETOOTH” is selected as the source, this
system will automatically try to connect to the last
connected device.
█ Disconnecting a device
1 Press [ ].
2 Press [PLAY MENU] repeatedly to se
“DISCONNECT?”.
3 Press [R, T ] to select “OK? YES” and t
[OK].
“BLUETOOTH RE
To cancel,
Using the main unit
Press and hold [ –PAIRING] until “
Note:
A device is disconnected when you:
• Select a different source.
• Move the device out of the maximum range.
• Disable the Bluetooth
®
transmission of the device.
• Switch off the system or the device.
USB device
(not supplied)
RQT0A08-B_en.fm Page
Media playback
The following marks indicate the availability of the feature.
Basic playback
CD USB BLUETOO
Note:
Depending on the Bluetooth
®
device, some operations may
not work.
Viewing available information
CD USB BLUETOO
You can view the ava
panel.
Press [DISPLAY]
Note:
• Maximum
• This system
• Text data that
differently.
• Example: MP
Play menu
CD USB
1 Press [PLAY MENU] repeatedly to se
“PLAYMODE” or “REPEAT”.
2 Press [R, T ] to select the setting and then press
[OK].
Note:
• During random playback, you cannot skip to tracks which
have been played.
• The setting is cancelled when you open the disc tray.
CD :
USB :
BLUETOOTH :
CD-R/RW in CD-DA format or with MP3 files.
USB device with MP3 files.
Bluetooth
®
device.
Play Press [4 /9 ].
Stop Press [8].
USB
The position is memorise
“RESUME” is shown.
Press again to stop fully.
Pause Press [4/ 9].
Press again to continue play
Skip Press [2/ 3 ] or 5/ 6 ] to skip track.
CD USB
Press [R , T ] to skip MP3 album.
Search Press and hold [2 /3 ] or [ 5 /6 ].
Album
number
Track
number
PLAYMODE
OFF
PLAYMODE
Cancel the setting.
1-TRACK
1TR
Play one select
Press [2 /3 ] or 5 /6 ] to
select the
1-ALBUM
1ALBUM
Play one select
Press [R , T ] to select the MP3 album.
RANDOM
RND
Play all tracks r
1-ALBUM
RANDOM
1ALBUM RND
Play all tracks
album randomly.
Press [R , T ] to select the MP3 album.
REPEAT
OFF REPEAT Cancel the setting.
ON REPEAT Repeat playback.
RQT0A08-B_en.fm Page
Link mode
BLUETOOTH
You can
Preparation
If this system is connected to
®
device,
disconnect it (Z“Disconnecting a device”
1 Press [PLAY MENU] repeatedly to select
“LINK MO
2 Press [R, T ] to
Note:
Select “MODE 1” if the sound is interrupted.
Input level
BLUETOOTH
You can change the input level setting if the sound
level of the Bluetooth
®
transmission is too low.
1 Press [PLAY MENU] repeatedly to select
“INPUT LEVEL”.
2 Press [R, T ] to select the level and then press [OK].
Note:
Select
“LEVEL 0” if the sound is distorted.
█ Note on disc
• This system can play CD-R/RW with CD-DA or MP3
format content.
• Before playback
recorded
• Some CD-R/RW cannot
condition of the recording.
█ Note on USB device
• This system supports USB 2.0 full speed.
• This system can support USB devices of up to
• Only FAT 12/16/32 file system is supported.
█ Note on MP3 file
• Files are defined
albums.
• Tracks must have the
• Tracks wi
recorded
• Some files can
MP3 file on disc
• This system can access
– 255 albums (including root folder)
– 999 tracks
– 20 sess
• Disc must conform to ISO
extended fo
MP3 file
• This system can access
– 800 albums (including root folder)
– 8000 tracks
– 999 tracks in on
MODE 1 Emphasis on connectivity.
MODE 2
(default)
Emphasis on sound quality.
(default)
RQT0A08-B_en.fm Page
Radio
Preparation
Press [RADIO] to select “FM”.
Manual tuning
1 Press [PLAY MENU] repeatedly to select
“TUNEMODE
2
Press
R
,
T
] to
3 Press [2/ 3 ] or [5/ 6 ] to tune in to the
station.
To tune automatica
the frequency
“STEREO” is shown when a stere
received.
Memor
You can pre
█ Automatic presetting
1 Press [PLAY MENU] to sele
2
Press [
R
,
T
] to select the setting a
The tuner presets
channels in ascendin
To cancel, press [8 ].
█ Manual presetting
1 Press [PLAY MENU] repeatedly to select
“TUNEMODE
2
Press
R
,
T
] to
3 Press [2/ 3 ] or [5/ 6 ] to tune in to the
station.
4 Press [OK].
5 Press [R, T ] to select a preset number and then
press [OK].
Do steps 3 through 5 agai
The
same preset number.
█ Selecting a preset station
1 Press [PLAY MENU] repeatedly to select
“TUNEMODE
2
Press [
R
,
T
] to select “PRESET” and th
3 Press [2/ 3 ] or [5/ 6 ] to select the preset
station.
Improving the sound quality
1 Press [PLAY MENU] repeatedly to se
“FM MODE”.
2 Press [R, T ] to select “MONO” and then pres
To cancel, select “STEREO”.
“MONO” is also canc
frequency.
To memorise t
Continue with step 4 of “Manual presetting”.
Checking the signal status
Press [DISPLAY].
LOWEST Tuning begins from the lowest
CURRENT Tuning begins fr
FM – – – – The FM signal is in m
The system is not tuned in to a sta
FM ST The FM signal is in stereo.
FM MONO “MONO” is selected as the “FM MODE”.
RQT0A08-B_en.fm Page
DA
Preparation
Press [RADIO] to select “DAB
Note:
If you select
“DAB+” for the first time, the system will tune
automatically.
Manual tuning
1 Press [PLAY MENU] repeatedly to select
“MANUAL SCAN”.
2 Press [R, T ] to select the frequency block and then
press [OK].
If no statio, “SCAN FAILED” is shown.
Adjust the antenna and
To tune automatically
1 Press [PLAY MENU] to select “AUTOSCAN” and
then pres
“START?” is shown.
2 Press [OK] to start tuni
“DAB AUTO SCAN”
If no statio, “SCAN FAILED” is shown.
Do manual tuning.
Note:
Preset frequencies are erased after you do automatic tuning.
Memor
You can pres
1 Press [PLAY MENU] repeatedly to select
“TUNEMODE
2 Press [R, T ] to select “STATION” and then press
[OK].
3 Press [2/ 3 ] or [5/ 6 ] to tune in to the
station.
4 Press [OK].
5 Press [R, T ] to select a preset number and then
press [OK].
Do steps 3 through 5 agai
The
same preset number.
Note:
You cannot preset a station when the station is not
broadcasting or when you have selected a secondary service.
█ Selecting a preset station
1 Press [PLAY MENU] repeatedly to select
“TUNEMODE
2 Press [R, T ] to select “PRESET” and then press
[OK].
3 Press [2/ 3 ] or [5/ 6 ] to select the preset
station.
Secondary ser
You can listen to second ” is shown.
1 Press [PLAY MENU] repeatedly to se
“DAB SECONDARY”.
2 Press [R, T ] to select the secondar
then press [OK].
To cancel,
Note:
The setting is cancelled when you select other stations.
Viewing available information
You can view the following information on the display
panel:
• Information about
• Programme type
• Ensemble labe
• Frequency
• Time
Press [DISPLAY].
Checking the signal quality
You can check the signa
antenna.
1 Press [PLAY MENU] repeatedly to se
“SIGNAL Q
The frequency bloc by the reception qualit
is shown.
To select other frequency blocksR, T].
2 Press [OK] again to exit.
Automatic clock adjustment
You can set the clock to upda
1 Press [PLAY MENU] repeatedly to se
“AUTO CLOCK ADJ”.
2 Press [R, T ] to sel
[OK].
To cancel, select “OFF ADJUST”
Frequency
block
Frequency Reception quality
0 (poor) to 8 (excellent)
RQT0A08-B_en.fm Page
Clock and timers
Setting the clock
This is a 24-hour clock.
1 Press [SETUP] repeatedly
2 Press [R, T ] to set the time and then press [OK].
To check the time
Press [SETUP] repeatedly
press [OK].
In standby mode, press [DISPLAY].
Note:
Reset the clock regularly to maintain accuracy.
Sleep timer
The sleep timer switches off the system a
1 Press [SETUP] t
2 Press [R, T ] to select the setting (in minutes) and
then pres
To cancel, se
Note:
• The remainin
display changes temporarily when you perform other
operations.
• The sleep tim
• The sleep tim
overlap of timers.
Play timer
(Except for Bluetooth
®
source)
You
you up
Preparation
Set the clock
1 Press [SETUP] repeatedly to selec
2 Press [R, T ] to set the start time and then press
[OK].
3 Do step
4 Press [R, T ] to select the source you want
and then press [OK].
To start the time
1 Press [SETUP] repeatedly to selec
2 Press [R, T ] to select “SET” and then press [OK].
“# ” is shown.
To cancel, select “OFF”.
The system must be swed off
operate.
To check the setting
Press [SETUP] repeatedly to selec
then press [OK].
In standby mode, press [DISPLAY] two times.
Note:
• The timer starts at a low volume and increases gradually to
the preset level.
• The timer comes on at the set time every day if the timer is
on.
• If
timer is in operation, the timer will not stop at the end time.
RQT0A08-B_en.fm Page
Sound effects
1 Press [SOUND] repeatedly to select the soun
effect.
2 Press [R, T ] to select the setting and then press
[OK].
Others
Auto off
This system automatically switc you do not
use it for 20 minutes.
1 Press [SETUP] repeatedly to selec
2 Press [R, T ] to select “ON” and then pres
To cancel, select “OFF”.
Note:
This function does not work when you are in radio source or
when a Bluetooth
®
device is connected.
Bluetooth
®
standby
This function automatically swit
you establish
®
connection from a paired
device.
1 Press [SETUP] repeatedly to selec
“BLUETOOTH STAN
2 Press [R, T ] to select “ON” and then pres
To cancel, select “OFF”.
Checking the software version
1 Press [SETUP] repeatedly to selec
then press [OK].
The software version is shown.
2 Press [OK] again to exit.
PRESET EQ “HEAVY” (default), “SOFT”, “CLEAR”,
“VOCAL” or “FLAT”
BASS –4 to +4
Using the main unit
1. Press [BASS]
2. Press [2/ 3] or [ 5/ 6].
TREBLE –4 to +4 (def
Using the main unit
1. Press [TREBLE].
2. Press [2/ 3] or [ 5/ 6].
D.BASS “ON D.BASS” (de
SURROUND “ON SURROUND” or
“OFF SURROUND” (default)
RQT0A08-B_en.fm Page