Linking with the Wi-Fi compatible equipment allows you to remotely
operate the camera, or share pictures with people in distant places even
during recording or playing back.
You can remotely operate the camera
using a smartphone/tablet. You need to
install “Image App” on your smartphone/
tablet.
[Remote Shooting]
By linking with the DLNA compatible TV,
you can display pictures on TV right after
taking them or display them on TV later by
playing them back on the camera.
[Playback on TV]
Every time you take a picture, the picture
can be automatically sent to a specified
location. You can play back the picture on
the smartphone/tablet, or save and edit it
on PC.
[Send Images While Recording]
You can select and send recorded
images.
[Send Images Stored in the Camera]
For details, refer to “Operating Instructions for advanced features”.
The camera cannot be used to connect to a public wireless LAN
connection.
■
About the Wi-Fi connection lamp
Wi-Fi connection lamp
Lit blue: The Wi-Fi connection is on standby
Blinking blue: Sending/receiving data
through the Wi-Fi connection
●
We strongly recommend that you set an encryption to maintain
information security.
●
When sending images on a mobile network, high packet
communication fees may be incurred depending on the details of your
contract.
●
Do not remove the memory card or battery or move to an area
without any reception while sending images.
●
“Wi-Fi”, “Wi-Fi Protected Setup”, “Wi-Fi Direct”, “WPA” and “WPA2” are
marks or registered marks of the Wi-Fi Alliance.
[Airplane Mode]
Electromagnetic waves from the camera can affect instruments and
meters. In airplane cabins or in other restricted areas, set [Airplane
Mode] to [ON].
Press [MENU/SET]
Press to select [Setup] and press [MENU/SET]
Press to select [Airplane Mode] and press [MENU/SET]
Press to select [ON] and press [MENU/SET]
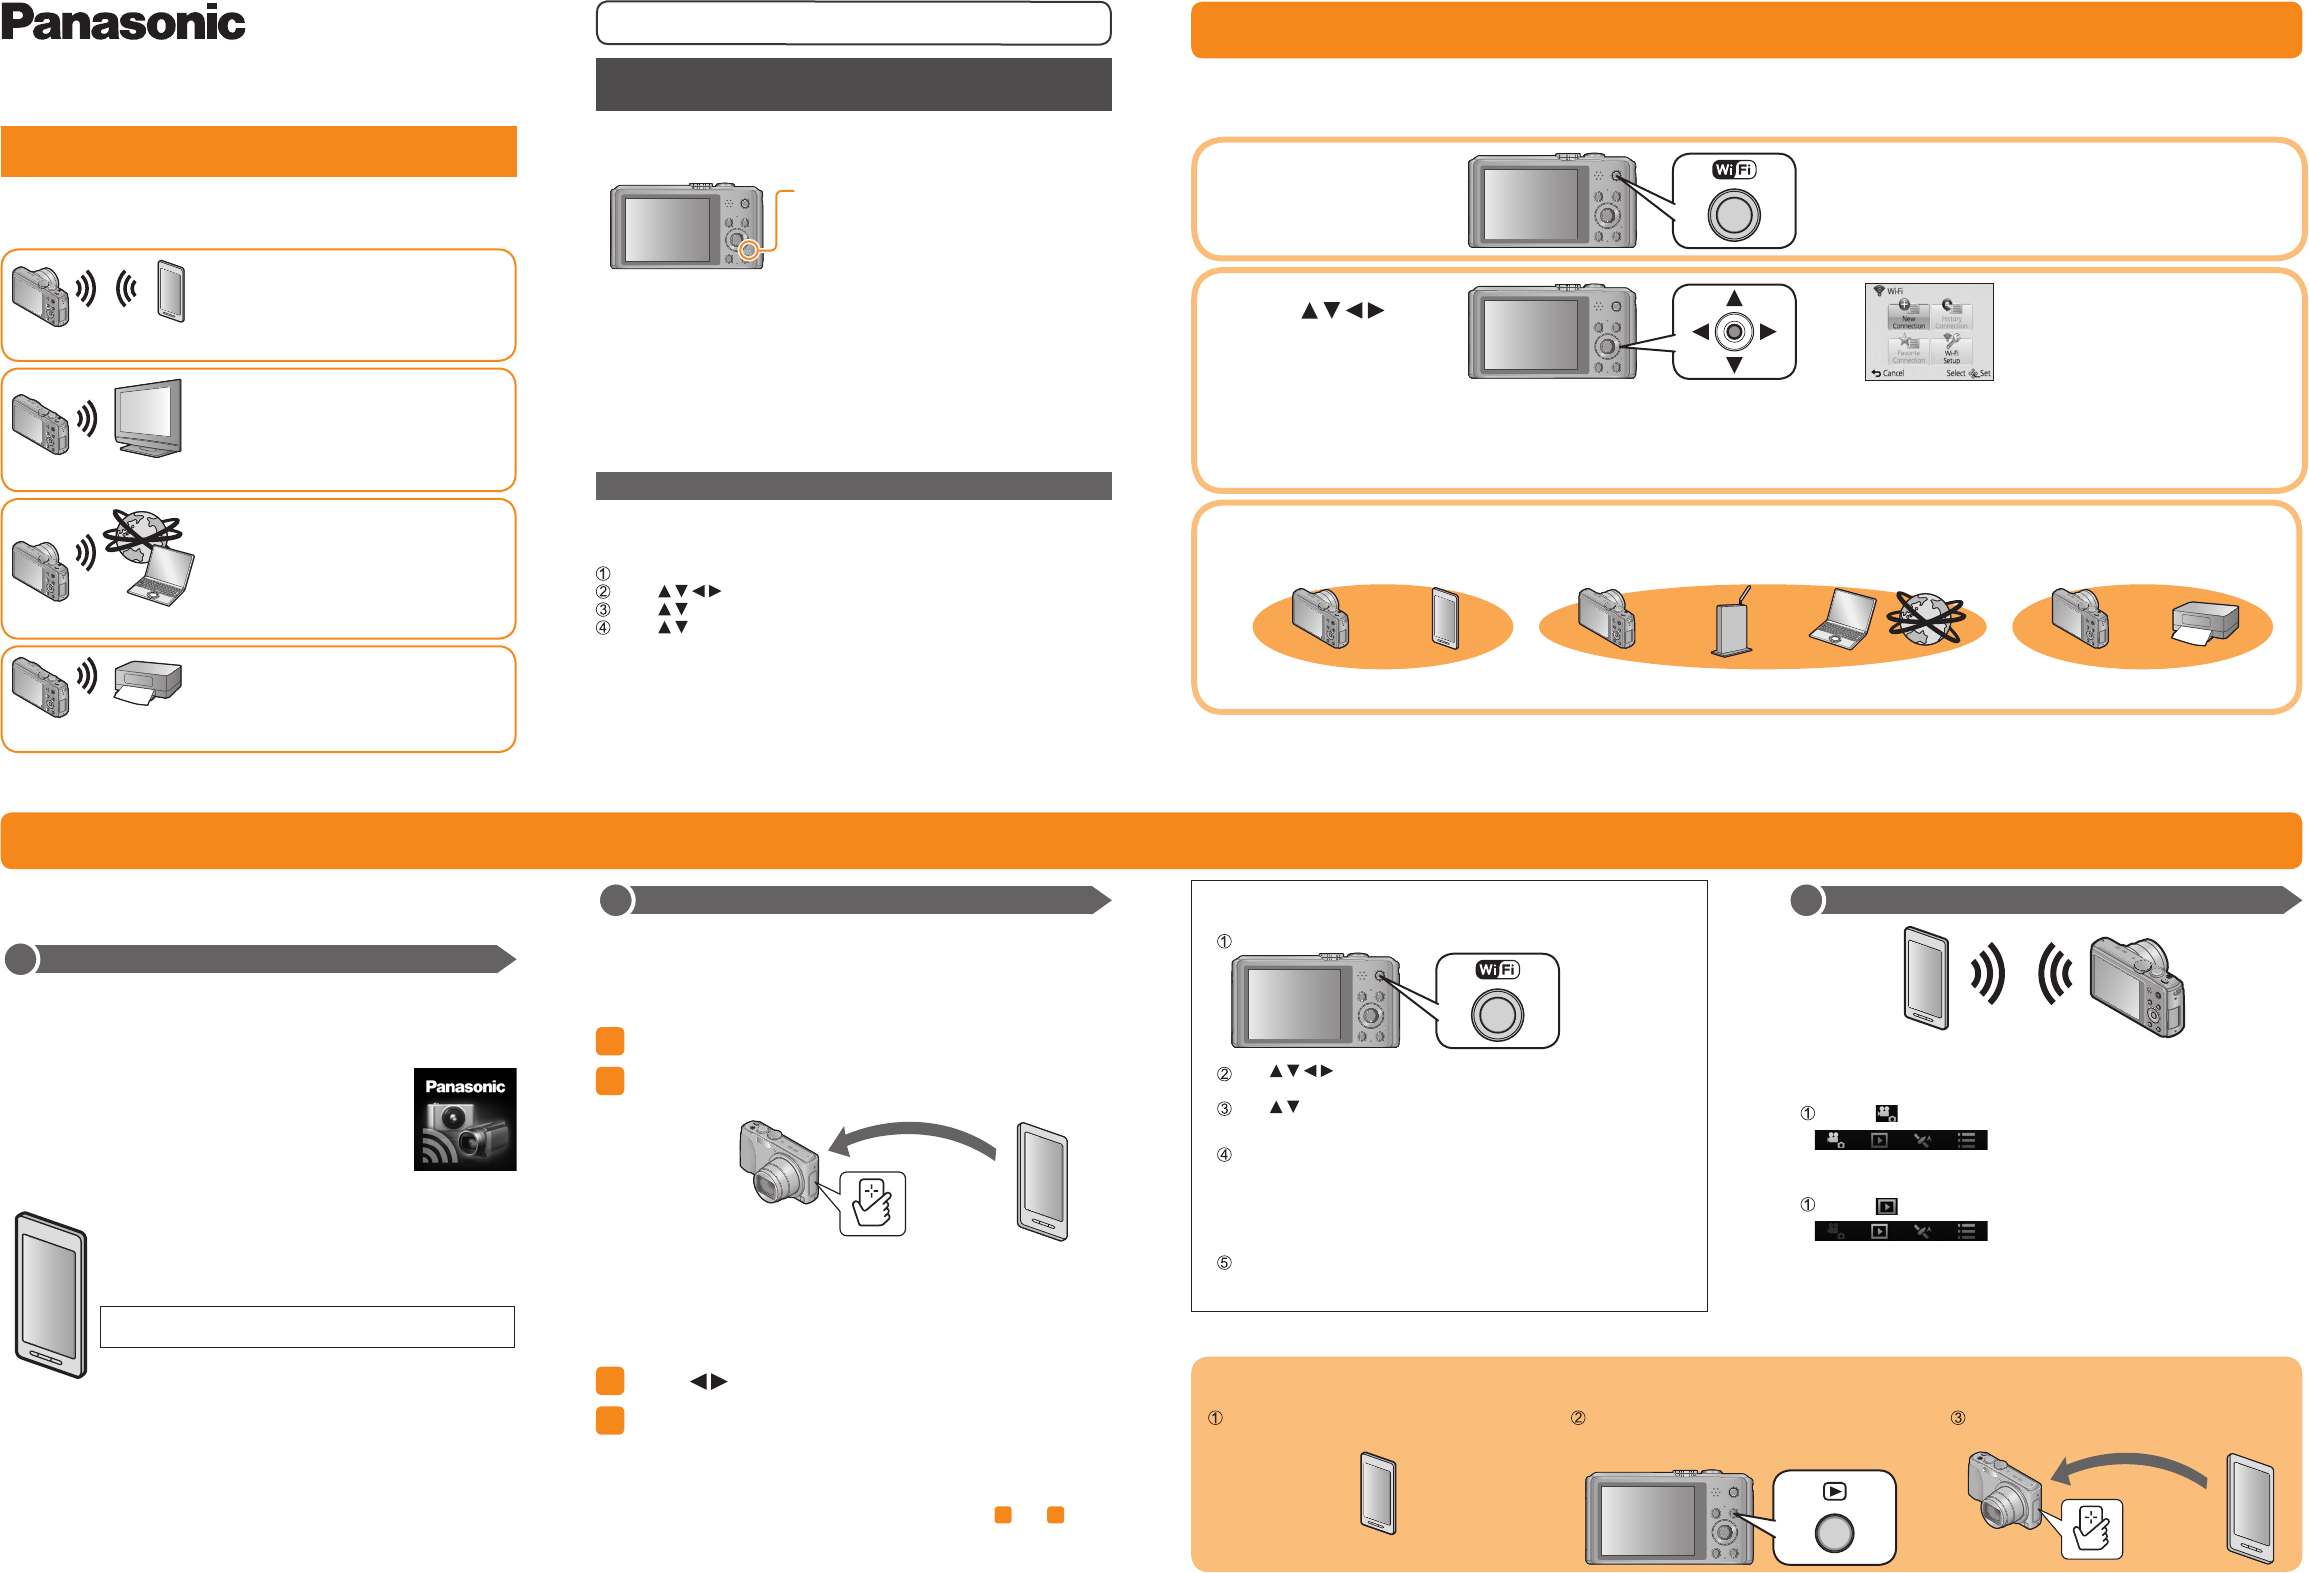
The operation to connect this unit to other devices by Wi-Fi differs by function, connection method, etc. Perform operation by following the screen display and
refer to the manual, etc. for the connecting device or WEB service.
Preparation: You may be required to configure settings on applicable devices depending on the connecting device or WEB service.
1
Press [Wi-Fi] button
2
Press to
select the item and
press [MENU/SET]
• You can also select it by touch
operations.
[New Connection]: Configure settings for a new Wi-Fi connection with Wi-Fi compatible devices or WEB services. ([Remote Shooting] / [Playback
on TV] / [Send Images While Recording] / [Send Images Stored in the Camera])
[History Connection]: Connect to compatible devices or WEB services using the same setting as before when connecting with Wi-Fi.
[Favorite Connection]: You can register frequently used connection settings.
[Wi-Fi Setup]: Configure various Wi-Fi settings.
3
Connect to Wi-Fi
Camera
Smartphone/
tablet
Camera
Wireless access
point
Compatible devices, etc.,
on network
Camera
Wi-Fi compatible
devices
[Remote Shooting] (see below)[Via Network] (see reverse side)[Direct] (see reverse side)
Sequence of connecting operation
This section describes how to make a Wi-Fi connection between this unit
and a smartphone/tablet to record pictures using the smartphone/tablet
and to transfer pictures to the smartphone/tablet.
1
Installing “Panasonic Image App”
The “Panasonic Image App” is an application provided by Panasonic that
allows your smartphone/tablet to perform the following operations of a
Wi-Fi-compatible LUMIX. (“Panasonic Image App” is indicated as “Image
App” in the text.)
■
Version
1.2 or above
■
Supported OS
Android 2.2 - Android 4.2
iOS 4.3 - iOS 6.0
■
Installation procedure
Connect your smartphone/tablet to the Internet, and
please install “Panasonic Image App” from the following
site.
• “Google Play™ Store” (for Android)
• “App Store
SM
” (for iOS)
In the search field of each site, search by entering
“Panasonic Image App” to find it quickly.
●
The service may not be able to be used properly depending on the
type of smartphone/tablet being used. For compatible devices,
see the following support site.
http://panasonic.jp/support/global/cs/dsc/
(This site is available in English only.)
●
Android and Google Play are trademarks or registered trademarks of
Google Inc.
●
App Store is a service mark of Apple Inc.
Recording/viewing pictures with a smartphone/tablet [Remote Shooting]
2
Easily connect to a smartphone/tablet
Use the NFC (Near Field Communication) function to easily connect this
unit to a smartphone/tablet with Wi-Fi for remote recording and to send
pictures to the smartphone/tablet.
• This function can be used with NFC compatible devices with Android
(2.3.3 or above). (Not available in certain models)
1
Start up “Image App” on your smartphone/tablet
2
Place your smartphone/tablet to the side of this
unit
Place over this area
(within 5 mm (0.20 inch))
• Do not bump your smartphone/tablet strongly against this unit.
(The smartphone/tablet or this unit may get scratched)
• For information on how to use NFC compatible devices, please
contact the device manufacturer.
• If there is no immediate reaction, slightly move the position where
the smartphone/tablet was placed.
3
Press to select [Yes] and press [MENU/SET]
4
Place your smartphone/tablet over this area of the
unit again
• When the connection is complete, live images captured by the
camera will be displayed on your smartphone/tablet.
• Smartphone/tablet that have already been approved to connect
can connect by performing the operations in step
1
and
2
.
When manually connecting without the NFC function
■
Operating this unit
Press the [Wi-Fi] button
Use to select [New Connection] and press
[MENU/SET]
Use to select [Remote Shooting] and press [MENU/SET]
■
On your smartphone/tablet
Select the SSID displayed on the camera, and enter the
password
• The SSID displayed differs depending on the connection
method.
• To connect [Via Network], select a wireless access point and
adjust the settings.
Start up “Image App”
• When the connection is complete, live images captured by the
camera will be displayed on the “Image App” screen.
3
Taking pictures / Playing back pictures
■
Taking pictures via a smartphone/tablet
(remote recording)
Select [ ] on a smartphone/tablet
■
Playing back pictures in the camera
Select [ ] on a smartphone/tablet
●
Read the [Help] in the “Image App” menu for further details on how to
operate.
●
The screen differs depending on the operating system.
Transferring a still picture easily to your smartphone/tablet
When transferring just 1 still picture to your smartphone/tablet with “Image App” installed, you can use the NFC function to easily send the picture.
Gebruikershandleiding.com neemt misbruik van zijn services uitermate serieus. U kunt hieronder aangeven waarom deze vraag ongepast is. Wij controleren de vraag en zonodig wordt deze verwijderd.
Product:
Spelregels forum
Om tot zinvolle vragen te komen hanteren wij de volgende spelregels:
lees eerst de handleiding door;
controleer of uw vraag al eerder door iemand anders is gesteld;
probeer uw vraag zo duidelijk mogelijk te stellen;
heeft u een probleem en al geprobeerd om dit op te lossen, vermeld dit erbij aub;
heeft u een oplossing gekregen van een bezoeker dan horen wij dat graag in dit forum;
wilt u een reactie geven op een vraag of antwoord, gebruik dan niet dit formulier maar klik op de knop 'reageer op deze vraag';
uw vraag wordt direct op de website gezet; vermijd daarom persoonlijke gegevens in te vullen;
Belangrijk! Als er een antwoord wordt gegeven op uw vraag, dan is het voor de gever van het antwoord nuttig om te weten als u er wel (of niet) mee geholpen bent! Wij vragen u dus ook te reageren op een antwoord.
Belangrijk! Antwoorden worden ook per e-mail naar abonnees gestuurd. Laat uw emailadres achter op deze site, zodat u op de hoogte blijft. U krijgt dan ook andere vragen en antwoorden te zien.
Abonneren
Abonneer u voor het ontvangen van emails voor uw Panasonic Lumix DMC-TZ41 bij:
nieuwe vragen en antwoorden
nieuwe handleidingen
U ontvangt een email met instructies om u voor één of beide opties in te schrijven.
Ontvang uw handleiding per email
Vul uw emailadres in en ontvang de handleiding van Panasonic Lumix DMC-TZ41 in de taal/talen: Engels als bijlage per email.
De handleiding is 1,08 mb groot.
U ontvangt de handleiding per email binnen enkele minuten. Als u geen email heeft ontvangen, dan heeft u waarschijnlijk een verkeerd emailadres ingevuld of is uw mailbox te vol. Daarnaast kan het zijn dat uw internetprovider een maximum heeft aan de grootte per email. Omdat hier een handleiding wordt meegestuurd, kan het voorkomen dat de email groter is dan toegestaan bij uw provider.
Andere handleiding(en) van Panasonic Lumix DMC-TZ41
Uw handleiding is per email verstuurd. Controleer uw email
Als u niet binnen een kwartier uw email met handleiding ontvangen heeft, kan het zijn dat u een verkeerd emailadres heeft ingevuld of dat uw emailprovider een maximum grootte per email heeft ingesteld die kleiner is dan de grootte van de handleiding.
Er is een email naar u verstuurd om uw inschrijving definitief te maken.
Controleer uw email en volg de aanwijzingen op om uw inschrijving definitief te maken
U heeft geen emailadres opgegeven
Als u de handleiding per email wilt ontvangen, vul dan een geldig emailadres in.
Uw vraag is op deze pagina toegevoegd
Wilt u een email ontvangen bij een antwoord en/of nieuwe vragen? Vul dan hier uw emailadres in.