Usage guidelines
• Once fi tted the OXFORD HotHands are designed for keeping gloved hands at a comfortable and warm
temperature. Small changes to the ambient temperature will affect the temperature of the HotHands and it is
necessary to adjust temperature as appropriate. For simplicity and reliability, there are 2 possible power settings.
In the LOW position the power is restricted to 25% and would commonly be used when the ambient temperature
is between 10° to 17°C. In the HIGH position the power is at 100% and would be used when temperatures are
between 0° and 9°. These ambient temperatures are given as a guide only and varies depending on the rider and
what type of gloves are worn.
If the grips are too hot please ensure the heat controller is turned to the LOW position or even switch it OFF if
necessary.
• If connected directly to the battery, please ensure that you remember to switch off the HotHands before leaving the
vehicle. The optional LED light should remind you that it is switched on.
Unfortunately Oxford Products cannot accept any responsibility for fl attened batteries.
• Your HotHands must only be connected and turned on when fi tted to your motorcycle grips as per the instructions.
• Turn the switch off before connecting each of the over-grips into the connectors
• Ensure that the over-grips are fi rmly attached and do not move independently of your motorcycle grips before using
the machine
• Ensure that the throttle operates freely
• Designed for use with leather winter gloved hands.
• No attempt should be made to alter the length of the HotHands’ wiring loom.
• Regularly check the integrity of the attachment and materials of your HotHands. Do not use if in doubt and consult
your local authorised Oxford stockist.
• Oxford Products will accept no liability for the consequences of over-grips which have not been securely fastened.
Fitting and Wiring Instructions
These heated over-grips are designed to fi t over most rubber grips mounted on 22mm handlebars.
• Wrap the overgrip over the existing handle bar rubber grip with the neoprene rubber side facing the grip.
• Ensure that the velcro fl ap secures onto the opposite velcro patch and that the over-grip is very tight and secure
onto the rubber grip. The over-grip must not be able to slide along or move independently of the grip.
• Position the over-grips such that the wires do not foul against the brake or clutch levers. The throttle grip should
rotate freely without obstruction and without stretching or pinching the wires.
• The wiring harness should be installed with the switch in position, which ensures that the wires from the grips can
reach without strain. Cable ties are provided to secure loose wires.
• The switch may be mounted on a fl at panel using self-tapping screws or preferably use the adhesive-backed foam
pad which is supplied in the kit (see below). Alternatively, it may be fi tted onto tubular handlebars by passing the
cable ties provided through the pre-made holes in the switch and around the handlebar.
• The switch contains an L.E.D. which glows when the over-grips are turned on.
• The loom is designed for ease of fi tting. There are only 2 wires that need attaching to the motorcycle’s existing wiring
loom. All other connections are through the multi-pin block connectors and cannot be fi tted the wrong way.
• The feed (Red wire) can be connected either to the battery positive or to an ignition feed so that the grips cannot be
inadvertently left “on” when leaving the machine.
• The negative (Black wire) should be connected to either the negative battery terminal or to a negative connection in
the motorcycle’s wiring loom.
• Both the negative and the positive connections are fi tted with a round eyelet type fi tting. This will allow them to be
bolted to the battery terminals. If you have chosen to use an ignition feed, the positive wire should not be trimmed
by more than 25mm. Safety fi rst: read carefully before fi tting or using!
*
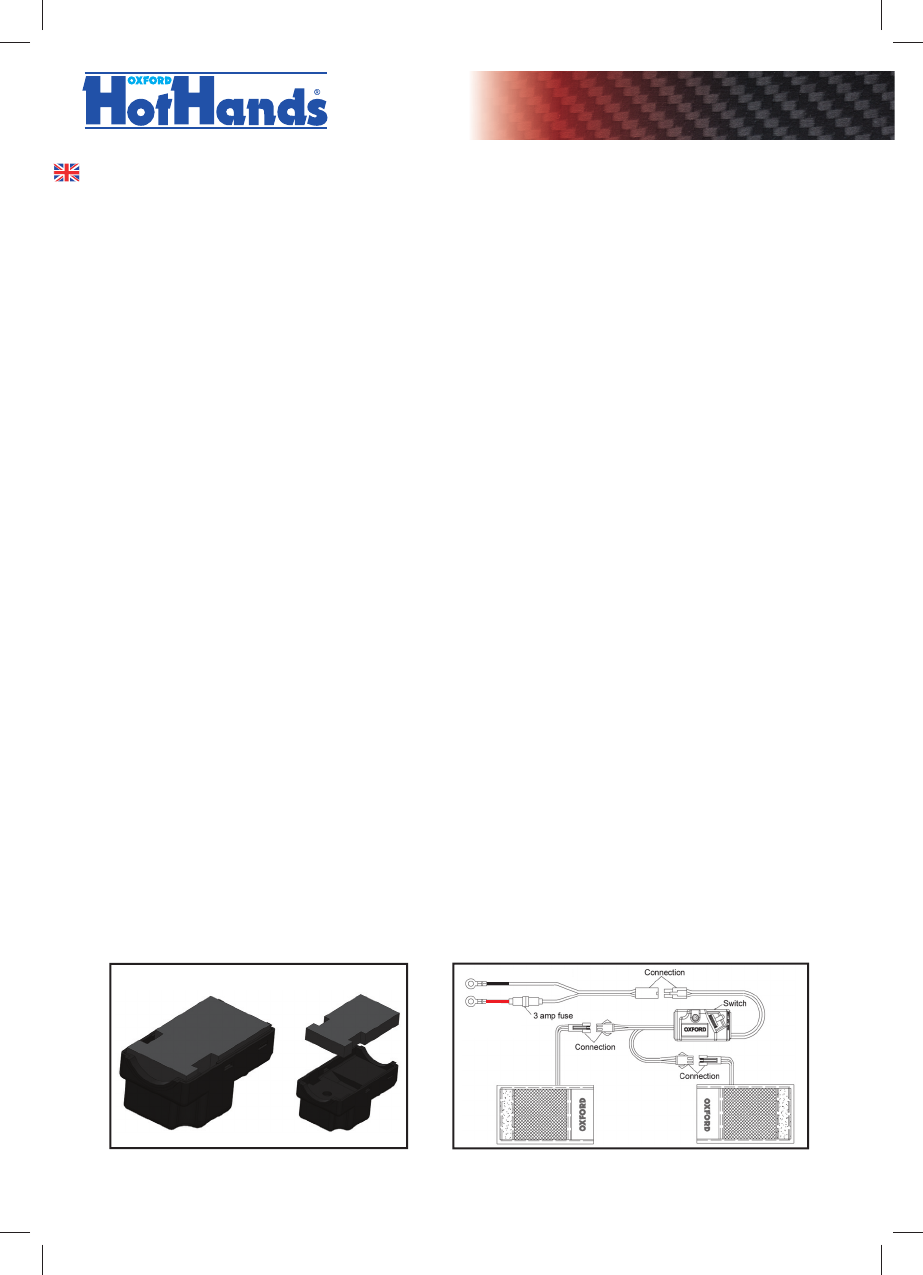
Wiring Diagram - Technical Data.
• 12 Volts input (Max: 14.3 Volts) -
• Each over-grip : 1.3 amp - 15.6 Watts (18.5 Watts max)
Carbon Heated Over-Grips
Safety fi rst: read carefully before fi tting or using!
See below for wiring diagram
Switch base for fl at panels
*
Battery connections
+
–