- En 2 - - F - Es 1 -
- En 1 - - F - F
D/A Con
Instruction Manual
D
“Made for iPod
accessory has been designed to connect specifically to iPod, iP
iPad, r
performance standards.
Apple is not responsible for the operation of this device or its compliance with
safety and regulatory standards.
Please note that the use of this accessory with iPod, iPhone, or iP
wireless performance.
Apple, Macintosh and Mac OS are trademarks of Apple Inc., registered in the U.S.
and other countries.
Android is a trademark of Google Inc.
Microsoft, Windows and Windows Vista are either registered trademarks or
trademarks of Microsoft Corporation in the United States and/or other countries.
Other company names and product names in this document are the trademarks
or registered trademarks of their respective owners.
IMPORT
The exclamation point within an equilateral triangle is
intended to alert the user to the presence of important
operating and maintenance (servicing) instructions in the
literature accompanying the appliance.
W
EXPOSE
CAUTION
●
DO NOT REMOVE
ELECTR
●
IF
STORE
NOT USE
●
USE OF CONTROLS OR ADJUSTMENTS OR PERFORMANCE OF PROCEDURES
OTHER
RADIA
Model for USA
This device complies with part 15 of the FCC Rules. Operation is subject
to the following two conditions: (1)
interference, and (2) this device must accept any interference received
including interference that may cause undesired operation.
CAUTION
Changes or modifications to this equipment not expressly approved b
Onkyo Corporation for compliance will void the user’s warranty
This equipment has been tested and found to comply with the limits
for a Class B digital device, pursuant to P
limits are designed to pro
interference in a residential installation.
and can radiate radio frequency energy and, if not i
accordance with the instructions, may cause harmful interference to radio
communications. However
not occur in a particular installation. If this equipment does cause har
interference to radio or television reception, which can be determined by
turning the equipment off and on, the user is encouraged to try to correct
the interference by one or more of the following measur
•
• Increase the separation between the equipment and receiver
• the outlet on a circuit from
which the receiver is connected.
•
Model for Canada
Industr
This Class B digital apparatus complies with Canadian ICES-003.
Cet appareil numérique de la classe B est conforme à la norme NMB-003
du Canada.
1) Read these instructions.
2) Keep these instructions.
3) Heed all warnings.
4) Follow all instructions.
5) Do not use this apparatus near water
6) Clean only with dry cloth.
7) Do not install near any heat sources such as radiators, heat r
or other apparatus (including amplifiers) that produce heat.
8) Only use attachments/accessories specified by the manufacturer
9) Refer all servicing to qualified ser
the apparatus has been damaged in any way
or plug is damaged, liquid has been spilled or objects have fallen into the
apparatus, the apparatus has been exposed to rain or moisture, does not
operate normally, or has been dr
●
Caution should be taken when using earphones or headphones with the
product because excessive sound pressur
headphones can cause hearing loss.
W
T
volume levels for long periods.
CAUTION
●
Do not expose this apparatus to drips or splashes.
●
If the product uses batteries (including a battery pack or installed
batteries), they should not be exposed to sunshine, fire or excessive heat.
Model for Europe
Declaration of Conf
We declare
product complies with the standards:
- Safety
-
disturbance characteristics
- Limits for harmonic current emissions
- Limitation of voltage changes, voltage fluctuations and flicker
- RoHS Directive, 2011/65/EU
- Hereby
with the essential requirements and other relevant pr
1999/5/EC.
WEEE
http://www.onkyo.com/manual/weee/weee
Introduction
Thank you for choosing Onkyo.
Read this manual carefully to get the best performance from this unit.
After reading this manual, keep it in a safe place f
Included accessories
Check to be sure the box includes all the supplied accessories shown below
Please contact the store where you pur
accessories are missing or have been damaged during transportation.
DC power supply cable (DC plug to USB A connector) × 1
USB cable for computer connection (USB micro-B connector to USB A connector) × 1
Rubber bands for attachment* × 2
Instruction manual (this document) × 1
* Use to attach a music player or other device to this unit.
F
This D/A Converter/Headphones Amplifier supports both Apple iOS and
Android products. Using asynchronous mode that supports 96 kHz/24-bit audio
over USB, this unit can convert signals from digital t
its built-in high-precision clock to enable playback of high-resolution audio
contents for computer connection.
Moreover
running Android. *
In addition to USB inputs, this unit also has an analog/optical digital input jack,
enabling support for input from a variety of devices.
* This does not guarantee operation with all Android devices.
The device must support AOA 2.0 connection for Android 4.1 or later version.
Apple products that can be used with
this unit
This unit can be connected to and used with the following Apple products.
iPhone 5s, iPhone 5c, iPhone 5
iPad Retina (4th generation), iP
iPod touch (5th genera
●
Always use the USB cable that was included with the iPod
to connect it to this unit’s iP
port. Operation cannot be guaranteed when using a non-genuine cable.
D
GAIN switch
Use this to change the output level to suit the headphones that you
are using.
H: high output level
L: low output level
Lower the volume bef
CAUTION
Particularly when using headphones for the first time with this unit, set
the GAIN switch to L and be sure to raise the volume g
playback to check the sound pressure sensitivity
E
Po
Turn this counter
Use this to adjust the volume.
Keep
turning it clockwise to increase the volume.
decrease the volume.
Recharging
This unit has a built-in rechargeable lithium-ion battery
●
Charge it before using the unit the first time after pur
not been used for a long time.
USB cable for computer
connection
(USB micro-B connector to
USB A connector)
DC power supply cable
USB AC adapter
sold separately
●
Make sure the temperature of the surrounding en
5−35°C when charging.
Charging might not occur properly outside this temperature range
●
A computer connected using the included USB cable can also charge the
unit.
●
Always connect this unit and the computer directly. If connected through a
USB hub or other device, charging might not occur properly
●
When connected to a computer
does not recognize this unit as a valid USB device.
●
Connect a USB compatible AC adaptor (commercially available) and the
included DC power supply cable to charge the unit.
when charging is 1 A. Compared to char
be charged more rapidly by using a DC power supply
●
When the included DC power supply cable and the USB cable for
computer connection are both connected, the unit will charge from the
DC power supply cable. P
this case.
Placement pr
●
Do not put anything on top of the unit.
●
Avoid placing the unit in direct sunlight or close to any sour
as a radiator
are subject to vibrations or exposed to excessive dust, cold or moisture
●
Place the unit in a stable location near the audio system that you will use
with it.
●
The voltage supplied to the unit should match the voltage printed on
the rear panel. If you are in any doubt r
electrician.
●
Do not open the body of the unit as this might result in damage to the
circuitry or cause electric shock
contact your dealer.
●
When removing the power plug from the wall outlet, alwa
on the plug; never yank on the cord.
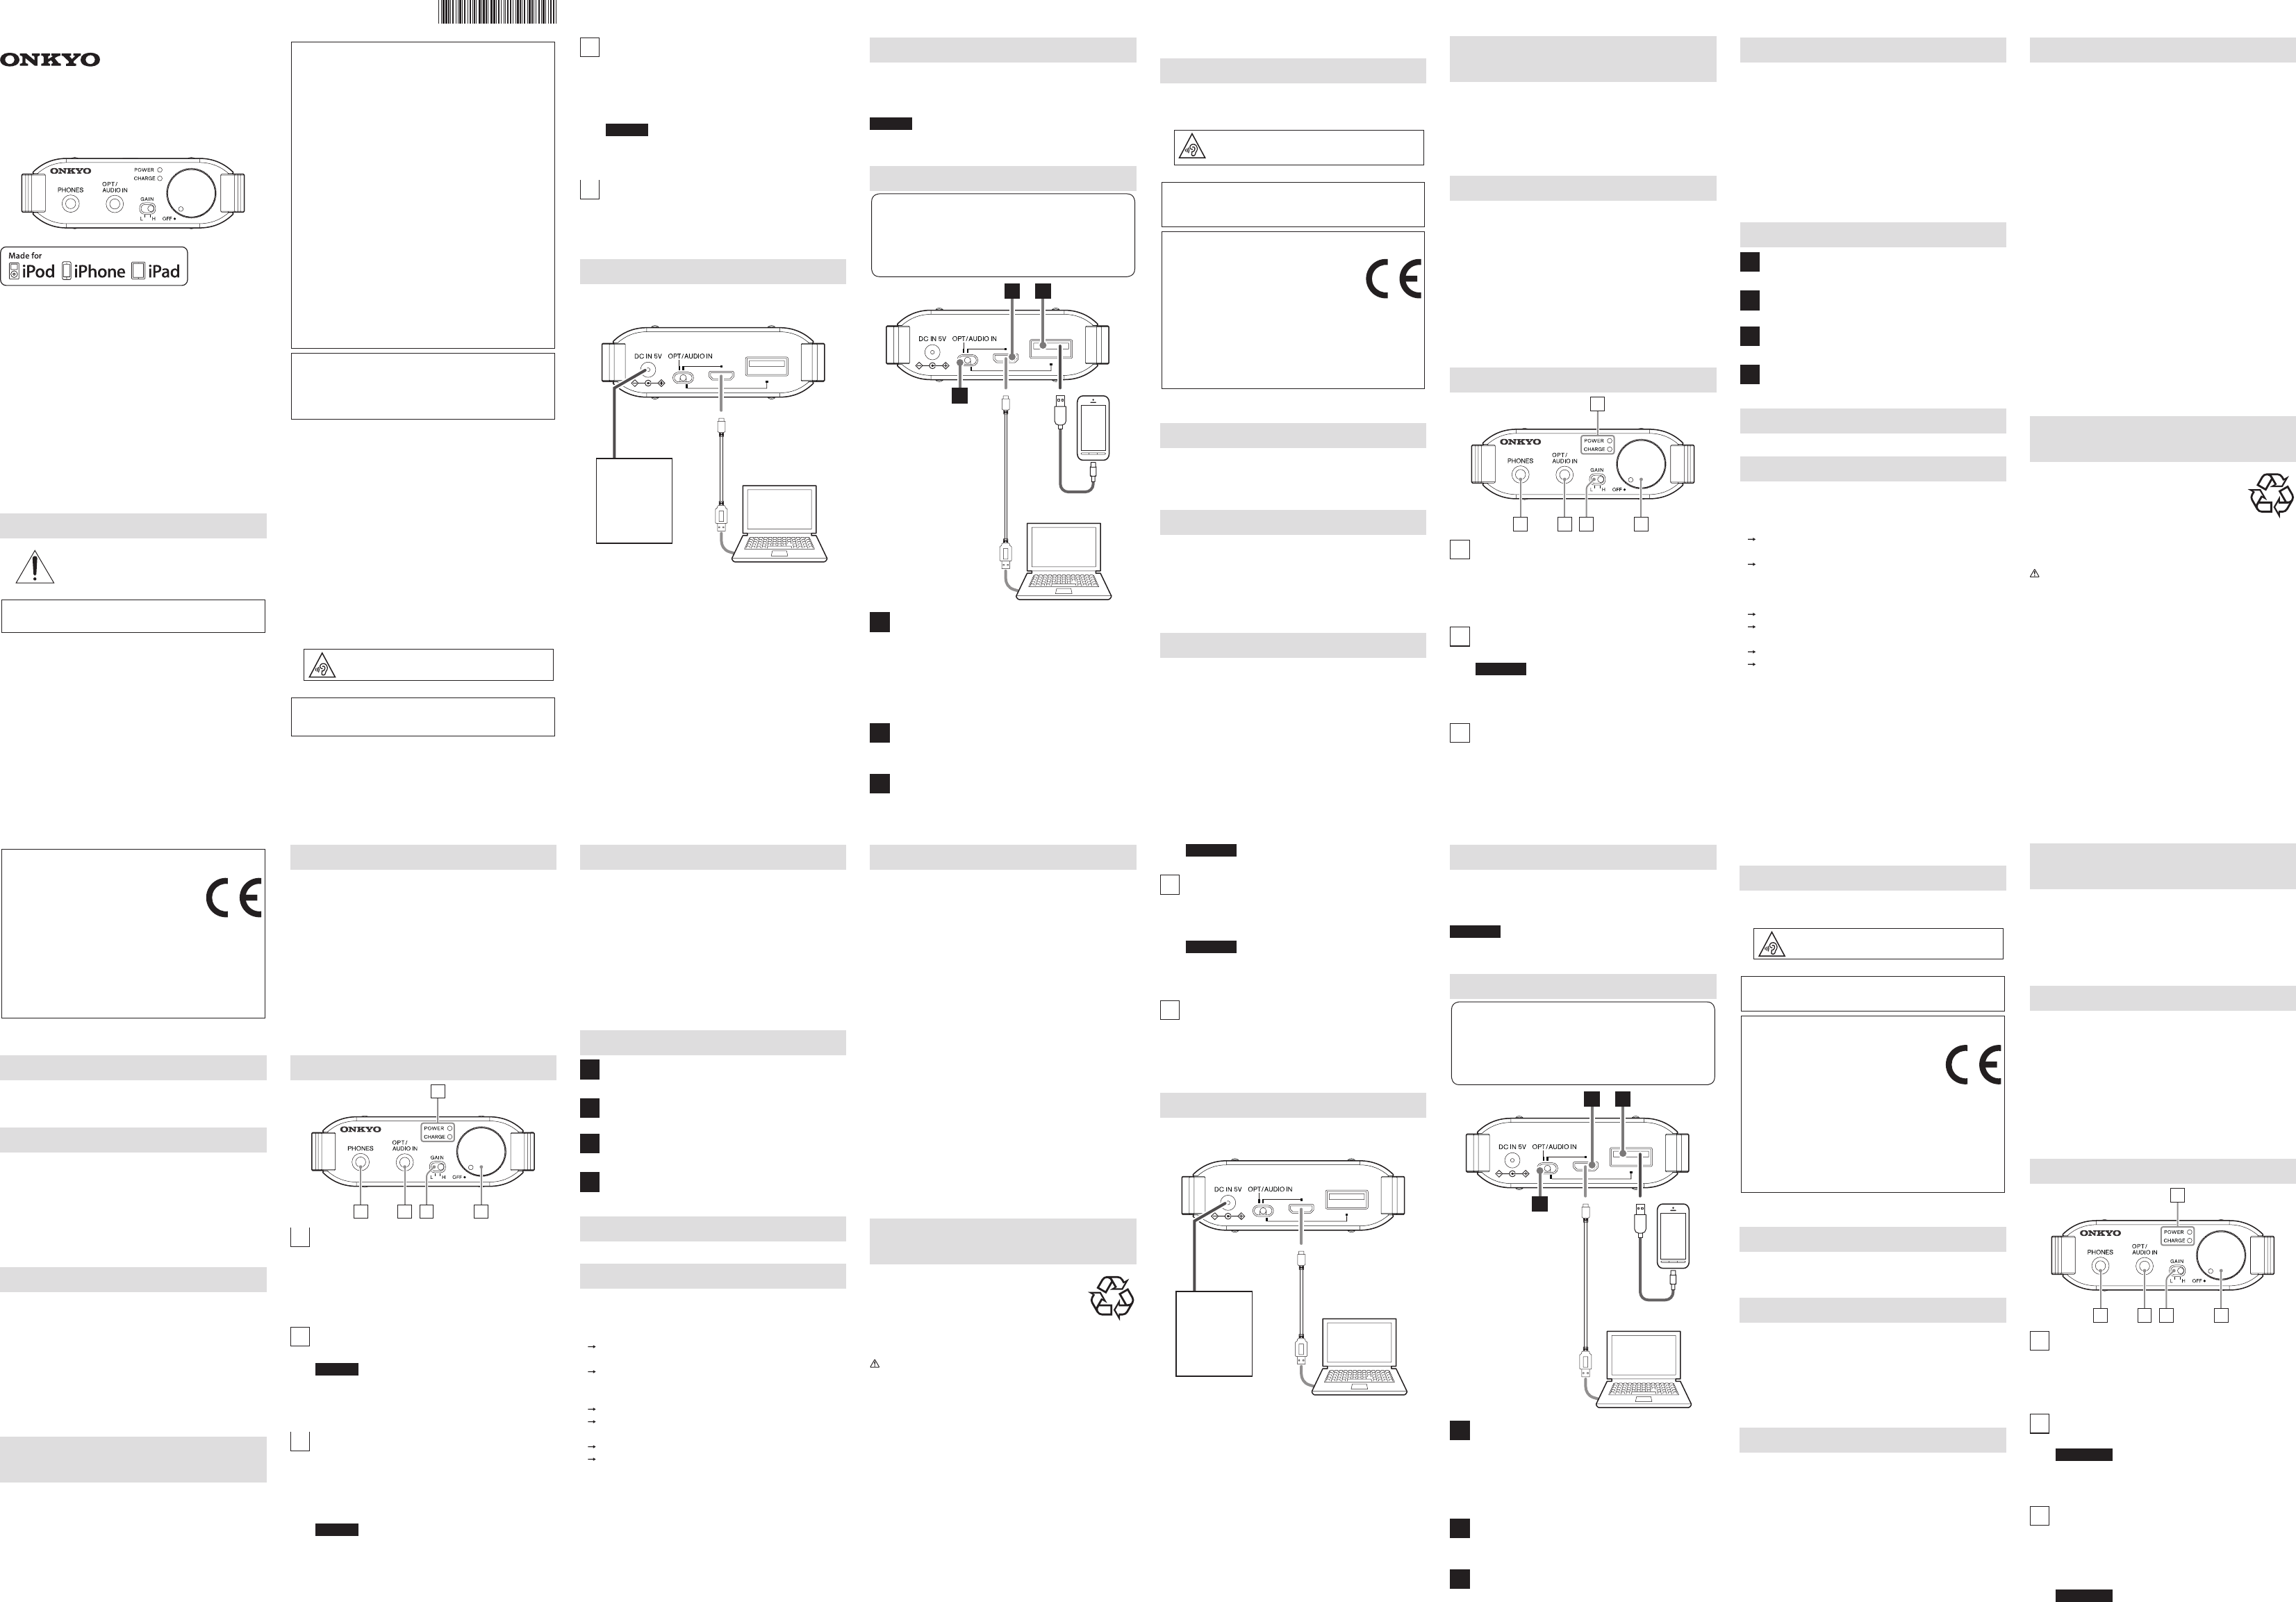
Names and functions of par
E
A
Indicators
POWER: This lights blue when the unit is on.
●
After the unit has been on for 10 seconds, this indicator will become
unlit to prevent battery consumption.
●
This indicator blinks when the remaining battery charge is low
CH
completes, it will become unlit.
B
PHONES jack
Connect a headphones plug (3.5 mm stereo mini) to this jack.
CAUTION
Always minimize the volume befor
putting them on.
disconnect them or turn the unit on or off. Doing so could result in a
sudden loud noise that could harm your hearing.
C
O
A
Digital connection (OPT
Use an optical cable with a mini plug.
Analog connection (AUDIO IN)
Use a cable with a 3.5 mm stereo mini plug.
CAUTION
Turn the pow
Automa
This unit will enter sleep mode automatically under the following cir
●
When 30 minutes pass without audio input.
●
When 30 minutes pass without headphones being plugged into the
PHONES jack.
CAUTION
T
turned off.
Connections
Complete all other connections before turning the unit on.
●
Read the owner’s manuals of all devices that will be connected, and
follow their instructions.
●
Do not bundle connection cables with the power cord. Doing so
could cause noise.
●
Connect all plugs securely.
C
USB cable for computer
connection
(USB micro-B connector to
USB A connector)
USB cable included with iPod/
iPhone/iPad/Andr
A
connection por
Use the USB cable included with the iPod/iPhone/iP
to connect it to this unit.
●
Connecting anything other than an iPod/iPhone/iP
could cause the operation time of the battery to be significantly
reduced.
B
C
Use the included USB cable for computer connection (USB micro-B
connector to USB A connector) to connect this unit to a computer
C
I
Use this switch to select the input source.
Supported operating systems
Computers running the following operating systems can be connected by USB
to this unit.
This unit can be operated with the standard OS driver
install a driver
Microsoft Windows
Windows Vista, Windows 7, Windows 8, Windows 8.1
Mac OS X
Mac OS X 10.6.4 or later (Snow Leopard)
OS X Lion 10.7
OS X Mountain Lion 10.8
OS X Mavericks 10.9
Use with operating systems other than the above is not guaranteed.
Basic operation
1 S
source
2 T
Set the volume at a low level.
3 S
device
4 T
volume.
Download the latest firm
The latest firmware is disclosed on the Onkyo website.
T
If you experience a problem with this unit, please check the following items
before requesting service. If it still does not operate correctly, contact the retailer
where you purchased the unit.
The unit does not turn on.
If the remaining batter
Supply power to the unit through the DC plug or the USB micro-B port.
Has the automatic power saving function put the unit to sleep? T
volume knob counterclockwise to turn the unit off once.
No sound is output.
Use the volume knob to adjust the volume.
Confirm that the input selection switch is set to the por
the playback device that you are using.
Confirm that the connected device is playing back
Confirm the PHONES jack connection.
Specifications
Frequency response .....................10 H
Distortion ............................... 0.003% or less (when using AUDIO IN)
(32 Ω, 1 kHz, 85 mW + 85 mW output, JEIT
Supported headphone impedance .................................... 8–600 Ω
Maximum input (AUDIO IN) ..............................................1 V
Effective maximum headphone output
145 mW + 145 mW (32 Ω, 1 kHz, 10%, JEIT
60 mW + 60 mW (300 Ω, 1 kHz, 10%, JEIT
35 mW + 35 mW (600 Ω, 1 kHz, 10%, JEIT
Operating temperature ............................................0°C to +40°C
Battery operation time (when load is 32 Ω and output is 1 mW + 1 mW
OPT/AUDIO IN ........................................... Appr
Apple iOS device ..........................................Approx. 8 hours
●
The operation time when using batteries will differ depending on use
and other conditions.
Charging time ......................................Appr
External dimensions ................64 × 112 × 21.7 mm (2 5/8" × 4 1/2” × 7/8” )
(
Weight ........................................................... 210 g (1/2 lb)
Supported sampling frequency/bit depth. . . . . . . . . . . . . . . . . . . . . . . . . 96 kHz/24-bit
●
Design and specifications are subject to change without notice.
●
Weight and dimensions are appr
●
Illustrations may differ slightly from production models.
Request regarding the disposal of this
product
This product has a built-in lithium-ion rechargeable battery
When disposing of this product, please check with the shop
where you purchased it or a nearby government agency for
instructions about how to dispose of the battery.
Please follow local laws
Instructions for removing the battery are provided for places
where laws require batt
CAUTION
●
Never disassemble this unit at an
●
T
purchased the product.
Lithium-ion batteries are valuable resources that can be r
cooperate in recycling them.
●
If you have any questions, please contact the store wher
the product.
Français
INSTRUCTIONS DE SÉCURITÉ IMPORT
●
Des précautions doivent être prises pour l’
casque avec le produit car une pression acoustique (v
dans les écouteurs ou dans le casque peut provoquer une perte d’audition.
A
Pour éviter les dommages auditifs
élevé pendant de longues périodes.
A
●
N’
●
Si le produit utilise des batteries (y compris un pack d’accus ou des
batteries fixes), elles ne doivent pas être exposées au soleil, au f
une chaleur excessive.
Modèles pour l’Europe
Déclaration de Conf
Nous déclarons, sous notre seule r
produit est conforme aux normes :
- Sécurité
- Limites et méthodes de mesure des caractéristiques
des perturbations radioélec
- Limites pour les émissions de courant harmonique
- Limitation des variations de tension, des fluctuations de tension et du
papillotement
- Directive RoHS, 2011/65/UE
- Par la présente, Onkyo Corporation déclare que l’appareil DA
conforme aux exigences essentielles et aux autres dispositions pertinentes
de la directive 1999/5/CE.
WEEE
http://www.onkyo.com/manual/weee/weee
Introduction
Nous vous remercions d’av
Lisez ce mode d’
de cette unité.
Après avoir lu ce mode d’
ultérieurement.
Acc
Vérifiez que vous disposez bien de tous les accessoir
Veuillez contacter le magasin dans lequel vous avez achet
ces accessoires manque ou a été endommagé durant le transport.
Câble d’alimentation CC (fiche CC v
Câble USB pour connecter l’
Bandes de caoutchouc pour la fixation* × 2
Mode d’
* Ser
Caractéristiques
Cet amplificateur pour casque-conver
appareils iOS d’
charge l’audio USB 96 kHz/24 bits, cet appareil peut conv
signaux numériques en signaux analogiques au moyen d’une horloge intégrée
de haute précision pour permettre de lire les contenus audio haut
d’un ordinateur
En outre, la lecture en qualité CD (44,1 kHz/16 bit) est possible pour les appareils
fonctionnant sous Android. *
En plus de l’
analogique/numérique optique permettant de faire entrer divers appareils
* Cela ne garantit pas un fonctionnement avec tous les appareils Android
L
une version ultérieure.
Produits Apple qui peuv
av
Ces produits Apple peuvent être connectés et utilisés av
iPhone 5s, iPhone 5c, iPhone 5
iPad Retina (4e génération), iP
iPod touch (5e généra
●
Utilisez toujours le câble USB qui était fourni avec l’
pour le connecter au port de connexion pour iPod/iPhone/iPad/appar
Android de cette unité. Un bon f
vous utilisez un autre câble que celui d’
Précautions conc
●
Ne posez rien sur l’unité.
●
Évitez d’
quelconque source de chaleur telle qu’un radiat
chauffage, une cheminée ou un amplificateur
aux vibrations ou exposés à une poussière excessive, au fr
●
Placez l’unité sur une surface stable près du système audio que vous allez
utiliser avec elle.
●
La tension d’alimentation de l’unité doit correspondre à la tension
imprimée sur son panneau arrière. Si vous avez des doutes à ce sujet,
consultez un électricien.
●
N’
ou causer un choc électrique. Si un objet étranger pénètre dans l’unité,
consultez votre revendeur
●
Quand vous débranchez le cordon d’alimentation de la prise secteur
toujours sur la prise, jamais sur le cordon.
Nomenclature et f
A
V
POWER : il s’allume en bleu quand l’unité est mise sous tension.
●
10 secondes après la mise sous tension de l’unité, ce voyant s
pour éviter de décharger la batterie.
●
Ce voyant clignote si la charge r
CHARGE
recharge terminée, il s
B
P
Branchez à cette prise la fiche d’un casque (mini-jack 3,5 mm stéréo).
A
Réduisez toujours le volume au minimum avant de brancher un casque
et de le mettre. N’allumez/n
débranchez pas le casque quand vous portez ce dernier. Cela pourrait
entraîner un bruit fort et soudain risquant d’endommager v
C
Prise d’
(OPT/A
Connexion numérique (OPT
Utilisez un câble optique à mini-fiche.
Connexion analogique (A
Utilisez un câble à fiche mini-jack 3,5 mm stéréo.
A
Coupez l’alimentation avant de changer la source d’
D
Sélecteur GAIN
Sert à changer le niveau de sor
H : haut niveau de sortie
L : bas niveau de sortie
Baissez le volume avant de basculer ce sélecteur sur H.
A
Lorsque vous utilisez pour la premièr
réglez le sélecteur GAIN sur L et veillez à monter pr
volume durant la reproduction pour contrôler la sensibilité de pr
acoustique.
E
Bouton alimentation/v
T
l’unité.
Utilisez-le pour régler le volume.
allumer l’unité. Continuez de le tourner dans le sens horaire pour
augmenter le volume.
le volume.
Recharge
Cette unité a une batterie lithium-ion rechargeable int
●
Chargez-la avant de l’utiliser pour la première f
qu’
Câble USB pour connexion
à l’
(connecteur USB micro-B
vers USB A)
Câble d’alimentation CC
Adaptateur
secteur USB vendu
séparément
●
Assurez-vous que la températur
lors de la recharge.
La recharge peut ne pas correctement s’
température.
●
Un ordinateur connecté au moyen du câble USB f
recharger l’unité.
●
Connectez toujours directement cette unité et l’
au travers d’un concentrateur (hub) USB ou d’un autre appareil, la r
peut ne pas se faire correctement.
●
En cas de connexion à un ordinateur
si l’
valable.
●
Branchez un adaptateur secteur compatible USB (disponible dans le
commerce) et le câble d’alimentation CC f
courant maximal lors de la recharge est de 1 A. P
depuis un ordinateur
utilisant une alimentation CC.
●
Quand le câble d’alimentation CC fourni et le câble USB pour la connexion
à l’
d’alimentation CC. L
Sy
Des ordinateurs fonctionnant sous les systèmes d’
être connectés par USB à cette unité.
Elle peut fonctionner avec le pilote standard du système d’
n’y a pas besoin d’
Microsoft Windows
Windows Vista, Windows 7, Windows 8, Windows 8.1
Mac OS X
Mac OS X 10.6.4 ou ultérieur (Snow Leopard)
OS X Lion 10.7
OS X Mountain Lion 10.8
OS X Mavericks 10.9
Le fonctionnement avec d’autr
F
1 Réglez le sélecteur d’
source d’
2 A
Réglez le volume à un niveau bas.
3 L
l’
4 T
unité pour régler le volume
T
Le firmware le plus r
Guide de dépannage
Si vous avez des problèmes av
avant de demander une intervention. Si cette unité ne fonctionne toujours pas
correctement, contactez le revendeur chez qui vous l’avez achetée
L
Si la char
Alimentez l’unité par la fiche CC ou le port USB micro-B.
La fonction d’
en veille ?
éteindre l’unité.
Aucun son n’
Utilisez le bouton de v
Vérifiez que le sélecteur d’
connecté l’appareil source de lecture.
V
V
F
Cette unité passera automatiquement en mode de veille dans les cir
suivantes.
●
Après 30 minutes sans entrée audio
●
Après 30 minutes sans casque connecté à la prise PHONES.
A
Pour mettre fin au mode de v
antihoraire jusqu’à ce que l’unité s
Branchements
T
●
Lisez les modes d’
suivez leurs instructions.
●
Ne regroupez pas les câbles de connexion av
Cela pourrait entraîner des bruits.
●
Branchez bien toutes les fiches.
B A
C
Câble USB pour connexion
à l’
(connecteur USB micro-B
vers USB A)
Câble USB inclus avec votre iP
iPhone/iPad/appar
A
Po
iPad/appar
Utilisez le câble USB fourni avec l’iP
pour relier celui-ci à l’unité.
●
Brancher autre chose qu’un iP
significativement l’autonomie de la batterie.
B
Port de connexion d’
Utilisez le câble USB fourni pour la connexion à l’
USB micro-B vers USB A) pour relier cette unité à un ordinat
C
Sélecteur d’
Utilisez ce sélecteur pour choisir la source d’
Caractéristiques techniques
Réponse en fréquence .............10 Hz – 100 kH
Distorsion ....................... 0,003% ou moins (av
(32 Ω, 1 kH
Impédance de casque prise en charge ..................................8-600 Ω
Entrée maximale (AUDIO IN) .............................................1 Vrms
Sortie efficace maximale pour casque
145 mW + 145 mW (32 Ω, 1 kHz, 10%, JEIT
60 mW + 60 mW (300 Ω, 1 kHz, 10%, JEIT
35 mW + 35 mW (600 Ω, 1 kHz, 10%, JEIT
T ...................................0°C à +40°C
Autonomie de batterie (sous charge de 32 Ω avec sortie de 1 mW + 1 mW
OPT/AUDIO IN ...........................................En
Appareil Apple iOS ........................................Environ 8 heures
●
L
conditions.
T .................................. Environ 8 heures (via USB)
Dimensions externes ...................................... 64 × 112 × 21,7 mm
(L × P × H, hors saillies)
Poids .....................................................................210 g
Fréquence d’ ........ 96 kH
●
Conception et caractéristiques techniques sont sujettes à modifications
sans préavis.
●
Le poids et les dimensions sont des valeurs approchées.
●
Les illustrations peuvent légèrement diff
Demande concernan
ce produit
Ce produit possède une batterie lithium-ion rechargeable int
Lors de la mise au rebut de ce produit, v
au magasin dans lequel vous l’avez acheté ou à une agence
gouvernementale locale des instructions sur la façon de vous
débarrasser de la batterie.
Veuillez respecter les lois locales
Les instructions de retrait de la batterie sont fournies pour les
pays où les lois imposent de retirer les batteries.
A
●
Ne démontez jamais cette unité si c
●
Pour remplac
lequel vous av
Les batteries lithium-ion sont des ressources pr
recyclées.
●
Si vous avez des questions, veuillez contacter le magasin dans lequel v
avez acheté le produit.
Español
NORMAS DE SEGURIDAD IMPORT
●
Deberá llevar cuidado cuando utilice auriculares con este producto, porque
una presión sonora (volumen) excesiva.
ADVERTENCIA
Para evitar daños en los oídos
volumen durante mucho tiempo.
PRECAUCIÓN
●
No exponga este aparato a goteras ni salpicaduras.
●
Si el producto utiliza pilas (incluido un pack de pilas o pilas instaladas), no
deben estar expuestas a la luz solar
Para los modelos europeos
Declaración de Conformidad
Declaramos, bajo nuestra total responsabilidad, que este
producto cumple con las normas:
- Seguridad
- Límites y métodos de medición de las caracteísticas
de perturbación radioeléc
- Límites de las emisiones harmónicas vigentes
- Limitación de los cambios de tensión, fluctuaciones de tensión y la
oscilación
- Directiva de Restricción de ciertas Sustancias Peligrosas (RoHS por sus
siglas en inglés), 2011/65/EU
- P
con los requisitos esenciales y otras exigencias relevantes de la Dir
1999/5/EC.
WEEE
http://www.onkyo.com/manual/weee/weee
Introducción
Gracias por elegir Onkyo.
Lea con cuidado este manual para lograr el mejor r
Después de leerlo, guárdelo en un lugar seguro para futuras consultas.
Acc
Compruebe que la caja incluye todos los accesorios suministrados indicados a
continuación. Contacte con el establecimiento donde adquirió esta unidad si
alguno de ellos falta o ha sufrido daños durante el transporte.
Cable de alimentación (conector de CC [DC] a conector USB A) × 1
Cable USB para conexión a ordenador (conector USB micro-B a conector USB A) × 1
Bandas de goma para sujeción* × 2
Manual de instrucciones (este documento) × 1
* Se utilizan para sujetar un reproductor de música o similar a esta unidad.
Prestaciones
Este convertidor D-A / Amplificador para audífonos funciona con productos Apple
iOS y Android. Mediante el modo asincrónico que admite audio de 96 kHz/24-bit
vía USB, esta unidad puede convertir con exactitud señales digitales en analógicas,
al utilizar un reloj incorporado de alta precisión, permitiendo la reproducción de
contenidos de audio de alta resolución para conectar a la computadora.
Además, los dispositivos que ejecutan Andr
calidad de CD (44,1 kHz/16-bit). *
Además de las entradas USB, esta unidad también tiene una entrada analógica/
digital óptica que la hace compatible con gran variedad de dispositivos.
* Esto no garantiza el funcionamiento en todos los dispositivos Android.
El dispositivo debe admitir una conexión AOA 2.0 para Android v
o posterior
Productos de Apple que se pueden
utilizar con esta unidad
Esta unidad puede conectarse y utilizarse con los siguientes productos Apple:
iPhone 5s, iPhone 5c, iPhone 5
iPad Retina (4ª generación), iP
iPod touch (5ª generación)
●
Utilice siempre el cable USB que viene incluido con el iPod
para conectarlo al puer
Android de esta unidad. No se puede garantizar el funcionamiento si el
cable no es el original.
Precauciones de emplazamiento
●
No coloque nada encima de la unidad.
●
Evite colocar la unidad directamente a la luz del sol o cerca de una fuente
de calor
también sitios expuestos a vibraciones o a polvo, frío o humedad excesiv
●
Coloque la unidad en un lugar estable cerca del equipo de audio con el
que vaya a utilizarla.
●
El voltaje suministrado a la unidad debe coincidir con el voltaje impreso
en el panel posterior
●
No abra la carcasa de la unidad porque podría dañar los circuitos o causar
una descarga eléctrica. Si se introduce un objeto extraño en la unidad,
póngase en contacto con su distribuidor.
●
Cuando desenchufe el cable de corriente de la toma de electricidad, tire
siempre directamente del conector
Nombres y funciones de las partes
A
Indicadores
POWER: se ilumina cuando la unidad está encendida.
●
Después de que la unidad lleve encendida 10 segundos, este
indicador se apaga para evitar el consumo de batería.
●
Este indicador parpadea cuando la carga de la batería está baja.
CHAR
terminal la carga, se apaga.
B
T
Conecte a este terminal un minijack estéreo de 3,5 mm.
PRECAUCIÓN
Ponga siempre el v
y ponérselos. Con los auriculares puestos, no los conecte ni desconecte,
ni encienda o apague la unidad. Si lo hace, puede producirse un ruido
inesperado a alto volumen y dañar sus oídos.
C
Terminal de entrada de audio óptico/
analógico (
Conexión digital (OPT
Utilice un cable óptico con un miniconector.
Conexión analógica (A
Utilice un cable con un minijack estéreo de 3,5 mm.
PRECAUCIÓN
Apáguelo antes de cambiar la fuente de entrada.