Shooting F
Using the C
T
Using the Menus
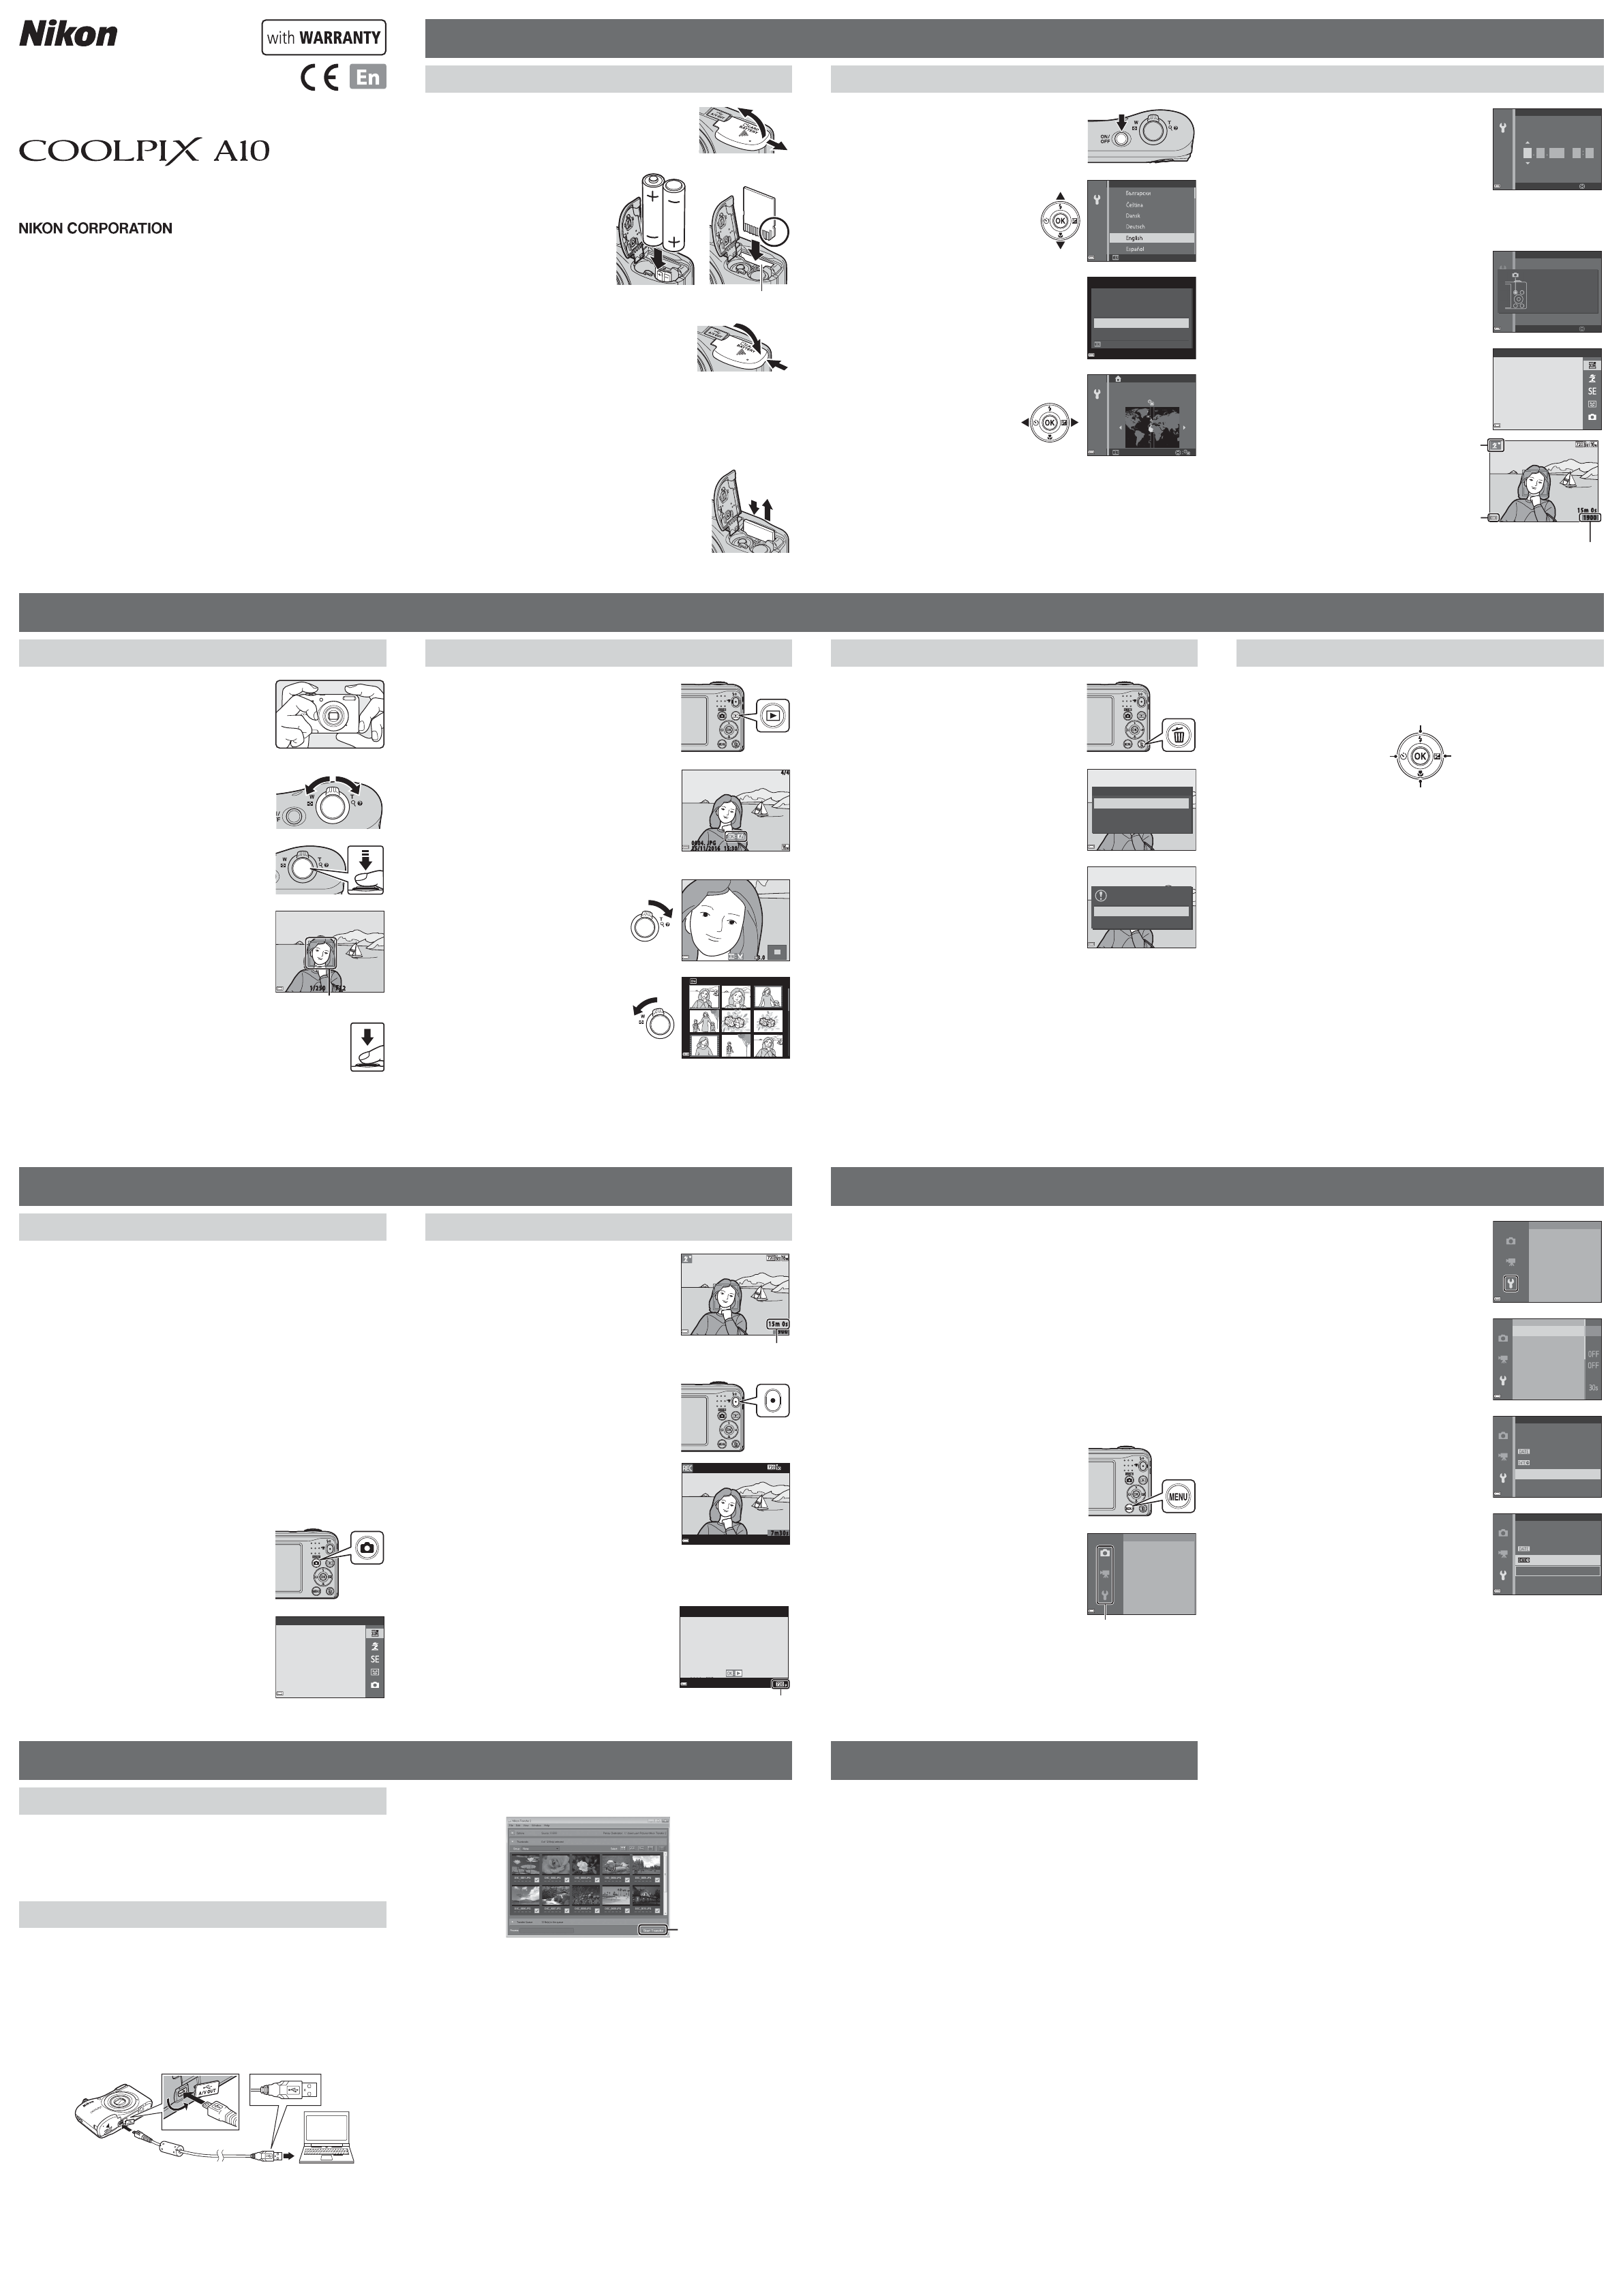
Inser
1
Open the battery-
card slot cov
• Hold the camera upside down to prevent the batteries from
falling out.
2
Inser
memory card.
• Confirm that the positive (+) and
negative (–) battery terminals are
oriented correctly and inser
batteries.
• Confirm the correct orientation
and slide the memory card in until
it clicks into place.
Memory card slot
3
Close the battery-
card slot cov
Applicable Batteries
• Tw
• Tw
• Tw
Performance of alkaline batteries may var
Removing the Memory Card
T
and the monitor have turned off
chamber/memory card slot cover
• Gently push the memor1 ) to
partially ejec2 ).
• The camera, batteries, and memory card may be hot
immediately after using the camera.
1
Pr
camera.
• The monitor turns on when the camera is turned on.
• T
2
Use the multi selector
HI to select the desired
language and press the
kbutton.
Cancel
Language
3
Use HI to select Ye and press the
kbutton.
Yes
No
Cancel
Choose time zone and
set date and time?
4
Use JK to select your
home time zone and press
the k button.
• Press H t
time (W is displayed above the
map).
Press I t
Back
London, Casablanca
5
Use HI to select the date format and prk button.
6
Set the date and time, and pr
kbutton.
• Use JK to select a field and then use HI to set
the date and time.
• Select the minute field and press the k button to
confirm the setting.
Date and time
2016 00 00
M
m
Edit
01 01
Y
7
When the confirmation screen is displaHI to
select Ye s and press the k button.
8
PrA (shooting mode) button.
Press this button in
shooting mode fo r
shooting-mode
selection menu.
Edit
Date and time
9
Use HI to select Scene auto selector
and press the k button.
Scene auto select or
• The camera enters the shooting
mode and you can take images in
Scene auto selector mode.
• While shooting, you can check
the battery level indicator and the
number of exposures remaining
1900
15m 0s
Shooting screen
Number of exposures
remaining
Battery level
indicator
Shooting
mode icon
T
Shooting with Scene Aut
1
Hold the camera steady
• Keep fingers and other objects away from the lens,
flash, microphone, and speaker
2
F
• Move the zoom control to change the z
position.
• When the camera automatically determines the
scene mode, the shooting mode icon changes.
Zoom out Zoom in
3
Pr
halfway
• When the subject is in focus, the focus ar
green.
• If the focus area or focus indicator flashes
camera is unable to focus. Modify the composition
and try pressing the shutter-release button halfway
again.
F 3.2
1/250
Focus ar
4
Without lifting your finger
release button the r
• The indicator showing the number of exposures r
indicator showing the maximum movie length flashes while images
are being saved or while a movie is being rDo not open the
battery-cha
or memory card while an indicator is flashing. Doing this could
result in loss of data, or in damage to the camera or the memory
card.
Play Back Images
1
Prc (playback) button to enter
playback mode.
2
Use the multi selector HIJK to
select an image to display
• TA button or
shutter-release button.
• When e is displayed in full-frame playback
mode, you can press the k butt
effect to the image.
15/11/2016 15:30
0004. JPG
Full-fr
• Move the zoom control to
g( i) in full-frame playback mode to
zoom in on the image.
3.0
• Move the zoom control to
f( h) in full-frame playback mode
to display a list of images called
“thumbnails.
1/20
Delete Images
1
Prl (delete) button to delete
the image currently display
monitor
2
Use the multi selector HI to
select Current image and pr
kbutton.
• Td button.
Delete
Current image
Erase select ed images
All images
3
Select Ye s and press the k button.
• Deleted images cannot be recover
Erase 1 image?
Yes
No
Recording and Pla
1
Display the shooting screen.
• Check the remaining amount of movie recor
time.
Movie recording time
remaining
1900
15m 0s
2
Prb (e movie
to start movie recording
7m30s
3
Prb (e movie
recor
4
Select a movie in full-frame playback
mode and press the k button.
• Movies are indicated by the movie options icon.
15/11/2016 15:30
0010. AVI
10s
Movie options
Changing the Shooting Mode
The following shooting modes ar
• x Scene auto selector
The camera automatically selects the optimum scene mode when you frame an image,
making it even easier to take images using settings that suit the scene.
• b Scene mode
Camera settings are optimized accor
• E Special effects
Effects can be applied to images during shooting.
• F Smart por
When the camera detects a smiling face, you can take an image automatically without
pressing the shutter-r
Y
• A Auto mode
Used for general shooting.
Settings can be adjusted to suit the shooting conditions and the type of shot you want
to capture.
1
PrA (shooting mode) button
in the shooting screen.
2
Use the multi selector HI to select
a shooting mode and press the
kbutton.
Scene auto select or
Using the F
Y
self-timer
YHIJK in the shooting screen.
Flash mode
Macro mode
Self-timer Exposure compensation
• X Flash mode
Y
• n Self-timer
If you select ON , the camera releases the shutter 10 seconds after you press the shutter-
release button.
• p Macro mode
Use macro mode when taking close
• o Exposure compensation
Y
The functions that are available vary with the shooting mode.
Use the multi selector and k button to navigate the menus.
The following menus ar
• A Shooting menu
Available by pressing the d butt
Allows you to change image size and quality
• G Playback menu
Available by pressing the d butt
mode or thumbnail playback mode. Allows you t
• D Movie menu
Available by pressing the d butt
Allows you to change movie r
• z Setup menu
Allows you to adjust basic camera functions such as date and time, display language
etc.
1
Prd (menu) button.
• The menu is displayed.
2
PrJ .
• The current menu icon is displayed in yellow
Image mode
White balance
Continuous
Shooting menu
ISO sensitivity
Menu icons
3
Use HI to select the desired menu
icon.
• The menu is changed.
Set up
Electronic VR
Sound settings
Auto o
Time zone and date
Monitor settings
Date stamp
4
Prk button.
• The menu options become selectable.
Electronic VR
Sound
Auto o
Time and
Monitor s
Date
5
Use HI to select a menu option, and
then press the k button.
• The settings for the option you selected are
displayed.
O
Date stamp
Date time
Date
6
Use HI to select the setting, and then
press the k button.
• The setting you selected is applied.
• When you are finished using the menu, pr
d button.
O
Date stamp
Date time
Date
• Certain menu options cannot be set depending on the current shooting mode or the
state of the camera.
• When a menu is displayed, you can swit
release button, A (shooting mode) button, or b (e movie-record) button.
If the camera fails to function as expected, check the list of common problems below
before consulting your r
The camera is on but does not respond.
Wait f
If the problem persists, turn the camera off.
If the camera does not turn off, remove and r
using an AC adapter
data currently being recorded will be lost, data that hav
be affected by removing or disconnecting the power sour
Camera turns off without warning
• The camera automatically turns off to save pow
• The camera or batteries have become too cold and cannot operate pr
• The inside of the camera has become hot. Leav
camera has cooled, and then try turning it on again.
Monitor is blank.
• The camera is off
• The batteries are exhausted.
• The camera has entered standby mode to sa
release button, A button, c button, or b (e mo
Camera becomes hot
The camera may become hot when used for an extended period of time to shoot movies
or when used in a hot environment; this is not a malfunction.
Printed in E
C
AMA16388 6MN64711-01
Quick Star
Thank you for pur
Before using the camera, please thoroughly r
Y
manual handy and refer to it t
The Quick Start Guide introduces the procedures necessary in using this camera for the first time.
For morReferenc”
http://downloadcenter
The Reference Manual can be viewed using Adobe Reader
Adobe website.
About This Manual
• SD, SDHC, and SD
• In this manual, images are sometimes omitted from monitor displa
monitor indicators can be more clearly shown.
• I
DIGIT
Pr
T
Installing V
ViewNX-i is fr
computer for viewing and editing.
T
following website and f
ViewNX-i: http://do
F
T
1
Pr
Y
to a computer
• SD memory card slot/card reader: Inser
of your computer or the card r
to the computer
• Direct USB connection: T
is inserted in the camera. Connect the camera to the computer using the USB
cable.
T
2
After Nikon Start T.
Start Tr
• Image transfer begins.
transferred images are displa
• Consult online help for more inf
3
T
• If you are using a card reader or car
computer operating system to eject the removable disk corresponding to the
memory card and then remove the memory card from the card reader or card
slot.
• If the camera is connected to the computer
the USB cable.