GB - 19 GB - 20
GB - 21
GB - 22
GB - 23
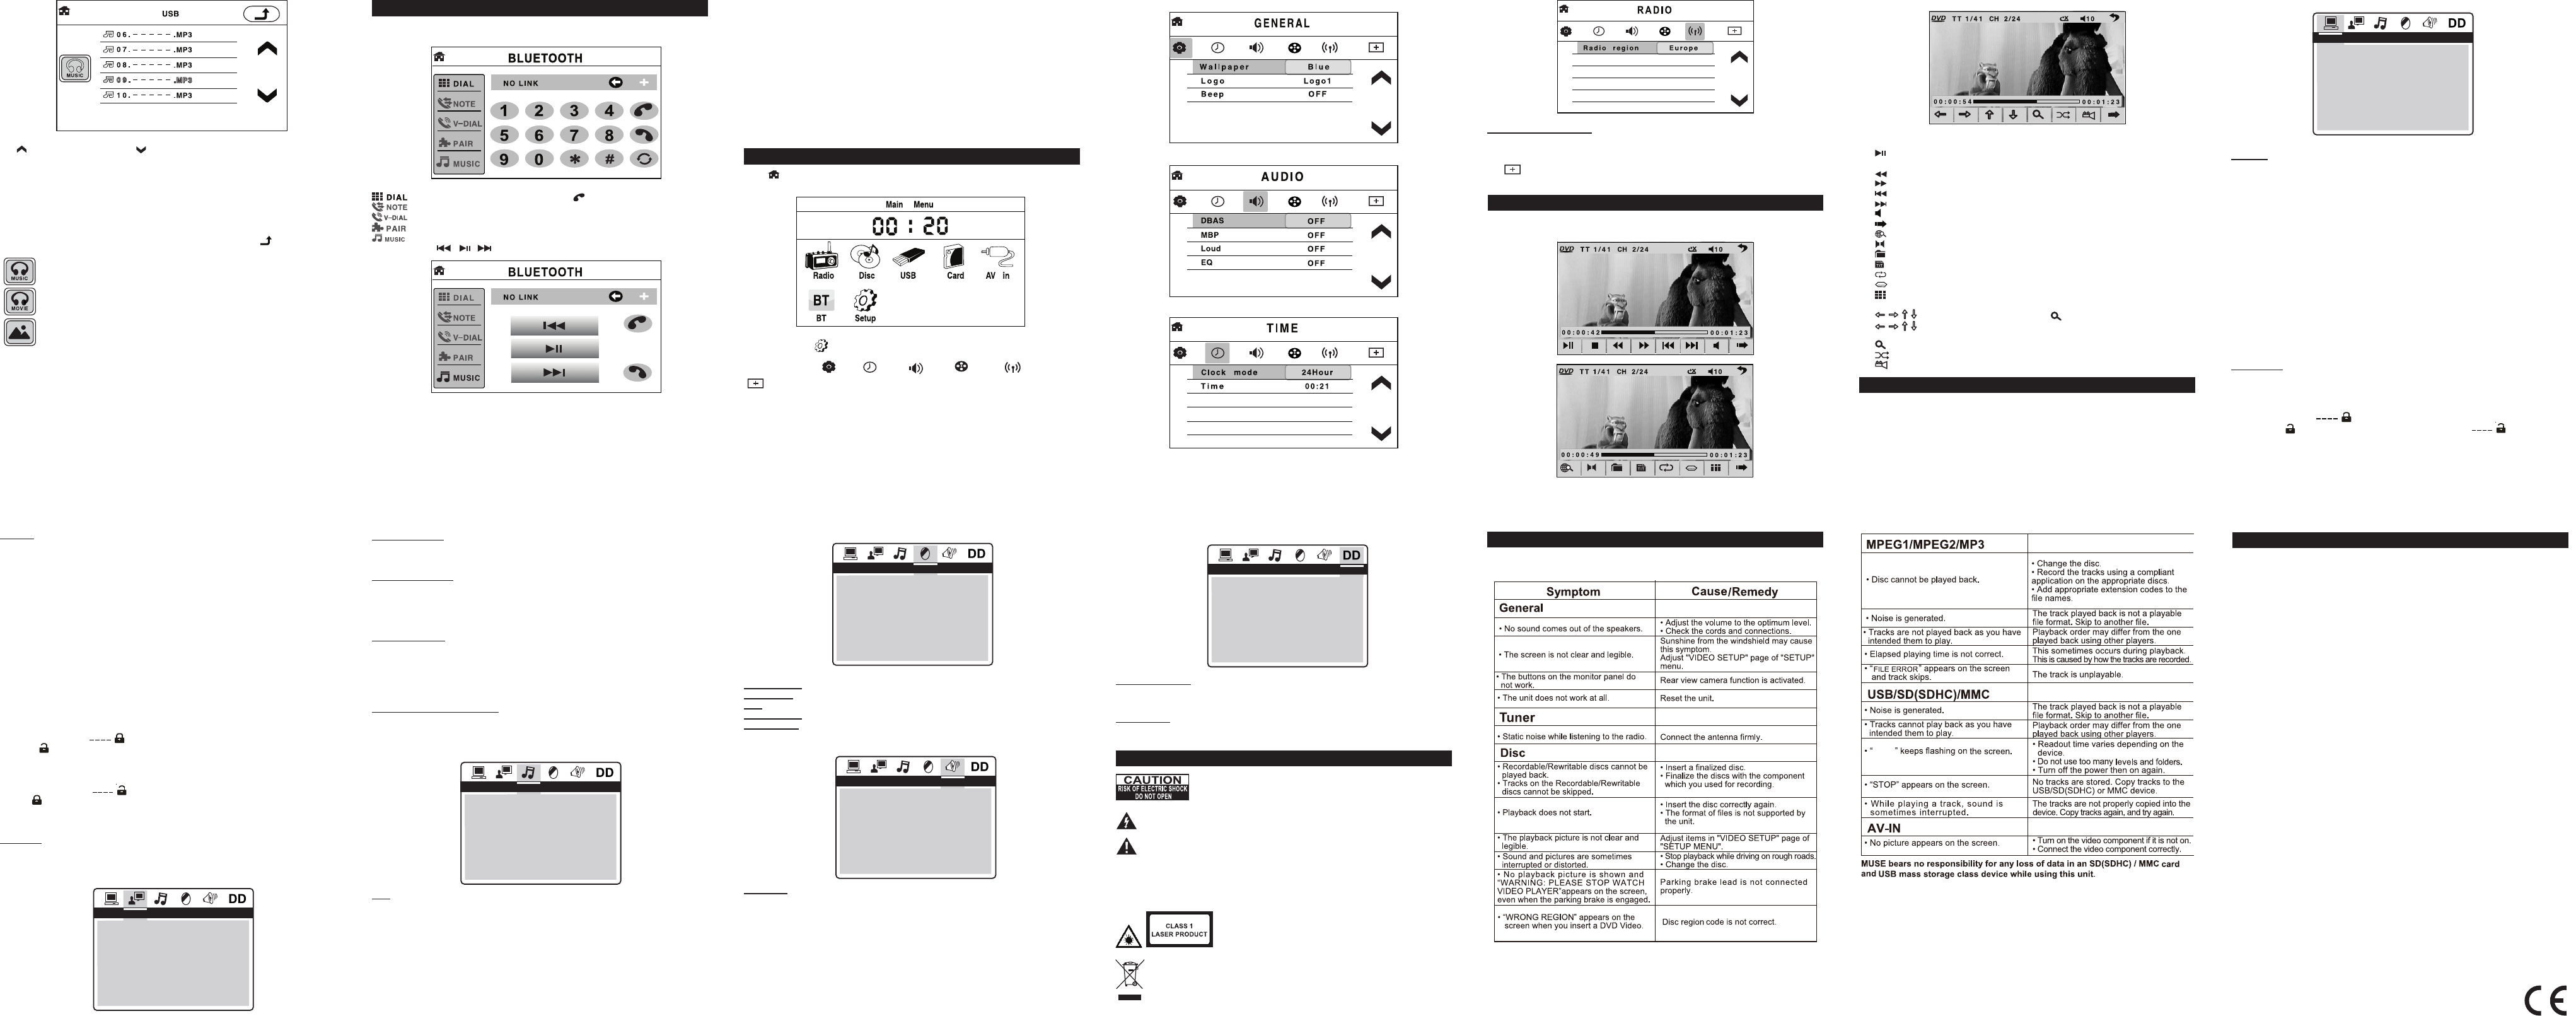
: To dial, tap the phone number and then
.
: To check received , dialed or missed calls.
: Tap this icon to switch to voice dialing mode.
: Tap this icon to start pairing.
: When pairing is successful, you can control music player of your phone by
taping
, , icons on the touch screen.
SPECIFICATION
General
Power Requirement 14.4V DC (11-16V allowable)
Load Impedance 4Ω
Max. Power Output 40Wx4
Tone Controls ±7dB
Bass 100Hz
Treble 10 kHz
Dimensions Approx.178x176x50mm (d/w/h)
Mounting Dimension Approx.187x176x58mm (d/w/h)
Weight Approx.2.2kg
FM Tuner Section
Tuning Range 87.5-108(MHz)
IF Range 10.7MHz
Usable Sensitivity (-30dB) 12dBuV
Signal-to-noise Ratio 50dB
Stereo Separation 30dB (1 kHz)
Frequency Response 40-12000Hz
MW Tuner Section
Frequency Range 522-1620(kHz)
IF Range 450 kHz
Usable Sensitivity (-20dB) 35dBuV
DVD Player Section
DVD Video Signal System NTSC
Number of channel 2 channels
Frequency Response 40Hz to 16,000Hz
Dynamic Range 60dB
Signal-to-Noise Ratio 50dB
GB - 14 GB - 15 GB - 16 GB - 17 GB - 18
GB - 24 GB - 25 GB - 26 GB - 27
During playback, tapping anywhere on the screen or press OSD button on remote
control to display the keyboard.
Set the rating level of parental control
1.To unlock the Parental settings, press ▲ or ▼ button to select “PASSWORD”, and
press ► to highlight “ ”. Input your 4-digit password, and then press OK to
unlock it ( is displayed).
2.Press ▲ or ▼ button to select “RATING”, then press ► button to enter submenu.
Press ▲ or ▼ button to select your desired rating level. Press OK to conrm.
3.To lock the Parental settings , press ▲ or ▼ button to select “PASSWORD”, and
press ► to highlight “ ”. Input your 4-digit password, and then press OK to
look it ( is displayed).
Note: Rating limits take affect only when the unit is locked.
DEFAULT
Pressing OK with this function selected resets all settings to their initial factory state,
except for parental level and password.
Touch screen calibration
If necessary, when the sensitive area is offset from icon position, you may need to re-
calibrate the touch screen.
Tap icon to access the calibration interface, calibrate your screen by accurately
taping the white cross appearing in the screen corners.
LANGUAGE SETUP
KEYBOARD INTERFACE
TROUBLESHOOTING
BLUETOOTH FUNCTION
WARNING: TO PREVENT FIRE OR SHOCK HAZARD, DO NOT EXPOSE THIS
APPLIANCE TO RAIN OR MOISTURE.
If at any time in the future you should need to dispose of this product please
note that Waste electrical products should not be disposed of with household
waste. Please recycle where facilities exist. Check with your Local Authority
or retailer for recycling advice.(Waste Electrical and Electronic Equipment
Directive)
ATTENTION: To reduce the risk of electric shock, do not
remove the cover or back. There are no user serviceable parts
inside the unit. Refer all servicing to qualied personnel.
The exclamation point within the triangle is a warning sign alerting the user
of important instructions accompanying the product.
The lightning ash with arrowhead symbol within the triangle is a warning
sign alerting the user of "dangerous voltage" inside the unit.
3. For some mobile phones, they can automatically connect with the Bluetooth device
of the car radio system after pairing is ok. While for some mobile phones, you need to
select the paired Bluetooth device and conrm it.
Note: When pairing is failed, press PAIR button to start pairing again.
4.Use your mobile phone to do connection or disconnection.
1. :To start or pause playback
2. ■ :To stop playback
3. :Fast backward
4. :Fast forward
5. :To directly access the previous chapter (DVD) or track (CD).
6. :To directly access the next chapter (DVD) or track (CD).
7. :To adjust volume.
8. :To go to next page of keyboard interface.
9. :To start or cancel intro playback
10. :To select audio language
11. :To access disc menu
12. :To access title menu
13. :To repeat playback.
14. :To select subtitle language
15. :Tap it to display the number buttons on screen, then tap the number to select
your chapter (DVD) or track (CD) . Then it will jump to the target location immediately.
16. : During DVD/ jpeg playback, tap to access zoom mode, then tap
to move to left, right, up or down. (On remote control, press ZOOM button,
then press ◄, ►, ▲ , ▼.)
17. :To access zoom function.
18. : To start/ cancel random playback.
19. : To access the camera angle function for DVD disc.
Tap to go to previous page, tap to go to next page. Tap your desired folder and
le, and then playback starts automatically.
3.To stop playback,
MP3 les: press ■ button once to pre-stop, press again to stop playback.
MP4 les & Jpeg les: press ■ button once to stop playback and display the content
list.
If the disc contains MP3/ MP4/JPEG files, after the disc is loaded, MP3 playback
starts automatically. If you want to play MP4 or JPEG les, tap repeatedly until
below icons appear.
Tap this icon to select music les.
Tap this icon to select MP4 les.
Tap this icon to select Jpeg les.
During Jpeg playback:
1.Use ◄, ► , ▲ , ▼ to change the display angle.
► : Rotate 90 degree clockwise
◄: Rotate 90 degree counter-clockwise
▲ : Up-down
▼ : Left-Right
2.Use PROG button to change the slide-show effect.
3.Use ZOOM button to change the zoom size.
When the unit is ON, press MODE button repeatedly to select BLUETOOTH mode.
Pair devices
1. Turn on the Bluetooth function of your mobile phone.
2.Select the item of searching the Bluetooth device and enter it. Your mobile phone
starts to search for Bluetooth devices within range (10 meters). Select this car radio
“M-725DR” and conrm it, then you are asked to input a 4-digit password that is 0000.
Enter the password and conrm it.( If you have made Bluetooth connectivity before, a
list of the previous search results is displayed. Select “M-725DR” and conrm.) “LINK
OK” appears if pairing is successful.
GENERAL SETTINGS
1.Tap icon on touch screen to display the main menu as shown below.
2. Tap Setup icon to display general setup interface.
3. Select GENERAL , TIME , AUDIO ,VIDEO , RADIO or CALIBRATE
by tapping the icon. Select the option and adjust the setting by tapping icons on
the right side accordingly.
DVD SETUP MENU
Navigating the setup menu
1.Press SETUP to display the setup main menu.
2.Press ◄ or ► to select a menu icon.
3.Press ▲ or ▼ to select one of the available options under a menu icon.
4.Press ► to access the submenu and ▲ , ▼ to select an option.
5.Press OK to conrm your selection.
6.Press ◄ to return to a previous menu.
7.Press SETUP to exit from the setup menu.
SYSTEM SETUP
OSD LANGUAGE
•To select the language of unit’s menus.
Note:The OSD language can only be changed in SETUP MENU with a DVD inserted.
AUDIO LANGUAGE
•To select the dialog language.
•If the selected language is not available on the disc, the disc’s language will be used
instead.
•To change the dialog language during playback, press AUDIO on the remote control.
SUBTITLE LANG
•To select the language of the DVD subtitles. Select “OFF” to turn off the subtitles.
•If the selected language is not available on the disc, the disc’s language will be used
instead.
•To change the subtitle language during playback, press SUBTITLE on the remote
control.
MENU LANG (menu language)
•To select the language of the DVD menus.
•If the selected language is not available on the disc, the disc’s language will be used
instead.
AUDIO SETUP
KEY
It is for selecting your desired basic music tone (from low to high).
VIDEO SETUP
BRIGHTNESS: To adjust the video brightness level on a scale of 0 to 12.
CONTRAST: To adjust the video contrast level on a scale of 0 to 12.
HUE: To adjust the color hue level on a scale of –6 to +6.
SATURATION: To adjust the color saturation level on a scale of 0 to 12.
SHARPNESS: To adjust the sharpness of video output.
SPEAKER SETUP
DOWNMIX
For selecting your desired sound effect when there is no center speaker and
subwoofer. There are 3 modes: LT/RT, STEREO, VSS.
LT/RT: When playing a disc with PRO LOGIC Dolby stereo effect, so it will output
audio signal with vivid theatre effect.
STEREO: with 5.1 audio signal, it will output the left and right channels signal; with 2
channels, it will output the common 2 channels signal of stereo signal.
VSS: when playing a disc with 5.1 channels, the main channel speakers can output
audio signal with VSS effect.
DIGITAL SETUP
DYNAMIC RANGE
Select a value between “FULL” (maximum compression) and “OFF”(maximum
dynamic).
DUAL MONO
It is for selecting a desired audio output mode for the left and right channels. There
are 4 modes as follows: STEREO, MONO L, MONO R, MIX MONO.
SAFETY INSTRUCTION
CAUTION: Invisible laser radiation when open and interlocks defeated. Avoid
exposure to beam. Class 1 laser product.
What appears to be trouble is not always serious. Check the following points before
calling a service center.
Note: Design and specication are subject to change without notice.
TV TYPE
4:3 PS (Panscan)
• When wide-screen video is played, this mode clips the right and left sides of the
image so that it can be viewed on a conventional screen.
• Some wide-screen DVDs that do not permit Pan Scan mode playback are
automatically played in letterbox mode (black bands top and bottom).
4:3 LB
• When wide-screen video is played in this mode on a conventional screen, black
bands appear at the top and bottom of the screen.
16:9 (Wide screen)
• This is the correct mode for playing wide-screen videos on a wide-screen TV.
Notes :
•The visible picture size is preset on the DVD disc. Therefore the playback picture of
some DVD discs may not conform to the picture size you select.
•When you play DVD discs recorded in the 4:3 aspect ratio, the playback picture
will always appears in the 4:3 aspect ratio regardless of the TV shape setting in the
function setup menu.
PASSWORD
This item is for locking or unlocking the rating level of the Parental Control. The
defaulted state is locked. If the password has not been set yet after you purchase this
unit, it is "0000".
To set a new password, use ▲ or ▼ button to select “PASSWORD”, then press►
button to highlight “ ”. Input the initial password 0000, and then press OK
to unlock it ( is displayed). Press ► button to highlight “ ” , then input a
4-digit new password and press OK to conrm.
TV TYPE
PASSWORD
RATING
DEFAULT
SYSTEM SETUP
EXIT SETUP
OSD LANGUAGE
AUDIO LANG
SUBTITLE LANG
MENU LANG
LANGUAGE SETUP
EXIT SETUP
KEY
AUDIO SETUP
EXIT SETUP
BRIGHTNESS
CONTRAST
HUE
SATURATION
SHARPNESS
VIDEO SETUP
EXIT SETUP
DOWNMIX
SPEAKER SETUP
EXIT SETUP
DYNAMIC RANGE
DUAL MONO
DIGITAL SETUP
EXIT SETUP