DC power :9V battery type 006P (not provided) for clock back-up system only.
An alkaline type battery is recommended. For optimum performance, this
battery should be replaced every 6 months.
1.Insert the AC power cord (17) into a convenient standard AC wall outlet.
2.Connect the 9V battery inside the compartment at the bottom of the unit (19).
BACK-UP SYSTEM :Ensures that the unit will continue to operate as normal during an
AC power disruption (in order to preserve the battery life the display will not light ). All
clock settings will be kept in the memory, however, the clock time may require adjustment
for exact accuracy. If this battery is not installed, the display will blink to indicate
that you have to redo the time and alarm settings.
Note: When the battery backup functions, the digital display will not light, however, the
wake function still occurs during the power interruption if remaining battery power is
adequate.
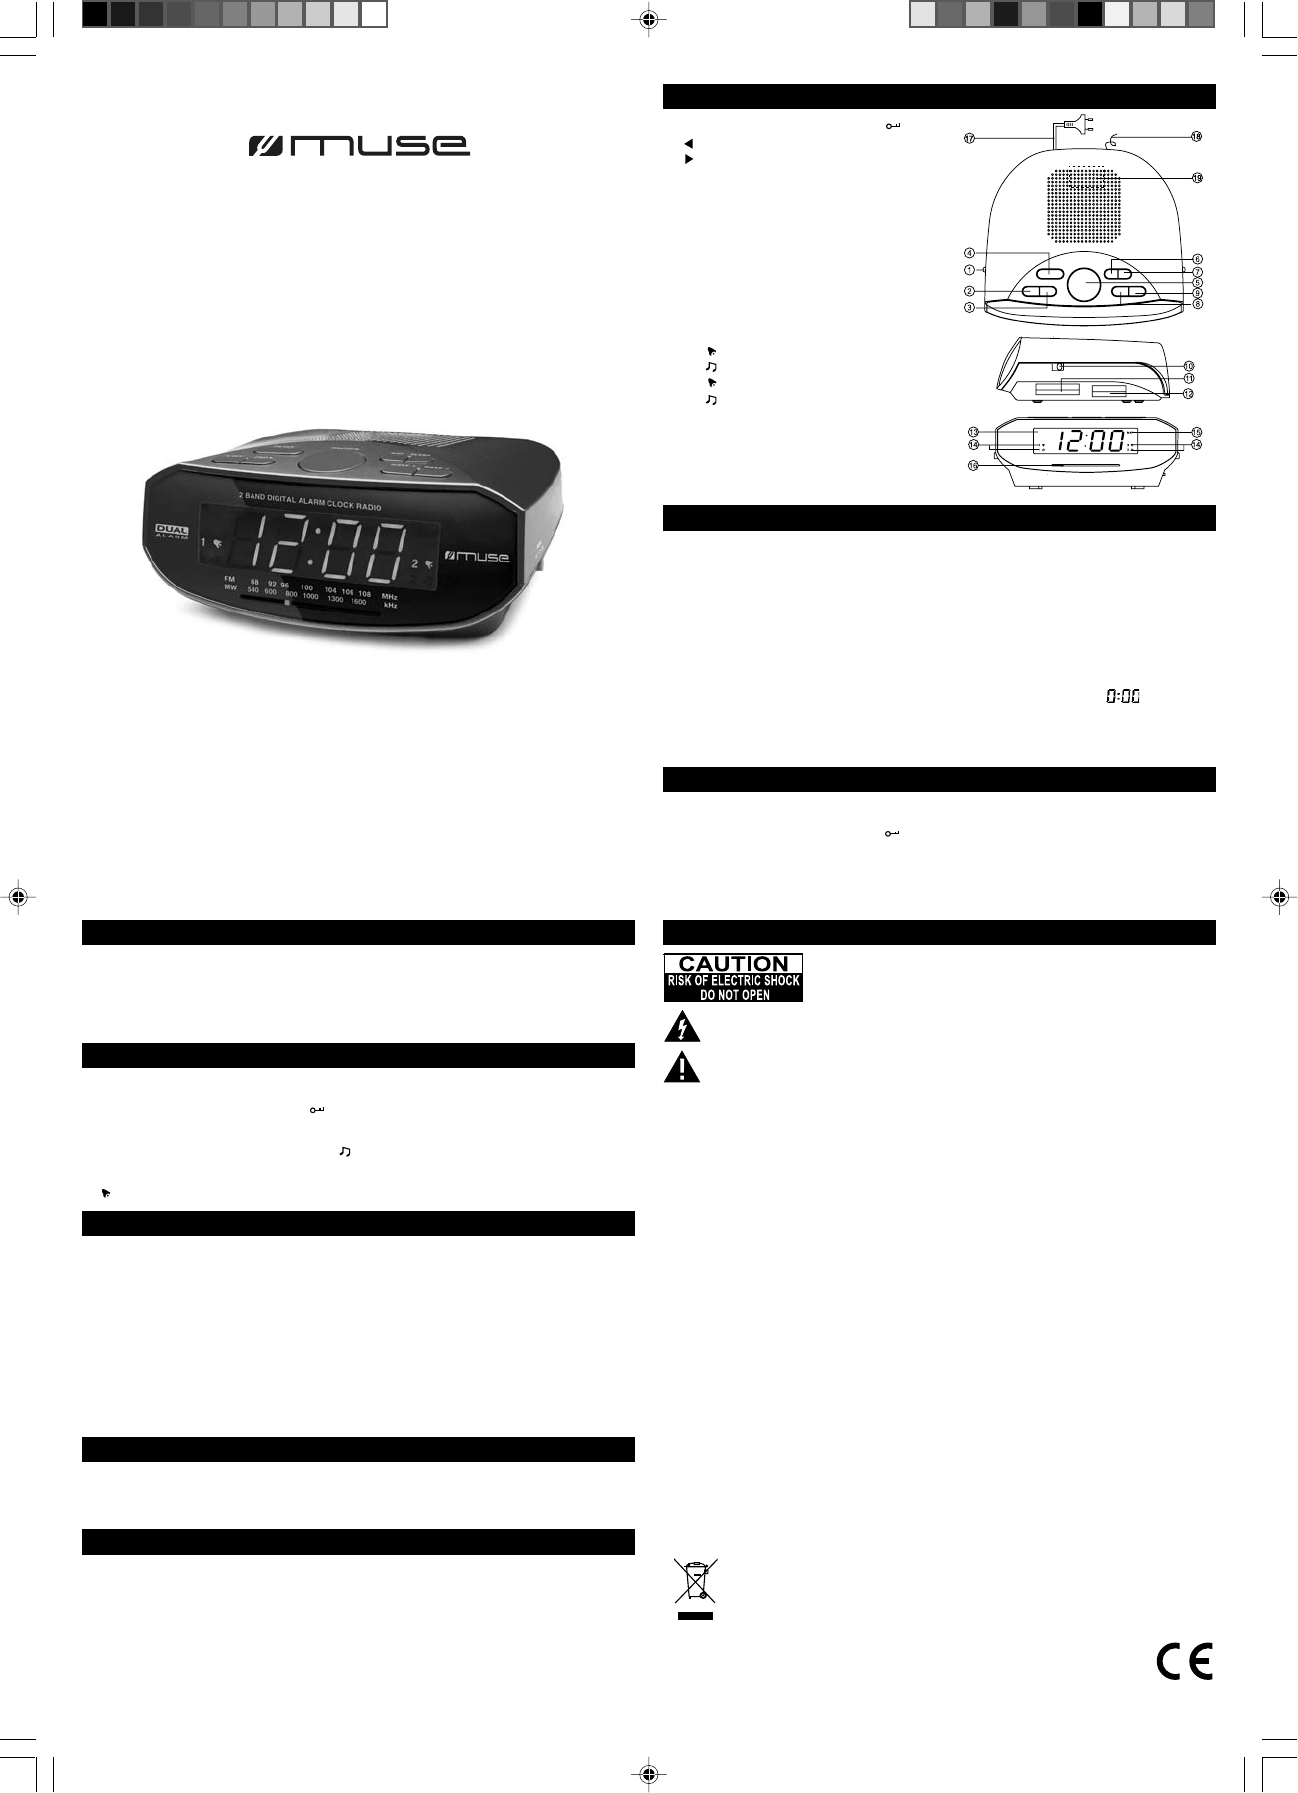
1. SET (TIME/ WAKE 1/ WAKE 2/ ) switch
2. REV button
3. FWD button
4. ON/OFF button
5. SNOOZE button
6. NAP button
7. SLEEP button
8. WAKE 1 button
9. WAKE 2 button
10.BAND selector : MW/ FM
11.TUNING knob
12.VOLUME control
13.Digital Display
14.Alarm ON indicators :
1. wake 1 to tone
1. wake 1 to music
2. wake 2 to tone
2. wake 2 to tone
15.NAP indicator
16.Dial scale and pointer
17.AC Power cord
18.FM wire antenna
19.Battery backup compartment
1. Slide the SET (1) switch to select WAKE 1 or WAKE 2 setting mode.
2. Press REV (2) or FWD (3) to set wake time.
3. Slide the SET (1) switch to lock.
4. To wake up to radio follow 1 to 6 in “ LISTENTING TO THE RADIO “. Press Wake 1 (8)
or Wake 2 (9) repeatedly to select wake source for the corresponding wake setting.
When wake to radio is selected, the indicator lights.
5. To wake up to the alarm sound, press Wake 1 (8) or Wake 2 (9) repeatedly to select
wake source for the corresponding wake setting. When wake to tone is selected, the
indicator lights.
M-15CR
Digital Alarm Clock Radio
User Manual
LOCATION OF CONTROLS
POWER SUPPLY
GB - 1GB - 1
GB - 2
SETTING THE ALARM AND WAKE-UP MODE
1. Slide the SET(1) switch to TIME to enter clock setting mode.
2. Press REV(2) or FWD (3) to set the time.
3. Slide the SET (1) switch to lock .
SETTING THE TIME
1. Press ON/OFF (4) button to turn on the radio.
2. Switch to FM or MW position with the BAND (10) selector.
3. For a better reception in FM, extend the antenna (18). In MW rotate the unit.
4. Adjust the volume (12) to the desired level.
5. Select your desired radio station with (11) and (16).
6. To stop listening to the radio, press ON/OFF (4) again.
LISTENING TO THE RADIO
GB - 3
TURNING OFF ALARM
* Silence the alarm momentarily
Press SNOOZE (5), NAP (6), SLEEP (7), REV (2) or FWD (3) to turn the alarm off
temporarily. The alarm will sound again when the snooze period is over.
Note: The “quiet” period is from 1minute to 30 minutes (the default time is 9 minutes).
Set “quiet” period as follow:
1. Press and hold SNOOZE (5).
2. Press REV (2) or FWD (3) to adjust snooze time. Release button, then the “quiet”
period is set.
* Stop the alarm
Press ON/OFF (4). Then, the alarm will be on the following day at the same time.
* Cancel Wake Settings
Press the Wake 1 (8) or Wake 2 (9) to cancel the corresponding wake function permanently.
Corresponding wake indicator turns off.
SLEEP TO MUSIC
Select FM or MW (10) then press SLEEP (7), the sound will come on for 59 min. If you
want to change this sleep time, press and hold SLEEP (7), and use REV (2) or FWD (3)
to adjust to the desired time. If you want to turn off the music earlier, press SNOOZE
(5) or ON/OFF.(4).
MORE INFORMATION
PLEASE READ THE INSTRUCTION CAREFULLY
BEFORE OPERATING THE UNIT.
WARNING
- The ventilation should not be impeded by covering the ventilation openings with items,
such as newspapers, table-cloths, curtains, etc.
- No naked flame sources, such as lighted candles, should be placed on the apparatus.
- Attention should be drawn to the environmental aspects of battery disposal.
IMPORTANT
- DO NOT THROW BATTERIES IN FIRE !
- THE APPARATUS SHALL NOT BE EXPOSED TO DRIPPING OR SPLASHING.
- ENSURE A MINIMUM DISTANCE OF 5CM AROUND THE APPARATUS FOR
SUFFICIENT VENTILATION.
- ENSURE THAT THE VENTILATION IS NOT IMPEDED BY COVERING THE
VENTILATION OPENINGS WITH ITEMS, SUCH AS NEWSPAPERS, TABLE-CLOTHS,
CURTAINS, ETC.
- DO NOT PLACE NAKED FLAME SOURCES, SUCH AS LIGHTED CANDLES ON THE
APPARATUS.
- TAKE ATTANTION TO THE ENVIRONMENTAL ASPECTS OF BATTERY DISPOSAL.
- USE THE APPARATUS ONLY IN MODERATE CLIMATES (NOT IN TROPICAL
CLIMATES).
- DO NOT EXPOSE THE APPARATUS TO DRIPPING OR SPLASHING.
- DO NOT PLACE OBJECTS FILLED WITH LIQUIDS, SUCH AS VASES, ON THE
APPARATUS.
- BATTERIES SHALL NOT BE EXPOSED TO EXCESSIVE HEAT SUCH AS SUNSHINE,
FIRE OR THE LIKE.
- THE MARKING PLATE IS LOCATED ON THE BACK ENCLOSURE.
- MAINS PLUG IS USED AS THE DISCONNECT DEVICE AND IT SHALL REMAIN
READILY OPERABLE. TO BE COMPLETELY DISCONNECTED THE POWER INPUT,
THE MAINS PLUG OF THE APPARATUS SHALL BE DISCONNECTED FROM THE
MAINS COMPLETELY. THE MAINS PLUG SHOULD NOT BE OBSTRUCTED OR
SHOULD BE EASILY ACCESSED DURING INTENDED USE.
- UNDER THE INFLUENCE OF ELECTRICAL FAST TRANSIENT OR/AND
ELECTROSTATIC PHENOMENON, THE PRODUCT MAY MALFUNCTION AND
REQUIRE USER TO POWER RESET.
If at any time in the future you should need to dispose of this product please
note that Waste electrical products should not be disposed of with household
waste. Please recycle where facilities exist. Check with your Local Authority
or retailer for recycling advice.(Waste Electrical and Electronic Equipment
Directive)
ATTENTION : To reduce the risk of electric shock, do not remove
the cover. There are no user serviceable parts inside the unit.
Refer all servicing to qualified personnel.
The lightening flash with arrowhead symbol within the triangle is a warning sign
alerting the user of "dangerous voltage" inside the unit.
The exclamation point within the triangle is a warning sign alerting the user of
important instructions accompanying the product.
NAP FUNCTION
This function wakes you up after a short period of time. Only alarm sound can be
selected for Nap.
1. Press and release the NAP (6) button. The Nap indicator flashes.
2. During this period, adjust nap time by pressing REV (2) or FWD (3).
Note: The nap range is from 10 minutes to 2 hours. (the default time is 20 minutes)
3. Press NAP (6) to confirm nap time or if no button is pressed after 5 seconds, the
clock will be shown. The Nap indicator lights.
4. To stop the Nap alarm, press NAP (6) or follow “Turning off Alarm”.
5. To cancel NAP function, press and hold NAP (6) until the Nap indicator turns off.
Hulp nodig? Stel uw vraag in het forum
Misbruik melden
Gebruikershandleiding.com neemt misbruik van zijn services uitermate serieus. U kunt hieronder aangeven waarom deze vraag ongepast is. Wij controleren de vraag en zonodig wordt deze verwijderd.
Product:
Spelregels forum
Om tot zinvolle vragen te komen hanteren wij de volgende spelregels:
lees eerst de handleiding door;
controleer of uw vraag al eerder door iemand anders is gesteld;
probeer uw vraag zo duidelijk mogelijk te stellen;
heeft u een probleem en al geprobeerd om dit op te lossen, vermeld dit erbij aub;
heeft u een oplossing gekregen van een bezoeker dan horen wij dat graag in dit forum;
wilt u een reactie geven op een vraag of antwoord, gebruik dan niet dit formulier maar klik op de knop 'reageer op deze vraag';
uw vraag wordt direct op de website gezet; vermijd daarom persoonlijke gegevens in te vullen;
Belangrijk! Als er een antwoord wordt gegeven op uw vraag, dan is het voor de gever van het antwoord nuttig om te weten als u er wel (of niet) mee geholpen bent! Wij vragen u dus ook te reageren op een antwoord.
Belangrijk! Antwoorden worden ook per e-mail naar abonnees gestuurd. Laat uw emailadres achter op deze site, zodat u op de hoogte blijft. U krijgt dan ook andere vragen en antwoorden te zien.
Abonneren
Abonneer u voor het ontvangen van emails voor uw Muse M-15 bij:
nieuwe vragen en antwoorden
nieuwe handleidingen
U ontvangt een email met instructies om u voor één of beide opties in te schrijven.
Ontvang uw handleiding per email
Vul uw emailadres in en ontvang de handleiding van Muse M-15 in de taal/talen: Engels als bijlage per email.
De handleiding is 0,11 mb groot.
U ontvangt de handleiding per email binnen enkele minuten. Als u geen email heeft ontvangen, dan heeft u waarschijnlijk een verkeerd emailadres ingevuld of is uw mailbox te vol. Daarnaast kan het zijn dat uw internetprovider een maximum heeft aan de grootte per email. Omdat hier een handleiding wordt meegestuurd, kan het voorkomen dat de email groter is dan toegestaan bij uw provider.
Uw handleiding is per email verstuurd. Controleer uw email
Als u niet binnen een kwartier uw email met handleiding ontvangen heeft, kan het zijn dat u een verkeerd emailadres heeft ingevuld of dat uw emailprovider een maximum grootte per email heeft ingesteld die kleiner is dan de grootte van de handleiding.
Er is een email naar u verstuurd om uw inschrijving definitief te maken.
Controleer uw email en volg de aanwijzingen op om uw inschrijving definitief te maken
U heeft geen emailadres opgegeven
Als u de handleiding per email wilt ontvangen, vul dan een geldig emailadres in.
Uw vraag is op deze pagina toegevoegd
Wilt u een email ontvangen bij een antwoord en/of nieuwe vragen? Vul dan hier uw emailadres in.