13.1 Indicating system information
To indicate the type of unit and the version of the
operating software used and to indicate and change
the MAC address of the recorder:
1) Activate the submenu
INFO/ SYSTEM INFORMA-
TION
(fig. 48) from the submenu SYSTEM/ SYSTEM
SETUP
(fig. 11).
2) Next to
DEVICE TYPE, the internal device identifi-
cation will be indicated; next to SOFTWARE VER-
SION
, the version of the operating software used
by the recorder will be indicated.
3) In the input field next to
MAC ADDRESS (Media
Access Control Address), the hardware address
of the recorder (6 bytes in hexadecimal format)
will be preset for unambiguous identification of
the recorder in a computer network (Ethernet). It
may be changed, if required (detailed description
of an input
chapter 6.2.3).
4) To store a
MAC AD DRESS that has been changed,
click the button APPLY, then confirm the message
inserted “Saved successfully!” by clicking the
button OK.
5) To exit the submenu, click the button
EXIT or the
right mouse button or press the button MENU /
ESC (7) or MENU (32).
14 Remote Access via
Computer Network
Via its connection jack LAN (23), it will be possible to
connect the video recorder to an individual com-
puter, to a local computer network or, e. g. via a
router, to the Internet. For correct configuration,
comprehensive knowledge of computer network
technology will be essential.
14.1 Setting up a network connection
1) Activate the main menu (MAIN MENU, fig. 10).
2) Activate the submenu
NETWORK/ NETWORK SETUP
(fig. 49).
3) For
TYPE, select the type of network connection:
DHCP Dynamic Host Configuration Protocol
a DHCP server (e. g. a router) will
assign the network configuration to
the recorder
STATIC the network configuration (IP
ADDRESS
, SUBNET MASK, GATEWAY)
will be manually defined in the
recorder
PPPOE Point-to-Point Protocol over Ethernet
e. g. for a direct Internet connection
via DSL modem; the access data
(PPPOE NAME, PASSWORD) will be
made available by the Internet
service provider
4) Enter the parameters (
PORT, WEB PORT, IP
ADDRESS
, SUBNET MASK, GATEWAY, DNS) required
for the type of network connection selected
(detailed description of an input
chapter
6.2.3).
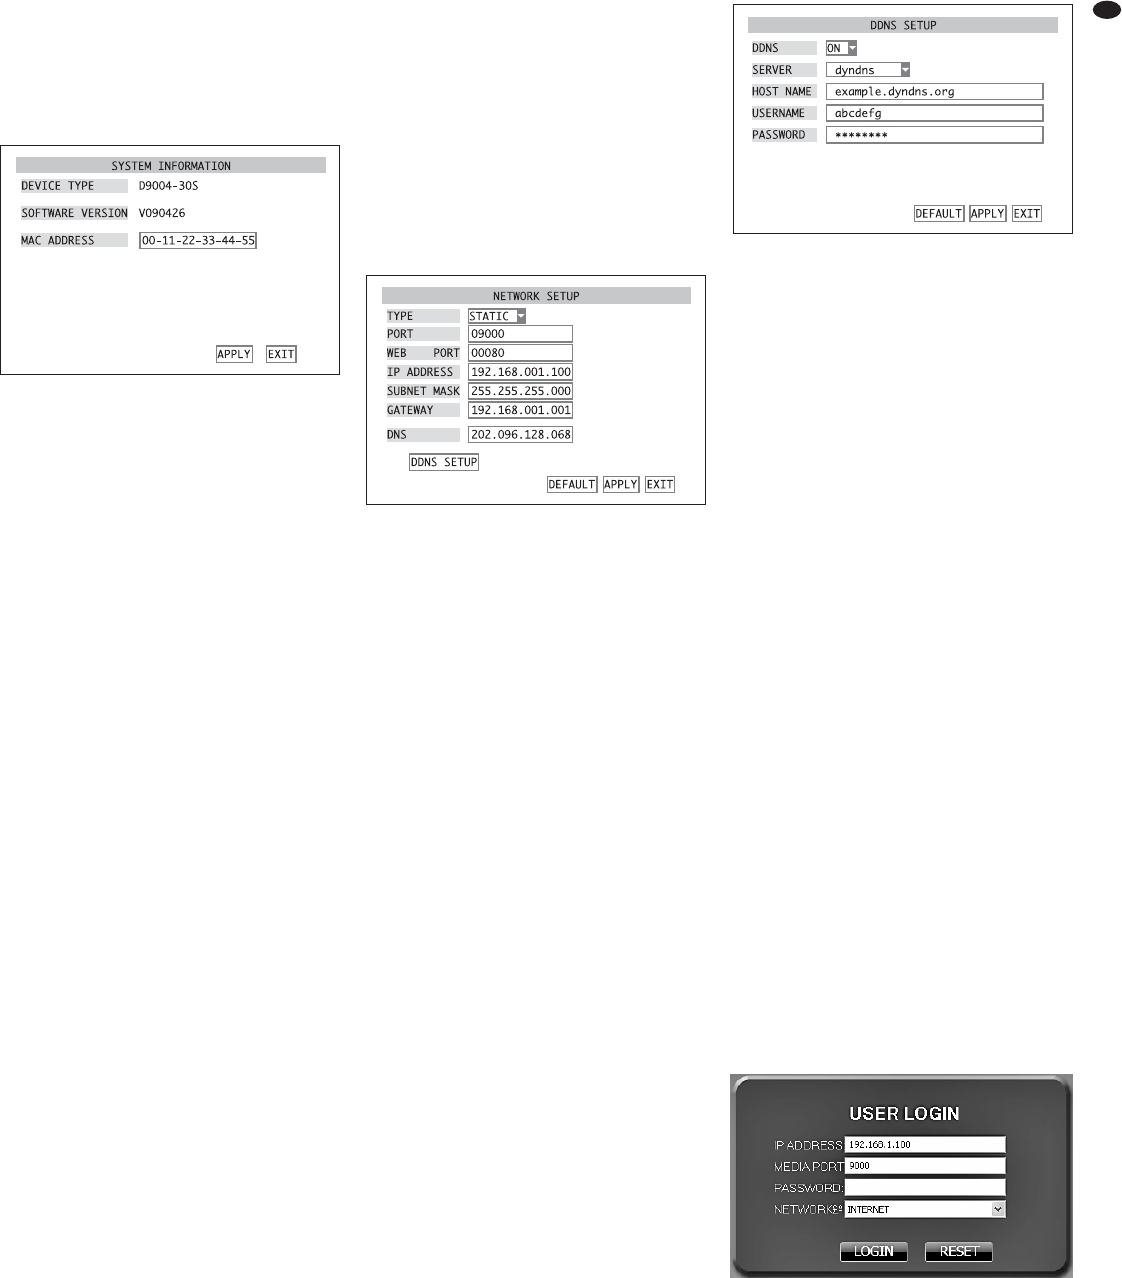
5)
For remote access, the IP address of the recorder
must be known. However, many Internet providers
change it each time a connection is made
(dynamic IP address). To solve this problem, use
a DDNS server, i. e. a network service offered by
several service providers. After registration with a
service provider, you will select a definite subdo-
main for addressing the recorder and a user name
and a password for access. If the DDNS service
provider “dyndns” is used, the subdomain may be,
for example, “example.dyndns.org”.
Use of this service will usually be configured in
the router connecting the recorder to the Internet,
but will also be possible with the recorder.
Each time a connection is made, the router or
recorder will send its current IP address to the
DDNS server which will store it and accordingly
route any queries made to the subdomain to the
recorder.
To configure the recorder for using a DDNS
server, click the button
DDNS SETUP in the sub-
menu NETWORK SETUP. The submenu DDNS
SETUP
, fig. 50 will appear. In the list field next to
DDNS, define if the DDNS function of the
recorder is to be used (ON) or not (OFF). Select the
service provider in the list field next to SERVER. In
the input fields, enter the parameters defined
(HOST NAME, USERNAME and PASSWORD) during
registration with the service provider.
6) To reset all settings of this submenu to the factory
settings, click the button
DEFAULT.
7) To store the settings, click the button
APPLY, then
confirm the message inserted “Saved success-
fully!
” by clicking the button OK.
Note: Changes of the network parameters will
not become effective until the recorder has been
restarted.
8) To exit the submenu, click the button
EXIT or the
right mouse button or press the button MENU /
ESC (7) or MENU (32): If changes have been
made, a message will appear announcing the
restart of the recorder. Click the button OK to
confirm.
14.2 Remote control via the programs
Win-
dows Internet Explorer
or 9D-VIEWER
Via the network, the programs
Windows Internet
Explorer
(IE) or the 9D-VIEWER provided will be
able to access the recorder in order to display live
images of the cameras or to replay recordings
regardless of the view selected on the recorder. Fur-
thermore, it will be possible to change settings of the
recorder.
When the first connection is made via the IE, after
entering the IP address of the recorder (or the pub-
lic IP address of the router to which the recorder has
been connected) in the address bar, the IE will load
an extension required (ActiveX control element)
from the recorder and will install it on the computer.
If necessary, relax the security settings of the IE to
allow this process.
As an alternative to operation via the IE, use the
program 9D-VIEWER. This program is supplied on a
CD with the recorder and offers the same possibili-
ties as operation via the IE. To install, start the pro-
gram “D9-PCviewer-en.exe” and follow the instruc-
tions on the screen. After installation, start the
program file “D9-VIEWER.exe”.
After starting or after making the connection, the
window “USER LOGIN” (fig. 51) will appear.
1) For “IP ADDRESS”, enter the IP address of the
recorder (already entered in the IE) or the public
IP address of the router to which the recorder has
been connected.
2) For “MEDIA PORT”, enter the port number
entered in the input field
PORT in the submenu
NETWORK SETUP of the recorder (
chapter 14.1,
fig. 49).
/
Window “USER LOGIN” for remote access
㊿
Submenu DDNS SETUP
Example: dynamic IP via “dyndns”
㊽
Submenu SYSTEM INFORMATION
㊾
Submenu NETWORK SETUP
35
GB
Windows is a registered trademark of Microsoft Corporation in the U.S.A. and
other countries.