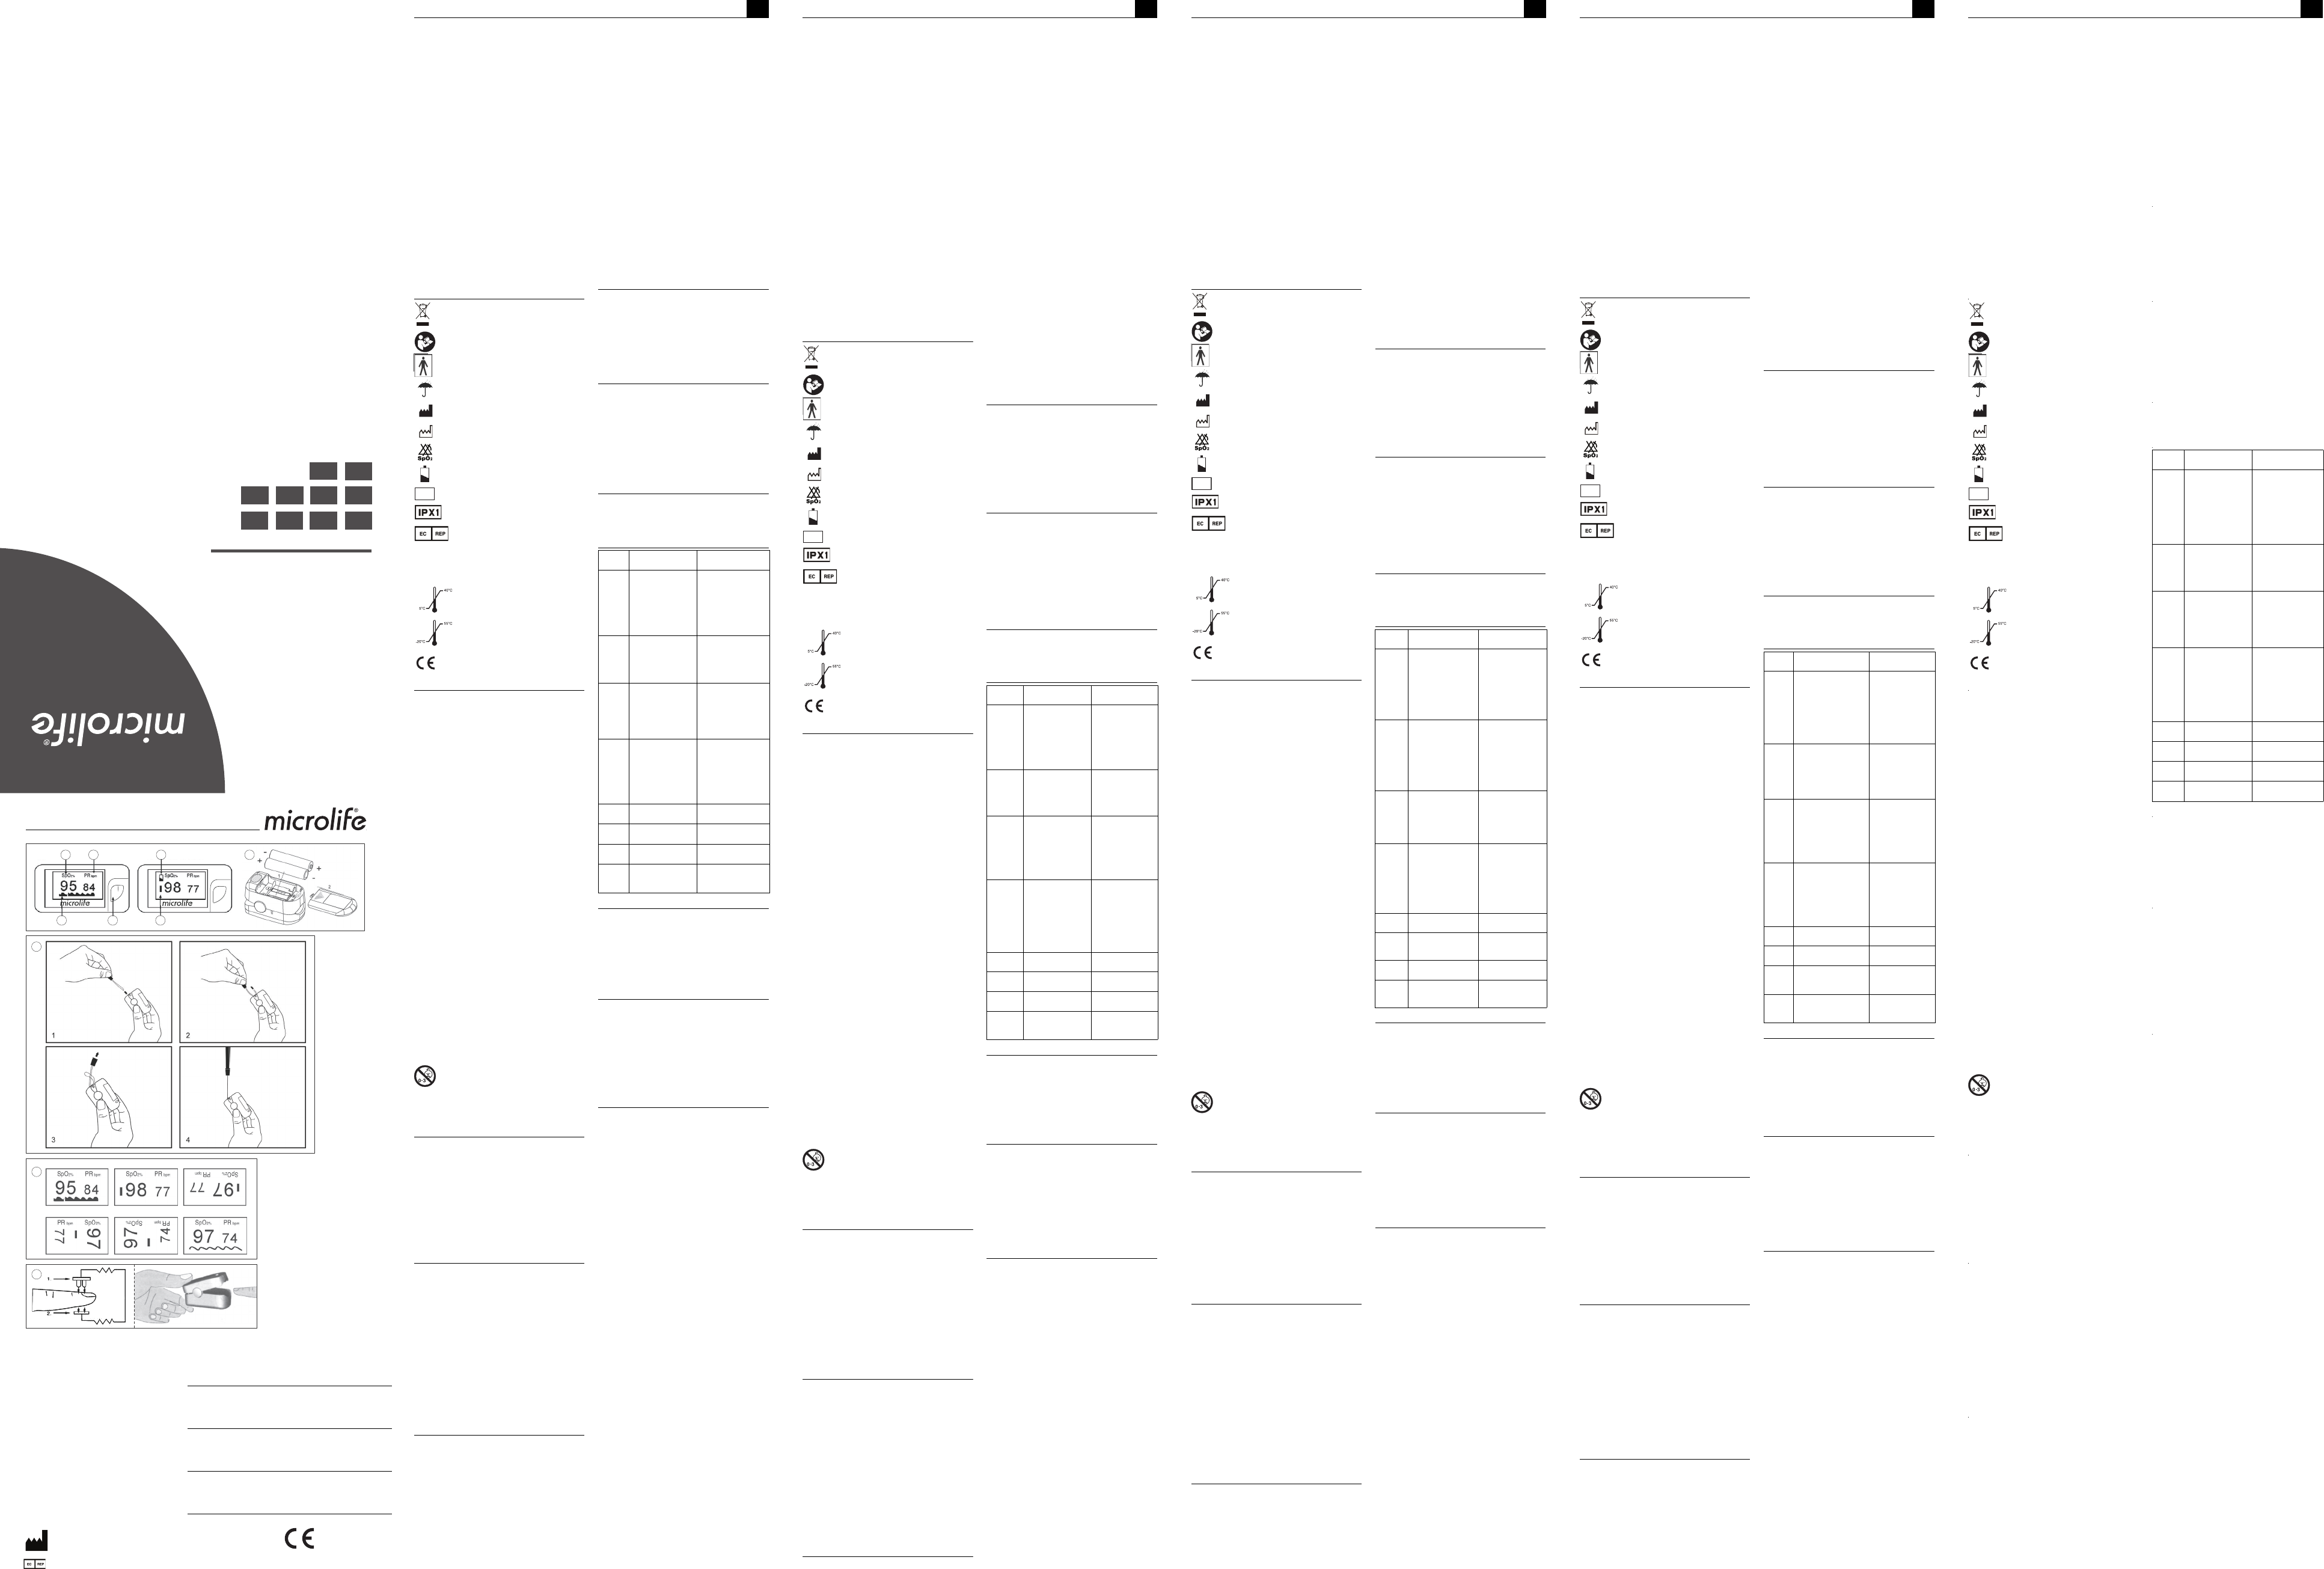
OXY 300
IB OXY 300 S-V10-1 0618
Guarantee Card
Name of Purchaser / Nom de l'acheteur / Nome del
rivenditore / Name des Käufers / Alıc ın ı n ad ı /
Nombre del comprador / Nome do comprador / Naam
koper / Ονοματεπώνυμο αγοραστή /
Serial Number / Numéro de série / Numero di
Serien-Nr. / Seri numarası / Número de serie /
Número de série / Serienummer / Αριθμός σειράς /
Date of Purchased'achat / Data d’acquisto /
Kaufdatum / Satı n alma tarihi / Fecha de compra /
Data da compra / Ημερομηνία
αγοράς /
Specialist Dealer / Revendeur / Categoria rivendito
/ Fachhändler / Uzman satıc ı / Vendedor especial-
izado / Revendedor autorizado /
Εξειδικευμ αντιπρόσωποςa /
Beijing Choice Electronic Technology Co., Ltd.
Room 4104, No. A12, Yuquan Road
100143 Beijing, People's Repu
Shanghai International Holding Corp. GmbH (EUROPE)
Eiffestrasse 80, 20537 Hamburg / Germany
0123
Dear Customer,
This Microlife fingertip pulse oximeter is a portable non-
invasive device intended for spot-checking of the oxygen
saturation of arterial
2
) and pulse rate of
adults and pediatric patients.
home, or on the go) as well as for use in the medical sector
(hospitals, hospital-type facili
proven to be of high precision during repeatability.
If you have any questions, problems or want to order spare
parts please contact your local Microlife-C
Your dealer or pharmacy will be able to
address of the Microlife dealer in your
tively, visit the inter
find a wealth of invaluable information on our products.
Retain instructions in a safe pl
Stay healthy – Microlife AG!
1. Explanation of symbols
Batteries and electronic devices must be
disposed of in accordance with
cable regulations, not
Read the instructions carefully before using th
device.
Type BF applied pa
2. Important Safety Instru
•
Follow i
tant prod
this devi
using the de
• This device may only be used for
described in these instructions. The manufacturer
cannot be held liable for damage
application.
• Never immerse this device in water or other
liquids. For cleaning please follow the instruc-
tions in the «Cleaning and Disinfecting» section.
• Do not use this device if you
notice anything unusual.
• Never open this device.
• This device comprises sensitive components and
must be treated with caution. Observe the storage
and operating conditions described in the «Technical
Specifications» section.
• Protect it from:
- water and moisture
- extreme temperatures
- impact and dropping
- contamination and dust
- direct sunlight
- heat and cold
•
The function of this device may
used close to strong electromagnetic fi
mobile phones or radio installations and we recom
a distance of at least 1 m
5). In cases where you suspec
please verify if the device is working properly before use.
• Do not use the device in an
• This device is not intended for continuous monitoring.
•
This device
fore not
use this device
• Do not sterilize this device using autoclaving or
ethylene oxide sterilizing. This device is not intended
for sterilization.
• If the device is not going to be used for a prolonged
period the batteries should be rem
Ensure that children do not use this device unsu-
pervised; some parts are small enough to be swal-
lowed. Be aware of the ri
this device is supplied with cables or t
Use of this device is not intended as a substitute
for a consultation with your doctor.
3. General Description
Oxygen saturation indicates the percentage of hemo-
globin in arterial blood that is loaded with oxygen. This is
a very important parameter for the respiratory circulation
system. Many respiratory diseases
oxygen saturation within human blood.
Following factors can reduce oxygen saturation:
Auto-
matic regulation of organ dysfunction caused by anes
thesia, intensive postoperative trauma, injuries caused by
some medical examinations. These situations may result in
light-headedness, asthenia and vomiting. Therefore,
very important to know the oxygen saturation of a patient so
that doctors can detect problems in a t
4. Measu
Principle of this fingertip pulse oxime
A mathematical
formula is established making use of L
according to spectrum absorption ch
genated hemoglobin (Hb) and ox
2
) in red
and near-infrared zones.
Operation principle of this dev Photoelectric
oxyhemoglobin inspection technology is adopted in
accordance with capacity pulse scanning and recording
technology, so that two beams of different wavelength of
lights (660 nm red and 905 nm near infrared light) can be
focused onto a human nail tip through a clamping finger-
type sensor. A measured signal obtained
sitive element, will be shown on the display through
process in electronic circuits and microprocessor.
Diagram of Operation Principle AT:
1. Red and infrared-ray emission tube.
2. Red and infrared-ray receipt tube.
5. Directions for Use
1. Insert the batteries as described in the «Inserting the
batteries 7 » section.
2. Insert one finger (nail side up; index or middle
is recommended) into the finger opening of the
device. Be sure to fully insert the finger
sensors are completely covered by the finger.
3. Release the device allowing
finger.
4. Press the ON/OFF button 1 to turn the
5. Do not shake your finger during the test. It is
recommended that you do not move your body
taking a reading.
6. Your measurement values will appear on the screen
after a few seconds.
7. Remove your finger from the device. The displ
indicate «Finger Out ».
8. The device will automatically switch off after approx.
8 seconds after the finger is removed from the device.
The height of the bar graph 5 is an indication of
the pulse and signal strength. The bar should
greater than 30 % for a proper
The device must be able to measure the p
properly to obtain an accurate SpO
2
measurement.
Verify that nothing is hindering the pul
ment before relying on the SpO
2
measurement.
The maximu
should
, in order to
ensure corre
Inaccurate measurements may occur if:
• The patient suffers from significant levels of dysfunc-
tional hemoglobin (such as carboxyhemoglobin or
methemoglobin).
• Intravascular dyes such as indocyanine green or
methylene blue have been injecte
• Used in the presence of high ambient light (e.g. direct
sunlight). Shield the sensor area with a surgical towel
if necessary.
• There is excess
• The patient experiences venous pulsations.
•
The patient
severe anem
• The patient is in cardiac arrest or is in shock.
• Fingernail polish or false fingernails are applied.
6. Inser
7
After you have
batteries. The
device. Remove
tion shown
thereby
Replace the batteries when the low power indi-
cator 6 appears on the display.
Always replace both batteries at the same time.
7. Adjusting Display Mode and Brightn
Display Mode
When the dev
button
1
to switch to an
desired disp
9
. There are 6 d
modes. Th
Brightness
Press and hold the ON/OFF button 1 for longer than
one second to adjust th
display will show «Br 1-10 ». There are 10
brightness. The default setting is level 4.
8. Using the Lanyard
8
1. Thread the thinner end of the lanyard through the
hanging hole at the rear end of the device.
2. Thread the thicker end of the lanyard through the
threaded end before pulling it tightly.
9. Malfunctions and Actions to take
10. Cleaning and
Use an alcohol swab or cotton tissue moistened with
alcohol (70% Isopropyl) to clean the silicone that touches
the finger inside of the
tested using alcohol before and after each test. Allow the
device to dry thoroughly before use.
Never use abrasive cleaning agents, thinners or
benzene for cleaning and never immerse the
device in water or other cleaning liquids.
11. Guarantee
This device is covered by a 2 year guarantee from the
date of purchase. The guarantee is valid
tation of the guarantee card completed by the dealer
(see back) confirming date of purchase o
• Batteries and parts that become worn with use are
not included.
•
Opening or altering the dev
• The guarantee does not cover damage caused by
improper handling, accidents or non-compliance with
the operating instructions.
12. Techni
Technical alterations reserved.
Pulse Oximeter
EN
1
ON/OFF button
2
Oxygen saturation (value as pe
3
Pulse rate (value in beats per minute)
4
Pulse wave (plethysmographic wave)
5
Pulse bar
6
Low battery indicator
7
Inserting the batteries
8
Attaching the lanyard
9
Display modes
AT
Operation principle
Keep dry
Manufacturer
Date of manufacture
No SpO
2
alarm
Low battery indicator
Serial number
Protected against dripping water
Authorized representative in the European
community
Oxygen saturation (value as percentage)
Pulse rate (value in beats p
Operating conditions:
5 - 40 °C / 41 - 104
Storage conditions:
-20 - +55 °C / -4 - +131 °F
CE Marking of Conformity
S
N
PR bpm
Descrip-
tion
Symptom/Possib
causes
Solutions
SpO
2
or
pulse
rate do
not
display
normally.
1. Finger is not
inserted correctly.
2. Patient S
2
value
is too low to be
measured.
3. There is exce
illumination.
1. Retry inserting the
finger.
2. & 3. Measure mo
times. If you deter-
mine the product is
working correctly,
consult your doctor.
SpO
2
or
pulse
rate is
shown
unstable.
1. Finger migh
inserted deep
enough.
2. Excessive patient
movemen
1. Retry inserting the
finger.
2. Sit calmly and re
The
device
cannot
be
powered
on.
1. No batteri
battery power.
2. Batteries a
installed correctly.
3. The device m
damaged.
1. Replace the batteries.
2. Remove and reins
the batteries.
3. Contact your local
Microlife-Customer
Service.
The
display
suddenly
switches
off.
1. The device is au
matically powered
off, when no signal
was detected after
8 seconds.
2. The battery power is
too low to operate.
1. Normal.
2. Replace the batteries.
«Error 3» The red emission LED
is damaged.
Check the red emission
LED.
«Error 4» The infrared emission
LED is damaged.
Check the infrared emis-
sion LED.
«Error 6» The screen has failed. Contact y
life-Customer Service.
«Error 7» The emission LED or
reception diode is
damaged.
Contact your local M
life-Customer Service.
Type:
Fingertip Pulse Oximeter O
Display:
OLED display
SpO
2
:
Measurement range:
70 ~ 100 %
Accuracy:
70 ~ 100 % : ±2 %
Resolution:
1 %
Pulse rate:
Measurement range:
30 ~ 250 bpm
Accuracy:
30 ~ 99 bpm: ±2 bpm;
100 ~ 250 bpm: ±2 %
Resolution:
1 bpm
Operating conditions:
5 - 40 °C / 41 - 104 °F
≤ 80 % relative maxi
humidity
Storage conditions:
-20 - +55 °C / -4 - +131 °F
≤ 93 % relative
Automatic switch-off:
Automatically shut down in
8 seconds, when no or low sig
detected.
Battery:
2 x 1.5 V alkaline batteries; size AAA
Battery lifetime:
approx. 30 hours (using new
batteries)
Weight:
56 g (including batteries)
Dimensions:
58 x 32 x 34 mm
IP Class:
IPX1
Reference to
standards:
EN ISO10993-1/-5
EN 60601-1-2; EN IS
EN 62304; EN 60601-1
Expected service life:
5 years (whe
20 minutes f
Cher client,
Cet Microlife oxymètre de pouls est un appareil portatif et
non-invasif pour vérifier le t
dans le sang, (hémoglobine SpO
2
) et la pulsation cardiaque
chez les adultes et les enfants. Il
tion dans le cercle privé (domicile, déplacement) mais
aussi pour une utilisation médicale (hôpital, établissement
de soin). Il a été cliniquement
délivre une mesure très précise et d'une grande répétitivité.
Si vous avez des questions, des problèmes ou désirez
commander des pièces détachées, veuillez contacter
votre Service Clients Microlife local. Adressez-vous à
votre revendeur ou à la pharmacie où vous av
l'appareil pour avoir les coordonnées du représentant
Microlife de votre pays. Vous pouvez aussi visiter no
site Internet à l'adresse www.micr
trouverez de nombreuses et précieuses informations sur
nos produits.
Veuillez lire attentivement ce mod
conserver en un lieu sûr.
Restez en bonne santé avec Microli
1. Significations des symboles
Les piles et appareils électroniques doivent être
éliminés en conformité avec les prescripti
locales, séparément des ordures ménagères.
Veuillez lire attentivement les
d'utiliser ce produit.
Partie appliquée du type
2. Importantes précautions d'emploi
• Respectez les instructions d’utilisation. Ce document
fournit des informations importantes sur le foncti
nement et la sécurité de cet app
attentivement ce document avant d'utiliser l'appareil
et conservez-le pour vous y référer ultérieuremen
• Cet appareil est réservé aux applications décrites
dans ce manuel. Le fabricant ne
responsable de dommages
sation incorrecte.
•
Ne jamais plonger cet appareil dans l'eau ou un autre
liquide. Pour le nettoyage, se
tions de la section
«
Nettoyage et désinfection
»
.
•
N'utilisez p
magé ou remar
•
N'ouvrez
• Cet appareil comprend des éléments sensibles et
doit être traité avec précaution. Re
tions de stockage et d'emploi indiqu
«Caractéristiques techniques».
• Il convient de le protéger contre:
- l'eau et l'humidité
- les températures extrêmes
- les chocs et chutes
- les saletés et la poussière
- les rayons solaires directs
- la chaleur et le froid
• Le fonctionnement de l’appareil risque d’être altéré
dans le cas d’une utilisation proche d’un champs
électromagnétique tels que les téléphones mobiles
ou des postes de radio ainsi nous recomm
respecter une distance de 1 mètre (selon 60
table 5). Dans le cas où ces conditions ne peuvent
être respectées, merci de vérifier que l’appareil fonc-
tionne correctement avant toute mesure.
•
Ne pas utili
ou CT.
•
Cet appa
•
Cet appareil
ne convient
Ne pas util
alarmes sont
• Ne pas stériliser cet appareil à l'aide d'autoclavage
ou la stérilisation de l'oxyde d'éthylène. Cet appareil
n'est pas prévu pour la stérilisation.
•
Si vous compt
période prol
Ne laissez jamais les enfant
sans surveillance. Certaines de ses parties sont
si petites qu'elles peuvent être avalées. Possible
risque d’étranglement dans le cas où l’appareil
est fourni avec des câbles ou des
L'utilisation de cet appa
d'une consultation médicale.
3. Description générale
La saturation en oxygène indique le pourcentage d'hémo-
globine dans le sang artériel qui est chargé avec de
l'oxygène. C'est un paramètre très
lation des voies respiratoires. Beaucoup de maladies
respiratoires peuvent entraîner une baisse la saturation
en oxygène dans le sang humain.
Les facteurs suiv
oxygène:
Régulation
des organes ca
postopérat
examens m
étourdiss
donc très im
d'un pa
détecter le
4. Principes de mesure
Principe de ce
Une formul
matique est éta
Beer selon l
globine
2
) dans
les zones roug
Princi
La techno-
logie d'inspection de l'oxyhémo
utilisée conforméme
impulsions et l'enregistrem
que les deux fais
lumière (660 nm rouge et 90
rouge) peuvent être concen
humain grâce à un
par un élément photose
le biais de circuits électronique
Principe de fonctionnemenAT :
1. Rouge et émission de rayons infrarouges.
2. Rouge et réception de rayons infrarouge.
5. Instructions d'uti
1. Insérez les piles com
des piles
7
».
2. Insérez un doigt (ongle côté supérieur; index ou le
majeur est recommandé) dans l'ouverture prévu
effet du dispositif. Assurez-vous d' i
ment le doigt de sorte que le ca
couvert par le doigt.
3. Relâchez le d
4. Appuyez sur le bouton ON/OFF 1 pour allumer
l'appareil.
5.
Ne pas bouger le doigt pendant le t
Il est aussi
recommandé de ne pas bouger le corps pendant la
mesure.
6. Vos valeurs de mesure seront affichées sur l'écran
après quelques secondes.
7. Retirer le doigt de l'appareil. L'écran aff
Finger
Out
» (Doigt dehors).
8. L'appareil s'étein
environ aprè
La hauteur du graphe 5 est une indication d
pulsation et la force du signal. La barre doit être
supérieure de 30% pour une lecture adéquate.
L'appa
tion cor
2
précis
du pouls avant
2
.
Le temps maximal d'épandage sur
devrait être moins d
, afin d'assurer
l'intégrité de capteur, l'
Des mesures inexactes peuvent se produire si:
•
Le patient souffre d'un niveau significatif
tionnements liés hémoglobine (telles que la carboxyhé-
moglobine ou méthémoglobine).
•
Des colorants intravasculaires tels que le vert
ou le bleu de méthylène ont été injectés dans le pat
•
Utilisé en présence de lumière ambiante élevée (par
exemple directe lumière du soleil). Protéger l
détection avec une serviette chirurgicale si nécessaire.
•
Il y a un mouvemen
•
Les expérience
•
Le patient a une hypotension, une vasocon
sévère, anémie sévère, ou d'hypothermie.
•
Le patient est en arrêt cardiaque ou est en état de choc.
•
Vernis à ongle ou de faux ongles s
6. Insertion des
7
Après avoir déballé votre appareil, insérez d'abord les
piles. Le compartiment à pile
de l'appareil. Enlever le capot à
dans la direction indiquée. Insérez les p
format AAA) en respectant les indications de polarité.
Remplacer les piles quand l'indicateur piles
usées 6 apparaît à l'écran.
Remplacez toujours les deux batteries en même
temps.
7. Réglage du mode d'affichage et de la
luminosité
Mode d'affichage
Lorsque l'appareil est allumé
bouton ON/OFF
1
pour passer à un
pour sélectionner vo
9
. Il y a
6 modes d'affichage différent. Le réglag
mode 1.
Luminosité
Appuyez et maintenez le bouton ON/OFF
1
pendant
plus d'une seconde pour régler la luminosité du dispositi
L'écran affiche «
Br 1-10
». Il y a 10 niveaux de luminosité.
Le réglage par défaut est le niveau 4.
8. Utilisation de l
8
1. Enfilez l' extrémité la plus mince de la lanière à
travers le trou, à l'extrémité arrière de l'appareil.
2. Enfiler l' extrémité la plus épaisse de la lanière à
travers l' extrémité filetée avant de la tirer fermem
9. Dépannage et actions à prendre
10. Nettoyage et désinfect
Utiliser un chiffon doux ou un chiffon en coton
d'alcool (70% isopropyl) pour nettoyer le silicon
le doigt à l'intérieur de l'appareil. Netto
mis à l'essai avec de l'alcool avant et après ch
Laissez l'appareil sécher complètement a
Ne jamais utiliser d'agent abrasif,
benzène et ne jamais plonger l'appareil dans
l'eau ou un autre liquide.
11. Ga
Cet appareil est assorti d'une g2 ans à
compter de la date d'achat. La g
valable sur présentation de la carte
remplie par le revendeur (voir verso) avec la
la date d'achat ou le justificatif d'achat.
• Les piles et ure ne sont pas couverts.
• Le fait
garantie.
• La garantie ne couvre pas les dommages causés par
une mauvaise manipulation, les accidents ou le non
respect des consignes d'utilisation.
12. Caractéristiques techniques
Sous réserve de modifications techniques.
Oxymètre de pouls
FR
1
Bouton ON/OFF (marche/arrêt)
2
Taux de sat
3
Fréquence du pouls (valeur en battements par minute)
4
Onde du pouls (onde pléthysmographique)
5
Barre de pulsation
6
Signal d'usure de la pil
7
Insertion des piles
8
Attaché du cordon
9
Mode d'affichage
AT
Mode opératoire
A conserver dans un endroit sec
Fabricant
Date de fabrication
Pas d'alarme SpO
2
Signal d'usure de la
Numéro de série
Protéger contre les projections d'eau
Représentation autorisée dans la
communauté européenne
Taux de saturation en oxygène
(en pourcentage)
Fréquence du pouls (valeur en
par minute)
Conditions d’utilisatio
5 - 40 °C / 41 - 104
Conditions de stockage:
-20 - +55 °C / -4 - +131 °F
Marquage CE conforme
S
N
PR bpm
Descrip-
tion
Symptômes
possibles
Solutions
SpO
2
ou
pulsation
ne s'affiche
pas norma-
lement.
1. Doigt n'e
inséré correctement.
2. La valeur
2
du
patient est trop faible
pour être mesurée.
3. L'éclairage e
fort.
1. Reinsérer le doigt.
2. & 3. Répétez les
mesures. Si le
produit fonctionne
correctement,
consultez votre
médecin.
L'affichage
du SpO
2
ou
la pulsation
est
instable.
1. Le doigt n
être assez inséré
profondément.
2. Le pat
trop.
1. Reinsérer le doigt.
2. Assis calmement
et réessayer.
L'appareil
ne
s'allume
pas.
1. Pas de piles ou p
faibles.
2. Les piles ne
pas installées
correctement.
3. L'appareil p
être endommagé.
1. Remplacer les piles.
2. Enlever et réin
taller les piles.
3. Contacter le SAV
Microlife local.
L'écran
s'éteint
soudaine-
ment.
1. L'appareil s'
automatiquement
quand aucun signal
a été détecté après
8 secondes.
2. La pile est
déchargée pour
pouvoir être utilisée.
1. Normal.
2. Remplacer les piles.
«Error 3» L'émission rouge de la
LED est endommagée.
Vérifier l'émission du
rouge.
«Error 4» L'émission de l'infra
rouge est endom
Vérifier l'émission de
l'infra-rouge.
«Error 6» L'écran ne r
Contacter le SAV
Microlife local.
«Error 7» L'émission LED ou la
réception de diode est
endommagée.
Contacter le SAV
Microlife local.
Type:
Oxymètre de pouls OXY 300
Affichage:
Écran OLED
SpO
2
:
Etendue de mesure:
70 ~ 100
Précision:
70 ~ 100
Résolution:
1 %
Fréquence des batte-
ments de coeur:
Etendue de mesure:
30 ~ 250 bpm
Précision:
30 ~ 99 bpm: ±2 bpm;
100 ~ 250 bpm: ±2 %
Résolution:
1 bpm
Conditions
d’utilisation:
5 - 40 °C / 41 - 10
Humidité rela≤ 80 % ma
Conditions de
stockage:
-20 - +55 °C / -4 - +131 °F
Humidité rela≤ 93 % max.
Extinction
automatique:
Extinction automatique en
8 secondes quand aucun sig
faible signal
Pile:
2 x piles al
Durée de vie des
piles:
env. 30 heur
Poids:
56 g (piles incluses)
Dimensions:
58 x 32 x 34 mm
Classe IP:
IPX1
Référence aux
normes:
EN ISO10993-1/-5/-10;
EN 60601-1-2; EN ISO99
EN 62304; EN 60601-1-6;
Espérance de
fonctionnement:
5 ans (lorsque utilisé 15 fois/jour;
20 minutes pour chaque mesure)
Gentile cliente,
Questo Microlife pulsossimetro
portatile non invasivo des
saturazione dell'ossigeno
2
) e
della frequenza cardiaca i
adatto per uso domiciliar
l'impiego nel settore medic
liere). La sua elevata precisione
In caso di domande, problemi
ricambio, contattare il proprio rivenditore di fiducia o il
locale servizio clienti di Microlife. In alternativa è possi-
bile visitare il sito www.microlife.com
sime informazioni utili sui nostri prodotti.
Conservare questo manuale in un luogo sicuro per ogni
ulteriore consultazione.
Rimanete in salute – Microlife AG!
1. Spiegazione dei simboli
Le batterie e gli
essere smaltiti in conformità alle disposizioni
locali e non
Leggere attentamente le istruzioni prima di usare
il dispositivo.
Parte applicata tipo BF
2. Importanti misure precauziona
• Seguire le istruzioni per l’uso. Questo manuale
contiene informazioni importanti sul funzionamento e
la sicurezza di questo dispositivo. Si prega di leggere
attentamente le istruzioni per l’uso prima di util
il dispositivo e di conservarle per ogni
tazione.
• Questo dispositivo deve esser
mente come descritto in questo manuale. Il produt-
tore non può essere ritenuto responsabile
causati da un utilizzo improprio.
•
Non immergere mai questo dispositivo in acqua o altri
liquidi. P
sezione
«
Pulizia e disinfezion
»
di questo manuale.
•
Non usare il dispositivo se si ri
o se si nota qualcosa di strano.
• Non aprire mai il dispositivo.
•
Questo disp
e deve ess
condizion
capitolo «S
• Proteggere il dispositivo da:
- acqua e umidità
- temperature estreme
- urti e cadute
- contaminazione e polvere
- luce solare diretta
- caldo e freddo
•
La funzio
messa se us
come telefo
manda di mantene
(secondo l
sibile mant
che il d
•
Non utilizzare il
•
Questo di
continuo
•
Questo di
allarme e qu
risultati m
in cui sono richie
•
Non steril
ossido di et
per la sterilizza
• Rimuovere le batterie se il dispositivo non viene
usato per un periodo prolungato.
Assicurarsi che i bambini non utilizzino
tivo senza la supervisione di un adul
parti sono piccole e
Prestare attenzione al rischio di strango
in presenza di cavi o tubi.
L’utilizzo di questo dispositivo non sostituisce la
consultazione dal proprio medico.
3. Descrizione generale
La saturazione di ossigeno indica la pe
emoglobina nel sangue arterioso che contiene ossigeno.
Questo è un parametro molto i
respiratorio. Molte malattie respiratorie possono causare
bassa saturazione di ossigeno nel sangue.
I seguenti fattori possono ridurre la saturazione di
ossigeno: Automatica regolazione di disfunzioni orga-
niche causate da anestesia, traumi intensivi post-opera-
tori, danni causati da alcuni esami medici. Queste situa-
zioni possono provocare vertigini, astenia e vomito.
Pertanto, è molto importante conoscere la saturazione di
ossigeno del paziente così che i medici possano rilevare
i problemi in modo tempestivo.
4. Princi
Principio di questo pulsossimetro da dito:
È stata defi-
nita una formula matematica prendendo spunto dalla legge
di Lambert Beer sulle caratteristiche di assorbimento dello
spettro di luce rossa ed infrarossa dell'emoglobina desos-
sigenata (Hb) e dell'ossiemoglobina (HbO
2
).
Principio di funzionamento di questo dispositivo:
La
tecnologia dell'ispezione foto elettrica dell' ossiemoglobina
è stata adottata in conformità con la capacità di scansione
della frequenza cardiaca e della tecnologia di r
zione, in modo che due fasci di luce di diver
d'onda (rossa 660 nm e infrarossa 905 nm) possono essere
focalizzati sulla punta di un dito at
dito. Una misurazione ottenuta attraverso un
fotosensibile sarà mostrata sul display attraverso un
processo di circuiti elettronici e
Schema del principio diAT :
1. Sonda generatrice di luce rossa ed infrarossa.
2. Fotocellula ricevente di luce rossa ed infrarossa.
5. Indicazioni per l’us
1. Inserire le batterie come descritto nella sezione
«Inserimento delle batterie 7 ».
2. Inserire un dito (unghia verso alto; è consigliato il dito
indice o medio) nell'a del dispositivo. Assicu-
rarsi di inserire il dito fino in fondo in modo che i
sensori siano completamente coperti da
3. Rilasciare il di
4. Premere il tasto ON/OFF
1
per accendere il dispos
5.
Non agitare il
È raccoman-
dato non muovere il corpo, mentre si fa la misurazione.
6. I valori di misurazione appariranno sullo schermo
dopo pochi secondi.
7. Togliere il dito dal dispositivo. Il display indicherà
«Finger Out » (dito
8. Il dispositivo si s
secondi, do
L'altezza del grafico a barre 5 è un'indicazione
della frequenza cardiaca e della forza del
segnale. La barra deve essere superiore al 30%
per una lettura corretta.
Il dispositivo deve essere in grado d
correttamente le frequenza cardiaca per otte-
nere una misurazione accurata della SpO
2
. Veri-
ficare che nulla ostacola la misurazione della
frequenza cardiaca prima di fare affidamento
sulla misurazione SpO
2
.
Il tempo massimo di applicazione in un singolo
sito dovrebbe essere inferiore a 30 minuti
, al
fine di garantire l'allineamento corretto del sensore
e l'integrità cutanea.
Misurazioni
• Il paziente soffr
disfunzionale (come carbossiemoglobina e metae-
moglobina).
• Al paziente sono stati iniettati coloranti intravascolari
come indocianina verde o metilene blu.
•
Utilizzat
es. luce di
con un asciugam
• Il paziente si muove
• Il paziente sente pulsazioni venose.
• Il paziente è ipotenso, ha gravi vasocostrizioni,
anemia, o ipotermia.
• Il paziente è in arresto cardiaco o è in stato di shock.
• Sono applicate unghia finte o smalto.
6. Inserimento delle batterie
7
Dopo aver estratto il dispositivo dall’imballag
prima le batterie. Il
dispositivo. Aprire il coperchio del vano batteria facen-
dolo scorrere nella direzione indicata. Inserire le batterie
(2 x 1,5 V, tipo AAA) osservando la polarità indicata.
Sostituire le batterie qua
di batterie quasi scariche 6 sul displ
Sostituire sempre entrambe le batterie nello
stesso momento.
7. Regolazione della mo
zione e della luminosità
Modalità di visualizzazione
Quando il disp
tasto ON/OFF
1
per passar
visualizzazi
zione desider
9
. Ci son
lizzazion
Luminosità
Premere e tenere premuto il tasto ON/OFF 1 per più di
un secondo per regolare la luminosità del dispositivo. Il
display visualizza «Br 1-10 ». Ci sono 10 livelli di lumino-
sità. L'impostazione predefini
8. Utilizzo del cordi
8
1. Infilare l'estremità sottile del cordino
situato nella parte posteriore del di
2. Far passare l'estremità più spessa del cordino attra-
verso l'estremità filettata prima di tirare sald
9. Malfunzion
10. Pulizia e disinfezione
Utilizzar
isopropil
all'inte
zerà con al
completam
Non utilizzare detergenti abrasivi, solventi o
benzene per la pulizia e non immergere mai il
dispositivo in acqua o altri liquidi detergenti.
11. Garanzia
Questo dispos
2 anni
dalla data d
tando l’appo
del rivendi
• Batterie e componenti usurabili non sono compresi
nella garanzia.
•
L'apertura o la manomissione del dispositivo invalidano
la garanzia.
• La garanzia non copre danni causati da trattamento
improprio, incidenti o inosservanza delle istruzioni
per l'uso.
12. Sp
Con riserva di apportare modifiche tecniche.
Pulsossimetro
IT
1
Tasto ON/OFF
2
Saturazione di ossigeno (valore in percentuale)
3
Frequenza cardiaca (valore in battiti al minuto)
4
Onda delle pulsazioni (onda ple
5
Barra della frequenza cardiaca
6
Indicatore di batterie quasi scariche
7
Inserimento delle batterie
8
Installazione del cordino
9
Modalità di visualizzazione
AT
Principio di funzionamento
Conservare in luogo asciutto
Produttore
Data di produzione
Nessun allarme SpO
2
Indicatore di batterie quasi scariche
Numero serie
Protetto contro il gocciolamento d'acqua
Rappresentante autorizzato nella Comunità
Europea
Saturazio
Frequenza ca
Condizioni di esercizio:
5 - 40 °C / 41 - 104
Condizioni di stoccaggio:
-20 - +55 °C / -4 - +131 °
Marchio di conformità CE
2
% SpO
Descri-
zione
Sintomo
cause
Soluzioni
SpO
2
o la
frequen
cardiaca
non sono
visualiz-
zate
corretta-
mente.
1. Il dito non è inserito
correttamente.
2. Il val
2
del
pazient
basso per essere
misura
3. C'è una eccessiva illu-
minazi
1. Ri
il dito.
2. e 3.
volte.
che il pro
funziona c
mente, cons
proprio med
La visua-
lizzazione
della SpO
2
e della
frequen
cardiaca
non è
stabil
1. Il di
essere i
stanza in pr
2. Movimento ecces
del pazien
1. Ri
il dito.
2. Stare seduti tranquil-
lamente e r
Il dispos
tivo n
accende
1. Nessuna bat
batter
2. Le batter
inserite c
3. Il di
essere d
1. So
2. Ri
lare le batte
3. Contattare il locale
Servizio Clien
Microlife.
Il display si
spegne
improvvi-
samente.
1. Il d
automatica
dopo 8 secondi
quando nessun
segnale v
2. La caric
è troppo ba
funzio
1. Nor
2. So
«Error 3» Il LED di emiss
rosso è danneg
Controllare il L
emissio
«Error 4» Il LED di emiss
dell'i
giato.
Controllare il L
emissione
rosso.
«Error La v
riuscita.
Contattare il lo
Servizio Clienti M
«Error 7» Il LED di emiss
diodo di ri
danneggiat
Contattare il lo
Servizio Clienti M
Tipo:
Pulsossimetro da dito OXY 300
Display:
OLED display
SpO
2
:
Range di
misurazione:
70 ~ 100 %
Precisione:
70 ~ 100 % : ±2 %
Risoluzione:
1 %
Frequenza cardiaca:
Range di
misurazione:
30 ~ 250 bpm
Precisione:
30 ~ 99 bpm: ±2 bpm;
100 ~ 250 bpm: ±2 %
Risoluzione:
1 bpm
Condizioni di
esercizio:
5 - 40 °C / 41 - 104 °F
≤ 80 % umidità relativa massima
Condizioni di
stoccaggio:
-20 - +55 °C / -4 - +131 °F
≤ 93 % umidità relativa massim
Spegnimento
automatico:
Spegnimento automatico dopo
8 secondi, quando non viene rilevato
alcun un segnale.
Batteria:
2 x batterie alcaline da 1,5 Volt; tipo
AAA
Durata batterie:
circa 30 ore (usando batterie nuove)
Peso:
56 g (comprese batterie)
Dimensioni:
58 x 32 x 34 mm
Classe IP:
IPX1
Riferimento agli
standard:
EN ISO10993-1/-5/-10; IEC
EN 60601-1-2; EN ISO9919;
EN 62304; EN 60601-1-6; CE012
Aspettativa di vita
del prodotto in uso:
5 anni (quando usato 15 v
20 minuti per misurazione)
Sehr geehrter Kunde,
Dieses tragbare Microlife Finger-Pulsoximeter dient der
nichtinvasiven Messung der arteriellen Sauerstoffsätti
(SpO
2
) und Pulsfrequenz von Erwachsenen und Kindern.
Es ist für den Privatgebrauch (zu Hause oder
sowie für den medizinischen Bereich (Krankenhäuser,
medizinische Einrichtungen) geeignet. Klinische Studien
haben gezeigt, dass die M
Wenden Sie sich bei Fragen, Problemen oder Ersatzteil-
bedarf jederzeit gerne an den lokalen Microlife-Service.
Ihr Händler oder Apotheker kann Ihn
Microlife-Landesvertretung mitteilen.
licher Informationen zu unseren Produkten finden Sie
auch im Internet unter www.microlife.com.
Bewahren Sie die Anleitung an einem sicheren Ort auf.
Wir wünschen Ihnen alles Gute
Microlife AG!
1. Zeichenerklärung
Batterien und elektronische Geräte dürfen ni
in den Hausmüll, sondern müssen entsprechend
den örtlichen Vorschriften entsorgt werden.
Vor Verwendung Bedienungsanleitung genau
studieren.
Anwendungsteil des Typs BF
2. Sicherheitshinweise
• Befolgen Sie diese Gebrauchsanweisung. Dieses
Dokument enthält wichtige Informati
Betrieb und zur Sicherheit dieses Geräts. Bitte lesen
Sie dieses Dokument sorgfältig durch, bevor Sie d
Gerät benutzen und bewahren Sie
tige Nutzung auf.
• Dieses Gerät darf
beschriebenen Zweck verwendet werden. Der
Hersteller ist nicht für Schäden haftbar, die aus
unsachgemässer Handhabung resultie
• Tauchen Sie das Gerät weder in Wasser noch in
andere Flüssig
Desinfektion folgen Sie bi
im Kapitel «Reinigu
•
Benutzen Sie das Gerät nicht, wenn Sie einen Schaden
erkennen oder Ihnen etwas Ungewöhnliches auffällt.
• Öffnen Sie niemals das Gerät.
•
Dieses Gerät besteht
vorsichtig behandelt
Betriebsanweisungen im Kapitel
«
Technische Daten
»
.
• Schützen Sie das Gerät vor:
- Wasser und Feuchtigkeit
- extremen Temperaturen
- Stössen und Herunterfallen
- Schmutz und Staub
- starker Sonneneinstrahlung
- Hitze und Kälte
• Die Funktion dieses Gerätes kann durch starke elek-
tromagnetische Felder wie z.B. Mobiltelefone oder
Funkanlagen beeinträchtigt werden. Wir empfehlen
einen Mindestabstand von 1 m (gemäss 60601-1-2
Tabelle 5). Falls Sie den
einhalten können, überprüfen Sie die ordnungsge-
mässe Funktion des Gerätes bevor Sie es benutzen.
•
Verwenden Sie das Gerät nicht in der Umgebung vom
MRI oder CT-Anlagen.
• Dieses Gerät ist nicht für die kontinuierliche Überwa-
chung vorgesehen.
• Dieses Gerät verfügt über keine Alarmfunktion und
eignet sich daher nicht zur Bewertung medi
Ergebnisse. Verwenden Sie das Gerät nicht in Situa-
tionen, in denen Alarme benötigt werden.
• Sterilisieren Sie dieses Gerät nicht mittels Damp
rilisation oder Ethylenoxid. Dieses Gerät darf nicht
sterilisiert werden.
• Entfernen Sie die Batterien, wenn das Gerät für
längere Zeit nicht benutzt wird.
Sorgen Sie dafür, dass Kinder das
unbeaufsichtigt benutzen; einige Teile sin
klein, dass sie verschluckt werden könnten.
Beachten Sie das Strangulierungsrisiko sollte
dieses Gerät mit Kabeln oder Schläuchen
ausgestattet sei
Die Benutzung dieses Geräts ist kein Ersatz für
einen Arztbesuch.
3. Allgemeine Beschreibung
Die Sauerstoffsättigung zeigt an, wie viel Prozent des
Hämoglobins im arteriellen Blut mit Sa
ist. Dies ist ein sehr wichtiger Indikator im Atemkreislauf.
Verschiedene Atemwegserkrankungen können zu einer
niedrigeren Sauerstoffsättigung im Blut führen.
Folgende Faktoren können d
senken:
Automatische Regulierung ein
ausgelöst durch eine Narkose, schweres p
Trauma, Verletzungen nach gewissen
suchungen. Diese Situationen k
Kraftlosigkeit und Übelkeit führen. Aus diesem Grun
wichtig, die Blutsauerstoffwerte eines Patienten zu messen,
damit Ärzte Probleme rechtzeitig erkennen kö
4. Messprinzip
Das Prinzip dies
Eine mathe-
matische Formel wi
Gesetz anhand der spek
des desoxydier
(HbO
2
) in Glut- und Nahin
Betriebsprinzip dieses Gerätes:
Bei der fotoelektrischen
Oxyhämoglobin-Messmethode scannen zwei Lichtstrahlen
mit unterschiedlic
hen W
ellenlängen (660 nm Glut und
905 nm Nahinfrarotlicht) aus einem Fingerspitzensensor
den Fingerpuls. Die Strahlen können durch die Finger
gelspitze eines Menschen dringen. Das Signal wird mit
einem fotosensitiven Element gemessen und im
angezeigt.
Abbildung zur FAT :
1. Rot und Infrarotsender.
2. Rot und Infrarotempfänger.
5. Gebrauchsanweisu
1. Legen Sie die Batterien ein wie i
der Batterien 7 » beschrieben.
2. Legen Sie einen Finger
Zeigefinger oder Mittelfinger wird empfohlen) in die
Fingeröffnung des Gerätes. Achten Sie darauf, dass
der Finger vollständing in die Fingeröffnung des
Gerätes eingelegt ist, dam
vom Finger bedeckt werden.
3. Lassen Sie das Gerät los, damit der Finger richtig
eingeschlossen wird.
4. Drücken Sie die Ein-/Aus-Taste 1 , um
einzuschalten.
5. Bewegen Sie den Finger währen
nicht. Es wird empfohlen, sich während der Messung
nicht zu bewegen.
6. Ihr Messergebnis wird nach ein paar Sekunden auf
dem Display angezeigt.
7. Entfernen Sie den Finger vom Ge
zeigt «Finger Out » an.
8. Das Gerät schaltet sich
tisch ab, s
Die Höhe des Balkens 5 gibt die Pu
Signalstärke an. Der Balken sollte grösser als
30% sein, um eine verlässliche Messung durch-
führen zu können.
Das Gerät muss den Puls richtig messen
können, um ein exaktes Sauerstoffsättigungser-
gebnis anzugeben. Stellen Sie sicher, dass die
Pulsmessung nicht gestört wird, bevor Sie sich
auf das Messergebnis verlassen.
Verwenden
30 Minuten am gl
, um di
korrekte Pla
leisten un
Fehlerhafte Messergebnisse können auftrete
•
Der Patie
binen leidet
Methämog
• Dem Pat
Indocyanin-Grün oder Methylenblau, injiziert wurden.
•
Das Gerät grö
Bedecken Sie den S
• Der Patient sich übermässig bewegt.
• Der Patient Venenpulsationen wahrnimmt.
•
Der Pat
fässe, erhe
• Der Patient einen Herzstillstand hat oder im
zustand ist.
• Nagellack aufgetragen oder künstliche Fingernägel
angebracht sind.
6. Einlegen der Batt
7
Nachdem Sie das Gerät ausgepackt haben, legen Sie die
Batterien ein. Das Batteri
Geräteunterseite. Entfernen Sie die
ckung, indem Sie die Abdeckung in die angezeigte Rich-
tung schieben. Legen Sie die Batterien (2 x 1,5 V, G
AAA) ein und achten Sie dabei auf die angezeigte Polarität.
Tauschen
für Batterie niedrig
6
auf dem Display a
wird.
Ersetzen Sie immer beide Batterien zur gleichen
Zeit.
7. Anzeigemodus und Helligkeit anpassen
Anzeigemodus
Drücken Sie kurz die Ein-/Aus-Taste 1 , um den Anzei-
gemodus zu wechseln und zu Ihrem
Anzeigemodus 9 zu gelangen. Es gibt 6 verschiedene
Anzeigemodi; die Standardeinstellung ist Modus 1.
Helligkeit
Drücken Sie die Ein-/Aus-Taste 1 länger als eine
Sekunde, um die Helligkeit des
Das GeräBr 1-10 » an. Es gibt 10 Helligkeits-
stufen; die Standardeinstellung ist Stufe 4.
8. Verwendung des Umhänge
8
1. Fädeln Sie das dünnere Ende des Umhängebandes
durch das dafür vorgesehene Loch am Gerät.
2. Fädeln Sie das dickere Ende du
tigte dünnere Ende und ziehe
9. Fehlfunktionen und Massn
10. Reinigung und De
Reinigen Sie die gummierte Innenfläche des Gerätes mit
einem Alkoholtupfer oder mit einem Alkohol (70% Isop-
ropanol) befeuchteten Baumwolltuch. Reinigen Sie auch
den Finger vor und nach jeder Anwendung. Lassen Sie
das Gerät vor Verwendung gründlich trocknen.
Verwenden Sie keine aggressiven Reinigungs-
mittel, Lösungsmittel oder Benzol zum Reinigen
und tauchen Sie das Gerät niemals in Wasser
oder andere Reinigungsflüssigkeiten.
11. Garantie
Für dieses Gerät gewähren wir 2 Jahre Garantie ab
Kaufdatum. Die Garantie gilt nur bei Vorlage einer vom
Händler ausgefüllten Garantiekarte (siehe le
mit Kaufdatum oder des Kassenbelegs.
• Batterien und Verschleissteile sind von der Garantie
ausgeschlossen.
• Wurde das Gerät
verändert, erlischt der Garantieanspruch.
•
Die Garant
unsachgemä
achtung der
12. Technische Daten
Technische Änderungen vorbehalten.
Pulsoximeter
DE
1
Ein-/Aus-T
2
Sauerstoffs
3
Pulsfrequenz (Schläge pro Minute)
4
Pulswelle (Plethysmografische Welle)
5
Pulsbalken
6
Batterie niedrig
7
Einlegen der Batterien
8
Umhängeband anbringen
9
Anzeigemodi
AT
Messprinzip
Vor Nä
Hersteller
Herstellungsdatum
Kein Sauerstoffsättigungsalarm
Batterie niedrig
Seriennummer
Geschützt gegen Tropfwasser
EU-Repräsentant
Sauerstoffsättigung (Wert in Prozent)
Pulsfrequenz (Schläge pro Minute)
Betriebsbedingungen:
5 - 40 °C / 41 - 104 °F
Aufbewahrungs-
bedingungen:
-20 - +55 °C / -4 - +131 °F
CE-Kennzeichnung
2
% SpO
Bezeich-
nung
Problem/Mögliche
Ursache
Lösungen
SpO
2
oder
Pulsfre-
quenz
wird nic
normal
ange-
zeigt.
1. Finger ist nicht korrekt
im Gerät.
2. Sauerstoffsättigung
Patienten is
3. Übermässige Belichtung.
1. Fin
richtig einlegen
2. & 3.
mehrmals. Funktio-
niert das Gerät
korrekt, suchen Sie
Ihren Arzt au
SpO
2
oder
Pulsfre-
quenz
variiert
stark.
1. De
weit genu
stecken.
2. Der Patient bewegt sich
zu stark.
1. Fin
richtig einlegen
2. Ruhig sitzen und
erneut probie
Das
Gerät
kann
nicht
einge-
schaltet
werden.
1. Keine oder leere Batte-
rien im Gerät.
2. Batterien sind nicht
richti
3. Das Gerät könnte
beschädigt sein.
1. Ba
schen.
2. Batterien entf
und neu ein
3. Kontaktieren Sie
Ihren lokalen Micro-
life Kundenservice.
Das
Display
ist plötz-
lich
ausge-
schaltet.
1. Das Gerät schalte
automatisch aus,
es innerhalb von 8
Sekunden kein Signal
empfängt.
2. Batterien sind zu
schwach für den Betrieb.
1. N
2. Ba
schen.
«Error 3» Rotlich
digt.
Rotlicht
prüfen.
«Error 4» Infraro
beschädigt.
Infrarotlichtsende
überp
«Erro Das Display ist de Kontaktieren
lokalen
Kundenservice.
«Error 7» Empfä
beschädigt.
Kontaktieren Sie Ih
lokalen
Kundenservice.
Typ:
Fingertip Pulsox
Anzeige:
OLED Displ
Sauerstoffsättigung:
Messbereich:
70 ~ 100 %
Genauigkeit
70 ~ 100 % : ±2
Messauflösung:
1 %
Pulsschlag
Messbereich:
30 ~ 250 bpm
Genauigkeit
30 ~ 99 bpm: ±2 bpm;
100 ~ 250 bpm: ±2 %
Messauflösung:
1 bpm
Betriebsbedin-
gungen:
5 - 40 °C / 41 - 104 °F
≤ 80 % relative maximale Luftfeuch-
tigkeit
Aufbewahrungs-
bedingunge
-20 - +55 °C / -4 - +131
≤ 93 % relati
tigkeit
Automatische
Ausschaltung:
Automatische Ausschaltung nach
8 Sekunden, bei keinem oder schwa-
chem Signal.
Batterie:
2 x 1,5 V Alkaline-Batte
Batterie-Lebens-
dauer:
ca. 30 Stunden (mit neuen Batterien)
Gewicht:
56 g (mit Batterien)
Grösse:
58 x 32 x 34 mm
IP Klasse:
IPX1
Verweis auf
Normen:
EN ISO10993-1/-5/-10; IEC 60601-1;
EN 60601-1-2; EN ISO9919;
EN 62304; EN 60601-1-6; CE0123
Durchschnittliche
Lebensdauer:
5 Jahre (wenn das Gerät 15 Mal täglich
während 20 Minuten verwendet wurde)
Sayı n Mü ş teri
Parmak tipi pulse oksimetre Microlife çocuklarda ve
yetiş kinlerde, non-invazif olarak oksijen saturasyonunu
(SpO
2
) ve kalp atış h ız ın ı tespit eden taşı nabilir bir
cihazdı r. Özel kullan ı m (e ış arda) ve medikal
sektör(ı ndan kullanıma
uygundur. Yüksek hassaslığ ı Klinik olarak test edilmiştir.
Soruların ı z, sorunlar ın ı z ve yedek parça sipari ş lerini
lütfen, yerel Microlife-Müş teri Servşün. Ülkeniz-
deki Microlife bayisinin adresini satıc ın ı zdan ya da eczane-
nizden öğrenebilirsiniz. İ kinci bir yol olarak, ürünl
hakkı nda geni ş bilgi edinebilece ğ in
internet adresini de ziyaret edebilir
İleride ba şvurmak amac ıyla ım talimatlar ın ı g
bir yerde saklayın.
Sağlı kla kal ı n – Microlife AG!
1. Simge Tanımlamalar ı
Piller ve elektronik ürünler, çöpe atılmamal ı;
ancak, yürürlükteki yönetmeliklere uygun olarak
elden çıkar ılmal ıd ır.
Aygıt ı kullanmadan önce, talimatlar ı dikkatl
okuyun.
BF tipi ekipman
2. Önemli Güvenlik Talimatları
• Kullan ım için talimatlar ı okuyunuz. Bu doküman
cihazı n güvenli kullan ım ı için ön
tedir. Lütfen cihazı kullanmı
tamamen okuyunuz ve gelecekte tekrar başvurmak
üzere saklayın ız.
• Bu ürün, sadece bu bro şürde aç ıklanan amaçlar
çerçevesinde kullanılabilir. İmalatç ı , yanlış uygula-
madan kaynaklanan zarar ziyan için sorumlu tutu-
lamaz.
• Ayg ıt ı su veya di ğer s ıv ılar ırmay ın ız. Temiz-
liğ i için lütfen «Temizlik ve Dezenfektasyon»
bölümündeki talimatlara uygulın ız.
• Hasar gördü ğünü dü şünüyorsan ız ya da herhangi bir
anormal durum sezdiyseniz, aygıt ı kullanmayın.
• Ayg ıt ı kesinlikle açmay ın.
• Ayg ıt, hassas parçalara sahiptir ve dikkatli biçimde
kullanı lmalıd ı r. «Teknik
Özellikler» bölümünde açık-
l
anan saklama ve çalışt ı rma koşullar ın ı göz önünde
bulundurun!
• Aş ağı daki durumlara maruz kalmas ı na engel olun:
- su ve nem
-aşır ı s ıcakl ıklar
- darbe ve düşürülme
- kir ve to
-dğrudan güne ş ı şı ğı
-sıcak ve so ğuk
• Cihaz, cep telefonu veya radyo istasyonlar ı gibi güçlü
elektromanyetik alanlara yakı n kullanıld ığ ı nda
düzgün çalış mayabilir ve bu dınamaya-
cağın ı zda en az 1 meığ ı korumanız ı öneririz
(60601-1-2 tablo 5'e göre), lütfen cihazı kull
önce doğ ru çalış ı p çalışmad ığ ın ı kont
rol ediniz.
• Ci
hazı MRI veya CT çevresinde kullanmay ın ı z.
• Bu cihaz süreki bir ğildir.
• Alarm fonksiyonu olmad ığ ı için medikal sonuçlar ı
değerlendirme de kulla ı lamaz. Alarm ı n gerekli
olduğ u durumlarda bu cihaz ı kullanmay ın ı z.
• Is ıyla veya
aygıt ı n sterilize de ğ il. Bu cihaz sterilizasyon için
tasarlanmamışt ı r.
• Ayg ıt ın uzun bir sılmamas ı durumund
pillerin çıkar ılmas ı gerekir.
Çocukları n denetimsiz bir ş ekilde ürünü kullan-
maları na izı parçalar, yutulabi-
lecek kaıt ı n kablo veya borula-
rı nı n olmas ı nedeni ile yaratabilece ğ i bo ğ ulma
riskinin farkı nda olun.
Bu aygıt ı n kullanılmas ı , doktorunuzlı lan bir
konsültasyon anlamı na gelmez.
3. Genel Tanım
Oksijen satur
lobin yüzşı m sistemii için ç
önemli bir paığ ı kandaki
oksijen satuş mesi ile başla.
Aş ağı daki faktörler oksijen saturasyonunun dü ş mesine
sebep olur:
Aneztezi sonucu organ fonksiyon bozukluğu,
yoğ un postoperatif travma, t ı bbi muayene esnas ı nda olu ş an
sakatlı klar. Bu durumlar sersemlik, halsizlik ve kusma ile
sonuçlanabilir. Bunun için hastanı n oksijen saturasyonunu
bilmek, problemin zamanı nda çözülmesi için çok önemlidir.
4. Ölçme
Pulse oksimetre prensibi: Lambert Beer yasasın ı
kullanarak spektrum emme özelliklerine göre oksijensiz
hemoglobin (Hb) ve oksihemoglobin arası nda kırm ız ı ve
yakı n k ız ı lötesi bölgele
2
) matemat
formül oluşturulmu ştu
Cihazı n çal ış ma prensibi:
Pulse tarama ve kaydetm
teknoljisine uygun olarak Fotoelektrik oksihemoglobin
inceleme teknolojisi benimsenmiş tir, bu sayede iki farklı
dalga bı yundaki (660 nm kırm ız ı vış ık,
parmak tipi bir sensörle tı rnak ucuna odaklanabiliriyor.
Mikrş lemci ve elektronik devreler ile elde edilen sonuç
ekranda gösterilir.
Çalış ma prensibi diyagram ı AT :
1. Kı rmız ı ve infrare
2. Kı rmız ı ve infrare ı lama tüneli.
5. Kullanı m Tali ı
1. «Pillerin yerleştirilmesi 7 » bölümünde açıkland ığ ı
gibi pilleri takın.
2. Bir parmağın ızı sokunuz (t ırnak yukar ıda o
şekilde; i şaret veya orta parmak önerilmektedir. Parma-
ğın ız ı tam olarak yştirdi ğ inizden emin olunuz.
3. Cihazı bı rakarak parma ğı na tam olarak oturtunuz.
4. AÇ/KAPA düğmesi 1 basarak cihazı açın.
5. Test süresince parma ğın ız ı oynatmay ın ız. Vücu-
dunuzu da oynatmamanı z önerilir.
6. Ölçüm değerleri birkaç saniye sonra ekranda görünür.
7. Parmağın ız ı cihazdan ç ı kartı n. Ekranda
Finger Out
»
ibaresi çıkacakt ır.
8. Aygı t otomatik olarak parmak ayg ı ttan kald ır ı ldı ktan
sonra yaklaşı k 8 saniye sonra geçer.
Bar grafiği 5 ritim sinyalinin kuvvetini göster-
mektedir. Düzgün bir okum
üzerinde olmalıd ır.
Düzgün bir SpO
2
okuması alabilmek için cihaz
uygun şekilde çalış ı yor olmalıd ı r. SpO
2
ölçümüne
engel olmadığ ı ndan emin olunuz.
Doğ ru sensör alg ı laması ve deri bütünlü ğ ü için
cihazı 30 dakikal ı k en fazla ile kullan ın ız.
Aş ağı daki durumlarda yanl ış ölçüm olabili
• Yüksek seviyerde i şlevsiz hemoglobin (karboksihe-
moglobin veya methemoglobin).
• İndosiyanin ye şil veya metilen mavi gibi damar içi
enjekteler.
• Yüksek ış ık alt ında (direk güne ş ış ıı ğ ı gibi). Bu
durumda sensörleri cerrahi bir havlu ile örtünüz.
• Fazla hasta hareketi.
• Hasta venöz ız ya ş ıyor
• Hastada hipotansiyon, zokonstriksiyon, anemi
veya hipotermi var ise.
• Hasta kalp durm ı veya şok içinde ise.
• Tı rnı rnak cilası var ise.
6. Pillerin yerleştirilm
7
Aygıt ı n ambalaj ın ı açt ı ktan sonr ş tirin.
Pil bölmesiıt ı n alt tarafındı r. Pil kapa ğın ı göst
yönde kaydı rarak açı n. Pi
yerleş tirin; ı n gösterild ğ i gibi do ğ ru
konumda buluı na dikkat edin.
Ekrenda düş ük pil 6 göstergesi çıkt ığ ı nda pilleri
deği ş tiriniz.
Her zaman aynı anda her ği ştirin.
7. Ekran Modunu ve Parlaklığ ı Ayar
Ekran modu
Cihaz çalış ı r durumda iken AÇ/KAPA düğmesi 1
basarak diğ er ekran moduna 9 geçebilirsiniz. 6 Farklı
ekran modu bulunmaktadı r. Varsayı lan mod 1'
Parlaklık
AÇ/KAPA düğmesi 1 bir saniyeden fazla basıl ı tutarak
ekran parlaklığ ın ı ayarlayın ı z. Ekranda «Br 1-10 » görü-
necektir. 10 Parlaklı k modu bulunmaktadı r; Varsayılan
ayar 4'dür.
8. Kordonun Kullanılmas ı
8
1. Kordonun ince tarafın ı cihazı n ası deliğ inden geçirin.
2. Kordonun kalı n tarafın ı askı deliğ inden geçirilen ince
uçtan geçirerek sık ı ca çekiniz.
9. Arı zalar ve Yapılacak İş lemler
10. Temizlik ve
Alkollü bez ya da alkolle (%70 izopropil) nemlendirilmiş
pamuklu bez kullanı n cihazı n içinde parmak dokunuyor
silikon temizlemek için. Parmak da temiz önce ve sonra
her bir test alkol kullanarak test ediliyor. Cihazı n kullan-
madan önce iyice kuın ı bekleyin.
Temizlik için kesişınd ır ıc ı temizlik ma
incelticiler ya daı n ve aıt ı su
ya da diğ er temizlıv ılar ı na kesinlikle batırmay ın.
11. Garanti Kapsamı
Bu aygı t, satı n alı ndığ ı tarihten itibaren 2 y ıl garanti
kapsamı ndadı r. Garanti, sadece sat ıc ın ı z (arkaya
bakın ı z) taraf ı ndan doldurulan ve sat ı n alma ya da fatura
tarihini teyit eden garanti belgesinin mevcudiyeti ile
geçerlilik kazanır.
• Yı pranm ış pillerle ve parçalarla kullan ı mı garanti
kapsamı nda de ğ ildir.
• Ayg ıt ın aç ılmas ı ya da üzerinde de ği şiklik yap ılmas ı,
garantiyi geçersiz kılar.
• Garanti, yanl ış kullan ımdan, kazalar vışt ırma
talimatları na uygun davran ı lmamaktan kaynaklanan
zarar ziyanı kapsamaz.
12. Teknik Özellikler
Teknik özelliklerin deği ş tirilmesi hakkı saklıd ı r.
Pulse Oksimetre
TR
1
AÇ/KAPAğmesi
2
Oksijen saturasyonu (yüzde olarak)
3
Kalp atış h ız ı (atış/dakika)
4
Nabı z dalga (Pletismografik dalga)
5
Bar grafiği
6
Düş ük Pil Göstergesi
7
Pillerin yerleştirilmesi
8
Kordonun bağlanmas ı
9
Ekran modları
AT
Çalış ma prensibi
Kuru tutun
Üretici
Üretim tarihi
SpO
2
Alarmsız
Düş ük Pil Göstergesi
Seri numarası
Su kaçağı na karşı korumalı
Avrupa yetkili
Oksijen saturasyonu (yüzde olarak)
Kalp atış h ız ı (atış/dakika)
Çalış ma ko ş ulları:
5 - 40 °C / 41 - 104
Saklama koşullar ı:
-20 - +55 °C / -4 - +131 °F
CE uygunluk işareti
S
N
PR bpm
Açı k-
lama
Olası Nedenler Çözüm
SpO
2
veya
nabı z
düzgün
görüntü-
lenmiyor.
1. Parmakğ ru bir
şekilde yerle ştirilme-
miş tir.
2. Hastanı n SpO
2
'si
gösterilemeyecek
kadar düşüktür.
3. Fazla ış ı ktan u
durunuz.
1. Parmağın ı z tekrar
yerleş tirmeyi deneyin.
2. & 3. Cihazı n doğru
çalışt ığ ı nda doktoru-
nuza başvurunuz.
SpO
2
seviyesi
dengesiz.
1. Parmağın ız ın tam
derin olarak yerleşti-
rilmemiş tir.
2. Fazla hasta hare-
keti.
1. Parmağın ı z tekrar
yerleş tirmeyi deneyin.
2. Sakin olarak tekrar
ölçüm yapın ız.
Cihaz
çalış-
mı yor.
1. Düş ür pil veya pille
takıl ı de ğ il.
2. Piller doğ ru yerleşti-
rilmemiş tir.
3. Cş
olabilir.
1. Pilleri deği ştiriniz.
2. Pilleri çıkartarak
yeniden yerleştiriniz.
3. Microşteri
servisi ile irtibata
geçiniz.
Ekran
birden
kapa-
nı yor.
1. 8 saniye sonun
cihaz simyal yakala-
yamadığ ı nda
otomatik olarak
kapanı r.
2. Pil seviyesi cihazı
çalışt ı rmayacak
kadar düşükt
ür.
1.
Normal
2. Pilleri deği ştiriniz.
«Error 3» Kırm ız ı emisyon LED
hasarlı.
Kı rm ı zı LED kon
ediniz
«Error 4» Infrared emisyon LED
hasarlı.
Infrared LED kontro
ediniz
«Error 6» Ekran hatası . Microlife müş teri servisi
ile irtibata geçiniz.
«Error 7» Emisyon LED veya
alıc ı diyot hatal ı.
Microlife müş teri servisi
ile irtibata geçiniz.
Tür:
Parmak tipi pulse oksimetre OXY 300
Ekran:
OLED Ekran
SpO
2
:
Ölçüm aralığ ı:
70 ~ 100 %
Doğ ruluk:
70 ~ 100 % : ±2 %
Çözünürlük:
1 %
Nabı z Say ıs ı:
Ölçüm aralığ ı:
30 ~ 250 bpm
Doğ ruluk:
30 ~ 99 bpm: ±2 bpm;
100 ~ 250 bpm: ±2 %
Çözünürlük:
1 bpm
Çalış ma ko ş ulları:
5 - 40 °C / 41
% ≤ 80 maksimum ba ğı l ne
Saklama koşullar ı:
-20 - +55 °C / -4 - +131 °F
%≤ 93 maksim ğı l nem
Otomatik kapanma:
Az veya hiçılanmad ığ ında
cihaz 8 saniye son
kapanı r.
Pil:
2 x 1.5 V alkalin piller; boyut AAA
Pil ömrü:
yaklaşı k 30 saat
Ağı rl ı k:
56 g (piller dahil)
Boyutlar:
58 x 32 x 34 mm
IP sın ıf ı:
IPX1
İlgili standartlar:
EN ISO10993
EN 60601-1-
EN 62304; EN
Beklenen servis
ömrü:
5 yı l (ne zaman 15 kez kullanılan/
gün; her ölçüm için 20 dakika)
OX300
Fingertip Oximeter
Distributor
Microlife AG
Espenstrasse 139
9443 Widnau / Switzerland
www.microlife.com
EN FR
IT DE
TR ES PT NL
GR
AR