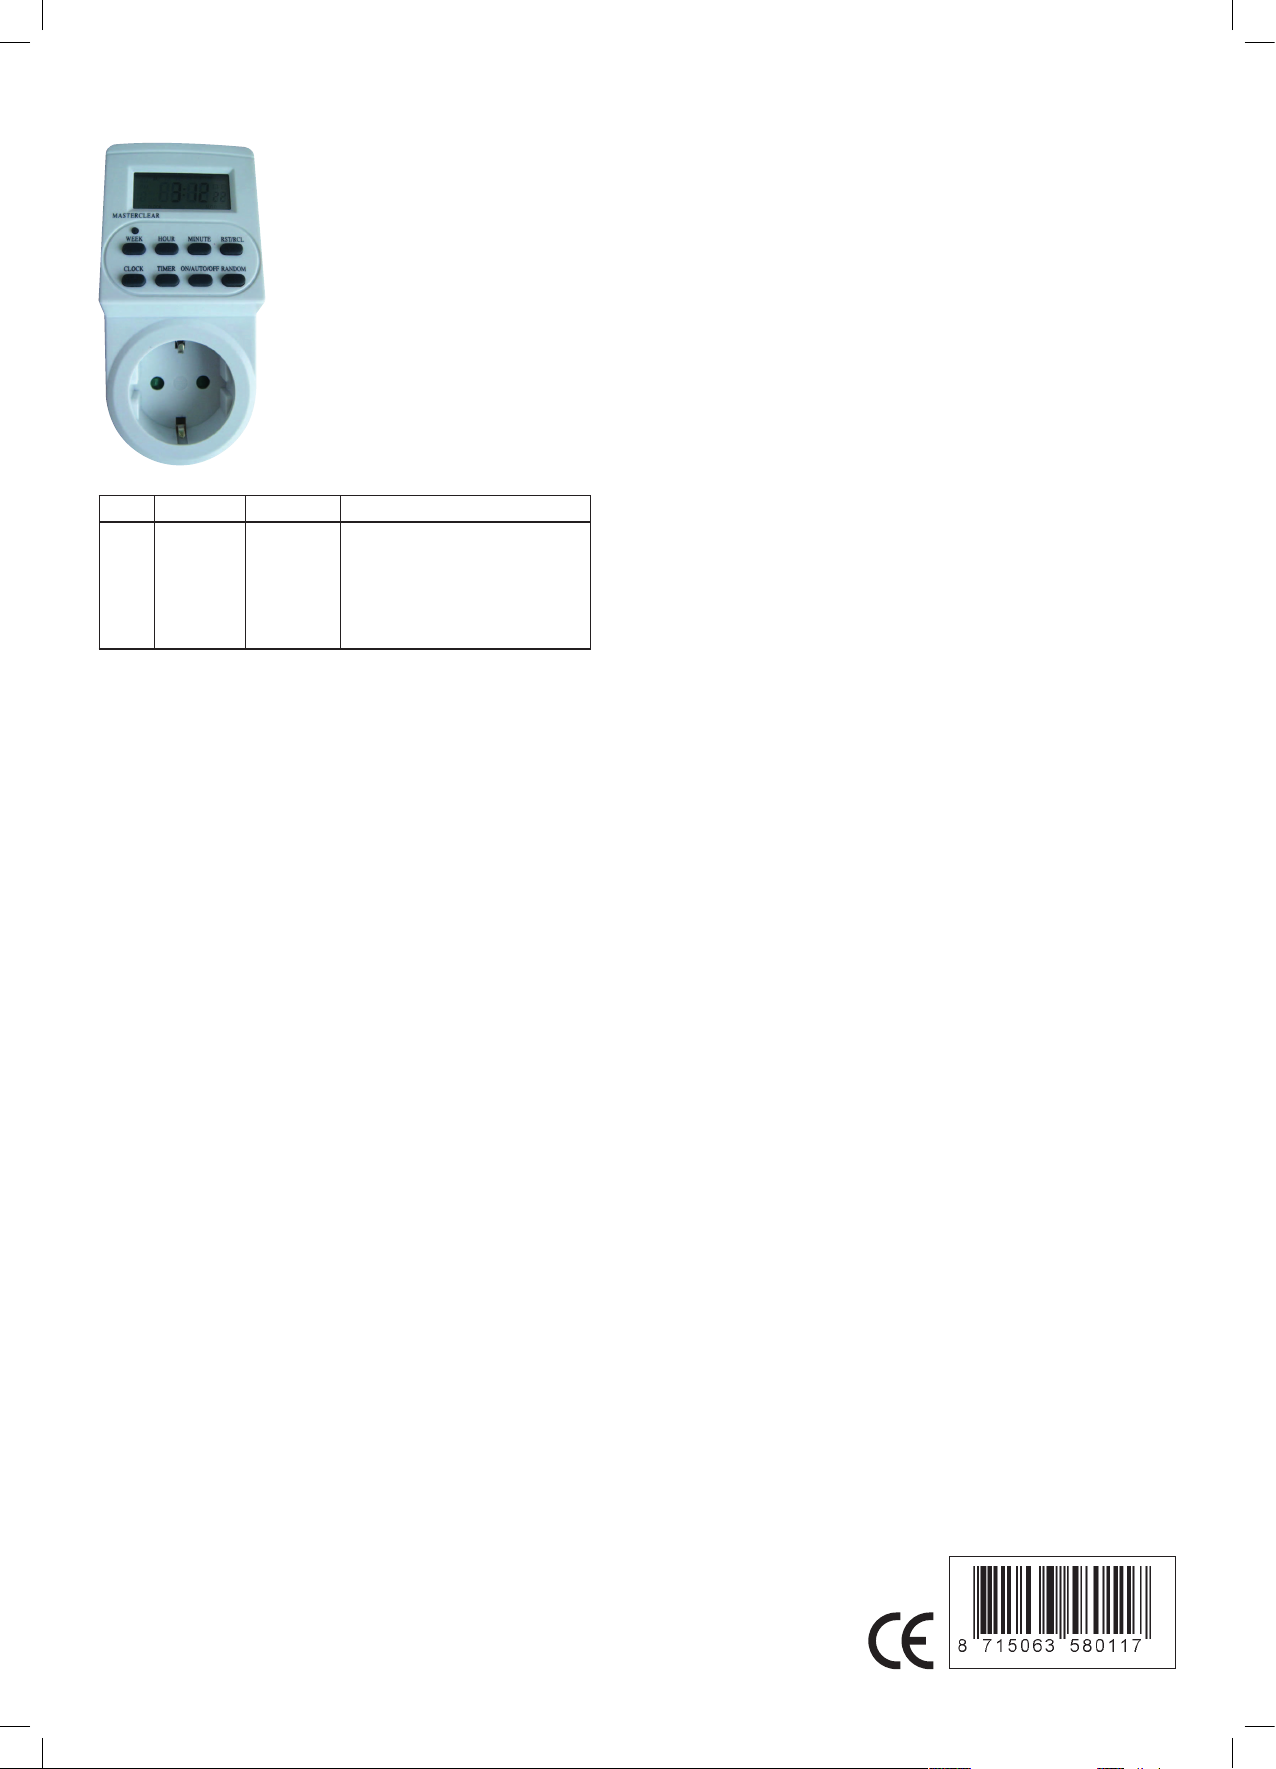
1. MASTER CLEAR: Clear all data in memory including current time and all programs.
2. RANDOM: Set or cancel random function.
3. CLOCK: Set current time with buttons WEEK, HOUR, MIN.
Select 12 or 24 hour mode using the TIMER button.
Activate summertime function with button ON/AUTO/OFF.
4. TIMER: Set programs combined with buttons WEEK, HOUR, MIN.
Select 12 or 24 hour mode combined with button CLOCK.
5. ON/AUTO/OFF: Select operating modes for the timer.
6. WEEK: Set week combined with button CLOCK or TIMER.
7. HOUR: Set hour combined with button CLOCK or TIMER.
8. MIN: Set minute combined with button CLOCK or TIMER.
9. RST/RCL: Override programs or recall the overridden programs.
GENERAL FEATURES
1. 10 ON/OFF programs with 1 minute step.
2. MANUAL ON/AUTO/MANUAL OFF selectable.
3. 12/24 hour mode selectable.
4. Large LCD display with second.
5. Summer time function available.
6. Random function with a randomly on 10-31minutes between 6:00 PM and 6:00 AM.
7. 16 combinations of day or blocks of days available as follows:
MO
TU
WE
TH
FR
SA
SU
MO, TU, WE, TH, FR, SA, SU
MO, TU, WE, TH, FR
SA, SU
MO, TU, WE, TH, FR, SA
MO, WE, FR
TU, TH, SA
MO, TU, WE
TH, FR, SA
MO, WE, FR, SU
INITIAL OPERATION
1. Plug the timer into a regular 230 Volts power outlet and turn the power on. Leave for
approximately 14 hours to charge the Memory Back-up battery.
2. Clear all current information by pressing MASTER CLEAR button with a sharp object
such as a pen or pencil after charging.
3. The timer is now ready to be set up for use.
SETTING CURRENT TIME
1. Press the CLOCK button and hold, simultaneously press WEEK button until the actual
day is displayed. Continue by pressing HOUR or MIN button until the current hour or
minute is displayed. When setting, the buttons WEEK, HOUR or MIN can
be held down for rapid forward counting.
2. Release both buttons. The week and time will be set.
3. To reset incorrect time, repeat above steps.
SETTING PROGRAMS
TIP: When verifying your programs ensure that the settings do not overlap,
especially when using the block option. If there are program settings overlapping,
the timer ON or OFF will be executed according to program time, not by program number.
Program OFF has the priority over program ON.
Thank you for buying this multifunctional Digital Timer!
Attention!!! Please read the manual / instructions carefully before installing the meter and connect electrical
appliances to it. Keep the manual on a safe place for future reference.
Warning!
Do not immerse the timer in water or any other liquid! Resistive devices are devices who uses, for the entire duration, the same amount of power, such
as lamps. Inductive devices consume at the start much more power than normal use / working. This includes washing machines, dryers, water heaters,
heaters, etc. If the inductive device, which you want to connect to this timer, exceeds the value of the inductive (max. Load) power of this timer, do not
connect the device to this timer. If you do, the timer contact will prematurely fail and cause damage to the timer which will be outside the warranty. It
also may cause re or create other accidents caused by improper use of the timer. Do not connect Heaters or similar appliances to this timer, because
these appliances should never be left unattended during operation. For indoor use only!
Important!
Don’t plug in any appliance where the maximum rated power exceeds 16 Amp. Always ensure the plug of any appliance is fully inserted into the Timer
socket. Before cleaning, remove the Timer from the wall socket or turn of the powersupply. Use a dry cloth to clean the Timer.
1. Press TIMER button and release. LCD shows ON_1. The rst ON setting can be made now.
2. Press WEEK button to set the day or block of days. Set the time by pressing HOUR and
MIN button.
3. Press TIMER button again to nish the rst ON setting and enter into the rst OFF setting.
LCD shows OFF_1. By repeating 2 to make the rst OFF setting.
4. Press TIMER button again to nish the rst OFF setting and enter into the 2nd ON setting.
Repeat 2 and 3 to program remaining settings.
Press TIMER button and hold for 2 seconds to enter fast advance.
5. After completing settings, press CLOCK button. The timer is ready to operate.
EXAMPLE: Timer ON at 17:15 and OFF at 22:30 everyday
a. Press TIMER once and release. LCD displays ON_1
b. Press WEEK till LCD displays “MO,TU,WE,TH,FR,SA,SU”
c. Press HOUR till LCD displays 5:00PM or 17:00
d. Press MIN till LCD displays 5:15PM or 17:15
e. Press TIMER again and release. LCD displays OFF_1
f. Repeat the above b,c and d till LCD displays “MO,TU,WE,TH,FR,SA,SU”,10:30PM or 22:30
MANUAL ON/AUTO/MANUAL OFF SETTING
Operating modes can’t be changed during program settings.
1. Press ON/AUTO/OFF button to revert the three modes in turn.
2. The programs can only be executed in AUTO mode. When AUTO is selected, the timer
operates as the programs. In MANUAL ON or MANUAL OFF mode all programs are ignored
and the timer doesn’t operate. When MANUAL ON mode is selected, power output is
always ON. When MANUAL OFF mode is selected, power output is permanently o.
3. When the mode is turned from MANUAL ON to AUTO, the timer will keep the setting of
MANUAL ON until to the next timer setting.
RANDOM FUNCTION
1. Press RANDOM button. LCD displays R(RANDOM). RANDOM function is activated.
2. When RANDOM is activated,the timer will be in On position randomly for 10-31 minutes
during the time gap----from 6:00PM to 6:00AM.
3. Press the RANDOM button again to cancel this function. Random function can’t be set
during program settings.
4. The RANDOM function can only be executed in AUTO mode between 6:00PM and 6:00AM.
12/24 HOUR MODE
Press CLOCK and TIMER simultaneously to turn the time display between 12 and 24 hour
mode.
SUMMERTIME FUNCTION
1. Press CLOCK and ON/AUTO/OFF simultaneously. LCD shows S(Summer time).
Clock advances 1 hour.
2. To revert to winter setting, press the two buttons again. Clock moves backward 1 hour.
Gebruikershandleiding.com neemt misbruik van zijn services uitermate serieus. U kunt hieronder aangeven waarom deze vraag ongepast is. Wij controleren de vraag en zonodig wordt deze verwijderd.
Product:
Spelregels forum
Om tot zinvolle vragen te komen hanteren wij de volgende spelregels:
lees eerst de handleiding door;
controleer of uw vraag al eerder door iemand anders is gesteld;
probeer uw vraag zo duidelijk mogelijk te stellen;
heeft u een probleem en al geprobeerd om dit op te lossen, vermeld dit erbij aub;
heeft u een oplossing gekregen van een bezoeker dan horen wij dat graag in dit forum;
wilt u een reactie geven op een vraag of antwoord, gebruik dan niet dit formulier maar klik op de knop 'reageer op deze vraag';
uw vraag wordt direct op de website gezet; vermijd daarom persoonlijke gegevens in te vullen;
Belangrijk! Als er een antwoord wordt gegeven op uw vraag, dan is het voor de gever van het antwoord nuttig om te weten als u er wel (of niet) mee geholpen bent! Wij vragen u dus ook te reageren op een antwoord.
Belangrijk! Antwoorden worden ook per e-mail naar abonnees gestuurd. Laat uw emailadres achter op deze site, zodat u op de hoogte blijft. U krijgt dan ook andere vragen en antwoorden te zien.
Abonneren
Abonneer u voor het ontvangen van emails voor uw Masterclear TGE-2A - 58011 bij:
nieuwe vragen en antwoorden
nieuwe handleidingen
U ontvangt een email met instructies om u voor één of beide opties in te schrijven.
Ontvang uw handleiding per email
Vul uw emailadres in en ontvang de handleiding van Masterclear TGE-2A - 58011 in de taal/talen: Nederlands, Engels als bijlage per email.
De handleiding is 0,22 mb groot.
U ontvangt de handleiding per email binnen enkele minuten. Als u geen email heeft ontvangen, dan heeft u waarschijnlijk een verkeerd emailadres ingevuld of is uw mailbox te vol. Daarnaast kan het zijn dat uw internetprovider een maximum heeft aan de grootte per email. Omdat hier een handleiding wordt meegestuurd, kan het voorkomen dat de email groter is dan toegestaan bij uw provider.
Uw handleiding is per email verstuurd. Controleer uw email
Als u niet binnen een kwartier uw email met handleiding ontvangen heeft, kan het zijn dat u een verkeerd emailadres heeft ingevuld of dat uw emailprovider een maximum grootte per email heeft ingesteld die kleiner is dan de grootte van de handleiding.
Er is een email naar u verstuurd om uw inschrijving definitief te maken.
Controleer uw email en volg de aanwijzingen op om uw inschrijving definitief te maken
U heeft geen emailadres opgegeven
Als u de handleiding per email wilt ontvangen, vul dan een geldig emailadres in.
Uw vraag is op deze pagina toegevoegd
Wilt u een email ontvangen bij een antwoord en/of nieuwe vragen? Vul dan hier uw emailadres in.