675284
2
Verklein
Vergroot
Pagina terug
1/4
Pagina verder
Comment commander la locomotive Locomotief besturen
Connecting the Remote Controlled
Rotary Crane to the Layout
A remote controlled rotary crane is included
with some K Track starter sets. See the
instructions about the contents of the set
about this crane. This model can also be
purchased separately (item no. 7051).
1. Install the plugs on the ends of the
connecting wires for the crane. Strip
about 4 mm or 1/16” of insulation from
the ends of the wires, then twist the
strands for each wire, bend the twisted
strands back against the insulation on
the wire, insert the wire into the plug
and finally tighten the set screw for
each plug. A red plug is to be installed
on each of the red wires, and a gray
plug is to be installed on each of the
gray wires, and a yellow plug is to be
installed on the yellow wire. A short
amount of insulation is stripped from
the end of the brown wire and the
strands are to be twisted. You do not
need a plug for this wire, since it will be
connected to the transformer.
2. Install a yellow plug on the single yellow
wire on the one side of the crane as
described above in Step 1. Strip a short
amount of insulation from the other
end of this wire and twist the strands.
3. Install a brown plug and a red plug on
the ends of the wires for the electro-
magnet.
4. Check to make sure that the power
cord for the transformer is unplugged
from the wall outlet!
5. Connect the brown wire from the
crane’s wiring harness to the brown
terminal clip on the transformer.
6. Connect the yellow wire to the yellow
terminal clip on the transformer.
7. Insert the plug on the yellow wire from
the transformer into the side socket on
the control box for the crane.
8. Insert the remaining plugs into the
back of the crane’s control box accor-
ding to the wiring diagram.
9. Insert the two plugs for the electro-
magnet into the sockets on the front
of the crane’s cab.
After you have plugged the power cord
for the transformer into the wall outlet, the
rotary crane is now ready for operation.
This model offers the following working
functions:
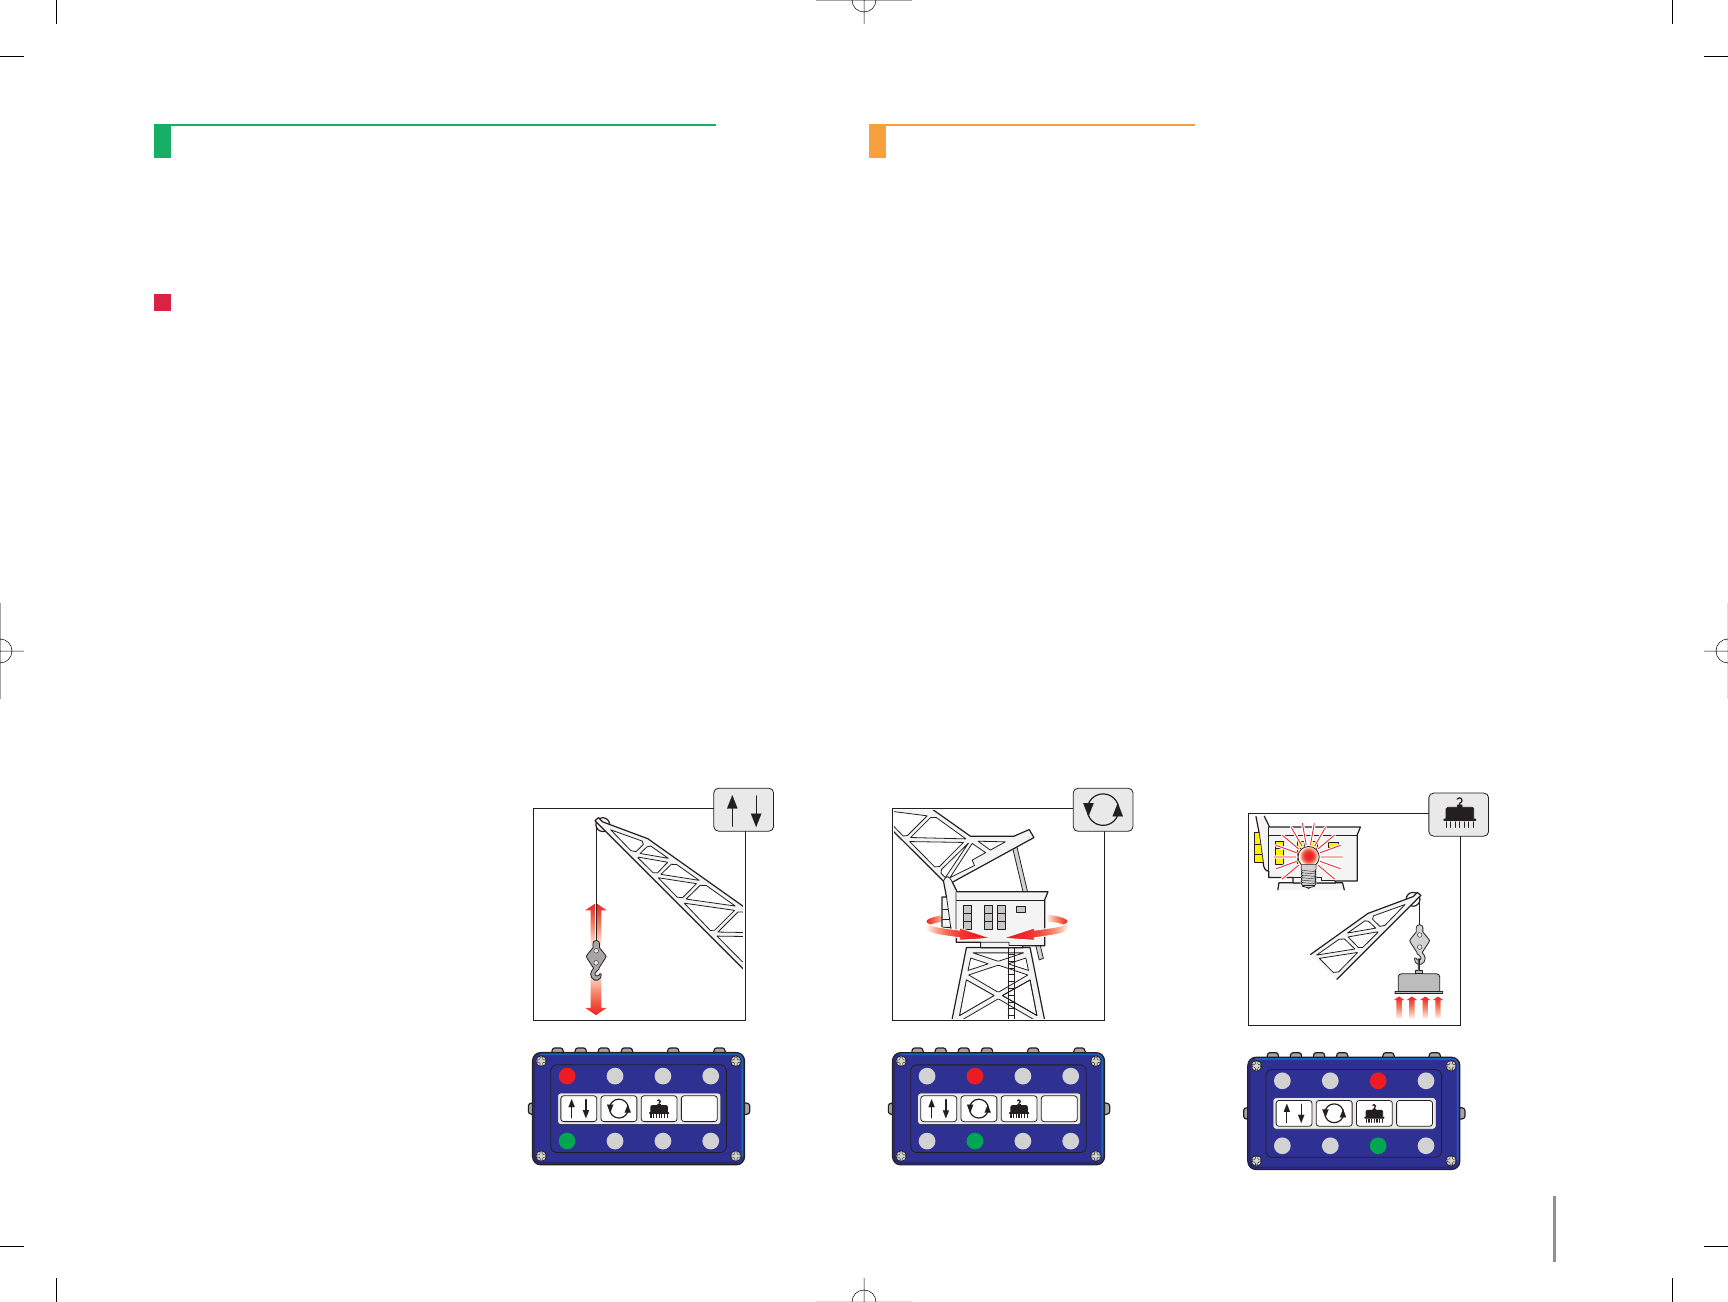
1. Raising and lowering the load. This is
controlled with the two buttons farthest
to the left on the control box.
2. Rotating the crane cab and boom
either to the right or the left. This is
done with one or the other of the two
buttons that are second from the left
on the control box.
3. Turning the electro-magnet on and off.
The light in the crane cab is also turned
on and off at the same time. This is
done with the third pair of buttons from
the left on the crane’s control box.
4. The boom can be adjusted manually
on the crane in several steps. This also
changes automatically the amount of
free space required for the boom to
swing.
Tip: In order to prevent collisions, be careful
when setting the crane up so that the boom
does not swing out onto an adjacent
track with a train that is running on it.
29
2

Hulp nodig? Stel uw vraag in het forum

Spelregels
1

Forum

Marklin-7051

Zoeken resetten

  • hoe moet ik de hijskraan, analoog, nog uit de jaren 70, aansluiten op een uit die tijd stammende trafo. Schakelkastje aanwezig Gesteld op 27-5-2022 om 17:06

    Reageer op deze vraag Misbruik melden
  • handleiding marklin 7051 voor kraan met wiad grijper Gesteld op 30-10-2021 om 11:58

    Reageer op deze vraag Misbruik melden
  • Heb hier een hijskraan de 7051 marklin krijg hem niet aan de gang de kabel daar komen 6 draden uit 1x geel 2x zwart2x rood 1x bruin hoe moet ik die aansluiten ? Gesteld op 13-4-2020 om 19:20

    Reageer op deze vraag Misbruik melden
    • er hoort een speciaal schakelkastje bij, verglijkbaar met de Marklin wisselbedieningskastjes.
      de 2 rode draadjes in de ingangen voor de meest linker knopjes, laten de lier draaien (omhoog en omlaag), de 2 zwarte in de ingangen daarnaast om de kraan te laten draaien. De gele is voor de magneet en moet in de rode ingang daar weer naast. als de magneet is ingechakeld gaat er ook een lampje branden.. de bruine gaat naar een wisselstroom uitgang van je trafo en van je trafo gaat er ook 1 naar de ingang van het schakelkastje. Op diverse sites zijn pdf's van de handleiding te vinden. gewoon marklin 7051 in google typen ;). Geantwoord op 14-5-2020 om 16:48

      Waardeer dit antwoord (4) Misbruik melden

Misbruik melden

Gebruikershandleiding.com neemt misbruik van zijn services uitermate serieus. U kunt hieronder aangeven waarom deze vraag ongepast is. Wij controleren de vraag en zonodig wordt deze verwijderd.

Product:

Bijvoorbeeld antisemitische inhoud, racistische inhoud, of materiaal dat gewelddadige fysieke handelingen tot gevolg kan hebben.

Bijvoorbeeld een creditcardnummer, een persoonlijk identificatienummer, of een geheim adres. E-mailadressen en volledige namen worden niet als privégegevens beschouwd.

Spelregels forum

Om tot zinvolle vragen te komen hanteren wij de volgende spelregels:

Belangrijk! Als er een antwoord wordt gegeven op uw vraag, dan is het voor de gever van het antwoord nuttig om te weten als u er wel (of niet) mee geholpen bent! Wij vragen u dus ook te reageren op een antwoord.

Belangrijk! Antwoorden worden ook per e-mail naar abonnees gestuurd. Laat uw emailadres achter op deze site, zodat u op de hoogte blijft. U krijgt dan ook andere vragen en antwoorden te zien.

Abonneren

Abonneer u voor het ontvangen van emails voor uw Marklin 7051 bij:


U ontvangt een email met instructies om u voor één of beide opties in te schrijven.


Ontvang uw handleiding per email

Vul uw emailadres in en ontvang de handleiding van Marklin 7051 in de taal/talen: Nederlands, Duits, Engels, Frans als bijlage per email.

De handleiding is 0,15 mb groot.


U ontvangt de handleiding per email binnen enkele minuten. Als u geen email heeft ontvangen, dan heeft u waarschijnlijk een verkeerd emailadres ingevuld of is uw mailbox te vol. Daarnaast kan het zijn dat uw internetprovider een maximum heeft aan de grootte per email. Omdat hier een handleiding wordt meegestuurd, kan het voorkomen dat de email groter is dan toegestaan bij uw provider.

Uw handleiding is per email verstuurd. Controleer uw email

Als u niet binnen een kwartier uw email met handleiding ontvangen heeft, kan het zijn dat u een verkeerd emailadres heeft ingevuld of dat uw emailprovider een maximum grootte per email heeft ingesteld die kleiner is dan de grootte van de handleiding.

Er is een email naar u verstuurd om uw inschrijving definitief te maken.

Controleer uw email en volg de aanwijzingen op om uw inschrijving definitief te maken

U heeft geen emailadres opgegeven

Als u de handleiding per email wilt ontvangen, vul dan een geldig emailadres in.

Uw vraag is op deze pagina toegevoegd

Wilt u een email ontvangen bij een antwoord en/of nieuwe vragen? Vul dan hier uw emailadres in.


Info