English Operating Instructions
18
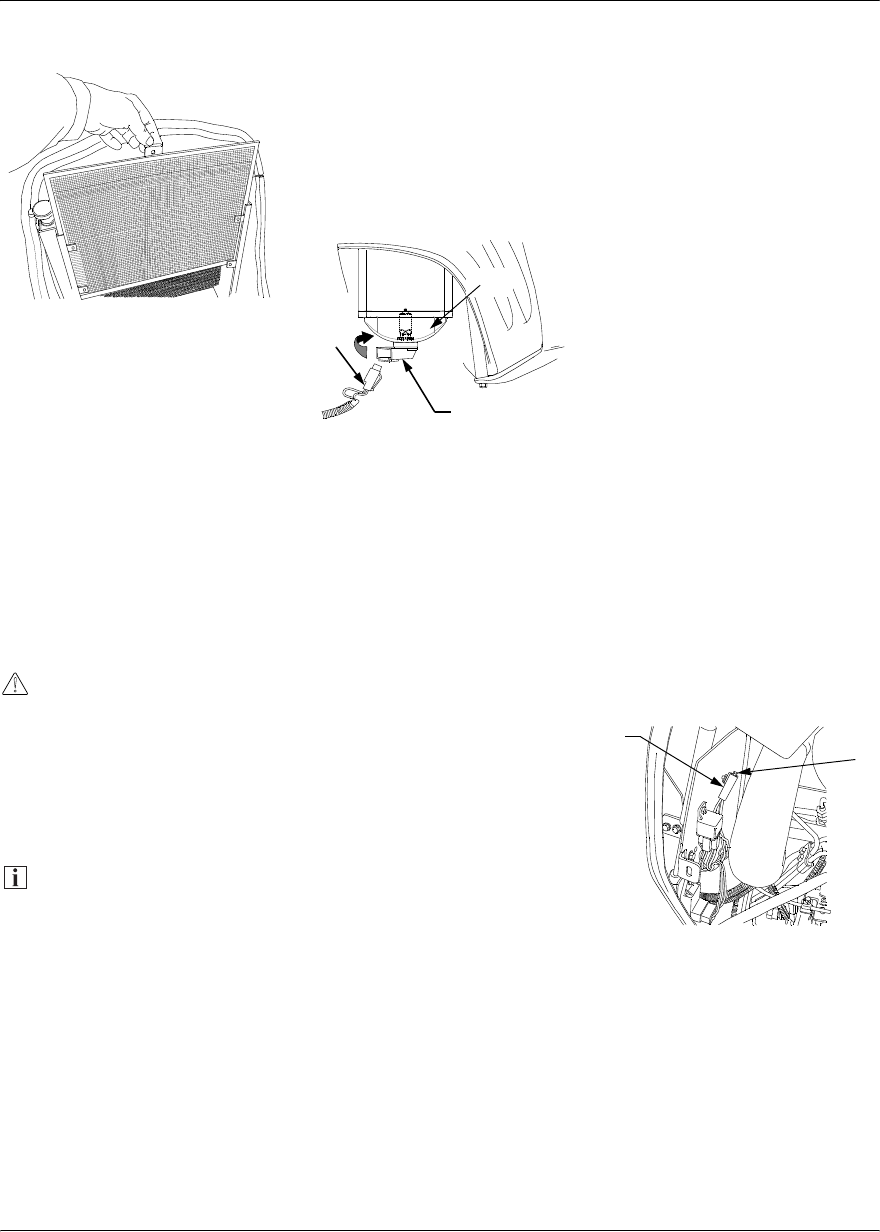
Cleaning the cooler and cooler
grille
n To remove the cooler grille, open
the bonnet and carefully take out
in the middle where the tounges
are. In order to clean its surface,
rinse the grille with water.
n Check the engine and
transmission oil cooler ribs for
accumilation of dirt between the
ribs. Blow out dirt from the cooler
with compressed air from the
engine ventilator side.
n Reinsert the grille, however at the
same time make sure that it is
inserted into the slots of the
cooler frame.
Checking the coolant
;EVRMRK
r %PEGOSJGSSPERXPIEHWXSWIVMSYW
IRKMRIHEQEKI
r 'EVV]SYXEGLIGOFIJSVIWXEVXMRK
XLIIRKMRIJSV GSPHIRKMRIW
To top up, use a mixture of water
and anti-freeze agent with a 1:1
ratio.
Note
If the local water supply is hard or is
polluted in some other way, use
distilled water for the mixture.
Observe the notes provided by the
anti-freeze agent manufacturer and
those in the engine manual.
Fig. 14
n Open the engine bonnet.
n Check the coolant level on the
adjustment container.
n If the coolant level is below the
MIN-mark, open the container
and fill it with the coolant mixture
up until the MAX-mark.
n Close the engine bonnet. Check
that it is fully engaged.
Exchanging the headlight
bulbs
n Open the engine bonnet.
n On the bulb unit (a), remove the
cable (b).
n Turn the bulb unit to the left by a
quarter of a revolution and
remove from the reflector (c).
n Exchange the bulb with a bulb of
the same wattage.
n Replace the bulb unit into the
reflector and secure it (by turning
a quarter of a revolution to the
right).
n Mount the cable on the bulb unit.
n Close the engine bonnet. Check
that it is fully engaged.
Exchanging the tail light bulbs
n Turn the bulb mounting anti-
clockwise until the tounges on the
mounting oppose the notches in
the tail light reflector.
n After bringing into line, carefully
pull the mounting out of the tail
light reflector.
n Remove the bulb from the
mounting and replace it with a
new one.
n Bring the tounges on the
mounting into line with the
notches in the reflector and
carefully push the mounting into
place. Tightly turn the mounting in
a clockwise direction.
Exchanging the indicator
bulbs
n Loosen the screws on the lens
and remove the lens.
n In order to remove the bulb from
the lamp mounting, press the
bulb in a little and turn it anti-
clockwise.
n Align the new bulb on the
mounting slot, press the bulb into
the mounting and screw it into the
mounting in a clockwise direction.
n Secure the lens again using the
screws.
Exchanging the fuses
The tractor’s electric system is
protected from high current damage
with fuses. Always exchange fuses
with replacements of the same
amperage. If the electric system
does not work, check for fuses
which have been tripped.
If the electrical system regularly trips,
take it to a specialist workshop.
The fuses in the tractor cable trunk
protect the entire electrical system
of the tractor.
A defective fuse is exchanged as
follows:
n Open the bonnet and remove the
right side covering
n In front of the cross-sheet,
localise the fuse holder (a) directly
on the right hand side, on the
inner side of the instrument
holder.
n Remove the fuse (b) from the holder
and replace it with one of the same
amperage. NEVER replace it with
one of a higher amperage.
n Attach the side covering and
reclose the bonnet.
a
b
c
a
b