■
C H A R A C T E R I S T I C S
1. Time/Calendar Display: Hour, minute, second,
month, date and day of the week
2. Time Indication: Choice of 12-hour display
format with PM indicator or 24-hour display
format is available.
3. Stopwatch: The stopwatch can measure up
to 23 hours 59 minutes and 59 seconds in 1/100-
second increments. Lap time measurement is
available.
4. Timer: The countdown timer can be set up to 23
hours 59 minutes and 59 seconds.
5. Alarm: The alarm can be set to sound at the
designated time on a 24-hour basis.
6. Second Time Zone:
Time in a different time zone
can be displayed.
7.
Chime: The chime can be set to sound every
hour on the hour with a single beep.
8. I l l u m i n a t i n g L i g h t : Th e bu i lt - in el e c tr o -
luminescent (EL) light evenly illuminates the
display for easy viewing in darkness.
■
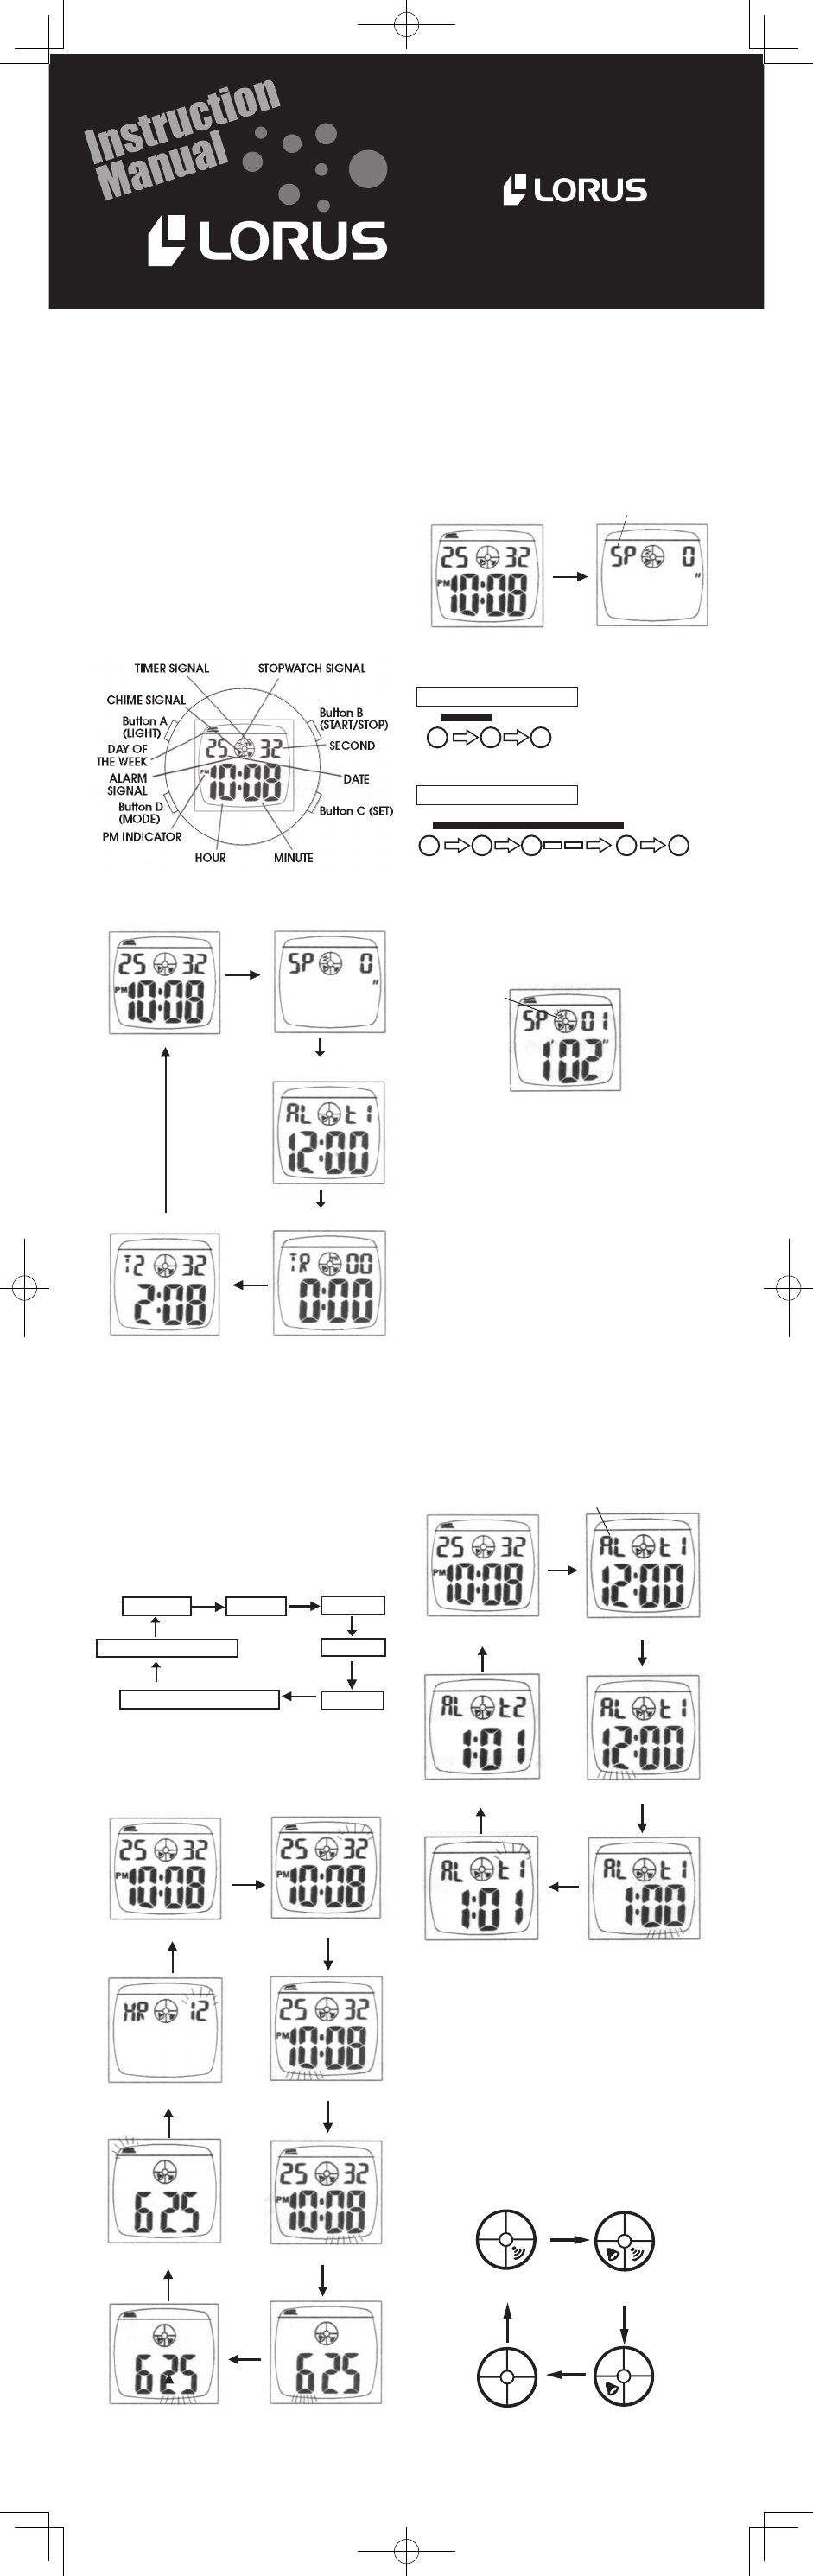
B U T T O N S A N D D I S P L AY S
■
H O W T O S E T T H E T I M E / C A L E N D A R
■
H O W T O U S E T H E S T O P WAT C H
1 Press Button C for 2 seconds to change the
display to the TIME/CALENDAR SETTING mode.
(The second digits start flashing.)
2
<Second setting>
Press Button B in accordance with a time
signal. The second digits are reset to“0 0”
and start counting immediately.
When the second digits count any number
from “30” to “59” and Button B is pressed,
one minute is added and the seconds are
immediately reset to “0 0.”
3 Press Button D to confirm the second setting and
move on to the next item.
Selection of the item to be adjusted (flashing)
is made in the following order when Button D is
pressed.
Choice of 12-Hour/24-Hour format
• The time display format in either 12-hour indication
or in 24 -ho ur in dic ati on ca n be se lec te d
alternately by pressing Button B. Under the 12-
hour indication format, “PM” mark appears in
the afternoon, but no AM mark appears in the
morning. Under the 24-hour indication format,
no mark appears on the display.
* Measurement and release of lap times can be
repeated when Button C is pressed.
* When Button C is pressed, the display changes to
show the current lap time and total time from START
for 3 seconds, and then it automatically returns to
show the ongoing measurement.
Press Button D to go to the STOPWATCH mode.
The STOPWATCH mode indicator appears on the
display.
STOPWATCH OPERATION
Standard Measurement
Lap Time Measurement
During the measurement, the STOPWATCH signal
keeps flashing.
Press Button D to return to the TIME/CALENDAR
mode.
4 To set the digits for each item, press Button B to
set the digits. One digit (flashing) is increased
with each pressing of Button B. To move the digits
quickly, keep the Button pressed.
5 After all the adjustments are completed, press
Button C to retur n to the TIME/CAL ENDAR
mode.
How to stop the alarm while sounding
The alarm sounds for 10 seconds at the designated
time. To stop it manually while sounding, press any
Button.
Note: The alar m can b e set only in one ti me
zone.
MI N U T E SE T TI NG
TI ME ZO N E
S E T T IN G
D
C
D
HO U R SE TT I NG
B
B
D
B
AL ARM
TI M E S ETT I NG
CO M P L ET ED
AL AR M
M O D E
C
B
D
TI ME / CA L EN DA R
MO D E
2 T I ME S
D
D
T IM E R
T IM E /C AL EN D A R
ST OP WAT C H
AL AR M
SE CO N D TI ME Z O NE
D
D
D
D
SE CO N D
DAY OF TH E W E EK
12 /2 4 -H OU R F O R MAT
DATE
HO UR
MI NU T E
D
D
D
D
D
D
DAY OF THE
WEEK SETTING
DATE SETTING
TIME/CALENDAR mode
12/24-HOUR FORMAT
SETTING
HOUR SETTING
MINUTE SETTING
SECOND SETTING
C
B
B
B
B
B
B
B
D
D
ST OP WAT C H m od e i nd ic at or
MO NT H
MONTH SETTING
D
D
D
D
D
D
C
D D
D
DD
■
H O W T O U S E T H E A L A R M
Press Button D two times to go to the ALARM
mode. The ALARM mode indicator appears on
the display.
1. Press Button C for 2 seconds to change the
display to the ALARM SETTING mode. The hour
digits start flashing.
2. Press Button B to set the hour digits. One digit
(flashing) is increased with each press of Button
B. To move the digits quickly, keep the Button
pressed.
3. Press Button D to confirm the hour setting and
move on to the minute setting. The minute digits
start flashing.
4. Press Button B to set the minute digits. One digit
(flashing) is increased with each press of Button
B. To move the digits quickly, keep the Button
pressed.
5. Press Button D to confirm the minute setting and
move on to the time zone setting.
6. Press Button B to select the time zone.
7. Press Button C to complete the alarm setting.
Press Button D to return to the TIME/CALENDAR
mode.
■
E N G A G E M E N T / D I S E N G A G E M E N T O F
T H E A L A R M & C H I M E
1. Press Button D two times to go to the ALARM
mode.
2. With each press of Button B, the alarm and chime
can be engaged or disengaged in the following
order. The ALARM singal and/or CHIME signal
appear on the display accordingly.
3. Press Button D to return to the TIME/CALENDAR
mode.