14
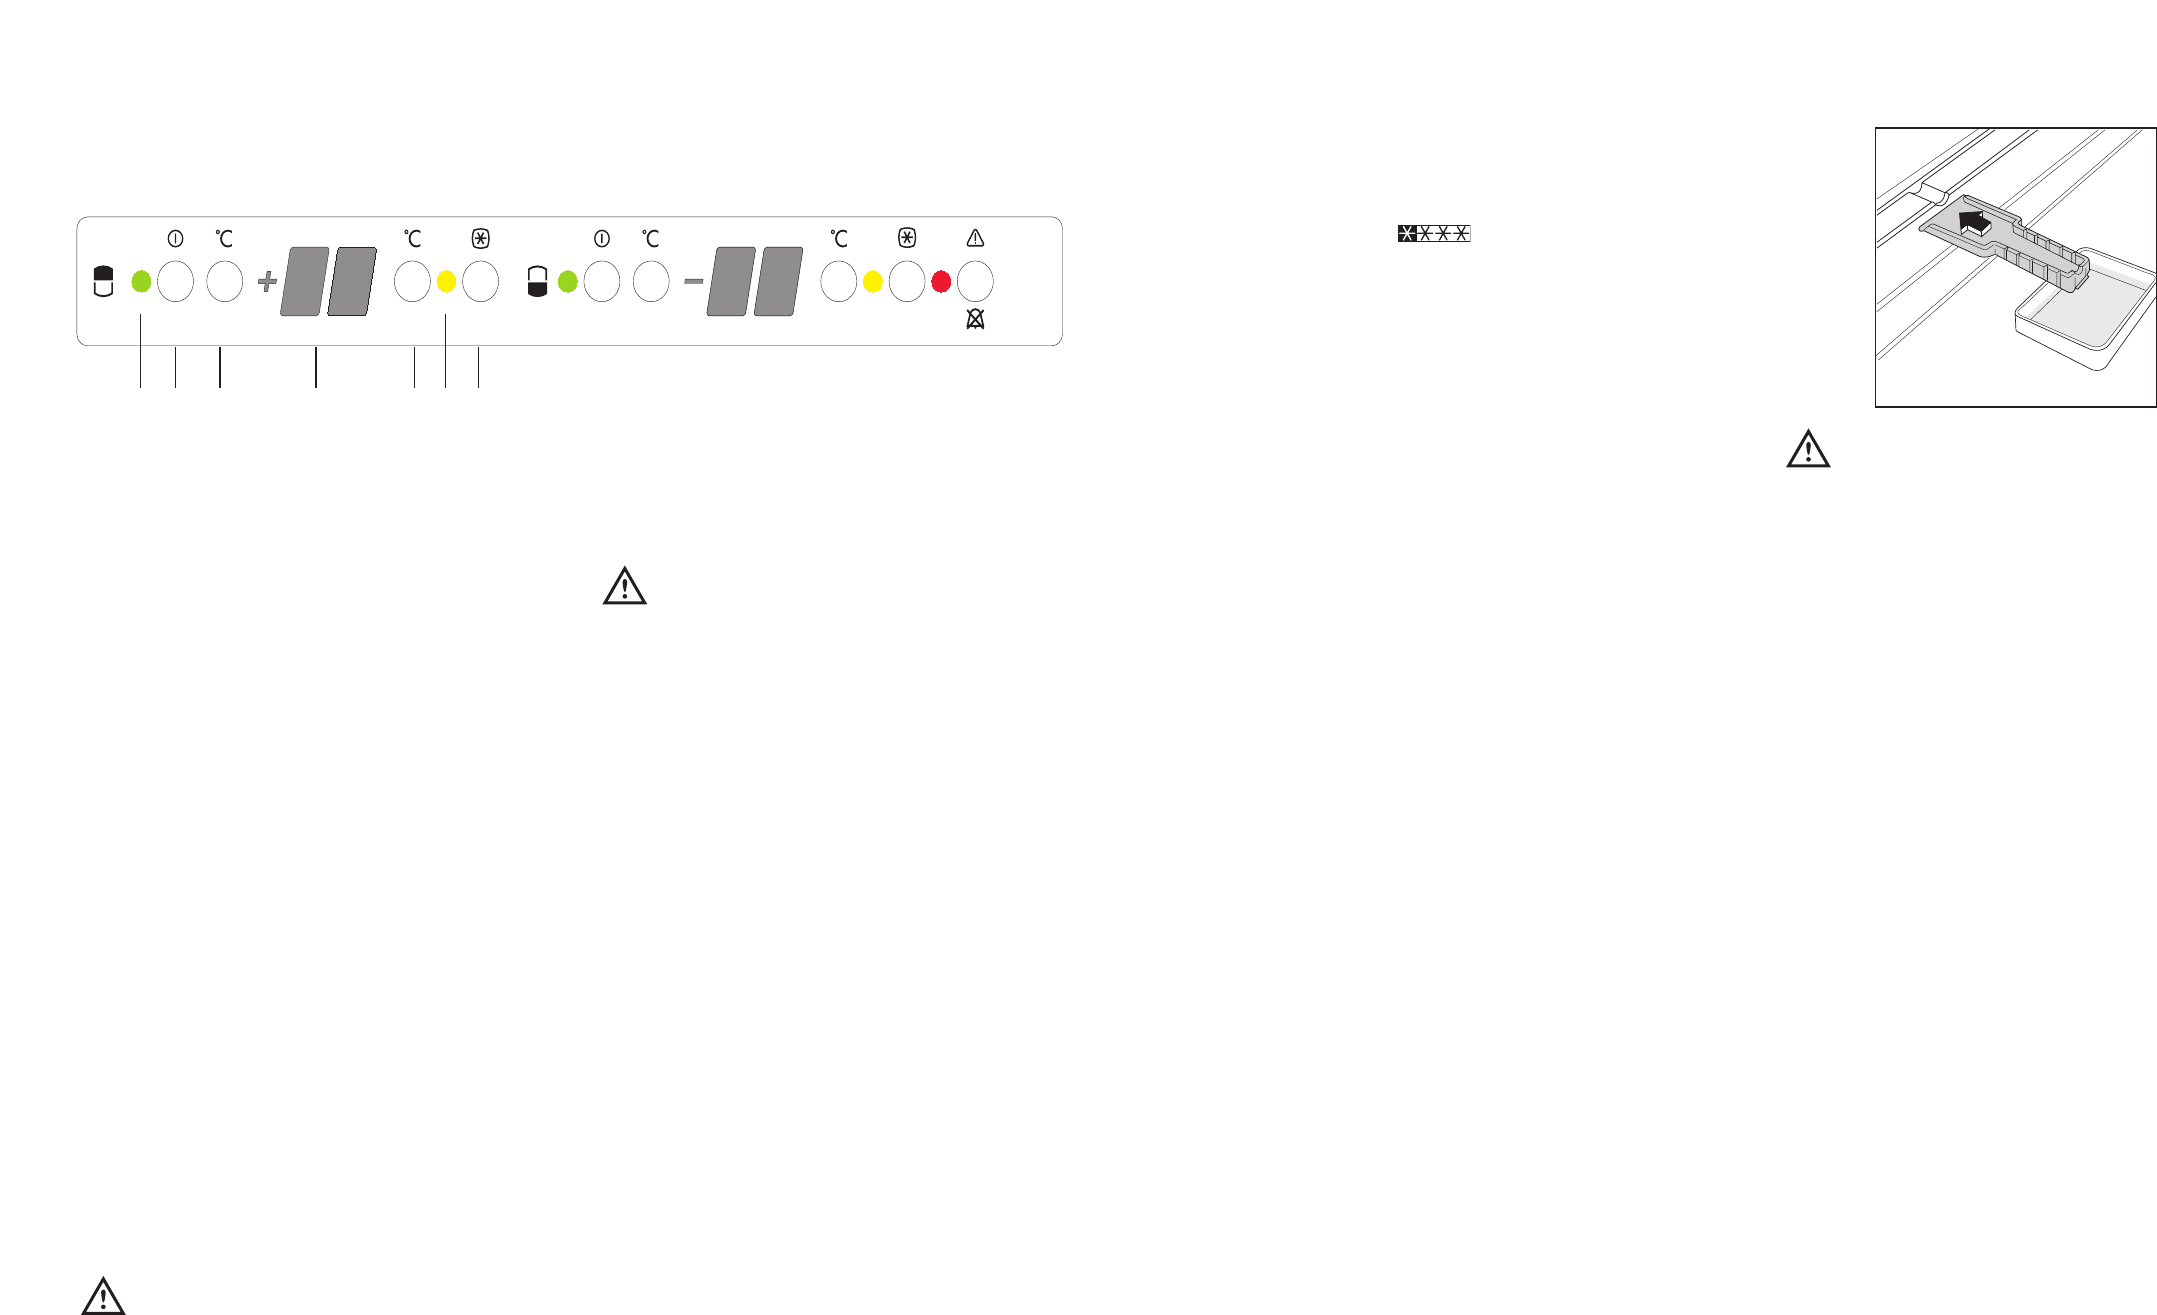
Control Panel
Use of the fridge
A. On/OFF light
B Fridge button ON/OFF
C Temperature setting button (warmest)
D Temperature indicator
E Temperature setting button (coldest)
F Super cooling light
G Super cooling button
A. Light ON/OFF
B. Button ON/OFF
ON: Press the button (B). The pilot light (A)
switches on.
OFF: Keep press the button (B) until the pilot light
(A) and the temperautre indicator switched off.
C - E. Temperature setting buttons
The temperature can be adjusted between +2°C and
+8°C.
By pressing the button (C or E), the current
temperature setting flashes on the indicator. It is
possible to modify the setting temperature only with
flashed indicator. To set a warmer temperature,
press button (C). To set a colder temperature, press
button (E). The indicator display the newly selected
temperature for a few seconds and then shows
again the inside compartment temperature.
The newly selected-temperature must be reached
after 24 hours.
Attention!
During the stability period by the first starting the
temperature displayed can not correspond to the
setting temperature. During this time it is possible
that the temperature displayed is lower than the
setting temperature.
D. Temperature indicator
During normal functioning the indicator shows the
temperature inside the fridge.
Attention!
Difference between the temperature displayed and
temperature setting is normal. Especially when:
- a new setting has recently been selected
- the door has been left open for a long time
- warm food has been placed in the compartment
F. Super cooling pilot light
G. Super cooling button
The maximum performance is obtained by setting
the supercooling function. It’s recommended when
loading large quantities of food.
Press the supercooling button (G).The relevant pilot
light (F) switches on.
The internal temperature goes down to +2°C.
After about 6 hours the supercooling function
switches off automatically.
Operation
Insert the plug in the power socket. Press the button
ON/OFF (B). The fridge is switched on.
The fridge is pre-set to run at +5°C. This
temperature will be reached in a few hours.
As soon as the appliance is switched on the
temperature indicator (D) shows the current
temperaure inside the fridge.
However, when the ice becomes very thick on the
inner liner, complete defrosting should be carried out
and it is advisable to carry out this operation when
the appliance is empty.
To carry out complete defrosting of the freezer
compartment proceed as follows:
1. pull out the plug from the wall socket or turn the
thermostat knob to the «O» setting;
2. remove any stored food, wrap it in several layers
of newspaper and put it in a cool place;
3. leave the door open, insert the plastic scraper in
the appropriate seating at the bottom centre,
placing a basin underneath to collect the defrost
water;
4. when defrosting is completed, dry the interior
thoroughly and refit the plug; keep the scraper for
future use;
5. turn the thermostat knob back to the required
setting or replace the plug in the power socket.
After letting the appliance run for at least half an
hour, replace the previously removed food into
the compartment.
CUSTOMER SERVICE AND SPARE PARTS
If the appliance is not functioning properly, check
that:
• the plug is firmly in the wall socket and the mains
power switch is on;
• there is an electricity supply (find out by plugging
in another appliance);
• the thermostat knob is in the correct position.
• If there are water drops on the bottom of the
cabinet, check that the defrost water drain
opening is not obstructed (see “Defrosting”
section).
• If your appliance is still not working properly after
making the above checks, contact the nearest
service centre.
To obtain fast service, it is essential that when you
apply for it you specify the model and serial number
of your appliance which can be found on the
guarantee certificate or on the rating plate located
inside the appliance, on the bottom left-hand side.
INSTALLATION
Location
The appliance should be installed well away from
sources of heat such as radiators, boilers, direct
sunlight etc.
Electrical connection
Before plugging in, ensure that the voltage and
frequency shown on the serial number plate
correspond to your domestic power supply. Voltage
can vary by ±6% of the rated voltage.
For operation with different voltages, a suitably sized
auto-transformer must be used.
Important:
Never use sharp metal tools to scrape off frost
from the evaporator as you could damage it.
Do not use a maechanical device or any artificial
means to speed up the thawing process other
than those recommended by the manufacturer.
A temperature rise of the frozen food packs,
during defrosting, may shorten their safe
storage life.