TransferRotate Zoom
Attention
Cancel On/Off
Help
Menu
Scan Copy
Photo
Proofsheet
OK
EasyShare 5300
All-in-One Printer
*1K1194*
*1K1194*
1K1198
Troubleshooting
If you have additional questions about troubleshooting this device, please
visit www.kodak.com/go/5300aiosupport
PROBLEM:
I cannot get a calibration sheet to print.
SOLUTION:
Where necessary, you can force a calibration sheet to print by following these
steps:
1. Press Menu, select Calibrate Printer and press OK.
2. Select Print Calibration Page and press OK.
3. When the print comes out, place it at the front, right corner of the scanner
glass.
4. Close the scanner lid and press START.
PROBLEM:
I cannot print to my desired paper type.
SOLUTION:
Check to see if the photo tray is pushed in. You can do this by checking if the
green photo tray light is illuminated. If it is, all prints will be produced from
this tray. If you want to print from the main tray, pull out the photo tray by
lifting the photo tray lid and sliding the paper tray towards you (see step 6d).
PROBLEM:
I have a paper jam.
SOLUTION:
1. Press in the tabs on the rear access door to remove the door.
2. Gently pull the paper out of the rollers.
IMPORTANT: If the paper tears while removing it, check inside the
printer for torn pieces of paper and remove them. Additional jams are
likely to occur if all of the torn pieces are not removed.
3. Replace the rear access door. Gently push the door forwards until it snaps
into place.
Is further troubleshooting required?
If you need further information to help answer your questions, please contact
Technical Support and have your KSN number ready. Your KSN number can
be found on the unit after lifting the printer access door as shown.
Helpful tips
Pull out the output tray extender
to help collect your 216 x 297 mm
(8.5 x 11.7") prints.
The photo tray light illuminates
when the photo tray is pushed in.
To use the main paper tray,
disengage the photo tray by
pulling it towards you.
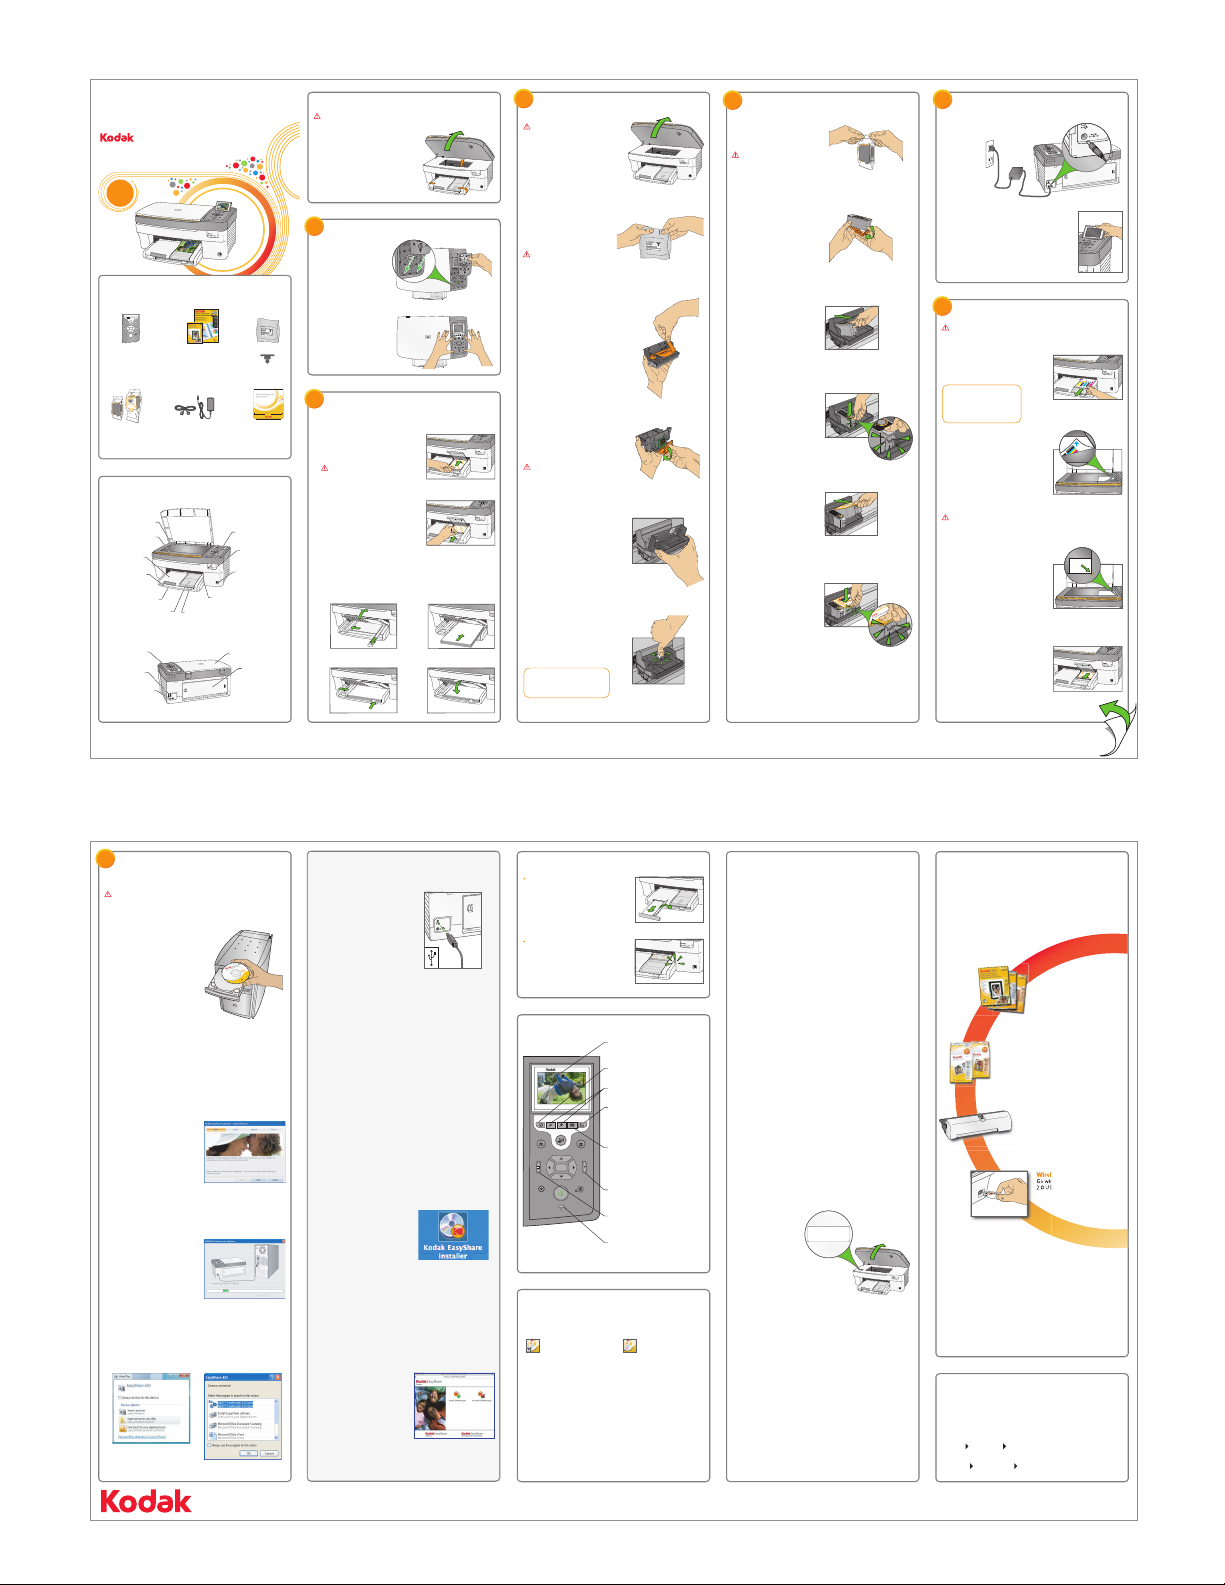
Identify main components
a) Remove the black ink
cartridge from its bag.
b) Carefully remove and
discard the orange cap.
Handle ink cartridges
carefully to avoid ink
transfer.
Install ink cartridges
IMPORTANT: Insert ink
cartridges immediately
upon opening sealed bag.
4
c) Insert the black ink
cartridge into the
printhead.
10
Black ink cartridge
10
Black ink cartridge
Colour ink cartridge
10
f) Press down firmly on the
ink cartridge until you
hear it click into position.
It is normal for the printhead
to flex when inserting the
cartridge. You will not
damage the printer.
g) Close the printer access door.
d) Press down on the ink
cartridge until you hear
it click into position.
10
Black ink cartridge
10
e) Open and uncap the colour
ink cartridge. Insert it into
the printhead.
10
Black ink cartridge
10
Colour ink cartridge
10
Black ink cartridge
f) Push firmly against the top
of the white label on the
printhead until it clicks into
place.
e) Place the printhead into
the carriage. Insert at the
angle shown.
Tip: The printhead requires a
firm push and makes an audible
click when locked into place.
IMPORTANT: Insert the
printhead immediately
upon opening sealed bag.
IMPORTANT: The printhead
is fragile. Handle carefully.
a) Lift the printer access door.
Make sure the orange tape
is removed from the carriage.
b) Remove the printhead from
its bag.
c) Pull on the orange tab to
remove the protective
retainer.
Install printhead
3
d) Carefully remove and discard
the clear plastic shield and the
orange protective cap.
IMPORTANT: Do not touch
the copper-coloured contacts.
PULL
IMPORTANT: The blue arrow in the corner of the calibration sheet
must point to the registration marks as shown.
a) Press Start. Wait two minutes
for the calibration sheet to print.
b) Remove the calibration sheet
from the output tray. Place it
face down and align to the front,
right corner of the scanner glass,
as shown.
c) Lower the scanner lid and
press Start. The ON/OFF
light will turn solid green
when the calibration is complete.
Remove the sheet from the
scanner glass.
Calibrate printer
Tip: If the calibration sheet
does not print properly, see
the Troubleshooting section
in this set-up poster.
6
IMPORTANT: Make sure that the photo tray is pushed in. The photo
tray light should be lit.
b) Remove the plastic film from the LCD
display. Position the LCD display
and press ON.
a) Connect the power supply
and adaptor.
Connect power
5
d) Lift the photo tray lid, then slide the
photo tray towards you to return to
main tray operation. The photo tray
light will turn o.
Control panel features
Unpack printer
a) See box flaps for unpacking
instructions.
b) Remove all orange shipping
tape from the printer.
IMPORTANT: Do not connect the USB cable to the printer until
instructed during software installation.
Install Macintosh software
b) Download the EasyShare
AiO software from
www.kodak.com/go/5300aiosupport.
c) Double-click the .dmg file to
open it.
d) Wait for the Kodak EasyShare
Installer icon to appear on your
desktop and double-click on it.
a) Connect the USB cable to
the printer and your
computer.
e) Click on the
Install Software.app
icon and follow
the on-screen prompts.
More accessories
More options
More convenience
Kodak's inkjet photo paper
Get prints that look great the first
time with Kodak's unique backprint
technology that automatically
enables optimised prints.
Two-sided printing accessory
It's easy to print both sides of your
document with the Kodak EasyShare
5000 Series two-sided printing
accessory.
Wireless adaptor
Go wireless with the Kodak wireless
2.0 USB Bluetooth adaptor.
Value packs
Save up to 50% on everything you
print and pay as little as 7p per print
with our ink and paper value packs.
Note: A USB 2.0 cable is required to connect your Kodak All-in-One printer
to your Windows or Macintosh OS computer. Available in the Kodak online
store or see your local retailer.
The KODAK EasyShare All-in-One Printer gives you more. Be sure to visit
our online store to select from our full line of supplies and accessories at
www.kodak.com/go/AiO.
EasyShare 5300
All-in-One Printer
Rear access
door
Power connector
USB port
Control panel Scanner lid
All-in-One Printer
EasyShare 5300
Memory card
light
Memory card
slots
USB drive/
PictBridge port
Photo tray light
Photo tray Paper-length
guide
Paper-width
guide
Main tray
Output tray
Printer access
door
Scanner glass
All-in-One Printer
EasyShare 5300
4x6
4x6
4x6
Rotates the picture on the display
Zooms in or out in .05X increments
Displays the proofsheet menu when
there are pictures on an inserted memory
card or connected USB host device
Transfers images from a device
connected to a USB host port, PictBridge
or Picture Transfer Protocol (PTP)
Indicates attention is needed. When
illuminated, see LCD screen for further
instruction
Displays photos, messages, status
and menus
Displays the Main menu on the LCD
screen
Displays the Help menu on the LCD
screen
EasyShare 5300
All-in-One Printer
*E*
*E*
E
You can access and use the AiO Home Centre by double-clicking on the
icon on your desktop.
Getting started
The AiO Home Centre will enable
you to copy, scan and configure
your AiO printer from the
computer. You can also launch
Kodak EasyShare software for
transferring, viewing and working
with your digital pictures and
videos.
Windows Macintosh
The AiO Home Centre will enable
you to configure your AiO printer
from the computer. You can also
order supplies and launch Kodak
EasyShare software for
transferring, viewing and working
with your digital pictures and
videos. Use the Kodak EasyShare
AiO drivers to print and scan to
your AiO printer.
Eastman Kodak Company
Rochester, NY 14650 U.S.A.
© Eastman Kodak Company, 2007
MC/MR/TM: Kodak, EasyShare.
The Bluetooth® trade marks are
owned by the Bluetooth SIG, Inc.
Printed in the U.S.A.
www.kodak.com/go/5300aiosupport
Need more help? Look here for answers:
KODAK SERVICE NUMBER
F330065
*F330065*
*F330065*
a) If not pre-installed, insert
the control panel overlay,
bottom end first.
b) Press down on all edges of
the overlay until it snaps
into position.
Install control panel
1
Load paper
2
IMPORTANT: Do not overload
the photo tray. Max 20 sheets.
1) Lift the photo tray lid. Insert
the photo paper glossy side
down.
3) 4)
1) 2)
b) Load plain white paper into the main tray.
a) Load photo paper into the photo tray.
2) Push the photo tray in
until it clicks into place.
NOTE: You can only print to
the photo tray when the photo
tray is pushed in.
3) Lower the photo tray lid.
Transfer
RotateZoom
Attention
CancelOn/Off
Help
Menu
Scan Copy
Photo
Proofsheet
EasyShare 5300
All-in-One Printer
OK
EasyShare 5300
All-in-One Printer
OK
OK
Vista XP
a) Load the Kodak EasyShare
CD into the CD-ROM drive.
If instructions do not appear,
click Start, then Run. Select
CD-ROM drive and type
setup.exe, then press ENTER.
b) If connected to the Internet,
select Web Install to get the
latest upgrades for your
printer.
c) Follow the on screen prompts
to install the AiO software.
Install Windows Software
IMPORTANT: Do not connect the USB cable to the printer until
instructed during software installation.
d) Connect the printer to
the USB port. Click Next
and follow the on screen
prompts.
e) When the EasyShare AiO dialog box appears, close the window.
If prompted, re-boot your
computer.
7
Wireless 2.0 USB
Bluetooth adaptor
Windows
Start All Programs Kodak
Macintosh
Library Documentation Kodak AiO Printers
The User Guide is installed with your Kodak AiO software and is located:
User guide
10
Black ink cartridge