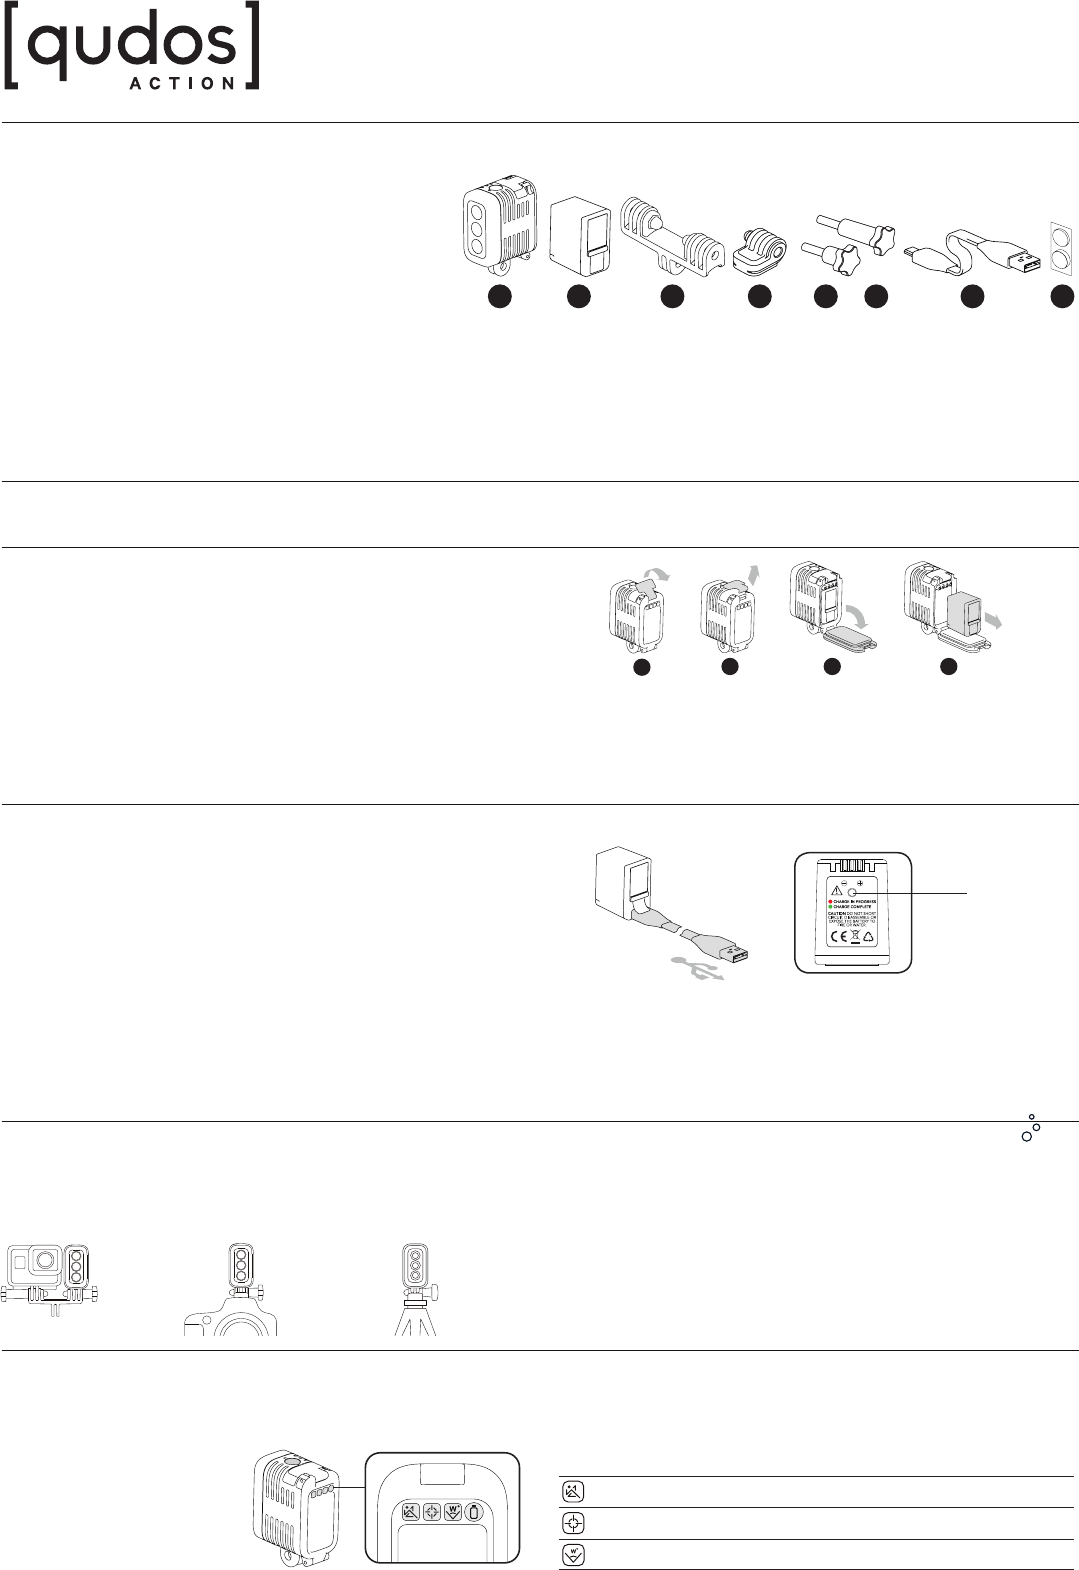
Rechargeable LiPo battery already assembled into the Light Unit.
2
Suitable for use with Go Pro Hero 2, Hero 2+, Hero 3 and Hero 3+ models or any action camera
with a GoPro-style mount.
3
Cold shoe + Tripod Adaptor suitable for mounting onto a variety of Digital SLR models and can also be used for mounting directly to a tripod.
4
Anti-vibration pads of varying heights have been provided for optional use and assembly onto the Light Unit surface that is mounted closest to the Action Camera.
Notes:
1
La batterie LiPo rechargeable est déjà mise en place dans l’éclairage.
2
Convient pour une utilisation avec les modèles suivants : GoPro Hero 2, Hero 2+, Hero 3 et Hero
3+, ainsi qu’avec toute autre action cam équipée d’un kit de fixation GoPro.
3
Adaptateur Cold Shoe + Trépied : compatible avec une grande variété de modèles d’appareils
photo reflex numériques. Peut également se fixer directement sur un trépied.
4
Des coussins anti-vibration de diérentes hauteurs sont fournis, et peuvent se fixer sur le
côté de l’éclairage au plus près de l’action caméra.
Before first use / Avant première utilisation:
Please fully charge the battery before you use the [qudos] Action Light for the first time. Merci de charger complètement la batterie avant 1ère utilisation du [qudos] action.
Modes of use / Modes d’utilisation:
The On/O switch is located on the top of the Light Unit. Press/hold for 2 seconds to turn it on and o. To switch between modes press the button for 1 second or less.
L’interrupteur on/o est situé sur le haut de l’éclairage. Maintenir appuyer pendant 2 secondes pour l’allumer ou l’éteindre. Pour passer d’un mode à l’autre, appuyer sur
le bouton pendant 1 seconde ou moins.
Removing the Battery / Retirer la batterie:
Battery removal and insertion should be carried out in a clean, dust-free environment.
Ensure your hands are clean. Should the area around the seal become dirty whilst
handling, the seal will become compromised. Please refer to “waterproof seal care”
section for further details and to ensure your product warranty is not voided.
Le retrait et l’insertion de la batterie doivent se faire dans un environnement propre
et sans poussière. Assurez-vous d’avoir les mains propres. Si la partie autour du
joint est sali au cours de la manipulation, cela risque d’abimer le joint. Merci de vous
reporter à la partie « Précaution -Etanchéité du joint » pour plus de détails et pour
vous assurer que la garantie du produit reste valable.
There are a variety of mounting options and models that will enable you to
capture images and video at night.
Il existe diérentes options de montage qui vous permettront de prendre de
parfaites photos ou vidéos de nuit.
Action Cameras:
Use parts C and E
Action Cameras:
utiliser les pièces
C et E
DSLR Cameras:
Use parts D and E
Appareils Photos Reflex
Numériques: utiliser les
pièces D et E
Tripods:
Use parts D and E
Trépieds: Utiliser les
pièces D et E
Scuba Diving applications / Applications pour la plongée sous-marine:
Using the standard Action cam mount whilst scuba diving may produce undesirable
‘backscatter’. For a more desirable result, use of a dedicated dive camera tray,
placing the [qudos] Action light at least 30-50cm away from the Action Camera,
is suggested.
L’utilisation du kit de fixation standard de l’action cam, en plongée sous-marine,
peut produire des eets indésirables tels que ‘rétrodiusion’. Pour de meilleurs
résultats, il est suggéré d’utiliser un support spécifique pour caméra de plongée,
permettant de fixer l’éclairage [qudos] action à une distance minimum de 30 à 50
cm de l’action camera.
1. Rotate tab, 2. Lift tab to release
battery door, 3. Open battery
door, 4. Remove battery from
Light Unit.
1. Connect battery to USB Extension
cord provided.
2. Connect USB to a computer USB
port or other electronic device with
USB port.
A full charge cycle will take 5-6 hours.
Battery charge status LED located at
bottom of the battery.
Wall charger Specifications:
If using a wall charger, use an approved USB charger only.
AC input: 90-260VAC 50/60Hz. DC Output: 5VDC (+0.25V/-0.1V) 2A.
Use chargers with suitable approvals and certifications only.
Charging conditions: Indoors only in temperatures above 10°C (50°F).
Spécifications du chargeur mural:
Si vous utilisez un chargeur mural, utilisez un chargeur USB approuvé uniquement.
AC input: 90-260VAC 50/60Hz. DC Output: 5VDC (+0.25V/-0.1V) 2A.
Utiliser uniquement un chargeur approuvé et certifié.
Conditions de recharge: en intérieur uniquement, à une température supérieure à 10°C.
1. Faire pivoter le crochet, 2. Dégager le
crochet pour permettre au clapet de s’ouvrir,
3. Ouvrir le clapet de protection de la batterie,
4. Retirer la batterie de son emplacement.
1. Connecter la batterie à la rallonge
USB fournie.
2. Connecter la fiche USB au port
USB d’un ordinateur ou d’un autre
équipement électronique.
Un cycle de charge complet dure 5 à 6
heures. Le témoin de charge est situé à
l’arrière de la batterie.
Note: Repeat steps in reverse to replace battery in Light Unit. Note : Refaire les manipulations en sens inverse pour replacer la batterie dans l’éclairage.
Gebruikershandleiding.com neemt misbruik van zijn services uitermate serieus. U kunt hieronder aangeven waarom deze vraag ongepast is. Wij controleren de vraag en zonodig wordt deze verwijderd.
Product:
Spelregels forum
Om tot zinvolle vragen te komen hanteren wij de volgende spelregels:
lees eerst de handleiding door;
controleer of uw vraag al eerder door iemand anders is gesteld;
probeer uw vraag zo duidelijk mogelijk te stellen;
heeft u een probleem en al geprobeerd om dit op te lossen, vermeld dit erbij aub;
heeft u een oplossing gekregen van een bezoeker dan horen wij dat graag in dit forum;
wilt u een reactie geven op een vraag of antwoord, gebruik dan niet dit formulier maar klik op de knop 'reageer op deze vraag';
uw vraag wordt direct op de website gezet; vermijd daarom persoonlijke gegevens in te vullen;
Belangrijk! Als er een antwoord wordt gegeven op uw vraag, dan is het voor de gever van het antwoord nuttig om te weten als u er wel (of niet) mee geholpen bent! Wij vragen u dus ook te reageren op een antwoord.
Belangrijk! Antwoorden worden ook per e-mail naar abonnees gestuurd. Laat uw emailadres achter op deze site, zodat u op de hoogte blijft. U krijgt dan ook andere vragen en antwoorden te zien.
Abonneren
Abonneer u voor het ontvangen van emails voor uw Knog QUDOS ACTION - VIDEO LIGHT FOR GOPRO bij:
nieuwe vragen en antwoorden
nieuwe handleidingen
U ontvangt een email met instructies om u voor één of beide opties in te schrijven.
Ontvang uw handleiding per email
Vul uw emailadres in en ontvang de handleiding van Knog QUDOS ACTION - VIDEO LIGHT FOR GOPRO in de taal/talen: Frans als bijlage per email.
De handleiding is 1,17 mb groot.
U ontvangt de handleiding per email binnen enkele minuten. Als u geen email heeft ontvangen, dan heeft u waarschijnlijk een verkeerd emailadres ingevuld of is uw mailbox te vol. Daarnaast kan het zijn dat uw internetprovider een maximum heeft aan de grootte per email. Omdat hier een handleiding wordt meegestuurd, kan het voorkomen dat de email groter is dan toegestaan bij uw provider.
Andere handleiding(en) van Knog QUDOS ACTION - VIDEO LIGHT FOR GOPRO
Uw handleiding is per email verstuurd. Controleer uw email
Als u niet binnen een kwartier uw email met handleiding ontvangen heeft, kan het zijn dat u een verkeerd emailadres heeft ingevuld of dat uw emailprovider een maximum grootte per email heeft ingesteld die kleiner is dan de grootte van de handleiding.
Er is een email naar u verstuurd om uw inschrijving definitief te maken.
Controleer uw email en volg de aanwijzingen op om uw inschrijving definitief te maken
U heeft geen emailadres opgegeven
Als u de handleiding per email wilt ontvangen, vul dan een geldig emailadres in.
Uw vraag is op deze pagina toegevoegd
Wilt u een email ontvangen bij een antwoord en/of nieuwe vragen? Vul dan hier uw emailadres in.