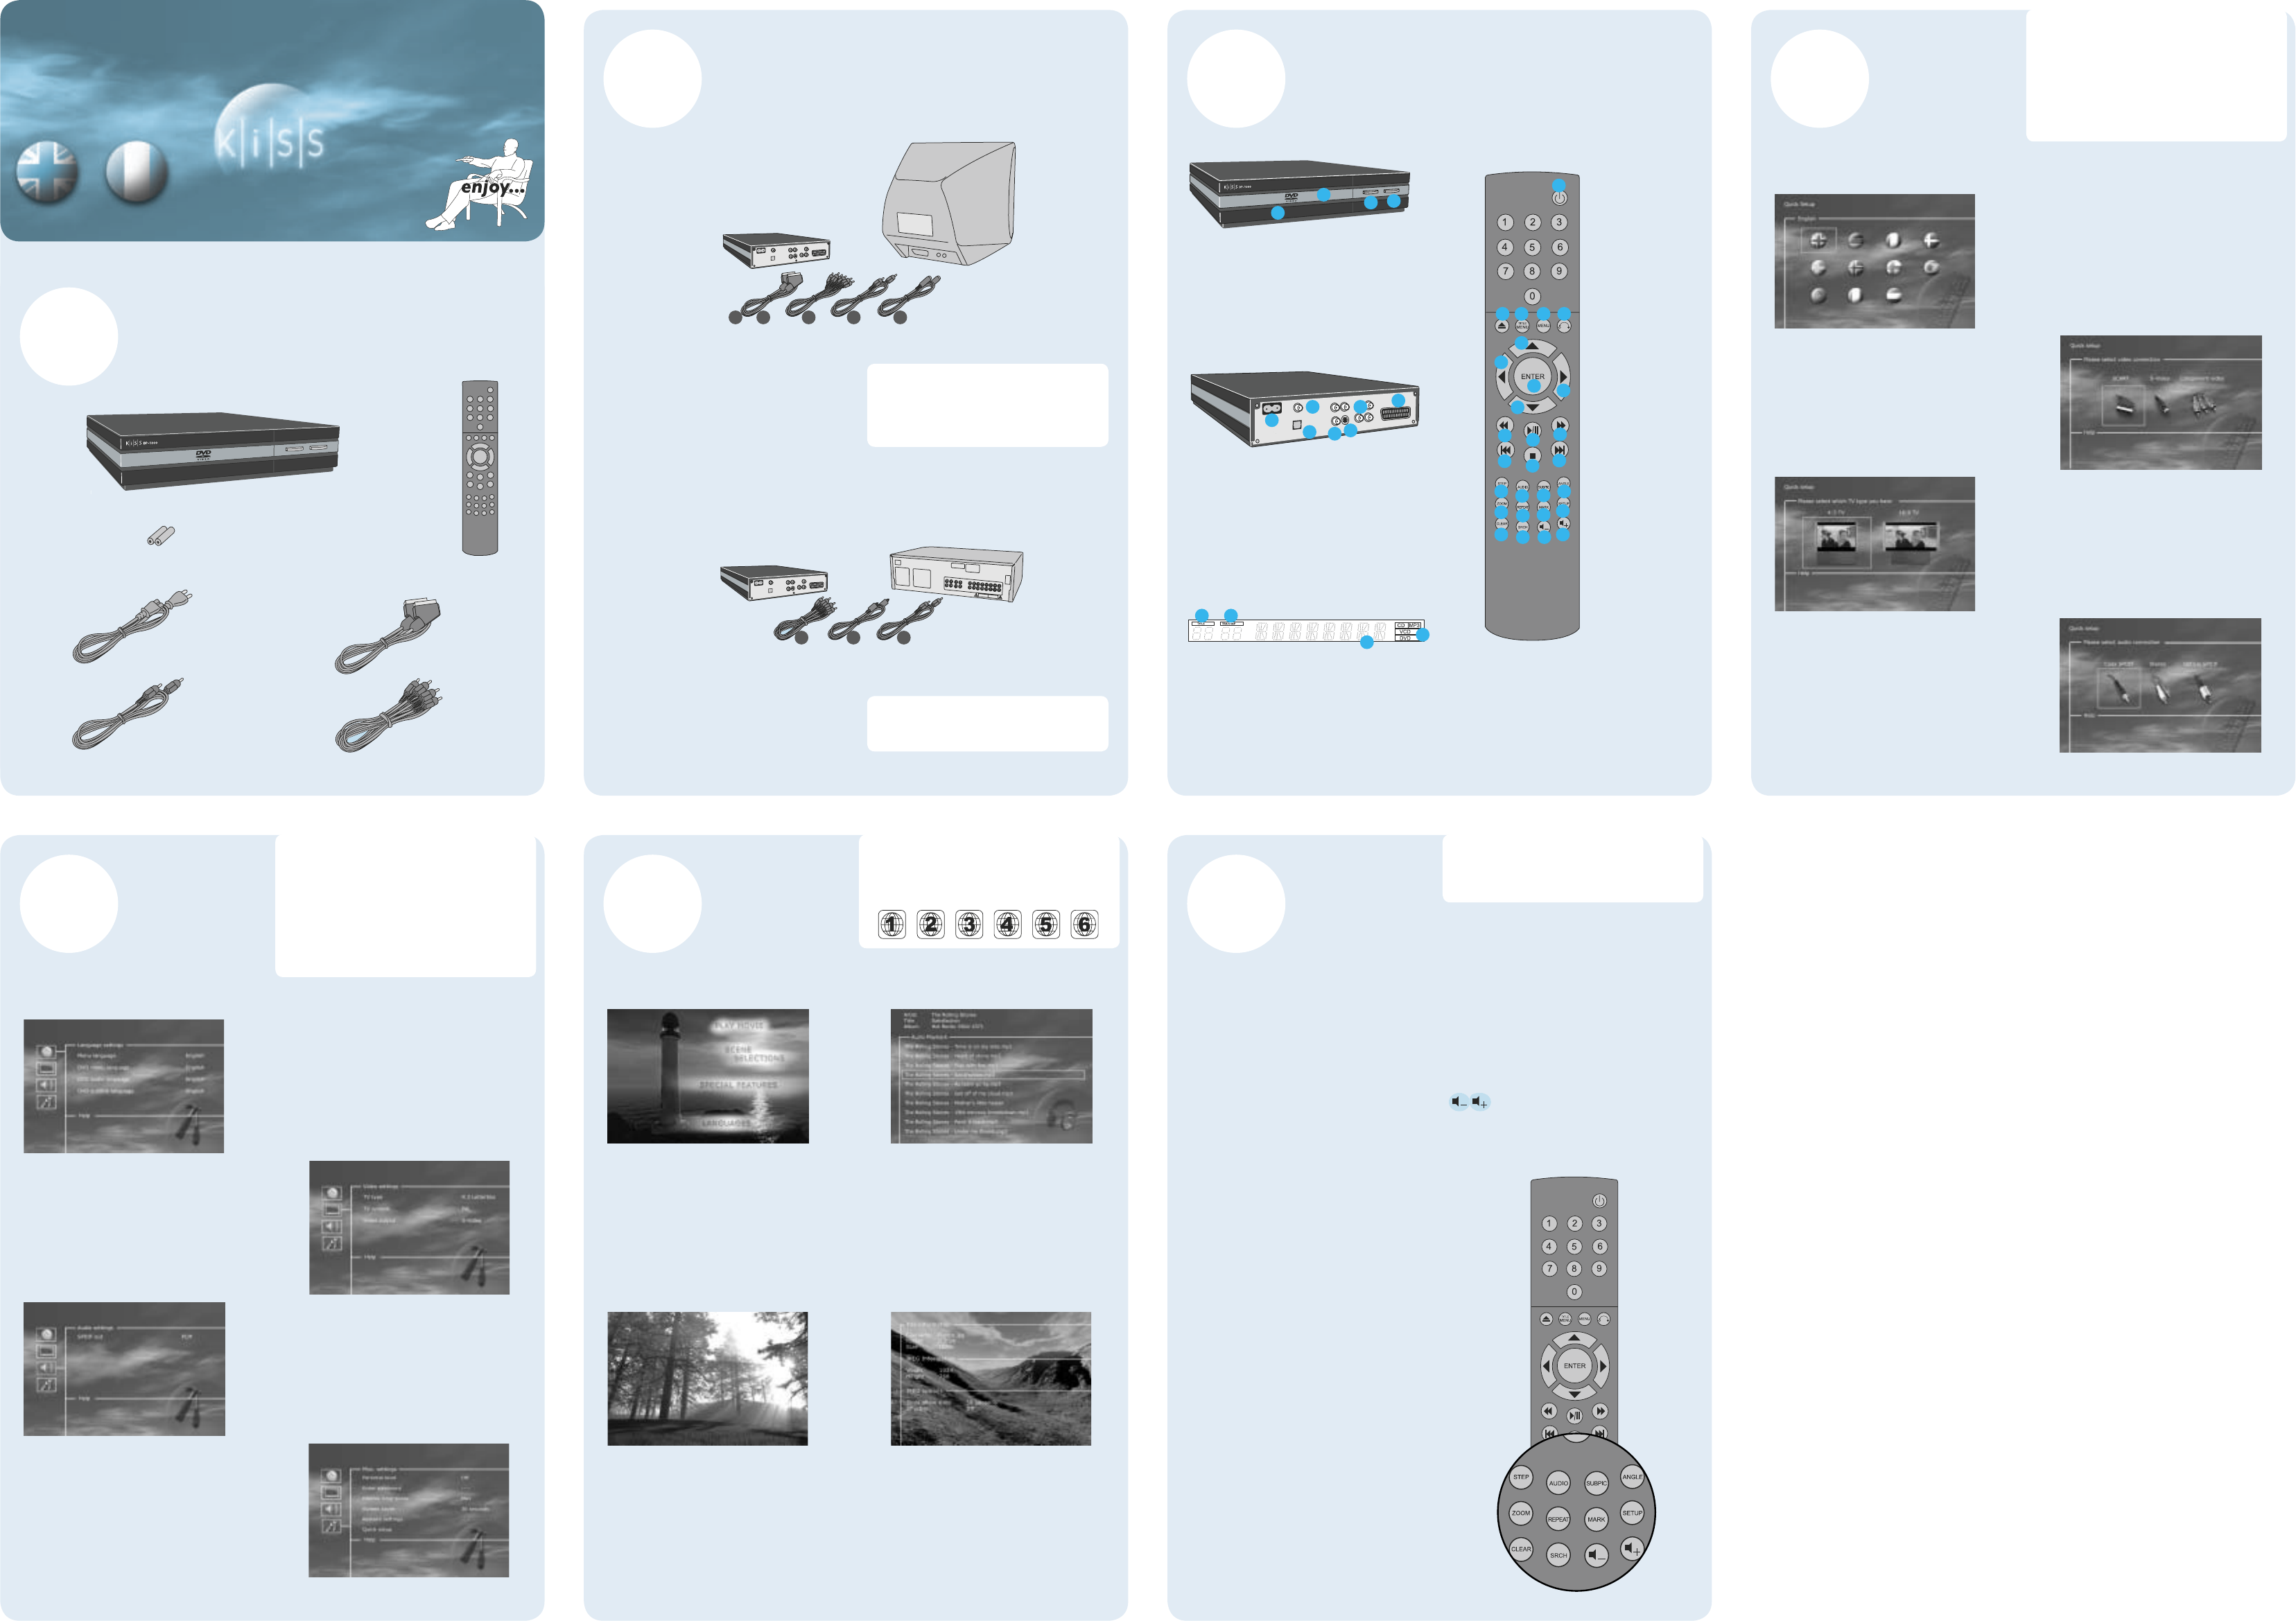
Press the (AUDIO) button to change the sound format.
The audio format options, such as two-channel stereo
and six-channel surround, are determined by the film
producer.
ZOOM
When watching the film, you can zoom in on specific
areas. You can zoom in either as the film is playing
or after you have paused it. Activate the function by
pressing the (ZOOM) button, and return to the normal
picture by pressing the button again.
TIP: Use the arrow buttons to move around the enlarged
screen display.
REPEAT
As the film is playing, press the (REPEAT) button and
three options will appear on the screen.
MODE: Shuffle (random chapter playing) or Off
(deactivated). Repeat: Lets you decide whether to repeat
the section or the entire film.
CLEAR
Use this function to delete all previous inputs.
SRCH
Use (SRCH) to find a specific spot on the disk.
Time: Specify time, minutes and seconds
Title/Chapter: Find the title or the chapter
ANGLE
If the film supports more than one camera angle, you
can switch from one angle to another by pressing the
(ANGLE) button.
SUBPIC
Use this button to change the film’s subtitles. If you
press the (SUBPIC) button, a message will appear in the
top left corner of the screen indicating the number of
available languages and the language that is currently
active. If you press the (SUBPIC) button again, you go to
the next language option. The number of languages is
also determined by the film’s producer.
SETUP
If the DVD Player is in the process of showing a film
or playing music, press the (SETUP) button to see the
available options on the disk. For instance, if you are
watching a DVD film, the left-hand side of the screen
will show information about the film’s length, the
number of chapters, the language options and the
number of subtitles.
If the DVD player is turned on, but not playing films
or other media, pressing this button will take you to a
menu, where you can configure your DVD player. Here
you can select the default settings for language, sound,
video, parental level, etc.
These buttons are used for increasing and decreasing the
sound volume.
MARK
This function not used
DVD PLAYER DP-1000
1
Remote control
Power Cable
Audio Cable
Scart Cable
Composite Video
Batteries
for the remote control [size “AAA” (R6P)]
DVD-Player KiSS DP-1000
Connections
Video Connection
Connecting your KiSS DP-1000 DVD player to your TV can be done with any of the cables below. (Only one cable can
be connected at a time).
13542
DP-1000
TV
1. RGB via SCART
2. S-Video (the cable is an extra accessory)
3. Composite via SCART
4. Composite Video
5. Component Video (the cable is an extra accessory)
Audio Connection
Connecting your KiSS DP-1000 DVD player to your amplifier can be done with any of the cables below. (Only one cable
can be connected at a time).
867
DP-1000
Amplifi er
6. Optical output (the cable is an extra accessory)
7. Coaxial output (the cable is an extra accessory)
8. Analogue Stereo
3
2
1
7
6
5
4
3
4
2
1
1. AC Input
2. Coaxial Output for Amplifi er
3. Optical Output for Amplifi er
4. Ordinary Stereo Output
5. S-Video Output for TV set
6. Component Video for TV set
7. SCART for TV set
1. Standby
2. Open/Close
3. Title/Menu
4. Menu
5. Back
6. Up Arrow
7. Left Arrow
8. Enter
9. Right Arrow
10. Down Arrow
11. Rewind
12. Play/Pause
13. Fast Forward
14. Previous Chapter
15. Stop
16. Next Chapter
17. Select Lang/Audio
18. Next Picture
19. Select Subtitles
20. Select Angle
21. Zoom
22. Repeat
23. Unused
24. Setup
25. Clear Input
26. Search
27. Increase Volume
28. Decrease Volume
8
10
27
28
26
25
24
23
22
21
20
19
17
18
16
15
14
13
12
11
7
9
6
5432
1
Note:
Certain functions will
only work if supported by
the media.
Presentation
1. Display
2. CD Tray
3. Eject/Stop
4. Play/Pause
Quick Setup
If your DVD Player is correctly connected (see the chapter
on cable connections), a menu will appear when you turn
on the DVD Player. The menu installs the most important
settings for your TV set and language.
Note: If this menu does not appear when you start the DVD
Player, recheck the cable connections.
Note: Try connecting your TV set using the Composite Video
cables. Composite Video always produces a picture.
Language
Select the language that will be used whenever you open the
DP-1000’s built-in menus. Use the arrow buttons on the remote
control to move the rectangular frame to the language you wish
to select and press ENTER.
Connection
Select your TV set’s connection. Your options are SCART, S-Video
and Component Video. The connection depends on the inlets
available on your TV set. (If you select SCART, this connection
also includes VGA and Composite Video).
TV
This screen presents two different types of TV formats:
4:3 (normal) or 16:9 (wide screen).
Note: Some 4:3 TV screens can display 16:9 format.
Audio
If your TV set is connected via SCART, your TV is automatically
provided with sound. If you would rather use an amplifier to
reproduce the sound, you have two options to choose from: the
phono jack or one of the two digital outputs.
Note: The default Audio choice should be stereo unless your
player is connected to a digital amplifi er
Advanced Setup
You can always access the Setup menu and adjust the
DP-1000 to your specific requirements and hardware.
When DP-1000 appears on the main screen, press the
SETUP button on your remote control, and a menu will
appear with the available options. The orange frame
shows your position on the menu. Use the arrow buttons
to move the frame and select by pressing the ENTER
button. The settings on some of the menus have already
been determined under Quick setup, but there are several
settings available under Advanced setup as well.
Language Settings
The first menu is the Language settings menu. Here you select
the language you wish to use for the menus, that will appear on
the screen, and your preferred language when playing a DVD film
– for subtitles, speech and menus (they will only be used if the
film supports the language).
Video settings
You can also select a different TV system from PAL (the European
standard), and you can indicate whether you have RGB via
SCART, Component or S-Video. Refer to your TV set’s instruction
manual before selecting the connection. Only one setting at a
time is possible.
Note: Composite Video via SCART is always activated.
Audio Settings
This menu enables you to select either RAW or PCM.
PCM: Stereo sound. Used for slightly older amplifiers. Choose
this option to obtain analogue sound.
RAW: Plays the surround sound track on the disk. Recommended
as default.
Miscellaneous Settings
This display lets you set your preferred level of protection on
the films. Some films are divided into levels, so that parents
can prevent their children from seeing a specific type of film. In
the next menu item, you create a password that is required for
editing this setup*. The light in the DVD Player’s display can be
modified from dim to normal or bright. All settings can be reset
in the “Restore settings” menu, and the Quick setup can be re-
initiated from the last menu. *If you wish to modify this setup
later on, you must re-enter the password.
The DVD Player supports the following media: DVD Video, DivX, XviD, ISO MPEG-4, Audio CD, MP3, Ogg Vorbis
and jpeg.
Playing Media
DVD films are normally supplied with a regional code (1),
(2), etc., and can only be played on DVD players with the
same regional code. You can see the region on the back of
the player. Region tags appear as follows:
DVD Menu
If you have adjusted your DVD Player according
to the instructions above, you can now insert a
DVD into your DVD Player. A moment later, the
DVD menu will appear. Use the arrow buttons
to navigate in the menu and start the film.
Note: As this menu is part of the DVD itself, it
will vary from DVD to DVD.
DivX, XviD and MPEG-4
The DP-1000 recognises the format and
automatically starts playing the CD when you
insert it into the drive. Use the counter in the
display to help you to see where you are in the
film. You have access to the usual playback
options, such as stop, pause, go to next, time
search, etc.
MP3 and Ogg Vorbis
When you insert an audio CD with MP3
or Ogg Vorbis music files, the player will
automatically recognise the format and let
you select the songs you wish to hear. You
can choose the order in which you want
to listen to the tracks, listen to just a few
songs/albums/folders or play them at random
by pressing the SETUP button on your remote
control and selecting the preferred method for
the playing order.
Picture CD and jpeg
You can either have your photos burned
on a disk in the shop, where you had them
developed or burn your own disk on your
computer. Afterwards the photos can be
shown on your TV to the delight of your family
and friends. You select whether the photos
should be shown one by one in the order you
prefer or as a slide show. Press SETUP to select
slide show.
A number of advanced functions are located on the
lower section of the remote control. These functions are
described below. Some functions may not work with all
media formats.
Advanced Functions
Accessories
Support
More information or assistance is available at KiSS Technology’s
website under Support for DVD Player.
Address:
www.kiss-technology.com
Updates
At our website, you can update the DVD Player’s firmware/operating
system with the latest new features. To do so, download the
software from the support section at the www.kiss-technology.com
website. Then burn it on a CD-R and load it into the DVD player. See
our website under support for additional information. If you do not
have Internet access, or do not own or have access to a CD burner,
an update can be purchased from the dealer where you purchased
your DVD Player. To reset the settings of the DP-1000, press the
following buttons on the remote control: “Open”, “Clear”, “1”, “2”,
“3”. KiSS Technology A/S reserves the right to change all settings
and specifications without notice.
Important safety information
•Read these instructions carefully and pay attention to all warnings
and guidelines.
•Do not overload electrical sockets or extension cables. Overloading
can result in fire or electric shock.
•Never insert objects into the DVD player’s cabinet door. They might
come into contact with dangerous voltage points or short-circuit
components, which can cause fire or electric shock.
•Do not spill liquids on the DVD player.
•If the DVD Player does not function normally, or if it emits unusual
sounds or odours, pull out the plug immediately and contact an
authorised technician.
•Do not attempt to service the DVD player yourself. If you open or
dismantle the shielding, you expose yourself to dangerous voltage
and other hazards. All maintenance must be carried out by qualified
service technicians.
Environmental information
• The system is made of recyclable materials which can be reused
if disassembled by authorised personnel.
• Please follow local regulations for the disposal of packaging
materials, used batteries and discarded units.
Copyright
This product contains copyright technology which is protected
pursuant to the patents that are the property of Macrovision
Corporation and other copyright holders. Any use of this copyright
technology must be approved by Macrovision Corporation. The
technology is intended for use in the home unless otherwise
approved by Macrovision Corporation. Breakdown and disassembly
are prohibited.
Made under license from Dolby Laboratories. “Dolby” and the double
“D” symbol are trademarks of Dolby Laboratories. “DTS” and “DTS
Digital Out” are trademarks of Digital Theater Systems, Inc.
KiSS Instant Repair Service
If the DVD player is STILL UNDER WARRANTY, KiSS Technology A/S
will pay freight costs back and forth to the customer. Please follow
the instructions given by the HelpDesk. Always remember to write
the RMA number (provided by the HelpDesk) on the freight bill. If
the DVD player is NOT UNDER WARRANTY, all costs must be held
by the customer.
There are three ways to obtain an RMA number. “An RMA
number is a reference number generated in every single case for
administrative purposes.”
1.By fax or e-mail: Fax: +45 44 78 41 48 and e-mail:
kiss@esupport.dk. Enclose the error description, serial no., invoice
no., copy of the invoice/sales receipt.
2.Personal contact: Phone KiSS’s Help Desk on +45 70 26 82 70 and
request an RMA number.
3.From the dealer: take the product to the dealer, where it was
purchased. Important: Never send the product to be repaired
without obtaining an RMA no. first, otherwise it will be rejected.
The product must always be packed properly, otherwise the product
warranty will be discontinued. (Packaging can be purchased from
KiSS Technology at the market price). Retrieval and delivery to the
end user. The product can be picked up from and delivered directly
to the end user. To do so, the end user must follow the HelpDesk’s
instructions at the time of the RMA enquiry. If these instructions
are not followed, the end user will be charged for extra costs that
must be paid on delivery.
Warranty certificate
KiSS Technology A/S provides a twenty-four (24) month warranty
from the date of purchase against material and manufacturing
defects. In the event of defects covered by the warranty, the product
must be returned to the dealer that sold the product, or refer to the
enclosed appendix on the KiSS Instant Repair Service. The expected
time of repair, including transport, is approximately five working
days (except for remote areas). If any problems arise, information on
our authorised service centres is available at the following address,
or from the dealer who sold the product.
Terms of Warranty
1.The warranty is only valid on presentation of a correctly completed
warranty certificate and sales ticket, and if the serial number on the
product is fully legible.
2.The obligations of KiSS Technology are limited either to repair or
replacement of defective components. The repair or replacement
of defective components is based on an assessment by KiSS
Technology. Exchange is only possible if the repair cannot be
performed.
3.Warranty repairs must be performed by an authorised KiSS
Technology dealer, or an authorised service centre. No remuneration
is provided for repairs performed by unauthorised workshops.
Any repairs or damage to the product caused by unauthorised
intervention are not covered by this warranty.
4.This product will not be viewed as defective, either in materials
or in manufacture, if adaptation to national, local, technical or
safety-related requirements is required in countries other than the
specific country for which the product was originally designed and
manufactured.
5.This warranty does not cover these types of adaptations, and
no remuneration will be offered for these types of adaptations or
for any consequential damages. The warranty does not cover the
following:
a) Periodic inspection, maintenance and repair or replacement of
parts resulting from normal wear.
b) Costs connected to transport, disassembly or installation of the
product.
c) Misuse, including use for other purposes than was intended, or
faulty installation.
d) Damage caused by lightning, water, fire, natural catastrophes,
war, insurrection, incorrect line voltage, insufficient ventilation or
other causes beyond the control of KiSS Technology.
6.This warranty applies to every legal owner of the product during
the warranty period.
7. Information we must receive before repairing the product: model
name, serial no, RMA no, copy of the invoice or sales receipt
the dealer’s name, address and phone no, personal information
(Name, address, post code/city, phone no. and e-mail address
(optional)), your signature, dealer’s stamp and signature, date.
KiSS Technology A/S, Slotsmarken 10, DK 2970 Hørsholm,
Denmark
Hotline (user support) +45 45 17 00 07,
HelpDesk (repair support) +45 70 26 82 70
hotline@kiss-technology.com
4
The DVD Player is equipped with a VFD display which indicates
the current ongoing activities.
1. Indicates the selection of the disk being played
2. Indicates the number or chapter being shown/played
3. Indicates the current function, such as play or stop
4. Indicates the type of media being played
3
21
englishfrançais
Hulp nodig? Stel uw vraag in het forum
Misbruik melden
Gebruikershandleiding.com neemt misbruik van zijn services uitermate serieus. U kunt hieronder aangeven waarom deze vraag ongepast is. Wij controleren de vraag en zonodig wordt deze verwijderd.
Product:
Spelregels forum
Om tot zinvolle vragen te komen hanteren wij de volgende spelregels:
lees eerst de handleiding door;
controleer of uw vraag al eerder door iemand anders is gesteld;
probeer uw vraag zo duidelijk mogelijk te stellen;
heeft u een probleem en al geprobeerd om dit op te lossen, vermeld dit erbij aub;
heeft u een oplossing gekregen van een bezoeker dan horen wij dat graag in dit forum;
wilt u een reactie geven op een vraag of antwoord, gebruik dan niet dit formulier maar klik op de knop 'reageer op deze vraag';
uw vraag wordt direct op de website gezet; vermijd daarom persoonlijke gegevens in te vullen;
Belangrijk! Als er een antwoord wordt gegeven op uw vraag, dan is het voor de gever van het antwoord nuttig om te weten als u er wel (of niet) mee geholpen bent! Wij vragen u dus ook te reageren op een antwoord.
Belangrijk! Antwoorden worden ook per e-mail naar abonnees gestuurd. Laat uw emailadres achter op deze site, zodat u op de hoogte blijft. U krijgt dan ook andere vragen en antwoorden te zien.
Abonneren
Abonneer u voor het ontvangen van emails voor uw Kiss 1600 bij:
nieuwe vragen en antwoorden
nieuwe handleidingen
U ontvangt een email met instructies om u voor één of beide opties in te schrijven.
Ontvang uw handleiding per email
Vul uw emailadres in en ontvang de handleiding van Kiss 1600 in de taal/talen: Engels als bijlage per email.
De handleiding is 0,87 mb groot.
U ontvangt de handleiding per email binnen enkele minuten. Als u geen email heeft ontvangen, dan heeft u waarschijnlijk een verkeerd emailadres ingevuld of is uw mailbox te vol. Daarnaast kan het zijn dat uw internetprovider een maximum heeft aan de grootte per email. Omdat hier een handleiding wordt meegestuurd, kan het voorkomen dat de email groter is dan toegestaan bij uw provider.
Uw handleiding is per email verstuurd. Controleer uw email
Als u niet binnen een kwartier uw email met handleiding ontvangen heeft, kan het zijn dat u een verkeerd emailadres heeft ingevuld of dat uw emailprovider een maximum grootte per email heeft ingesteld die kleiner is dan de grootte van de handleiding.
Er is een email naar u verstuurd om uw inschrijving definitief te maken.
Controleer uw email en volg de aanwijzingen op om uw inschrijving definitief te maken
U heeft geen emailadres opgegeven
Als u de handleiding per email wilt ontvangen, vul dan een geldig emailadres in.
Uw vraag is op deze pagina toegevoegd
Wilt u een email ontvangen bij een antwoord en/of nieuwe vragen? Vul dan hier uw emailadres in.