6
Mark 1 = very good Mark 6 = unsatisfactory
When the TIME display has counted down from 0:60 to 0:00, the display
stops at 0:00. The recovery pulse level (a figure between 1,0 and 6,0) is
displayed in the final two figure display areas of the speed display (4).
The medium display will show the difference between pulse under exertion
and recovery pulse. If there is no pulse signal when starting the recovery
pulse measuring (display "P"), the recovery pulse measuring will not be started.
If there is no pulse signal during or at the end of recovery pulse measuring,
the display will read "FE" after count-down.
All values achieved up to this point will be reloaded again in the display,
the speed is 0,0 km/h. Training can then be resumed at the point at which
it previously ceased.
By pressing the [SET] button (12) or by increasing pedalling speed to over
20 revolutions per minute, the pulse recovery mode is interrupted. The
training computer then starts up in the mode it was in before pulse recovery
was initiated and training can be continued at the levels programmed
before the interruption.
The comparison of the pulse rates under exertion and during recovery is an
easy and quick method of checking body fitness. The pulse recovery level
is a guide for recovery capability after physical exertion. With regular heart
and circulatory training you will notice that your pulse recovery level will
improve. To record your training performance a table is provided to fill in
your training data.
Training in run mode
Run mode is initiated after switching on the home trainer (by pressing one
of the buttons ( ”+”, ”-” or ”SET”) or by starting to pedal) or by re-setting
the training computer. When run mode starts up, all displays are at zero,
except for the pulse display (5) which either shows the current pulse or a
”P”.
Start your training simply by pedalling. As soon as your pedalling speed
exceeds 20 pedal revolutions per minute, the training computer then starts
to display values for time, training distance and kilojoule consumption and
begins to count upwards. The display for speed shows the current speed
and the pulse display the current heart rate or a ”P”. When they have reached
the max. display value, all displays revert to zero ( figure 1 ).
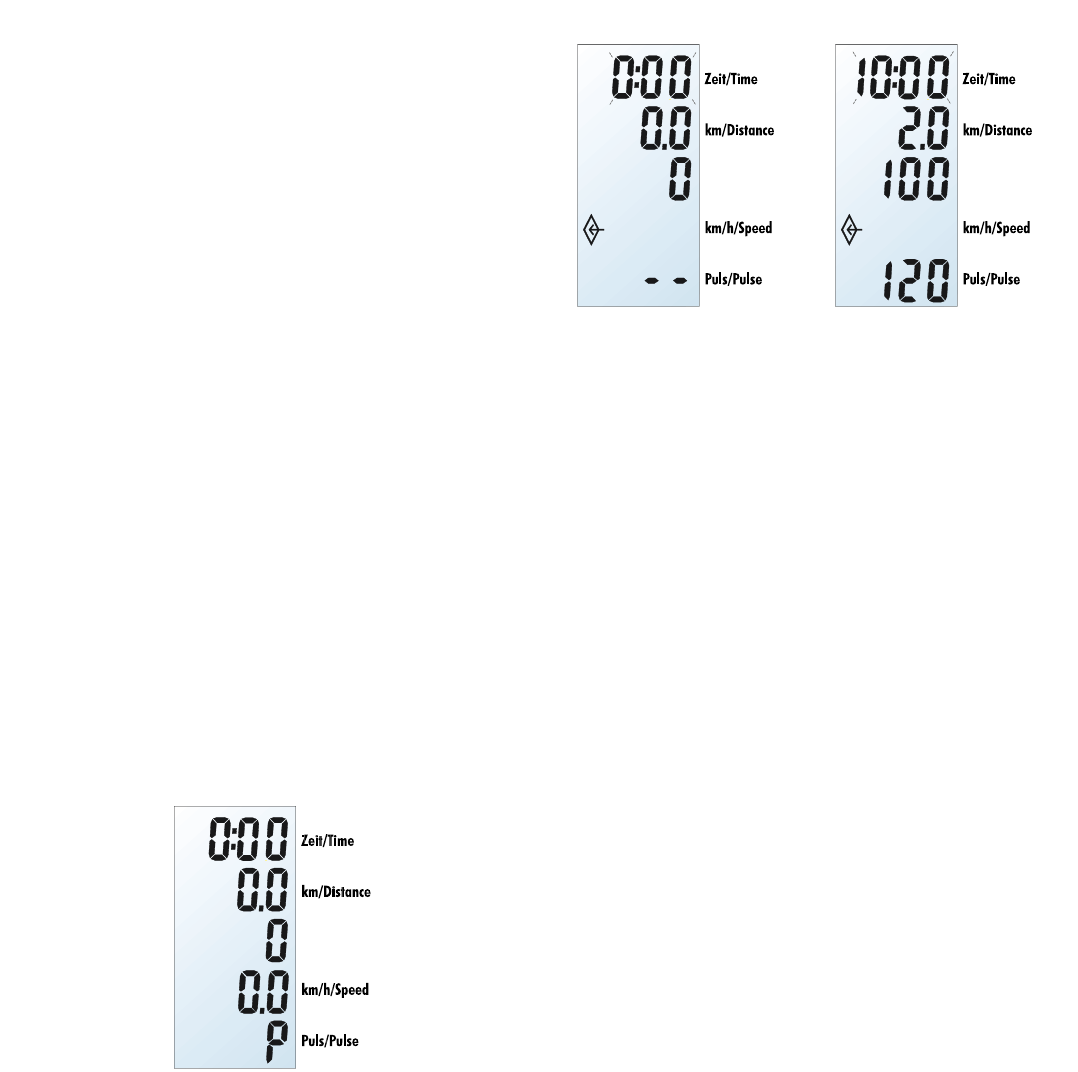
Training in countdown mode
By pressing the [SET] button (12) in run mode at a pedalling speed of 20
revolutions per minute, the countdown mode is initiated.
All displays, with the exception of the time display (1), are at zero or are
displaying previously programmed values. In the LCD display, the pro-
gramme symbol (9) appears and indicates the countdown mode. The time
display (1) begins to blink and this indicates to you that the training time
can be keyed in. Fig. 2 shows you the LCD display as it looks when first
being programmed. Fig. 3 shows the LCD display as it looks at a later pro-
gramming session. Here it can be seen that at the previous programming
session the following data was keyed in:
10 minutes training time, 2 kilometres training distance, 100 kilojoule
energy consumption and a upper pulse limit of 120 beats.
The individual training parameters can be keyed in the sequence: training
time, training distance, energy consumption and training pulse using the buttons
[+] (11), [SET] (12) and [-] (10). To confirm a value that has just been keyed
in, the [SET] button must be pressed. The blinking of the time display then
ceases and the next display (training distance) begins to blink. If both the
buttons [+] and [-] are pressed at the same time while keying in, that parti-
cular parameter reverts to zero.
So that the programming can be completed, all the data values programmed
must be confirmed. Therefore the programming of an individual parameter
is not what is important. Programming is only complete when the [SET] button
(12) is pressed in the display area training pulse. All displays then show
the programmed parameters for training. Only the pulse display (5) shows
the current heart rate or a ”P”.
When training is started, all programmed parameters start to count down
backwards (non-programmed parameters on the other hand count upwards)
When the parameters have reached zero, the originally programmed values
are then re-loaded and starting from these values they then begin to count
upwards. Each display blinks for approx. 5 seconds after starting to count
upwards.
Basic information for programming training data
Training data can be programmed as follows:
Programme range Programme interval
Time 0:00 - 99:00 +/- 1 minute
Distance 0,0 - 19,9 +/- 0,1 km
Kilojoule 0 -1999 +/- 1 kJ
Training pulse 90 - 189( - - Aus ) +/- 1 beat
Display of total number of kilometres
The training computer has a display which shows the total distance covered
in kilometres. After turning on the training computer, the total number of kilo-
metres can be called up in the middle area of the LCD display (3), the Calories
display, by pressing one of the buttons or by starting to pedal. In the pulse
display either the current heart rate or a ”P” can be seen.
The addition of kilometres covered during a training session to the kilometre
total happens every 0,1 km. The kilometre total is displayed in full kilometres
not fractions. The total number of kilometres is displayed for 30 seconds.
After these 30 seconds, the training computer reverts automatically to run
mode.
It is however possible to revert directly to run mode by pressing the [SET]
button (12).
Stand-by mode
The training computer has an energy-saving ”sleep” mode. If training is inter-
rupted for more than 4 minutes and during this time, no buttons are pressed,
the training computer turns itself off and reverts to the energy-saving ”sleep”
mode. All display values are then lost.
Calculation of energy consumption
The calculation of energy consumption is to be seen as a rough guide. The
calculated value cannot be taken as a medical assertion.
Information about pulse measuring
It is only one of the three puls measurement methods possible (earclip or
handpulse sensors or Cardio-Puls-Set).
The measurement will start when the heard symbol in the display begins to
flash in the beat of your pulse.
With ear-clip
The pulse sensor operates with infrared light and measures the changes in
the transparency of your skin resulting from your pulse beat. Before clipping
the pulse sensor to your ear lob rub your lob firmly 10 times in order to increase