Model Frequency r Max.
NX
TX/RX 136.000 - 174.000 MHz 25 W
GPS 1575.42 ± 1 MHz –
Bluetooth 2402 - 2480 MHz Class2 / 2.5 mW
NX
TX/RX 400.000 - 470.000 MHz 25 W
GPS 1575.42 ± 1 MHz –
Bluetooth 2402 - 2480 MHz Class2 / 2.5 mW
NX TX/RX 136.000 - 174.000 MHz 25 W
NX
TX/RX 136.000 - 174.000 MHz 25 W
GPS 1575.42 ± 1 MHz –
Bluetooth 2402 - 2480 MHz Class2 / 2.5 mW
NX TX/RX 400.000 - 470.000 MHz 25 W
NX
TX/RX 400.000 - 470.000 MHz 25 W
GPS 1575.42 ± 1 MHz –
Bluetooth 2402 - 2480 MHz Class2 / 2.5 mW
NX TX/RX 136.000 - 174.000 MHz 25 W
NX TX/RX 400.000 - 470.000 MHz 25 W
TRANSCEIVER
USER GUIDE
This User guide cov
For using details instruction manual, r
or QR code.
https://manual.ken
SUPPLIED A
Carefully unpack the tr
in the follo
or hav
Item NX
series NX
series NX
series
DC power cable with fuses (15 A) 1 1 –
DC power cable with fuses (10 A) – – 1
Mounting bracket 1 1 1
Microphone 1 – –
Microphone hanger 1 – –
4 x 16 mm self-tapping screw 3 – –
Screw set
5 x 16 mm self-tapping screw 4 4 4
M4 x 6 mm hex-headed scr 4 4 4
Spring washer 4 4 4
Flat washer 4 4 4
User guide 1 1 1
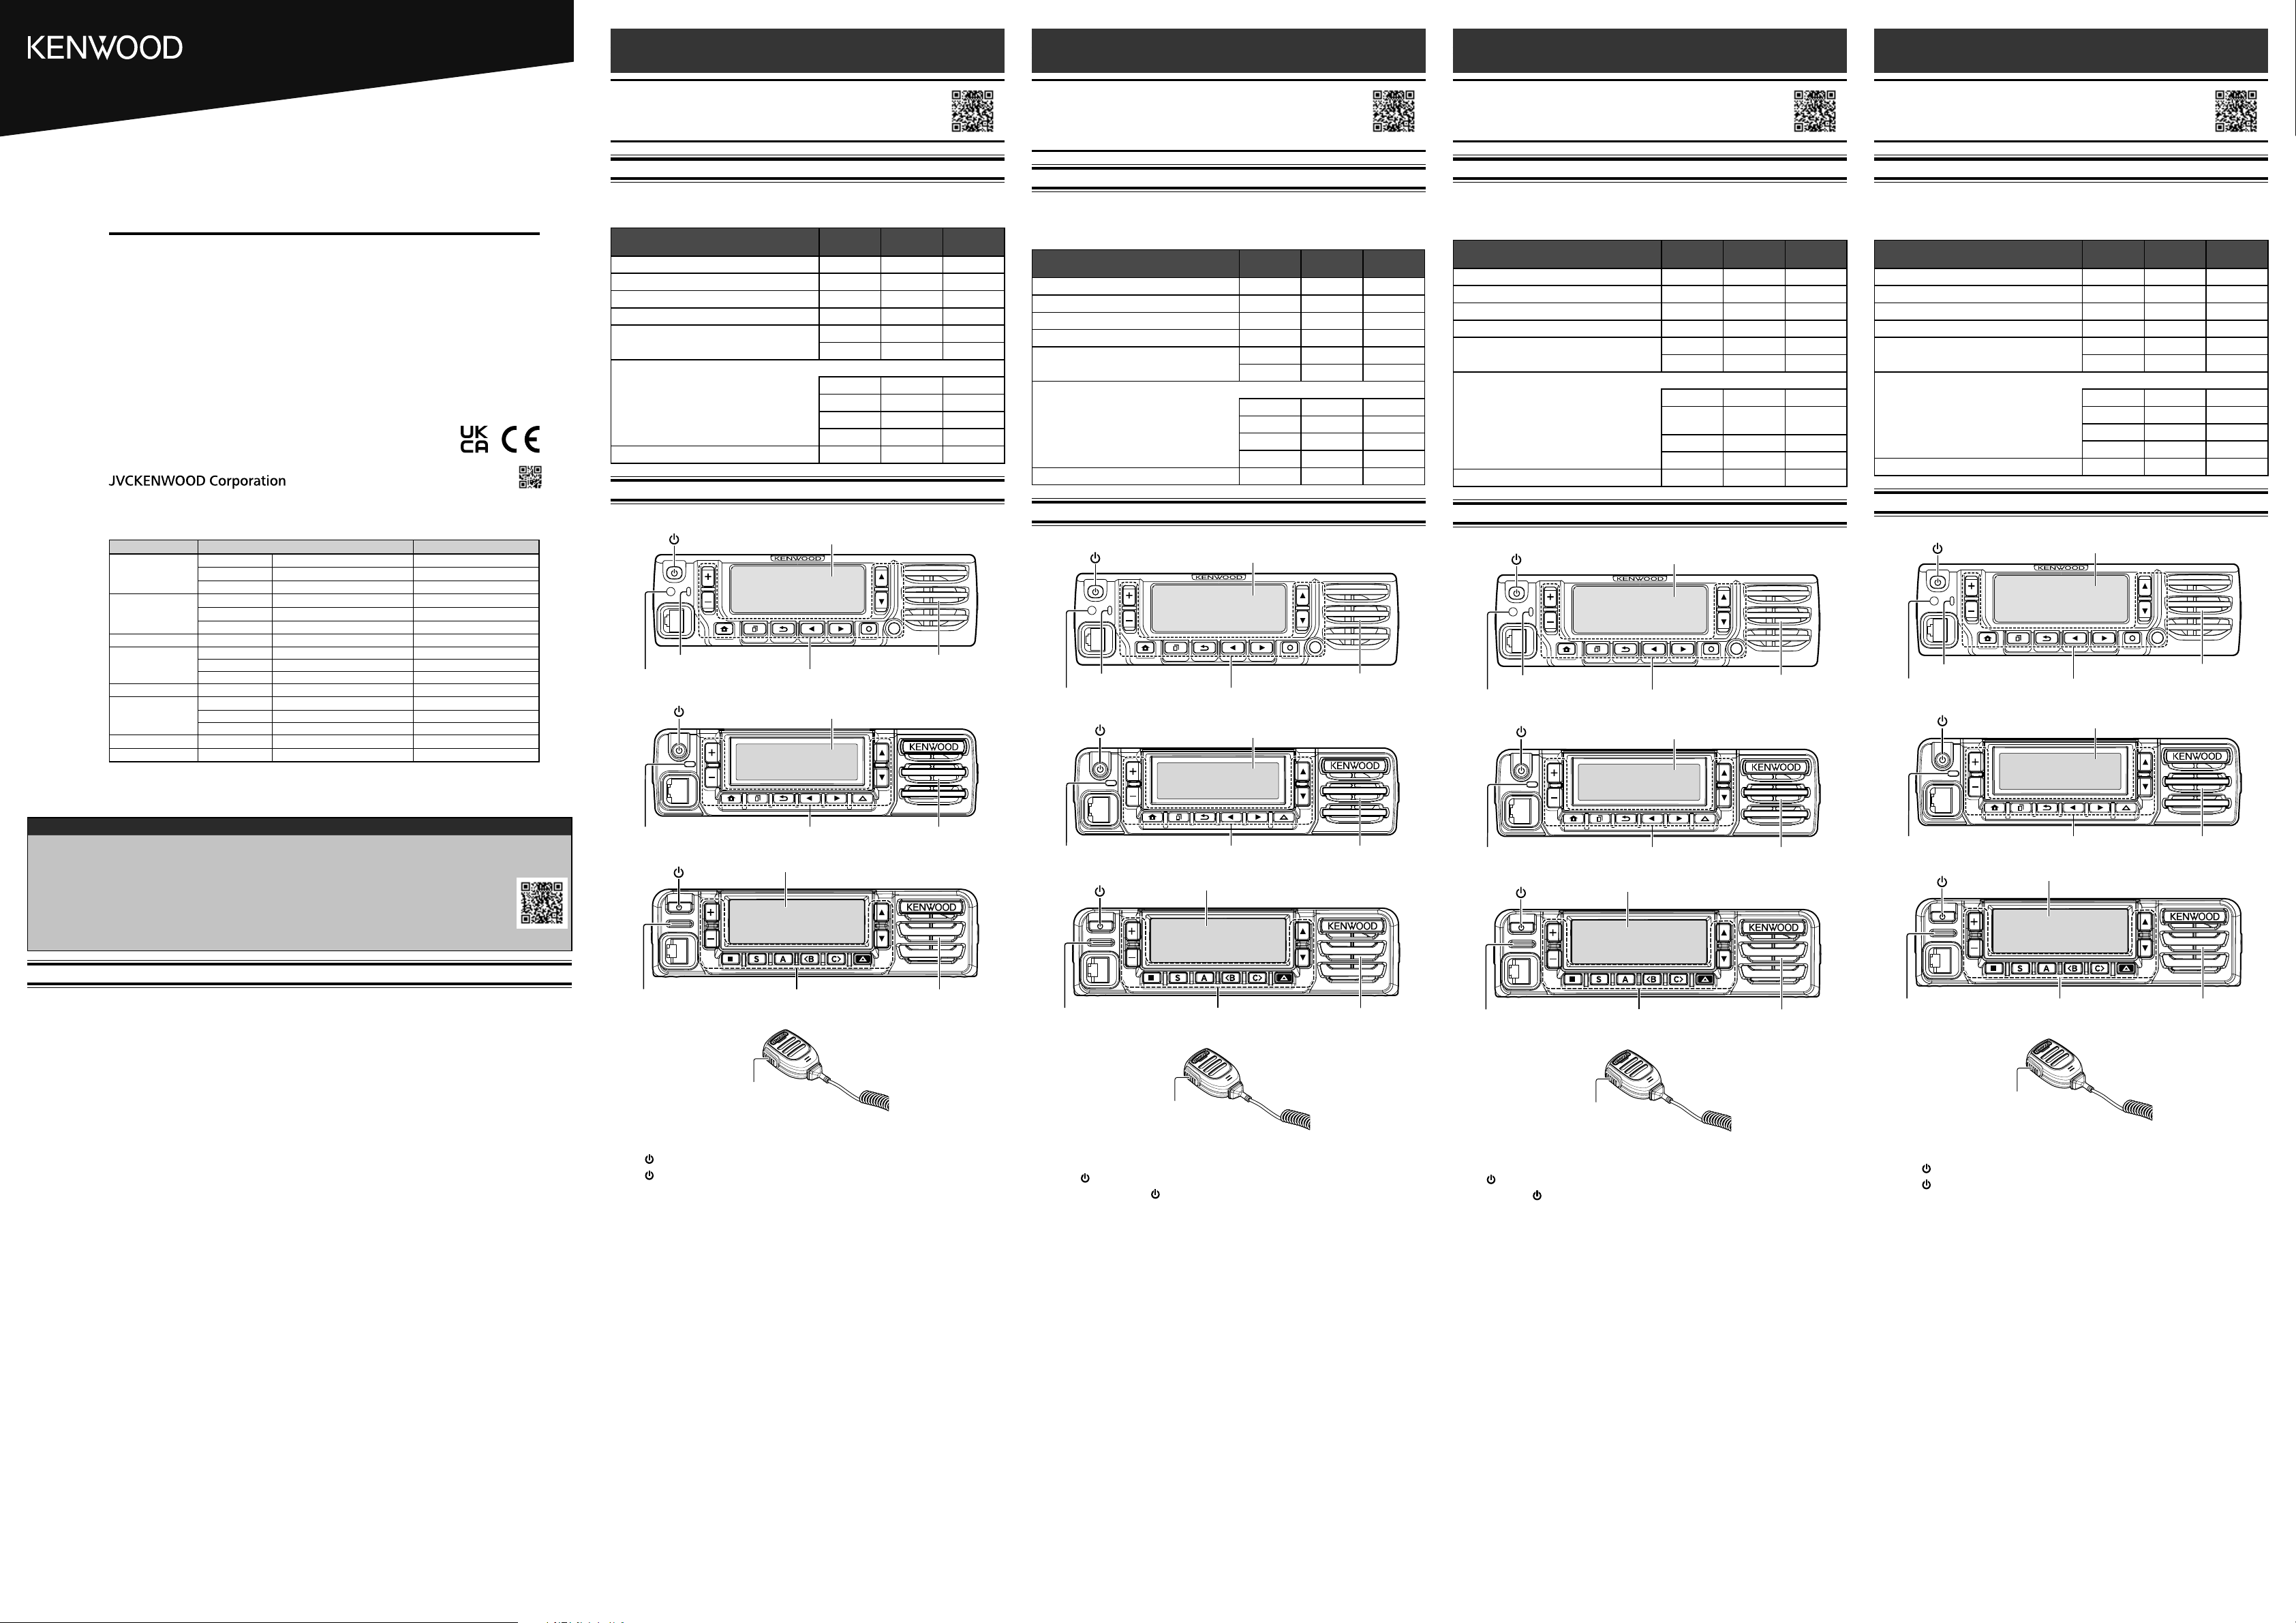
BA
Display
Illumination sensor
Status indicator Speaker
Speaker
Status indicator
NX
NX
Display
NX Display
Status indicator Operation buttons
Operation buttons
Operation buttons
Microphone
PTT switch
Speaker
S
Press [ ] to switch the tr
Press [] again to switch the tr
ADJUS
Press the button programmed as [V to increase the volume.
Press the button programmed as [V to decrease the volume
SELEC
Select the desired zone and channel using the buttons pr[Zone Up] /
[Zone Do and [Channel Up]/ [Channel Down].
TRANSMITTING
1 Select the desired zone and channel.
2 Press the PTT switch and speak into the micrPTT s
to receive
• For best sound quality
inches) from y
RECEIVING
Select the desired zone and channel.
selected channel, you will hear a call only if the receiv
transceiver settings
ÉMETTEUR-RÉCEPTEUR
GUIDE DE L
Cette Guide de l’utilisateur couvre uniquement les opérations
de base de votre r
(User Manual) en détail, reportez-vous à l’URL suiv
code QR.
https://manual.ken
A
Déballez soigneusement l’émetteur-récepteur
des articles ci-dessous avant de v
S’il manque un des éléments ou si un élément est endommagé, remplissez
immédiatement un formulaire de plainte a
Article Série
NX Série
NX Série
NX
Câble d’alimentation CC av 1 1 –
Câble d’alimentation CC av – – 1
Support de montage 1 1 1
Microphone 1 – –
Crochet à microphone 1 – –
Vis taraudeuse 4 x 16 mm 3 – –
Ensemble de vis
Vis taraudeuse 5 x 16 mm 4 4 4
Vis à tête hex 4 4 4
Rondelle à ressort. 4 4 4
Rondelle ordinaire 4 4 4
Guide de l’utilisateur 1 1 1
FONC
Affichage
Capteur d’éclairage
Indicateur d’état Haut-parleur
Haut-parleur
Série NX
Série NX
Affichage
Série NX Affichage
Indicateur d’état Boutons de fonctionnement
Boutons de fonctionnement
Boutons de fonctionnement
Microphone
Commutateur PTT
Haut-parleur
MISE SOUS/ HORS
Appuyez [ ] pour mettr
Appuyez à nouv[] pour mettre l’émetteur-récepteur hors tension.
RÉGLA
Appuyez sur la touche pr[Vpour augmenter le
volume
Appuyez sur la touche pr[V pour diminuer le
volume
SÉLEC
Sélectionnez la zone et le canal souhaités à l’aide des boutons progr
tant que [Zone haut] / [Z et [Canal haut]/ [Canal bas].
TRANSMISSION
1 Sélectionnez la zone et le canal v
2 Appuyez sur le commutateur PTT et parlez dans le microphone
commutateur PTT pour rece
• P
de votre bouche
RÉCEPTION
Sélectionnez la zone et le canal voulus
sur le canal sélectionné, vous entendrez un appel uniquement si le signal r
correspond aux réglages de votr
B5A-4029-10 (E)
USER GUIDE
GUIDE DE L'UTILISA
GUÍA DEL USU
GUID
BENUTZERHANDBUCH
GEBRUIKERSHANDLEIDING
KULLANICI REHBERI
Ο
GUIA DO UTILIZADOR
NX-5000 ser
NX-3000 ser
NX-1000 ser
TRANSCEPT
GUÍA DEL USU
Este Guía del Usuario sólo cubre las operaciones básicas de
su radio
uso , consulte el siguiente URL código QR.
https://manual.ken
A
Desembale el transceptor con cuidado
los elementos que se indican a continuación antes de deshacerse del material de
embalaje.
inmediatamente una reclamación a la empresa de transporte.
Artículo Serie
NX Serie
NX Serie
NX
Cable de alimentación CC con fusibles (15 A) 1 1 –
Cable de alimentación CC con fusibles (10 A) – – 1
Soporte de montaje 1 1 1
Micrófono 1 – –
Horquilla del micrófono 1 – –
T 3 – –
Juego de tornillos
T 4 4 4
T
de M4 x 6 mm 444
Arandela de resorte 4 4 4
Arandela plana 4 4 4
Guía del usuario 1 1 1
OPERA
P
Sensor de iluminación
Indicador de estado Altav
Altav
Indicador de estado
Serie NX
Serie NX
P
Serie NX P
Indicador de estado Botones de operación
Botones de operación
Botones de operación
Micrófono
Conmutador de PTT
Altav
ENCENDIDO Y
Pulse [ ] para activ
V[] para apagar el transceptor
AJUS
Pulse el botón programado como [Subir v para aumentar el volumen.
Pulse el botón programado como [Bajar v para reducir el v
SELECCIÓN DE UNA Z
Seleccione la zona y el canal deseados utilizando los botones pr
[Zona arriba]/ [Z y [Subir canal]/ [Bajar canal].
TRANSMISIÓN
1 Seleccione la zona deseada mediante.
2 Presione el conmutador PTT y hable al micrófono PTT
para recibir
• P
de la boca.
RECEPCIÓN
Seleccione la zona y el canal deseados.
señalización en el canal seleccionado
recibida coincida con la conguración del transceptor
RICETRASMETTIT
GUID
Questa guida per l’utente spiega soltanto i fondamenti d’uso
del ricetrasmettitore
scaricabile dall’indirizzo o codice QR.
https://manual.ken
A
Disimballare con cura il ricetrasmettitor
d’imballaggio
nell’elenco seguente.
immediatamente reclamo al corriere
Articolo Serie
NX Serie
NX Serie
NX
Cav 1 1 –
Cav – – 1
Staa di montaggio 111
Microfono 1 – –
Gancio microfono 1 – –
Vite autolettante 4 x 16 mm 3 – –
Set di viti
Vite autolettante 5 x 16 mm 444
Vite esagonale con rondella M4 x 6 mm 4 4 4
Rondella a molla 4 4 4
Rondella piatta 4 4 4
Guida per l’utente 1 1 1
FUNZIONAMENT
Display
Sensore d’illuminazione
Indicatore di stato Altoparlante
Altoparlante
Indicatore di stato
Serie NX
Serie NX
Display
Serie NX Display
Indicatore di stato Pulsanti di funzionamento
Pulsanti di funzionamento
Pulsanti di funzionamento
Microfono
Interruttore PTT
Altoparlante
A
Premere [ ] per accendere il ricetr
Premere [] di nuo
REGOLAZIONE
Premere il pulsante progr[V per aumentare il v
Premere il pulsante progr[Vper diminuire il v
SELEZIONE DI UNA ZONA E DI UN DI C
Selezionare la zona e il canale desider
[Zone su]/ [Z e [Canale su]/ [Canale giù].
TRASMISSIONE
1 Selezionare la zona e il canale desider
2 Premere l’interruttore PTT e parlarPTT
per la ricezione.
• P
cm dalla bocca.
RICEZIONE
Selezionare la zona e il canale desider
programmato uno specico tipo di segnalazione
corrispondente potrà avv
idonee al formato utilizz
INFORMA
This transceiver uses a softw
*zlib LICENSE (NX-5000 series/ NX
Copyright (C) 1995-2013 Jean-loup Gailly and Mark Adler
This software is pr
warranty
In no ev
the use of this software
P
including commercial applications, and to alter it and redistribute it
freely
1.
must not claim that you wrote the original softw
this software in a pr
documentation would be appreciated but is not requir
2.
must not be misrepresented as being the original softw
3.
distribution.
Jean-loup Gailly (jloup@gzip.or
Mark Adler (madler@alumni.caltech.edu)
*libpng LICENSE (NX-5000 series/ NX
This copy of the libpng notices is pro
case of any discrepancy betw
png.h that is included in the libpng distribution, the latter shall prev
COPYRIGHT NO
If you modify libpng y
following this sentence
This code is released under the libpng license.
August 15, 2004, through 1.6.8, December 19, 2013, are Cop
(c) 2004, 2006-2013 Glenn Randers-P
according to the same disclaimer and license as libpng-1.2.5 with the
following individual added to the list of Contributing A
Cosmin T
libpng versions 1.0.7, July 1, 2000, through 1.2.5 - October 3, 2002, ar
Copyright (c) 2000-2002 Glenn Randers-P
according to the same disclaimer and license as libpng-1.0.6 with the
following individuals added to the list of Contributing A
Simon-Pierre Cadieux Eric S.
Gilles V
and with the following additions to the disclaimer:
There is no warr
library or against infringement.
or the library will fulll any of your particular purposes or needs.
library is provided with all faults
quality
libpng versions 0.97, January 1998, through 1.0.6, March 20,
2000, are Copyright (c) 1998, 1999 Glenn Randers-P
and are distributed according to the same disclaimer and license
as libpng-0.96, with the following individuals added to the list of
Contributing Authors:
T Glenn Randers-P
Willem van Schaik
libpng versions 0.89, June 1996, through 0.96, Ma
Copyright (c) 1996, 1997 Andreas Dilger Distributed accor
the same disclaimer and license as libpng-0.88, with the following
individuals added to the list of Contributing Authors:
John Bowler Ke
Sam Bushell Magnus Holmgr
Greg Roelofs T
libpng versions 0.5, Ma
Copyright (c) 1995, 1996 Guy Eric Schalnat, Group 42, Inc.
For the purposes of this cop
dened as the following set of individuals:
Andreas Dilger Dav
Guy Eric Schalnat P
Tim W
The PNG Ref
Authors and Group 42, Inc.
implied, including, without limitation, the warranties of mer
and of tness for an
42, Inc.
ex
of the PNG Ref
damage.
P
source code, or portions hereof
the following r
1.
2.
be misrepresented as being the original source
3.
source or altered source distribution.
The Contributing Authors and Group 42, Inc.
fee, and encour
supporting the PNG le format in commercial products
source code in a product, acknowledgment is not r
be appreciated.
A “png_get_cop
“about”
printf(“%s”,png_get_copyright(NULL));
Also
“pngbar
Libpng is OSI Certied Open Source Software
Source is a certication mark of the Open Source Initiative
Glenn Randers-P
glennrp at users.sourcef
December 19, 2013
*Md5 (NX
Copyright (C) 1999, 2000, 2002 Aladdin Enterprises.
reserved.
This software is pr
warranty
In no ev
from the use of this softwar
P
purpose, including commercial applications
redistribute it freely
1.
must not claim that you wrote the original softw
this software in a pr
documentation would be appreciated but is not requir
2.
must not be misrepresented as being the original softw
3.
distribution.
L.
ghost@aladdin.com
Access the follo
Ref
riferimento alla
“K
“KIIRJUHEND”.
“KRA
Katso “YK
Consulte o “GUIA SIMPLES”.
SEMPLIĊI”.
https://manual.ken