TRANSCEIVER
USER GUIDE
This User guide cov
your r
to the follo
https://manual.ken
SUPPLIED A
Carefully unpack the tr
in the follo
or havfi le a claim with the carrier immediately
Item Quantity
Li-ion battery pack (KNB-45L) 1
Speak
er/ microphone jack cap 1
Speaker/ microphone locking br 1
Belt clip (KBH-10) 1
Screw (M3 x 8 mm) 2
User guide 1
INST
1 Align the battery pack with the back of the
transceiver
transceiver fi rmly together until the r
the base of the transceiver lock
2 T
the base of the transceiver
latch underneath the safety catch.
3 While pressing the release latch, pull the battery
pack aw
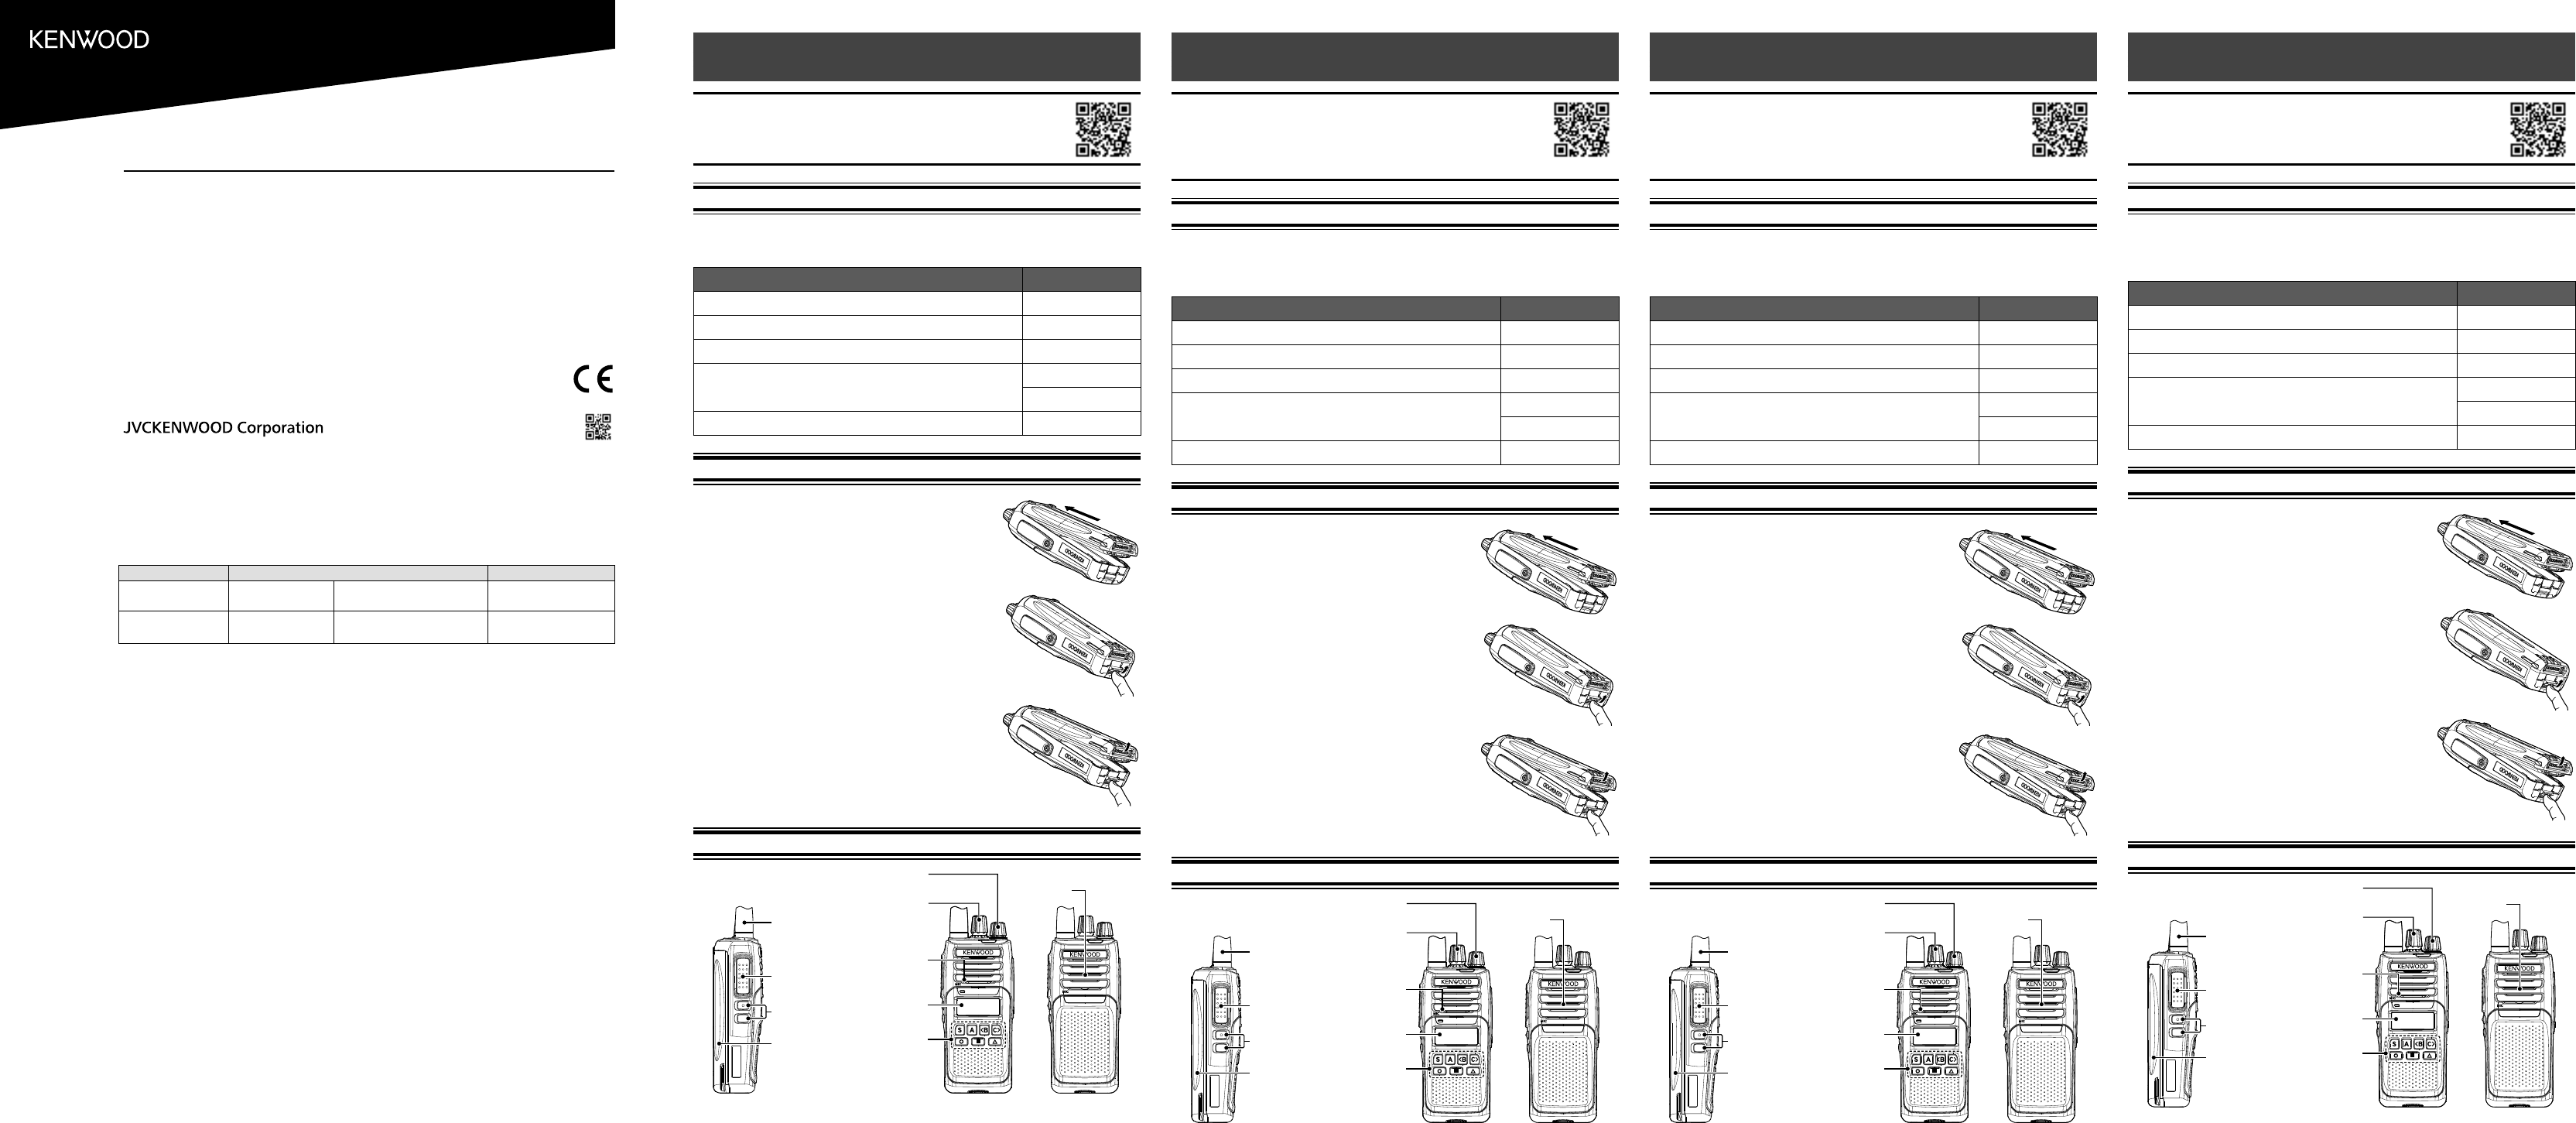
BASIC OPERA
Display
PTT switch
Antenna
Microphone
Speaker
Battery pack
P
Selector
Programmable
buttons
Programmable
buttons
SWIT
TPo clockwise to switch the transceiv
TPo counterclockwise fully to switch the
transceiver OFF
ADJUSTING THE V
Rotate the P to adjust the volume.
increases the volume and counter
SELEC
Select the desired zone using the buttons pr[Zone Up] / [Z
Down].
Select the desired channel using the Selector or the buttons programmed as
[Channel Up]/ [Channel Down].
transmitting and receiving.
TRANSMITTING
1 Select the desired zone and channel.
2 Press the button programmed as [Monitor] or [Squelch Off ] to check whether
or not the channel is free.
• If the channel is busy
3 Press PTT switch and speak to the microphonePTT s
to receive
• For best sound quality
inches) from y
RECEIVING
Select the desired zone and channel.
selected channel, you will hear a call only if the r
transceiver settings
ÉMETTEUR-RÉCEPTEUR
GUIDE DE L
Cette Guide de l’utilisateur couvre uniquement les
opérations de base de votr
manuel d’instruction (User Manual) en détail, reportez-
vous à l’URL suiv
https://manual.ken
A
Déballez soigneusement l’émetteur-récepteurfi er la présence
des articles ci-dessous avant de v
S’il manque un des éléments ou si un élément est endommagé, remplissez
immédiatement un formulaire de plainte a
Article Quantité
Bloc-piles au lithium-ion (KNB-45L) 1
C
ache des prises du microphone à haut-parleur 1
Support de verrouillage du haut-parleur/ microphone 1
Crochet de ceinture (KBH-10) 1
Vis (M3 x 8 mm) 2
Guide de l’utilisateur 1
POSE/ DÉPOSE DU BLOC PILES
1 Alignez le bloc-piles av
récepteur
bloc-piles et l’émetteur-récepteur en même temps
jusqu’à ce que le loquet de blocage sur la base de
l’émetteur-récepteur soit verrouillé.
2 P
sécurité sur la base de l’émetteur-récepteur
appuyez sur le loquet de blocage sous le cr
sécurité.
3 Lorsque v
enlev
FONC
Affichage
Commutateur
PTT
Antenne
Microphone
Haut-parleur
Bloc-piles
Commutateur d’alimentation/
Commande de volume
Sélecteur
Boutons
programmables
Boutons
programmables
MISE SOUS/ HORS
Tcommutateur d’alimentation/ commande de volume dans le sens
horaire pour mettre l’émetteur-récepteur sous
Tcommutateur d’alimentation/ commande de volume dans le sens
anti-horaire pour mettre l’émetteur-récepteur hors tension.
RÉGLA
Tcommutateur d’alimentation/ commande de volume pour régler le
volume
diminue.
SÉLEC
Sélectionnez la zone souhaitée à l’aide des boutons progr
[Zone haut]/ [Z.
Sélectionnez le canal souhaité à l’aide de Sélecteur ou des boutons programmés
en tant que [Canal haut] / [Canal bas] .
réglages de transmission et de réception.
TRANSMISSION
1 Sélectionnez la zone et le canal souhaités
2 Appuyez sur le bouton pr[Moniteur] ou [Silencieux
désactivé] pour sav
• Si le canal est occupé, attendez qu’il se libère.
3 Appuyez sur le commutateur PTT et parlez au microphone
commutateur PTT pour rece
• P
4 cm de votre bouche
RÉCEPTION
Sélectionnez la zone et le canal v
sur le canal sélectionné, vous entendrez un appel uniquement si le signal r
correspond aux réglages de votr
B5A-3225-00 (E)
TRANSCEPT
GUÍA DEL USU
Este Guía del Usuario sólo cubre las operaciones
básicas de su radio
instrucciones de detalles de uso , consulte el siguiente
URL código QR.
https://manual.ken
A
Desembale el transceptor con cuidadofi car
los elementos que se indican a continuación antes de deshacerse del material de
embalaje.
inmediatamente una reclamación a la empresa de transporte.
Artículo Cantidad
Batería de iones de litio (KNB-45L) 1
Cubier
ta de jack de micrófono/ alta 1
Soporte del bloqueo del altavo 1
Gancho para cinturón (KBH-10) 1
T 2
Guía del usuario 1
INS
1 Alinee la batería con la parte posterior del
transceptor
transceptor fuertemente hasta que la pestaña de
liberación situada en la parte inferior del transceptor
chasquee.
2 P
situado en la base del transceptor y luego presione
la pestaña de liberación situada debajo de dicho
cierre.
3 Mientras presiona la pestaña de liberación, separ
la batería del transceptor
OPERA
P
Conmutador
PTT
Antenna
Micrófono
Altav
P
batería
Interruptor de encendido/Control de volumen
Selector
Botones
programables
Botones
programables
ENCENDIDO Y
Gire el interruptor de encendido/ control de v hacia la derecha para
encender el transceptor
Gire el interruptor de encendido/ control de v hacia la izquierda par
apagar el transceptor
AJUS
Gire el interruptor de encendido/ control de v para ajustar el volumen.
Hacia la derecha aumenta el nivel de v
SELECCIÓN DE UNA Z
Seleccione la zona deseada mediante los botones progr[Zona
arriba]/ [Zona abajo].
Seleccione el canal deseado mediante el Selector o los botones programados
como [Subir canal] / [Bajar canal] .
transmisión y recepción.
TRANSMISIÓN
1 Seleccione la zona y el canal deseados
2 Pulse el botón programado con la función [Monitor] o [Desactiv
silenciamiento] para comprobar si el canal está libre
• Si el canal está ocupado
3 Presione conmutador PTT y hable al micrófonoconmutador PTT
para recibir
• P
de la boca.
RECEPCIÓN
Seleccione la zona y el canal deseados
señalización en el canal seleccionado
recibida coincida con la confi guración del transceptor
RICETRASMETTIT
GUID
Questa guida per l'utente spiega soltanto i fondamenti
d’uso del ricetrasmettitore
dettagliato è scaricabile dall’indirizzo o codice QR.
https://manual.ken
A
Disimballare con cura il ricetrasmettitor
d’imballaggiofi care la pr
nell’elenco seguente.
immediatamente reclamo al corriere
Articolo Quantità
P 1
C
appuccio jack altoparlante/ microfono 1
Staff 1
Clip da cintura (KBH-10) 1
Vite (M3 x 8 mm) 2
Guida per l’utente 1
INST
1 Allineare il pacco batteria con il retro del
ricetrasmettitore
il ricetrasmettitore insieme fi no a quando il f
sgancio alla base del ricetrasmettitore si blocca.
2 P
di sicurezza alla base del ricetr
premere il f
sicurezza.
3 Mentre si preme il f
sollev
FUNZIONAMENT
Display
Interruttore PTT
Antenna
Microfono
Altoparlante
P
batteria
Interruttore di accensione/
regolatore di v
Selettore
Pulsanti
programmabili
Pulsanti
programmabili
A
Ruotare l’interruttore di accensione/ r in senso or
accendere il ricetrasmettitore
Ruotare l’interruttore di accensione/ r in senso antior
per spegnere il ricetrasmettitore
REGOLAZIONE DEL
Ruotare l’interruttore di accensione/ r per eseguir
regolazione.
lo si abbassa.
SELEZIONE DI UNA ZONA E DI UN DI C
Selezionare la zona desider[Zone su] /
[Zone giù].
Selezionare il canale desiderato utilizzSelettore o i pulsanti programmati
come [Canale su] / [Canale giù] .
per la trasmissione e la ricezione.
TRASMISSIONE
1 Selezionare la zona e il canale desider
2 Premere il pulsante progr[Controllo] o [Squelch disattivato]
per controllare se il canale è libero o meno
• Se il canale è occupato
3 Premere interruttore PTT e parlare nel micr’interruttore
PTT per la ricezione.
• P
3 ~ 4 cm dalla bocca.
RICEZIONE
Selezionare la zona e il canale desider
programmato uno specifi co tipo di segnalazione
corrispondente potrà avv
idonee al formato utilizz
Model Frequency r Max.
NX
NX
TX/RX 136.000 - 174.000 MHz 5
NX
NX
TX/RX 400.000 - 470.000 MHz 5
USER GUIDE
GUIDE DE L'UTILISA
GUÍA DEL USU
GUID
BENUTZERHANDBUCH
GEBRUIKERSHANDLEIDING
KULLANICI REHBERI
Ο ΧΡΗΣ
GUIA DO UTILIZADOR
NX-1000 ser