•It is NOT allowed to connect more than one motor to the same single switch. The centralisation controls can be done by an appropriate devices,
which are supplied on request.
•The gear motor is made for intermittent working. However, it is provided by an internal thermal protection, which stops the power supply in case of
overheating, for example after continuous operations (more than 10 non-stop). The motor re-functioning happens after a time not lower than 10
minutes, at the end of which the thermal protection resets itself automatically. But, after this resetting, the motor can function at a reduced rate; the
normal functioning will be possible only after a complete motor cooling (about 60 minutes).
•If the electricity supply cable of this motor is damaged, it must be replaced only by a repair centre, recognised by the manufacturer, as it is necessary
to use special equipment. In cases where such indications are not adhered to, the guarantee will be rendered invalid..
4 Limit switch adjustment
WARNING
:
•In order to avoid injury or damage to the device during the regulation procedure of the
stop, it is essential to be able to stop the coiler tube at any moment.
•It is recommended that you use a normal screwdriver to regulate the route end points.
If you use and electric screwdriver use a very low rotation velocity (inferior to 100
RPM) without exerting pressure on the screws.
•In the case of rolling shutters, do not install stopper or stop carriers on the end blade.
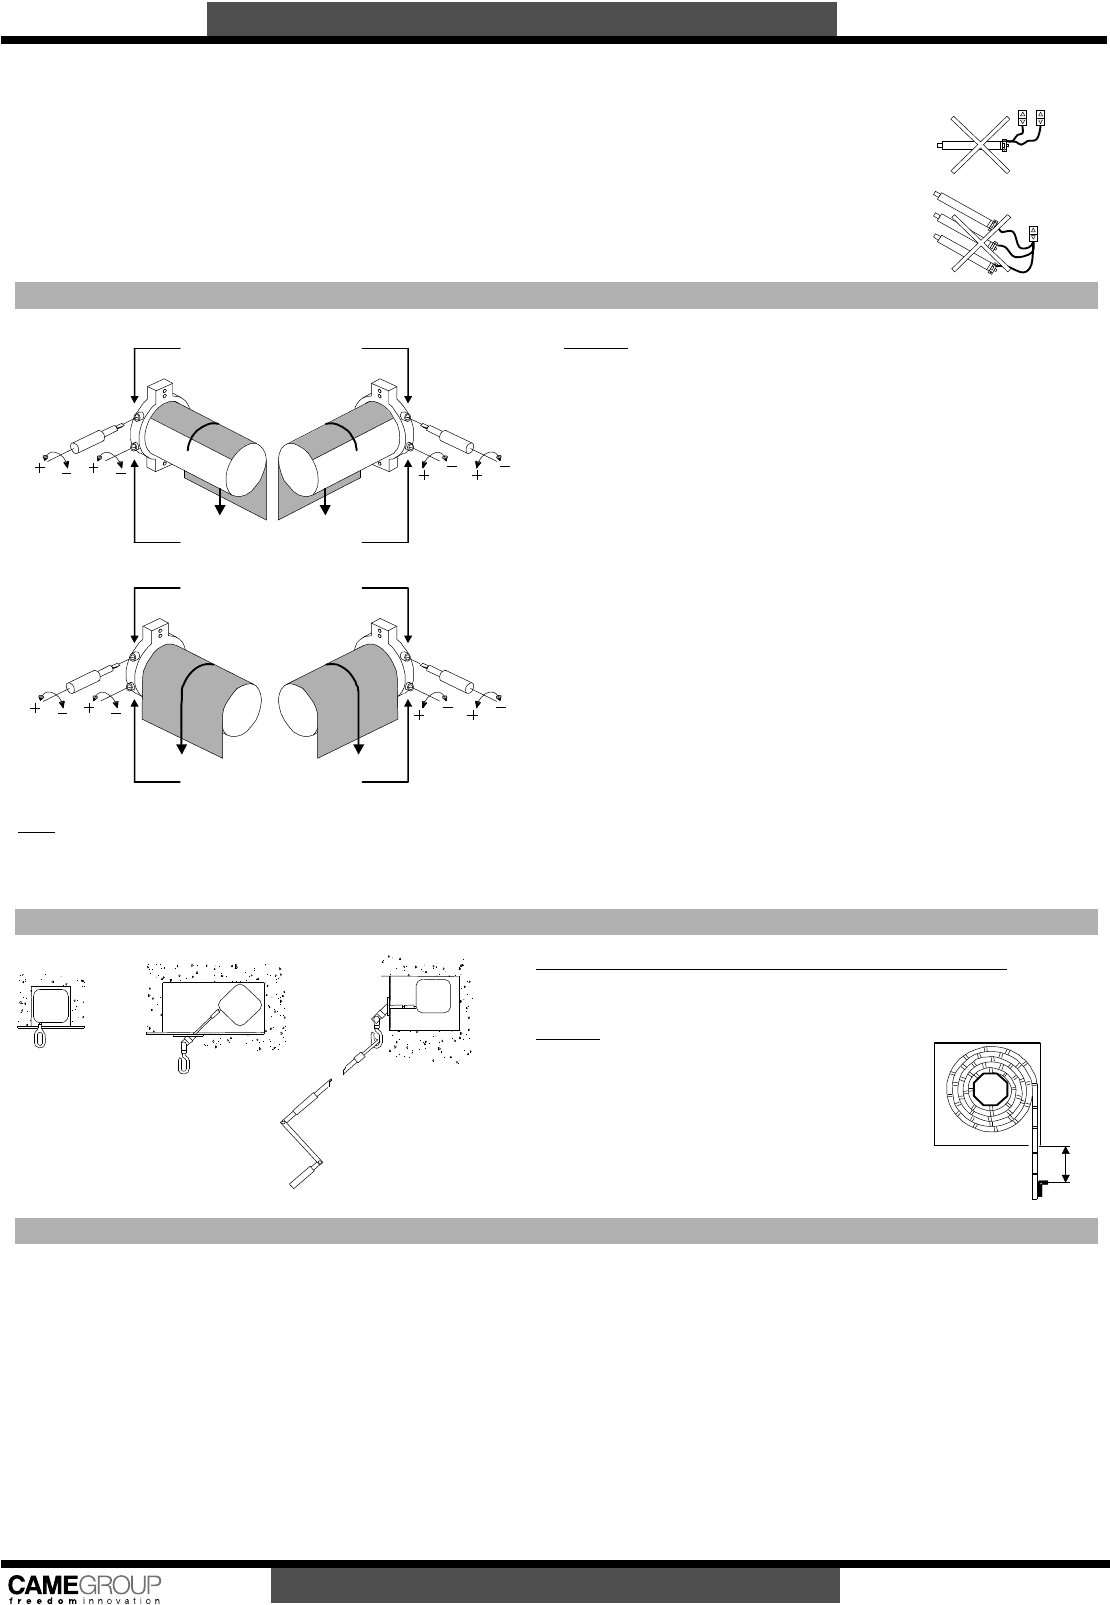
LIMIT SWITCH ADJUSTMENT:
a)Lower the tube, without the roller, until the motor stops automatically.
b)While keeping the down button pressed, turn the lower end run adjustment screw (see
figure) anti-clockwise (+), until the roller tube is in a suitable position for anchoring the
roller shutter.
c)Fix the roller shutter to the tube. Warning: DO NOT USE over-long screws.
d)Raise the roller shutter/awning until the motor stops automatically.
e)While keeping the up button pressed, turn the upper end run adjustment screw (see
figure) anti-clockwise (+), until the roller shutter/awning reaches the topmost position
desired.
LATER ADJUSTMENTS:
If, for example, the upper stopping point has been set too high, move the roller shutter or
awning to a position below the desired stopping point. At this point, turn the upper end run
adjustment screw a few times in a clockwise direction (−), and then start the procedure
again from point d).
NOTE
: for awnings we advise you to:
•Regulate the stop points with a reasonable safety margin that takes into account the size variations of the tent sheet due to various phenomenon such as heat and humidity… .
•One first check is suggested after few days from the installation and eventually a further end run adjustment to recover an eventual cloth “plays”.
•Use automatic closing systems in case of strong wind in order to avoid damage to the motor.
5 Reducer gearboxes with supplementary operation
Before utilizing the manual override switch off electric current of the motor.
The figure shows various installation possibilities of the manual maneuver with respect to the
position of the motor.
WARNING
:
•If the gear motor is provided by a manual override device,
it is necessary to take care to the motor orthogonality as
regards its fixing plan (static part).
•Only for reducer gearboxes with supplementary operation,
fit the stop brackets as to pic. 5, to avoid during manual
operation, the roller blind entering the housing completely.
In this case, adjust the limit switch so that the stop
brackets remain at least 5 cm lower than the stop
threshold.
6 Trouble shooting
1.THE MOTOR DOES NOT WORK:
•Check the electrical supply.
•Verify the correct execution of the electrical connections (see par. 3).
•If the problem occurs after numerous close operations the thermal protection could have intervened. In that case wait for the cooling of the system.
2.THE SHUTTER/SHADE DOES NOT STOP IN CORRESPONDENCE TO THE STOP:
•Check that the stop has been well inserted in the coiler tube (see point d) par. 2).
•Verify that the procedure for the regulation of the stops has been executed correctly (see par. 4).
•Check that the moving pulley is adequate and correctly inserted in the coiler tube.
•Verify the fastening of the pin square support to the roller-shutter box or to the wall.
3.THE MOTOR TURNS BUT THE ROLLER-SHUTTER/SHADE DOES NOT MOVE:
•Check that the roller-shutter/shade is fixed well to the coiler tube.
•Check that the moving pulley is correctly inserted in the shaft of the motor (see point b) par. 2).
Gebruikershandleiding.com neemt misbruik van zijn services uitermate serieus. U kunt hieronder aangeven waarom deze vraag ongepast is. Wij controleren de vraag en zonodig wordt deze verwijderd.
Product:
Spelregels forum
Om tot zinvolle vragen te komen hanteren wij de volgende spelregels:
lees eerst de handleiding door;
controleer of uw vraag al eerder door iemand anders is gesteld;
probeer uw vraag zo duidelijk mogelijk te stellen;
heeft u een probleem en al geprobeerd om dit op te lossen, vermeld dit erbij aub;
heeft u een oplossing gekregen van een bezoeker dan horen wij dat graag in dit forum;
wilt u een reactie geven op een vraag of antwoord, gebruik dan niet dit formulier maar klik op de knop 'reageer op deze vraag';
uw vraag wordt direct op de website gezet; vermijd daarom persoonlijke gegevens in te vullen;
Belangrijk! Als er een antwoord wordt gegeven op uw vraag, dan is het voor de gever van het antwoord nuttig om te weten als u er wel (of niet) mee geholpen bent! Wij vragen u dus ook te reageren op een antwoord.
Belangrijk! Antwoorden worden ook per e-mail naar abonnees gestuurd. Laat uw emailadres achter op deze site, zodat u op de hoogte blijft. U krijgt dan ook andere vragen en antwoorden te zien.
Abonneren
Abonneer u voor het ontvangen van emails voor uw Jolly Motor FC45 bij:
nieuwe vragen en antwoorden
nieuwe handleidingen
U ontvangt een email met instructies om u voor één of beide opties in te schrijven.
Ontvang uw handleiding per email
Vul uw emailadres in en ontvang de handleiding van Jolly Motor FC45 in de taal/talen: Engels als bijlage per email.
De handleiding is 0,1 mb groot.
U ontvangt de handleiding per email binnen enkele minuten. Als u geen email heeft ontvangen, dan heeft u waarschijnlijk een verkeerd emailadres ingevuld of is uw mailbox te vol. Daarnaast kan het zijn dat uw internetprovider een maximum heeft aan de grootte per email. Omdat hier een handleiding wordt meegestuurd, kan het voorkomen dat de email groter is dan toegestaan bij uw provider.
Uw handleiding is per email verstuurd. Controleer uw email
Als u niet binnen een kwartier uw email met handleiding ontvangen heeft, kan het zijn dat u een verkeerd emailadres heeft ingevuld of dat uw emailprovider een maximum grootte per email heeft ingesteld die kleiner is dan de grootte van de handleiding.
Er is een email naar u verstuurd om uw inschrijving definitief te maken.
Controleer uw email en volg de aanwijzingen op om uw inschrijving definitief te maken
U heeft geen emailadres opgegeven
Als u de handleiding per email wilt ontvangen, vul dan een geldig emailadres in.
Uw vraag is op deze pagina toegevoegd
Wilt u een email ontvangen bij een antwoord en/of nieuwe vragen? Vul dan hier uw emailadres in.