Inserting batteries
Main unit
PREP
NO
• The power will not be supplied thr
through the AC outlet or car batt
• The battery is consumed more quickly than usual when operating the unit
continuously or operating it in a cold place
• When the power is supplied using the batteries
unit is turned off (at standby).
• When the power is supplied using the batteries
or source buttons on the main unit.
CAUTION
T
• If you are not going to use this unit f
the battery compar
• Dispose of batteries in the proper manner
regulations.
• Do not mix with batteries of differ
• Do not attempt to charge an
• Discard leaky batteries immediately
personal injuries.
• If chemicals leak onto the unit, clean the unit completely
Match the polarities (+ and –) of the batteries.
Remote control
• If the range or effectiveness of the remote contr
Cautions when connecting to the car adapter
• Be sure to use the car adapter (not supplied) with the same
polarity design as the one equipped with this unit to prevent
mishaps or damage.
• F
• Be sure to start the engine when you use the car adapter;
otherwise, the car batter
• During transport, stabilize the unit in a box, etc.
• T
long time.
Connecting the pow
Battery compar
Discs CDs with one of the marks below on
the sur
Files Files in audio CD f
files on a finalized CD-R or CD-R
MP3/WMA files in a USB device can
also be played
Playable discs/files
Hierarchy
Level 1 Level 2 Level 3 Level 4 Level 5
F
MP3/WMA track with its play or
MP3/WMA folders/tracks c
• MP3/WMA discs requir
time than regular CDs. (It depends on the
complexity of the folder/file configuration.)
• Some MP3/WMA files cannot be played back
and will be skipped.
recording pr
• When making MP3/WMA discs, use ISO 9660
Level 1 f
• This unit can play back MP3/WMA files with
the extension code <.mp3> or <.wma>
(regardless of the letter case upper/lo
• It is recommended that you make each MP3
file at a sampling rate of 44.1 kHz and at a bit
rate of 128 kbps. Similarly each
sampling rate of 44.1 kHz and at a bit rate of
96 kbps.
• Playback order of MP3/
different fr
when recording
MP3/
• This unit cannot play
• If a CD-R
format, erase all data on the CD-RW
completely befor
• This unit can recog
tracks and folders on a disc, and 65536 files
in up to 200 groups (maximum 500 files in a
single group) on a USB device
F
• USB Memor
mass storage class specifications are connectable.
• Always set the volume t
connecting or disconnecting a USB device.
• When connecting with a USB cable, use the USB 2.0
cable less than 1 m (3.28 ft) in length.
• Y
MEMORY terminal of the unit.
• Connect one USB device to the unit at a time. Do
not use a USB hub.
• When the power is supplied thr
or car battery and USB is selec
USB device is charged through the USB MEMOR
terminal, how
charged.
F
• When connecting a USB device, ref
manual.
• Y
(maximum data transfer rate: 2 Mbps).
not play back some files even though their f
are listed abov
• While playing back a file in a USB device, do
not disconnect the USB device. It may cause
malfunction of both this unit and the device.
• This unit is compatible with USB 2.0 F
• Y
• When playing a file of a large transf
may be dropped during playback.
• This unit cannot recog
device whose rating exceeds 5V/500 mA.
• Y
this unit.
• Some USB devices may not be recog
not work properly
• Some DAP
• Copyrighted tr
played back on the unit.
• Coded or encrypted tracks in a special method
cannot be played on the unit.
• Electrostatic shock at connecting a USB device may
cause abnormal playback of the device. In this case
disconnect the USB device then reset this unit and
the USB device.
• JVC bears no responsibility for any loss of data in
the USB mass storage class device while using this
unit.
* DRM (Digital Rights Management): Any of several
technical methods used to contr
use of digital media content on electronic devices
with such technologies installed.
• Compatible
iPod model
iPod nano
iPod nano (2nd Generation)
iPod nano (3r
iPod nano (4th Generation)
iPod mini
iPod mini (2nd Generation)
iPod (4th Generation)
iPod classic
iPod photo (4th Generation)
iPod video (5th Generation)
iPod touch
iPod touch (2nd Gener
• Sound distortion may occur when playing back
audio sources with high rec
distortion occurs, it is recommended to turn
off the equalizer of iP
operating iPod
Important for USB mass storage class
device
NO
• The power can also be supplied thr
instruction on the right) and the car batter
• A small amount of power is alway
standby
CAUTION
• Only use JVC power cor
malfunction or damage to the unit.
• Remove all the batteries when using the po
battery.
• Be sure to unplug the pow
out or when the unit is not in use for an extended period of
time.
Unplug the AC pow
power through the car batt
compartment; other
Maintenance
T
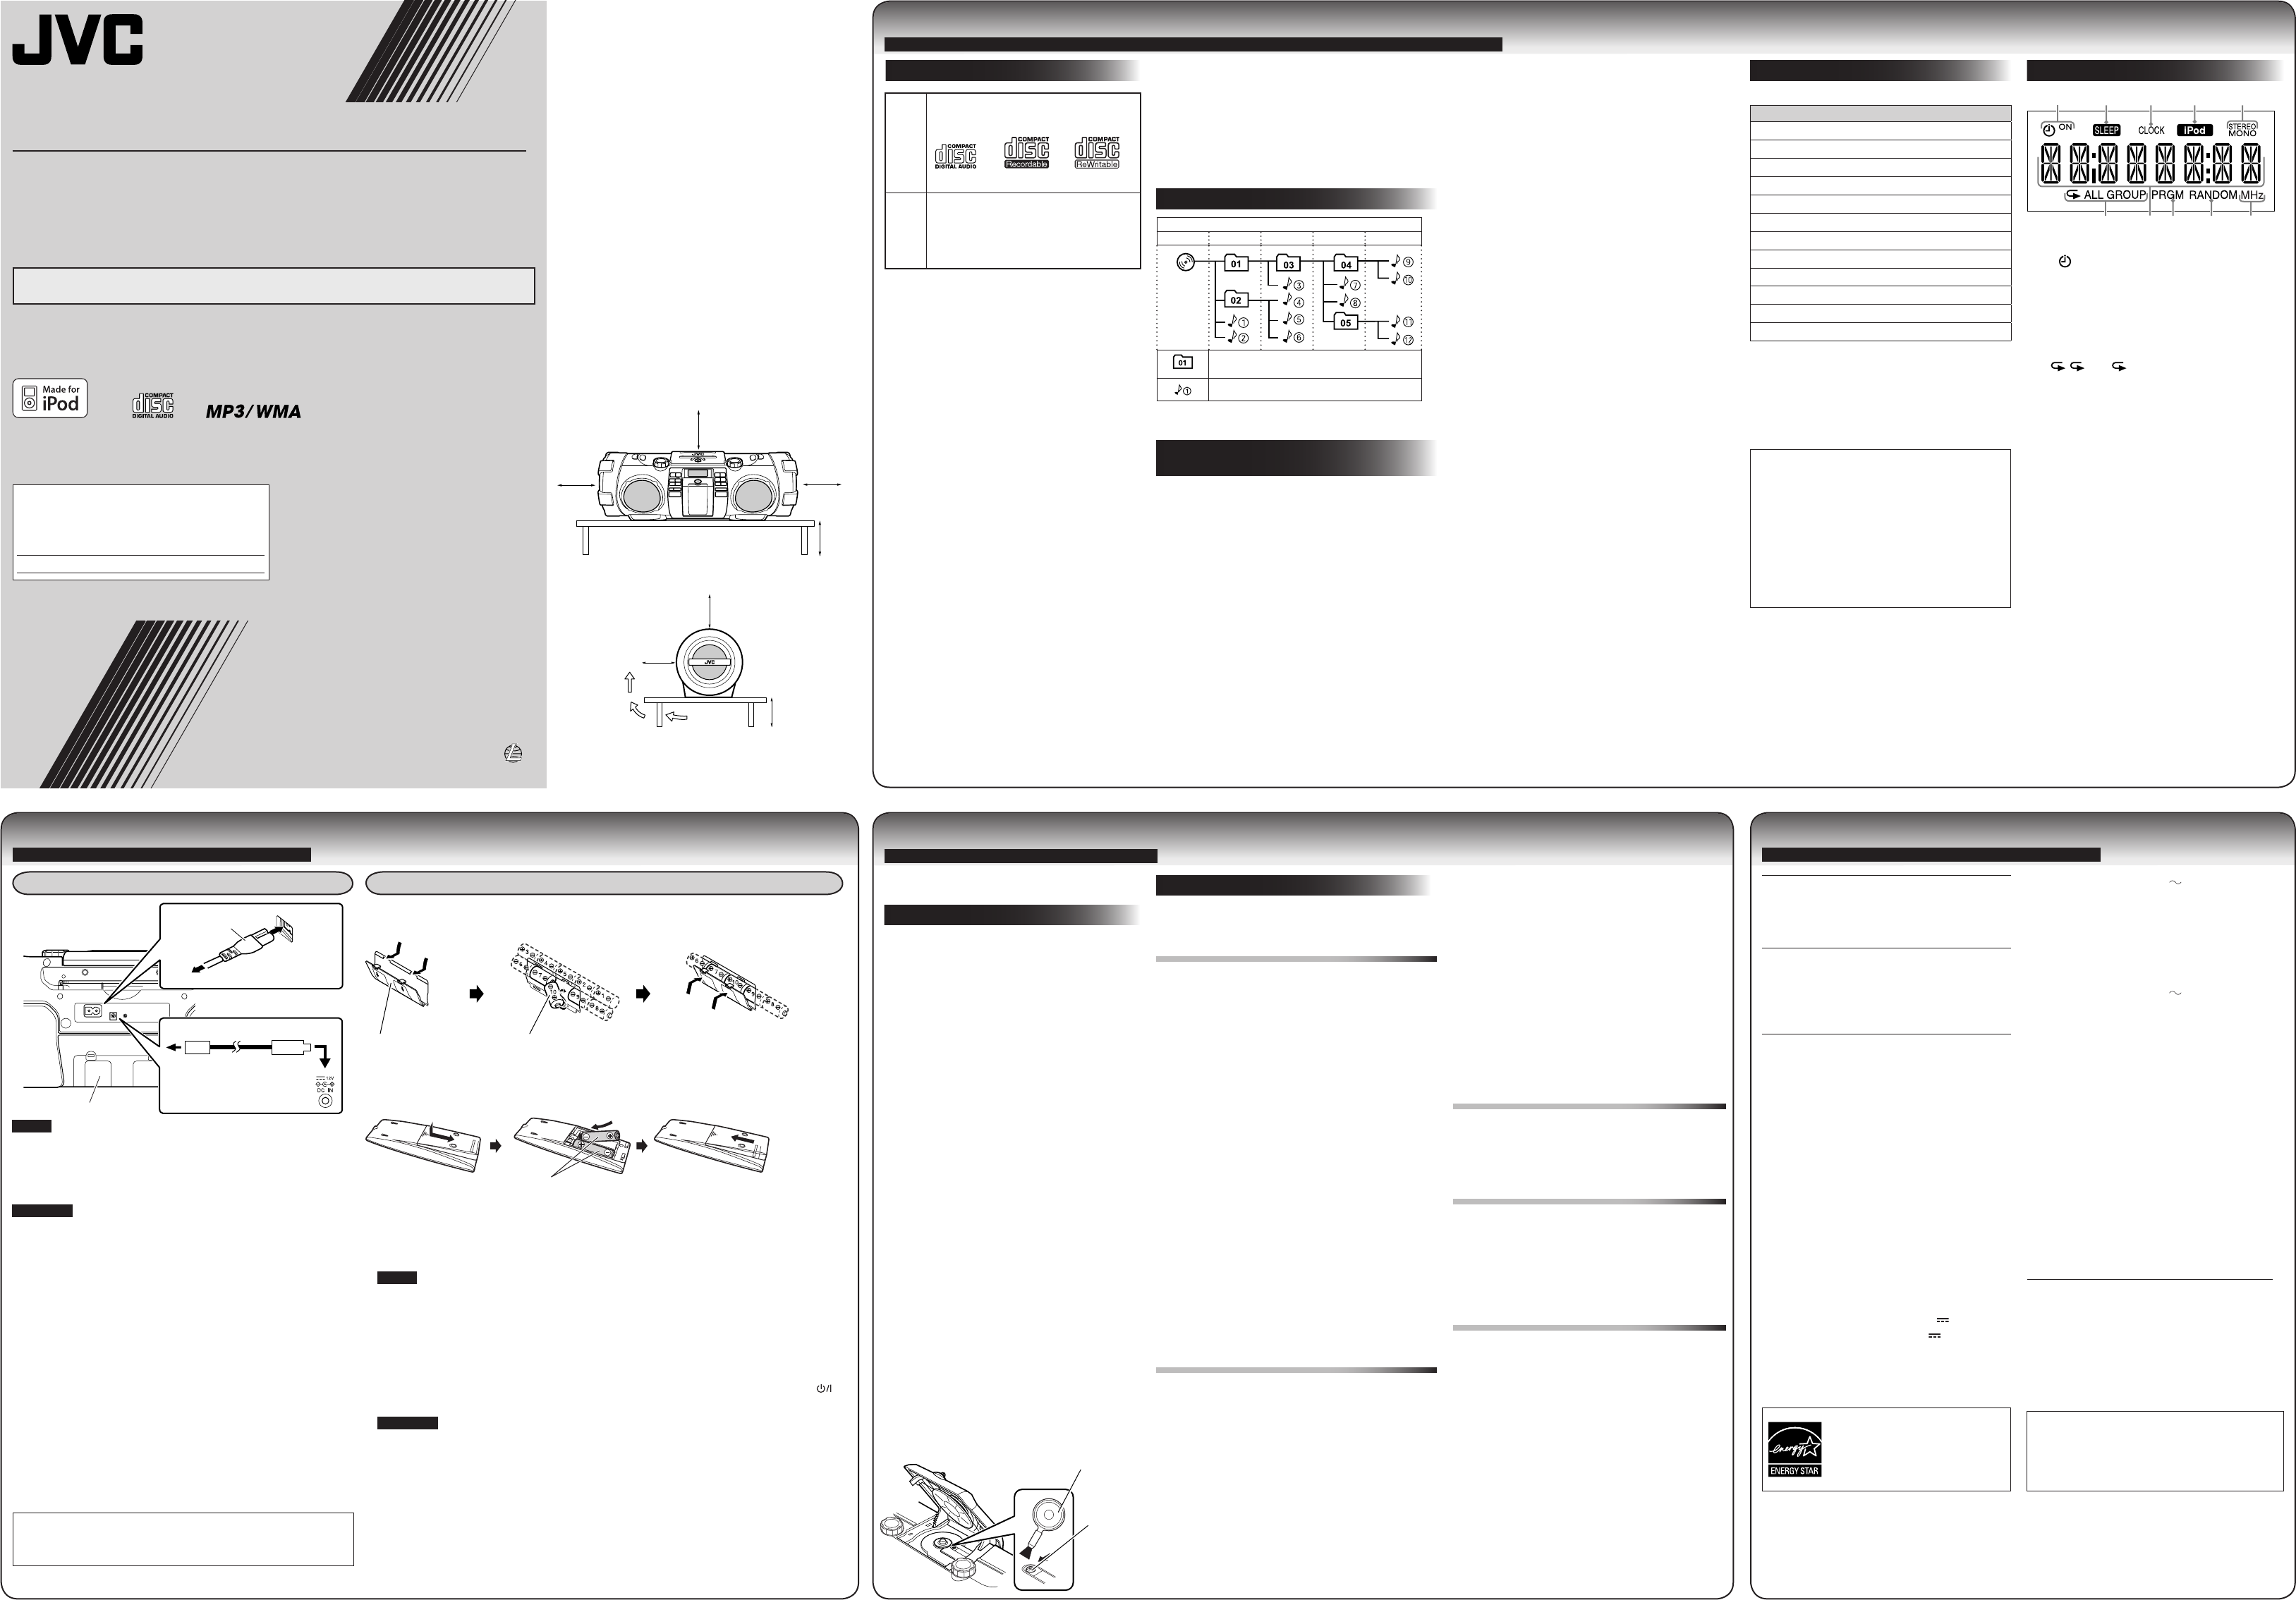
Display
1 Timer
•
(timer), ON
2 SLEEP
3 CL
4 iPod
5 FM mode indicators
STEREO
6 Repeat
, ALL, GROUP
7 Main
8 PRGM (program) indicator
9 RANDOM
0 Fr
iPod is a trademark of Apple Inc., r
the U.S. and other c
“Made for iP
accessory has been designed to connect
specifically to iP
the developer to meet Apple performance
standards.
Apple is not responsible for the oper
this device or its compliance with saf
regulatory standards.
Important for iPod de
Disc play
CD capacity 1CD
Signal-to-noise ratio: 85 dB
Dynamic range: 90 dB
Tu
FM tuning range: 87.5 MHz –
108.0 MHz
Antenna: FM telesc
antenna
Gener
Speakers:
• F
• Super
8 cm (3 3/16”)
cone x 2
Speaker impedance:
16 Ω
13 cm (5 1/8”)
cone x 2
Speaker impedance:
7 Ω
Output power: 40
Input terminal:
• USB:
• Dock for iP
• DC
Playable files:
MP3, WMA
• Compatible
Mass storage class
• Output
DC 5
500 mA
DC 5
500 mA
DC 12
Output terminal:
PHONES (φ 3.5) x 1
As an ENERGY S TA® P
JVC has determined that
this product or product
models meet the E
NERGY S TA®
guidelines for energy efficiency
SPECIFICA
Po AC 120 , 60 Hz
DC 15
(13D)-size batteries x 10)
External DC 12
(Car battery via the optional
car adapter)
Po
consumption: AC 120 V
, 60 Hz:
28
1 W
External DC 12
2 A (power on mode)
Dimensions: 666 mm (26 1/4”) x
231 mm (9 1/8”) x 240 mm
(9 1/2”) (
Mass:
Approx. 6.8 kg (15.0 lbs)
(without batteries stored in
the battery compar
Accessories
provided: Po
Remote control x 1
Shoulder belt x 1
Buckle x 2
Stopper x 2
Design and speci
without notice.
Microsoft and W
register
Microsoft Corporation in the United States
and/or other countries.
MP3/WMA groups and tracks ar
back as you e
\
and tracks were r
writing application.
The disc/USB devic
\
\
onto the USB device.
Sounds from USB device are in
\
In this case, disconnect and connect the USB
device again after turning off the unit.
iP
iPod does not pla
the display
\
iPod batt
Radio Operations
Hard to listen to broadcasts because of noise
\
positioned.
\
cause noise. If this happens, turn off and on the
unit again.
Timer Oper
Daily
\
comes.
is turned off
If you are having a pr
list for a possible solution befor
General
Po
\
connection or change the batteries.
Adjustments or settings ar
before y
\
Unable to operate the unit or the unit does not
work properly
\
to external electrical inter
Unplug the power cor
\
Unable to operate the unit fr
control.
\
remote sensor on the unit is blocked.
\
No sound is heard.
\
While the pow
sound from the speakers is distorted or too quiet.
\
Disc/USB Mass Storage Class Devic
Operations
The disc/USB devic
\
the label side up.
\
file unit).
want to play back.
\
T
your discs and mechanism clean.
Handling discs
• Remove the disc from its case b
at the edge while pressing the center hole
lightly
• Do not touch the shiny surface of the disc, or
bend the disc.
• Put the disc back in its case after use.
• Be careful not to scratch the surface of the
disc when placing it back in its case.
• Av
temperature extremes, and moistur
Cleaning discs
• Wipe the disc with a soft cloth in a straight
line from center t
Cleaning the unit
• Stains should be wiped off with a soft cloth. If
the unit is heavily stained, wipe it with a cloth
soaked in water-diluted neutral detergent
and wrung well, then wipe clean with a dry
cloth.
• Since the unit may deteriorate in quality
become damaged or get its paint peeled off
be careful about the follo
– DO NOT wipe it hard.
– DO NOT wipe it with thinner or benzine.
– DO NOT apply any v
as insecticides to it.
– DO NOT allow any rubber or plastic t
remain in contact for a long time
Cleaning the CD pickup lens
• Keep the CD pickup lens clean, or the sound
may be degraded. U
camera store
ABOUT DISC/FILE/iP
• The reflection factor of CD-R
other CDs, possibly causing CD-RW to take longer
time to read.
• In this manual,
used for MP3/WMA oper
POWERED WOOFER CD SYSTEM
RV
Front view/Face
Side view/Côté
15 cm
(5 15/16”)
10 cm
(3 15/16”)
Caution: Proper Ventilation
To avoid risk of electric shock and fire, and to prevent
damage, locate the apparatus as follows:
1 Front:
No obstructions and open spacing.
2 Sides/ Top/ Back:
No obstructions should be placed in the areas shown by
the dimensions below.
3 Bottom:
Place on the level surface. Maintain an adequate air path
for ventilation by placing on a stand with a height of
10 cm (3 15/16”) or more.
Attention: Aération correcte
Pour prévenir tout risque de décharge électrique ou
d’incendie et éviter toute détérioration, installez l’appareil
de la manière suivante:
1 Avant:
Bien dégagé de tout objet.
2 Côtés/dessus/dessous:
Assurez-vous que rien ne bloque les espaces indiqués sur
le schéma ci-dessous.
3 Dessous:
Posez l’appareil sur une surface plane et horizontale.
Veillez à ce que sa ventilation correcte puisse se faire en
le plaçant sur un support d’au moins dix centimètres de
hauteur.
Thank you for purchasing a JVC product.
Before operation, please read the instructions carefully.
15 cm
(5 15/16”)
15 cm
(5 15/16”)
15 cm
(5 15/16”)
15 cm
(5 15/16”)
10 cm
(3 15/16”)
INSTR
L
0110YOMMDWBET
EN
©2009
For customer use:
Enter below the Model No. and Serial No. which are
located either on the rear, bottom or side of the
cabinet. Retain this information for future reference.
Model No.
Serial No.
REFERENCES
Blower
Lens
Battery compar R20 (SUM-1)/D(13D)
(not supplied)
T
lighter socket
(DC12V
Po
(supplied)
AC outlet
R6(SUM-3)/AA(15F)
(not supplied)
0786
34
9
5
Car adapter (not supplied)
RV-NB50[J_C].indd 1RV-NB50[J_C].indd 1 10.1.27 9:06:38 PM10.1.27 9:06:38 PM