534277
2
Verklein
Vergroot
Pagina terug
1/7
Pagina verder
LCD sports watch
with altimeter and compass
Instruction manual
Display symbols
NHeading direction
WAlarm ON/OFF
ZAlarm and snooze function
BLow battery
CCompass mode
AAltimeter mode
TTime mode
PAfternoon
cTemperature in Celsius
fTemperature in Fahrenheit
MMaximum memory
mMinimum memory
Safety notes
This electronic appliance must be protected from water and other hazards. It is
not a toy and children should not use it unsupervised.
Startup and setting of watch
Remove the printed foil from the display. Press and hold both A and C together until all
segments on the display are activated simultaneously.
Selection of M/Ft (meters/feet) distance format
After all display segments have activated the "M" symbol on the display will begin to
blink.
Set the format (M=meters/Ft=feet) by pressing C; confirm your setting by pressing A.
Selection of temperature format °C/°F
After setting the distance format the "C" Symbol on the display will begin to blink.
Set the format (°C=Celsius / °F=Fahrenheit) by pressing C; confirm your setting by
pressing A.
Time setting
After setting the temperature format the symbol for 24h time display mode "24H" will
begin to blink on the display.
Set the format to 12H or 24H by pressing C.
Confirm your setting by pressing A.
Now the hours will begin to blink on the display.
Press C to set the time in hours; subsequently press A to confirm your setting.
After setting the time in hours the minutes will begin to blink.
Press C to set the time in minutes; subsequently press A to confirm your setting.
Repeat this process to set the weekday, the month and the day.
Back light
Press B to activate the back light.
Alarm with snooze function
To set the alarm time press and hold A in normal time mode until the hour display for the
alarm begins to blink on the display.
Press C to set the hours; press A to confirm your setting.
After setting the time in hours the minute display will begin to blink.
Press C to set the minutes; press A to confirm your setting.
Immediately after setting the alarm time the alarm may be activated or deactivated by
pressing C. The W and Z symbols indicate that the alarm is activated.
Confirm your setting by pressing A.
The alarm will sound 3 times in 5 minute intervals for 30 seconds. During the snooze
time the Z symbol will blink on the display. Press C to shut off the alarm.
To view the set alarm time press A in normal time mode to alternate between the alarm
time and the date.
Temperature memory recall and reset
Press C in normal time mode to access the stored maximum and minimum temperature
values.
The temperature memory may be reset by pressing A immediately upon access.
Entering the different modes
Repeatedly press D to access the different modes of operation. The 3 modes are
accessed in the following order: time mode (T), altimeter mode (A), compass
mode (C) and then back to time mode (T).
Digital altimeter (-500m to 9000m or -1600 feet to 29500 feet)
To minimize the effects of air pressure fluctuations the altimeter should always be
checked / adjusted when at a location with a known altitude (for example at sea level).
Setting
Press D to enter altimeter mode (A). The altitude above or below sea level is shown
on the display.
To adjust the altitude press C to enter Trip Timer mode t. Should the timer already be
running, press A to stop the timer.
Press and hold A until the N or D symbol begins to blink.
Press C to choose the upwards distance counter N or the downwards distance
counter D.
For an ascent choose the upwards distance counter; for a descent choose the
downwards distance counter.
Press A to confirm your setting; the first digit of the altitude display will begin to blink.
Press C to set the first digit und confirm your setting by pressing A.
Repeat the process until the desired altitude is set.
To reset the altitude to sea level, press and hold A until 0 appears on the display.
Ascent or descent (trip)
Before beginning your ascent or descent, enter Trip Timer mode t by pressing C.
Press A to start the timer. The timer can be stopped and restarted at any time by
pressing A.
The current rate of ascent or descent will appear in the upper part of the display.
Press C to enter the different functions t (Trip-Timer), d (total altitude gain or loss) and
a (average ascent or descent speed).
To reset (set to zero) the current trip information, first enter Trip Timer Mode t by
pressing C.
Press A to stop the timer and then press and hold A for 3 seconds to reset the data.
If the height above sea level does not change more than 2.5 meters within 5 minutes,
the altimeter will enter energy saving mode. In energy saving mode the height above
sea level will only be measured once per minute. If the height changes more than 5
meters within 1 Minute the watch will exit energy saving mode and the altitude will be
measured once every 2 seconds. Energy saving mode can also be exited by pressing
any button.
Digital Compass
Press D to switch to compass mode (C).
For precise measurements hold the compass level to the ground pointing in the direction
of N.
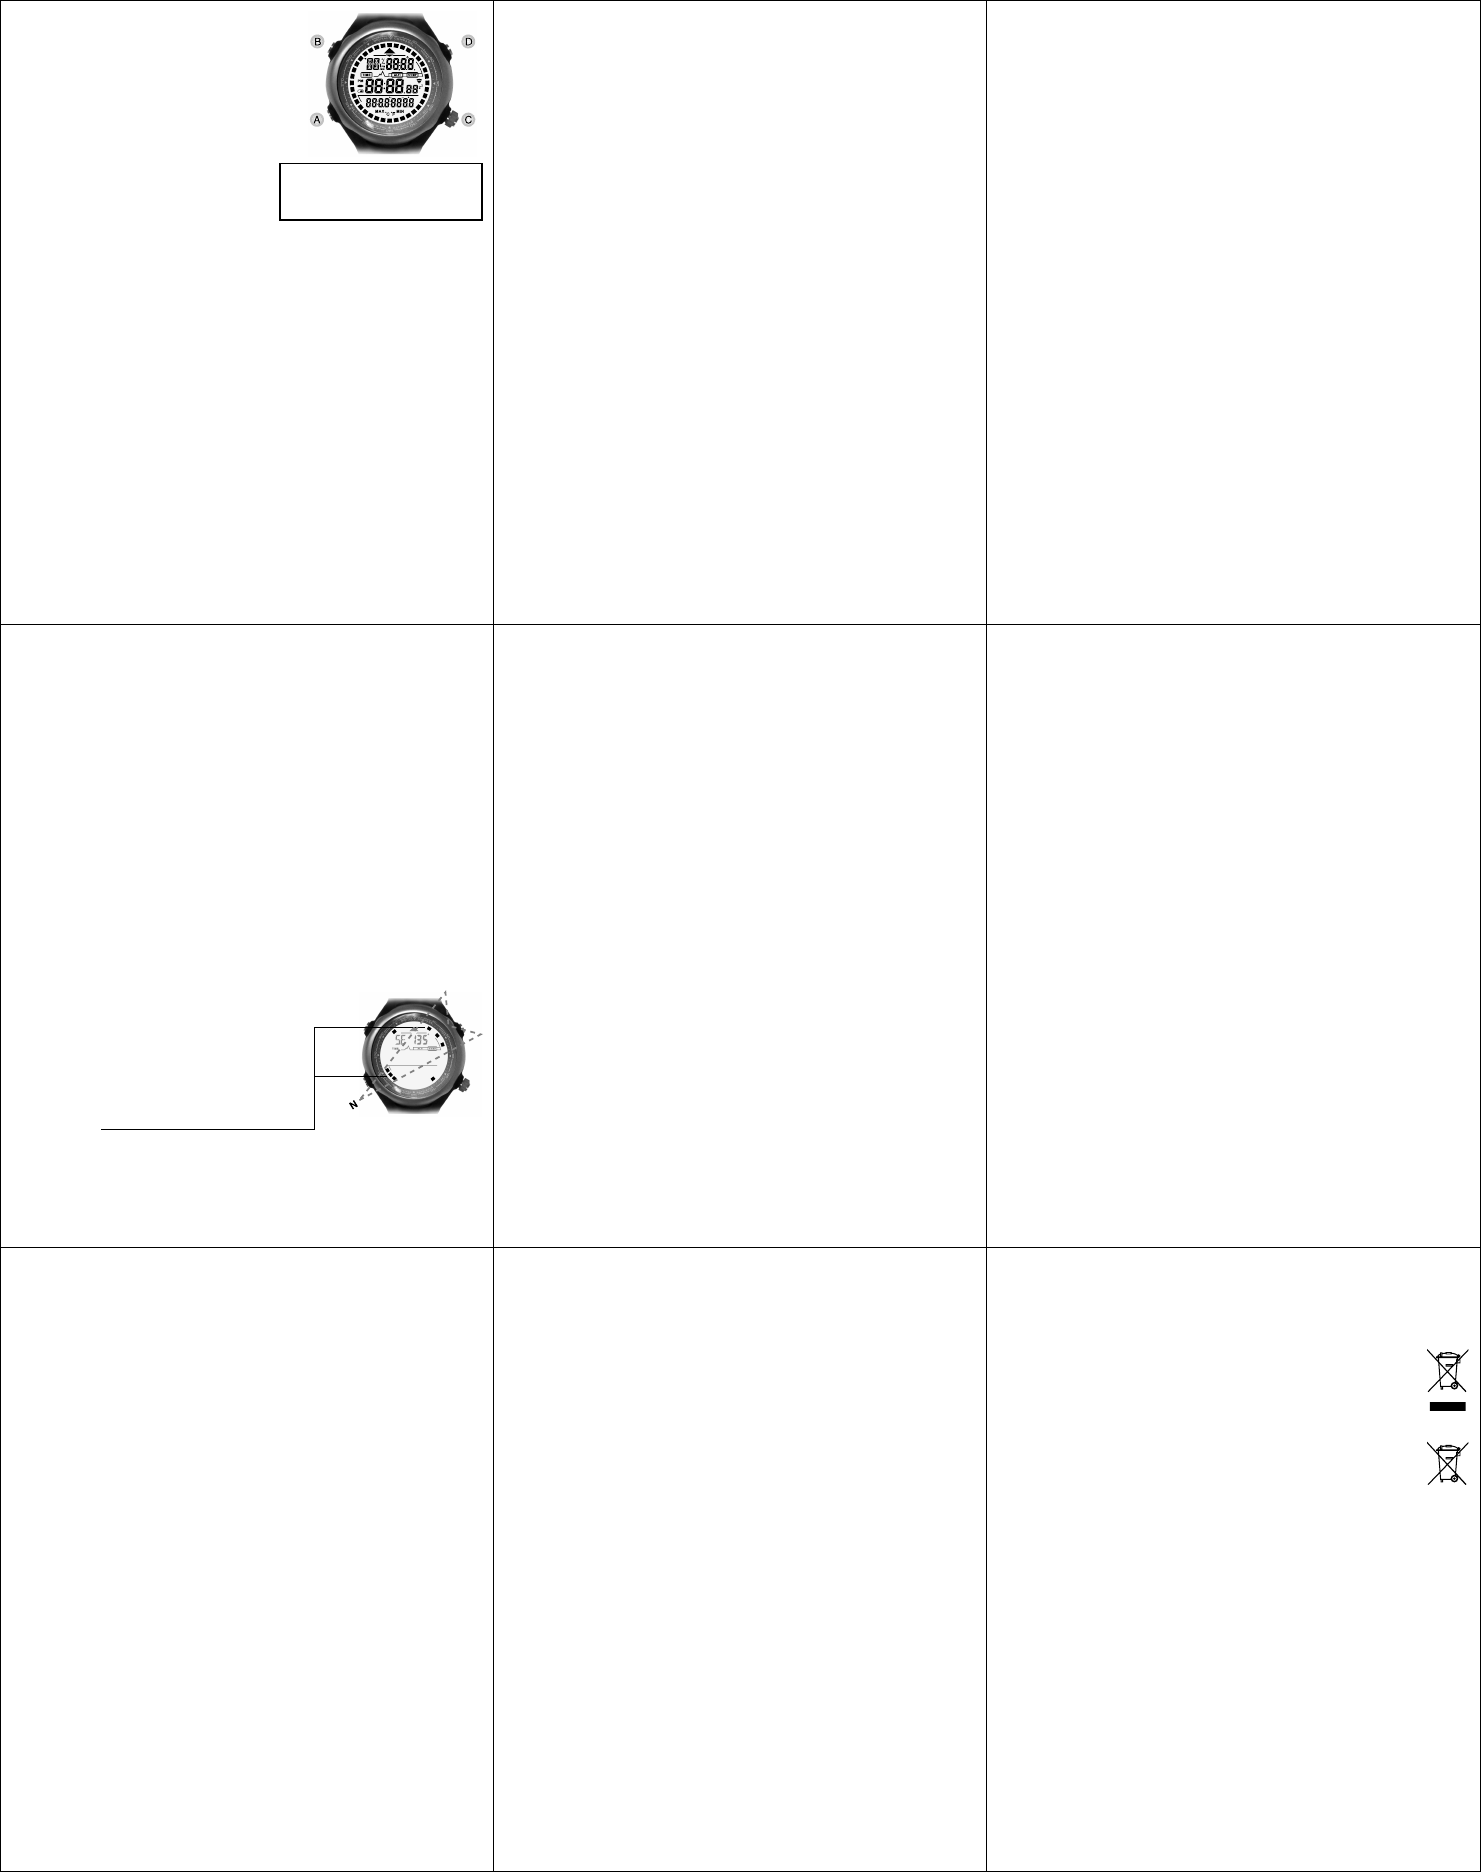
The compass shows direction in 3 ways:
1. Precise direction with N in degrees,
2. and cardinal readout e.g. South-East (SE) 135°
3. Precise direction of north (SSS),
south (S S S), east (S) and west (S) on the
outer ring.
To conserve battery power the compass will stop
directional measurements 1 minute after the display
appears. Press A to repeat the directional
measurement.
These dots represent the needle of a conventional
compass:
Example: finding north
The symbol (SSS) can be regarded as the tip of an imaginary needle pointing towards
north. The Symbol (S S S) represents the "tail" end of the needle pointing towards south.
Regardless of the orientation of the compass, north and south is always easily identified
with the symbols (SSS) and (S S S).
Calibrating the compass and environmental interference
All compasses, including digital units, use the earths magnetic field and are sensitive to
environmental interference. Distortions of the magnetic field may be caused by various
sources such as large metal objects, electrical appliances, computers, transformers and
high-voltage power lines.
To achieve precise measurements the compass should be calibrated if:
(1) the error message "Err" (for magnetic distortions) appears continuously,
(2) the numeric readout in degrees is in error by more than 10°
(3) the compass is used in a vehicle for the first time; in this case the magnetic distortions
caused by the metallic parts of the vehicle must be compensated.
Calibrating the Compass
Press D to enter the compass function (C). Press and hold A to enter calibration mode
CAL. To start the calibration press C. The outer ring will on the display will be shown and will
slowly turn.
Place the watch on a flat, level surface (keep away from metal objects, electrical appliances,
computers and high-voltage power lines). Turn the watch slowly in clockwise direction until
you have completed two complete 360° turns. The turns do not need to be perfect but both
turns must be completed in the same direction.
Each turn must not last longer than 60 seconds and not less than 20 seconds.
Complete the calibration procedure by pressing C.
Incorrect calibration can result in erroneous readings from the compass. Preform a new
calibration if the readings seem incorrect.
Entering the declination angle for true north
The magnetic declination at any point on the Earth is the angle between the local magnetic
field -- the direction the north end of a compass points -- and true north.
The local declination is given on the map margin as either east declination (plus) or west
declination (minus).
When navigating, the plus declination must subtracted from and the minus declination
added to the direction on the map.
To enter the declination press D to enter the compass function (C). Press and hold A to
enter calibration mode CAL. Press A again to reach the setting for declination "dEC".
Upon reaching the setting for declination the letter "E" (for east) will begin to flash on the
display. Press C to choose E or W (west) declination and press A to confirm your choice.
The declination value in degrees will blink on the display. Press C to enter the value and
press A to confirm your choice.
The declination value entered into the watch will influence the reading on the compass and
needs to be activated ("On") by pressing C. Press A to confirm.
The following example shows the effect of the declination setting:
The direction shown is N10° (10 degrees north).
- If an east adjustment (E) of 30 degrees is entered the current direction will change to NE
(north-east) 40 degrees.
- If a west adjustment (W) of 30 degrees is entered the current direction will change to NW
(north-west) 340 degrees.
Important Information
Compass
The compass should not be used in the immediate vicinity of magnetic objects- for example
other compasses.
The compass should be recalibrated If the error message "Err" appears continuously on the
display.
Hold the compass exactly horizontally to get a precise reading.
Temperature
The temperature shown is measured within the watch. Please note that your body
temperature will therefore influence the reading.
To correctly measure the temperature, take off the watch for 15 to 30 minutes.
Avoid placing the watch in direct sunlight.
Altimeter
All altimeters (except GPS units) show the altitude by measuring the atmospheric pressure.
Changes in local air pressure can therefore affect the altitude reading.
Please check and readjust the altimeter when you are at a location of known altitude or at
sea level.
Intended use
This electronic appliance is intended for time display and the described additional
features. Any other use or modification of the electronic appliance does not comply with
the intended uses. The manufacturer is not liable for damages caused by improper use
or misuse. The device is not intended for commercial use.
In case of errors
Incorrect compass reading
Incorrect calibration and changing external influences (for example a change of location)
may affect the reading.
Precisely follow the instructions on recalibrating the compass.
Error message "Err" is shown when using the compass
External magnetic influences (for example: metal objects, electrical appliances, computers
and high-voltage power lines).
Move to a different location or recalibrate the compass.
Display becomes weaker or shows incorrect readings
The batteries may have run down or the battery contact surface may have become
corroded.
Remove and reinsert the battery or insert a fresh battery.
Blackened display
External temperature too high; the watch may have been exposed to direct sunlight for an
extended duration.
Display shows irregular digits
Remove and reinsert the battery.
Changing the battery CR2032)
Battery replacements should be performed by an expert to avoid damaging the case and
the gaskets.
Disposal of the electronic appliance
This electronic appliance may not be disposed of with normal household waste.
Dispose of the unit at an approved disposal facility or at your local recycling
centre. Please observe the current rules and regulations when disposing of the
appliance. Contact the disposal system if in doubt.
Disposal of the batteries
Please dispose of your batteries properly in containers especially set up at
retailers. Batteries do not belong in household waste. Dispose of the batteries
at an approved disposal facility or at your local recycling centre. Contact the
disposal system if in doubt.
(
Cleaning instructions
Clean the product with a dry, lint-free cloth. A glasses cleaning cloth is ideal.
Warranty
This product has a 3 year warranty. The warranty period starts on the day of purchase
(sales receipt). Within this period we repair any defects due to material or production
fault free of charge. This does not include batteries. For any defects which are due to
improper use, for example in case of dropping, hitting, contact with water, the right to
claim under warranty ceases to apply.
digi-tech ®, Valterweg 27A, D-65817 Eppstein
-1-
G/I
-2-
-3-
-4-
-5- -6-
-7-
-8- -9-
G/IG/I
G/I
G/I
G/I
G/I
G/I
G/I
ATTENTION: Button C is a push
button only. Please do not pull
on or twist the button.
2

Hulp nodig? Stel uw vraag in het forum

Spelregels

Misbruik melden

Gebruikershandleiding.com neemt misbruik van zijn services uitermate serieus. U kunt hieronder aangeven waarom deze vraag ongepast is. Wij controleren de vraag en zonodig wordt deze verwijderd.

Product:

Bijvoorbeeld antisemitische inhoud, racistische inhoud, of materiaal dat gewelddadige fysieke handelingen tot gevolg kan hebben.

Bijvoorbeeld een creditcardnummer, een persoonlijk identificatienummer, of een geheim adres. E-mailadressen en volledige namen worden niet als privégegevens beschouwd.

Spelregels forum

Om tot zinvolle vragen te komen hanteren wij de volgende spelregels:

Belangrijk! Als er een antwoord wordt gegeven op uw vraag, dan is het voor de gever van het antwoord nuttig om te weten als u er wel (of niet) mee geholpen bent! Wij vragen u dus ook te reageren op een antwoord.

Belangrijk! Antwoorden worden ook per e-mail naar abonnees gestuurd. Laat uw emailadres achter op deze site, zodat u op de hoogte blijft. U krijgt dan ook andere vragen en antwoorden te zien.

Abonneren

Abonneer u voor het ontvangen van emails voor uw Inter-Quartz 1-LD3061 bij:


U ontvangt een email met instructies om u voor één of beide opties in te schrijven.


Ontvang uw handleiding per email

Vul uw emailadres in en ontvang de handleiding van Inter-Quartz 1-LD3061 in de taal/talen: Duits, Engels, Deens, Zweeds, Fins als bijlage per email.

De handleiding is 0,9 mb groot.


U ontvangt de handleiding per email binnen enkele minuten. Als u geen email heeft ontvangen, dan heeft u waarschijnlijk een verkeerd emailadres ingevuld of is uw mailbox te vol. Daarnaast kan het zijn dat uw internetprovider een maximum heeft aan de grootte per email. Omdat hier een handleiding wordt meegestuurd, kan het voorkomen dat de email groter is dan toegestaan bij uw provider.

Andere handleiding(en) van Inter-Quartz 1-LD3061

Inter-Quartz 1-LD3061 Gebruiksaanwijzing - Nederlands, Français - 5 pagina's


Uw handleiding is per email verstuurd. Controleer uw email

Als u niet binnen een kwartier uw email met handleiding ontvangen heeft, kan het zijn dat u een verkeerd emailadres heeft ingevuld of dat uw emailprovider een maximum grootte per email heeft ingesteld die kleiner is dan de grootte van de handleiding.

Er is een email naar u verstuurd om uw inschrijving definitief te maken.

Controleer uw email en volg de aanwijzingen op om uw inschrijving definitief te maken

U heeft geen emailadres opgegeven

Als u de handleiding per email wilt ontvangen, vul dan een geldig emailadres in.

Uw vraag is op deze pagina toegevoegd

Wilt u een email ontvangen bij een antwoord en/of nieuwe vragen? Vul dan hier uw emailadres in.


Info