G. Top drawer or door (frozen and deep-frozen food
storage zone)
H. Middle drawer (area for storing frozen and deep
frozen food)
I. Lower drawer (freezing area)
L. Ice cube trays (if provided)
Note: All of the drawers, door shelves and shelves
can be removed.
The ideal food storage temperatures are already
factory-set
Read the instructions carefully before using the
appliance.
Features, technical data and images may vary
according to the model.
400010790611
Freezing fresh food
Arrange the fresh food to be frozen in the freezing area in the
freezer compartment avoiding the food coming into direct contact
with food that is already frozen. To maximise the freezing speed, the
lower drawer can be removed and the food can be placed directly
on the bottom of the compartment.
The freezing will be complete after 24 hours.
Fan (if available)
You can turn the fan on/off by pressing the button on the base (as
shown in the figure). If the ambient temperature exceeds 27°C, or
if drops of water are present on the glass shelves, it is essential
that the fan is on to ensure the proper
preservation of the food. Deactivation of
the fan allows energy consumption to be
optimised.
Note: some noises, such as gurgles and hissing, caused by the refrigeration system, are normal.
What to do if...
Possible reasonsSolution
The appliance is not working.There may be a problem with the power supply to the appliance.
Check that:
• there is no power outage
• the plug is correctly inserted into the socket and the double-pole switch, if there is one, is in the
correct position
• the protective relays for the electrical system for the house are working
• the power cable is not broken
• the thermostat control knob is not in the “
•
” position.
The inside light does not work.It may be necessary to replace the light bulb.
Disconnect the appliance from the power supply, check the light bulb and replace it with a new one
if necessary (see section “Replacing the light bulb” in the instructions for use).
The internal temperature of the compartments is
not cold enough.
The reasons could vary (see “Solution”) column.
Check that:
• the doors are closed properly
• the appliance is not installed near a heat source
• the temperature is appropriately set
• the circulation of air through the ventilation grilles on the base of the appliance is not obstructed
(see installation manual).
There is water on the bottom of the refrigerator
compartment.
The defrost water drain is blocked.
Clean the defrosting water drain (see section “Maintaining and cleaning the appliance” in the
instructions for use).
Excessive amount of frost in the freezer
compartment.
The door to the freezer compartment is not closed properly.
- Check that there is nothing preventing the door from closing properly.
- Defrost the freezer compartment.
- Make sure the appliance has been correctly installed.
The front edge of the appliance that the door
gaskets seal against is hot.
This is not a problem. It prevents condensation from forming.A solution is not needed.
The temperature of the refrigerator compartment
is too cold.
- The set temperature is too cold.
- A large amount of fresh food may have been placed in the freezer compartment.
- Try to set a less cold temperature.
- If fresh food has been put in the freezer compartment, wait until the freezing has been completed.
- Turn off the fan (if present) following the procedure described in the paragraph “FAN” above.
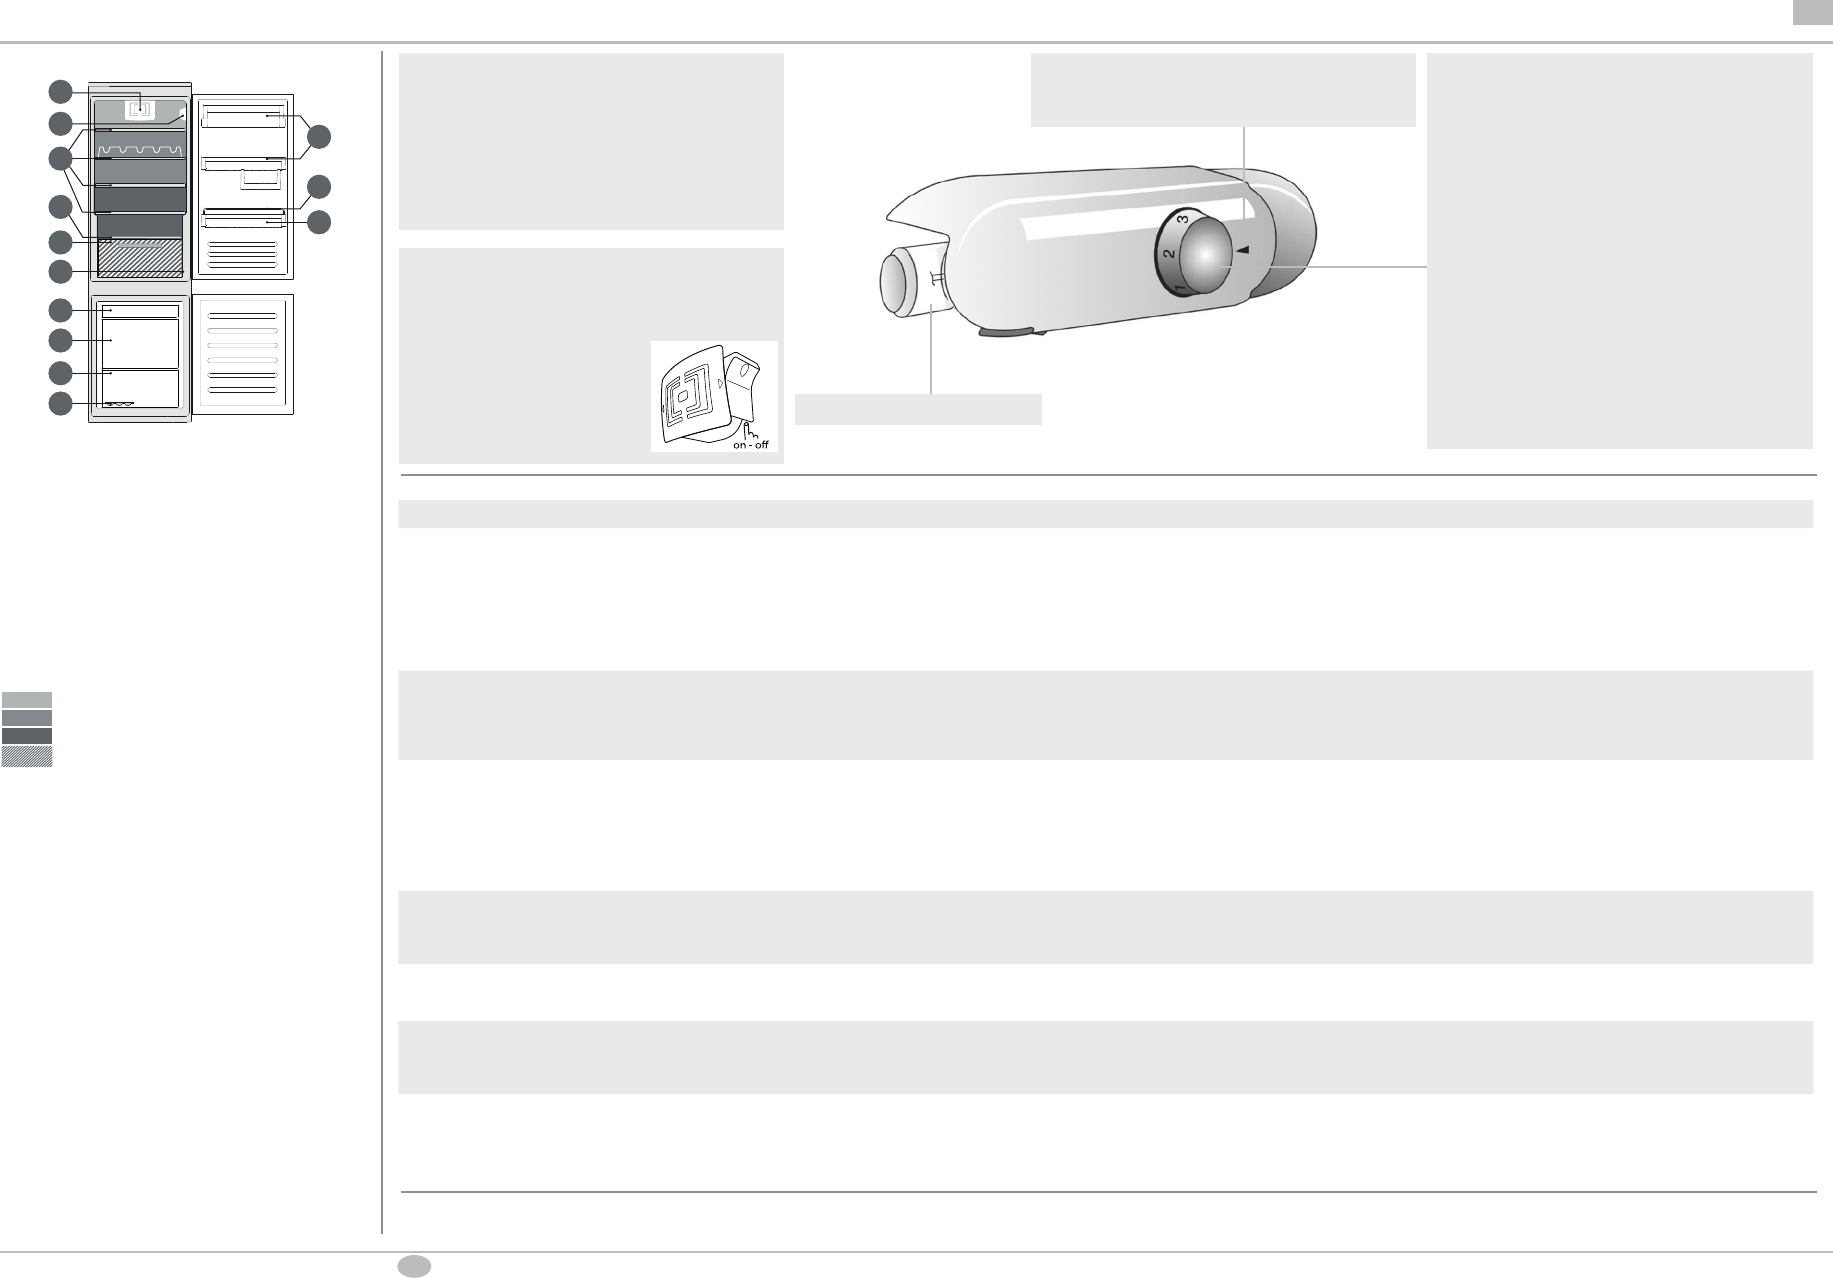
Freezer and refrigerator compartment temperature
This refrigerator/freezer is operated using the thermostat unit
situated inside the refrigerator compartment.
The temperature of both compartments is regulated by turning the
thermostat control knob.
Thermostat on 1/2 : temperature is less cold
Thermostat from 3/5 : medium temperature
Thermostat on 6/7 : temperature is colder
If you position the thermostat control knob to
•
the whole product
will turn off.
Light bulb/LED light bulb
Reference mark for the thermostat position
B
E
F
A
G
H
I
O
M
D
L
B
E
F
A
G
H
I
O
M
D
L
N
N
C
C
Image 1
Comparto Frigorifero
A. Ventola e ltro antibatterico e antiodore (a seconda del modello)
B. Gruppo termostato con luce
C. Ripiani
D. Piano di copertura cassetto frutta e verdura
E. Cassetto frutta e verdura
F. Targhetta matricola (posta a lato del cassetto frutta e verdura)
M. Balconcini
N. Fermabottiglie (se in dotazione)
O. Balconcino bottiglie
Zona meno fredda
Zona intermedia
Zona più fredda
Zona frutta e verdura
Comparto Congelatore
G. Cassetto superiore (zona di conservazione alimenti congelati e surgelati)
H. Cassetto centrale (zona di conservazione alimenti congelati e surgelati)
I. Cassetto inferiore (zona di congelamento)
L. Contenitore cubetti ghiaccio (se in dotazione)
Image 4
Comparto Frigorifero
A. Ventola e ltro antibatterico e antiodore (a seconda del modello)
B. Pannello comandi con luce LED
C. Ripiani
D. Piano di copertura cassetto frutta e verdura
E. Cassetto frutta e verdura
F. Targhetta matricola (posta a lato del cassetto frutta e verdura)
M. Balconcini
N. Fermabottiglie (se in dotazione)
O. Balconcino bottiglie
Zona meno fredda
Zona intermedia
Zona più fredda
Zona frutta e verdura
Comparto Congelatore
G. Cassetto superiore (zona di conservazione alimenti congelati e surgelati)
H. Cassetto centrale (zona di conservazione alimenti congelati e surgelati)
I. Cassetto inferiore (zona di congelamento)
L. Contenitore cubetti ghiaccio (se in dotazione)
B
E
F
A
G
H
I
O
M
D
L
B
E
F
A
G
H
I
O
M
D
L
N
N
C
C
Image 1
Comparto Frigorifero
A. Ventola e ltro antibatterico e antiodore (a seconda del modello)
B. Gruppo termostato con luce
C. Ripiani
D. Piano di copertura cassetto frutta e verdura
E. Cassetto frutta e verdura
F. Targhetta matricola (posta a lato del cassetto frutta e verdura)
M. Balconcini
N. Fermabottiglie (se in dotazione)
O. Balconcino bottiglie
Zona meno fredda
Zona intermedia
Zona più fredda
Zona frutta e verdura
Comparto Congelatore
G. Cassetto superiore (zona di conservazione alimenti congelati e surgelati)
H. Cassetto centrale (zona di conservazione alimenti congelati e surgelati)
I. Cassetto inferiore (zona di congelamento)
L. Contenitore cubetti ghiaccio (se in dotazione)
Image 4
Comparto Frigorifero
A. Ventola e ltro antibatterico e antiodore (a seconda del modello)
B. Pannello comandi con luce LED
C. Ripiani
D. Piano di copertura cassetto frutta e verdura
E. Cassetto frutta e verdura
F. Targhetta matricola (posta a lato del cassetto frutta e verdura)
M. Balconcini
N. Fermabottiglie (se in dotazione)
O. Balconcino bottiglie
Zona meno fredda
Zona intermedia
Zona più fredda
Zona frutta e verdura
Comparto Congelatore
G. Cassetto superiore (zona di conservazione alimenti congelati e surgelati)
H. Cassetto centrale (zona di conservazione alimenti congelati e surgelati)
I. Cassetto inferiore (zona di congelamento)
L. Contenitore cubetti ghiaccio (se in dotazione)
GB
Hulp nodig? Stel uw vraag in het forum
Misbruik melden
Gebruikershandleiding.com neemt misbruik van zijn services uitermate serieus. U kunt hieronder aangeven waarom deze vraag ongepast is. Wij controleren de vraag en zonodig wordt deze verwijderd.
Product:
Spelregels forum
Om tot zinvolle vragen te komen hanteren wij de volgende spelregels:
lees eerst de handleiding door;
controleer of uw vraag al eerder door iemand anders is gesteld;
probeer uw vraag zo duidelijk mogelijk te stellen;
heeft u een probleem en al geprobeerd om dit op te lossen, vermeld dit erbij aub;
heeft u een oplossing gekregen van een bezoeker dan horen wij dat graag in dit forum;
wilt u een reactie geven op een vraag of antwoord, gebruik dan niet dit formulier maar klik op de knop 'reageer op deze vraag';
uw vraag wordt direct op de website gezet; vermijd daarom persoonlijke gegevens in te vullen;
Belangrijk! Als er een antwoord wordt gegeven op uw vraag, dan is het voor de gever van het antwoord nuttig om te weten als u er wel (of niet) mee geholpen bent! Wij vragen u dus ook te reageren op een antwoord.
Belangrijk! Antwoorden worden ook per e-mail naar abonnees gestuurd. Laat uw emailadres achter op deze site, zodat u op de hoogte blijft. U krijgt dan ook andere vragen en antwoorden te zien.
Abonneren
Abonneer u voor het ontvangen van emails voor uw Ignis ARL 6501 A bij:
nieuwe vragen en antwoorden
nieuwe handleidingen
U ontvangt een email met instructies om u voor één of beide opties in te schrijven.
Ontvang uw handleiding per email
Vul uw emailadres in en ontvang de handleiding van Ignis ARL 6501 A in de taal/talen: Engels als bijlage per email.
De handleiding is 0,24 mb groot.
U ontvangt de handleiding per email binnen enkele minuten. Als u geen email heeft ontvangen, dan heeft u waarschijnlijk een verkeerd emailadres ingevuld of is uw mailbox te vol. Daarnaast kan het zijn dat uw internetprovider een maximum heeft aan de grootte per email. Omdat hier een handleiding wordt meegestuurd, kan het voorkomen dat de email groter is dan toegestaan bij uw provider.
Uw handleiding is per email verstuurd. Controleer uw email
Als u niet binnen een kwartier uw email met handleiding ontvangen heeft, kan het zijn dat u een verkeerd emailadres heeft ingevuld of dat uw emailprovider een maximum grootte per email heeft ingesteld die kleiner is dan de grootte van de handleiding.
Er is een email naar u verstuurd om uw inschrijving definitief te maken.
Controleer uw email en volg de aanwijzingen op om uw inschrijving definitief te maken
U heeft geen emailadres opgegeven
Als u de handleiding per email wilt ontvangen, vul dan een geldig emailadres in.
Uw vraag is op deze pagina toegevoegd
Wilt u een email ontvangen bij een antwoord en/of nieuwe vragen? Vul dan hier uw emailadres in.