1-1-32 Kamiminami, Hirano-ku, Osaka 547-0003, Japan
A-6495D-1EX
Printed in Japan
© 2006 Icom Inc.
■ Lock functions
The Lock function electronically locks keys and switches to pre-
vent accidental changes and function access from the micro-
phone.
• All keys, switches and controllers on the transceiver are functional.
DD
Activating the Lock function
➥ While pushing
[
[
H/L
H/L
]
], push
[
[
SQL
SQL
]
]
(
(
L)
L) to turn the Lock function ON or
OFF.
•“
T
” appears.
• Only
[
[
PWR
PWR
]
],
[
[
PTT
PTT
]
],
[
[
H/L
H/L
]
],
[
[
SQL
SQL
]
]
(
(
L)
L),
[
[
VOL
VOL
]
]+
[
[
YY
YY
]
]
/
[
[
ZZ
ZZ
]
] and
[
[
SQL
SQL
]
]+
[
[
YY
YY
]
]
/
[
[
ZZ
ZZ
]
] are functional.
DD
Activating the All key lock function
➥ While pushing
[H/L]
[H/L], turn the power ON
by pushing
[PWR]
[PWR] to turn the All key lock
function ON or OFF.
•“
T
” blinks.
• Only
[PWR]
[PWR] and
[PTT]
[PTT] are functional.
■ Display backlighting
The function display and keys can be backlit for better visibility
under low light conditions. The backlighting condition can also
be adjusted independently from the transceiver.
q Push
[VOL](
[VOL](
P
P
A/RX
A/RX
)
) for 1 sec. to
enter the backlight adjusting mode.
•“ ” with the number of the backlight level
appears in the channel comment indicator.
w Push
[
[
YY
YY
]
]
/
[
[
ZZ
ZZ
]
] to adjust the backlight
level.
• The backlight level is adjustable in 7 levels
and OFF.
■ Monitor function
The monitor function releases the noise squelch mute of the micro-
phone only. (An independent noise squelch system is employed.)
➥ Push
[
[
SQL
SQL
]
]
(
(
L)
L) for 1 sec. to acti-
vate the Monitor function.
•“ ” blinks and audio is emitted.
• Any key other than
[
[
PWR
PWR
]
] or
[
[
VOL
VOL
]
] can-
cels the Monitor function.
■ RF attenuator function
➥ Push
[
[
LO/DX
LO/DX
]
] to turn the RF attenuator
function ON and OFF.
• “LOCAL” appears.
■ Voice scrambler operation
(Available depends on transceiver)
DD
Activating the Scrambler
q Select an operating channel, except for
Channel 16, Channel 70 or weather chan-
nels.
w While pushing
[
[
H/L
H/L
]
], push
[
[
LO/DX
LO/DX
]
]
(
(
SCR)
SCR) to turn the Voice scrambler
function ON.
• “SCRM” appears.
e To turn the Scrambler function OFF, repeat step w.
• “SCRM” disappears.
DD
Programming scramble codes
There are 128 codes available with UT-98 or 32 codes (01 to
32) available with the UT-112 for programming. In order to un-
derstand one another, all transceivers in your group must have
the same scrambler code as well as the same scrambler unit.
The scrambler code is programmed in Set mode. See the trans-
ceiver’s instruction manual for details.
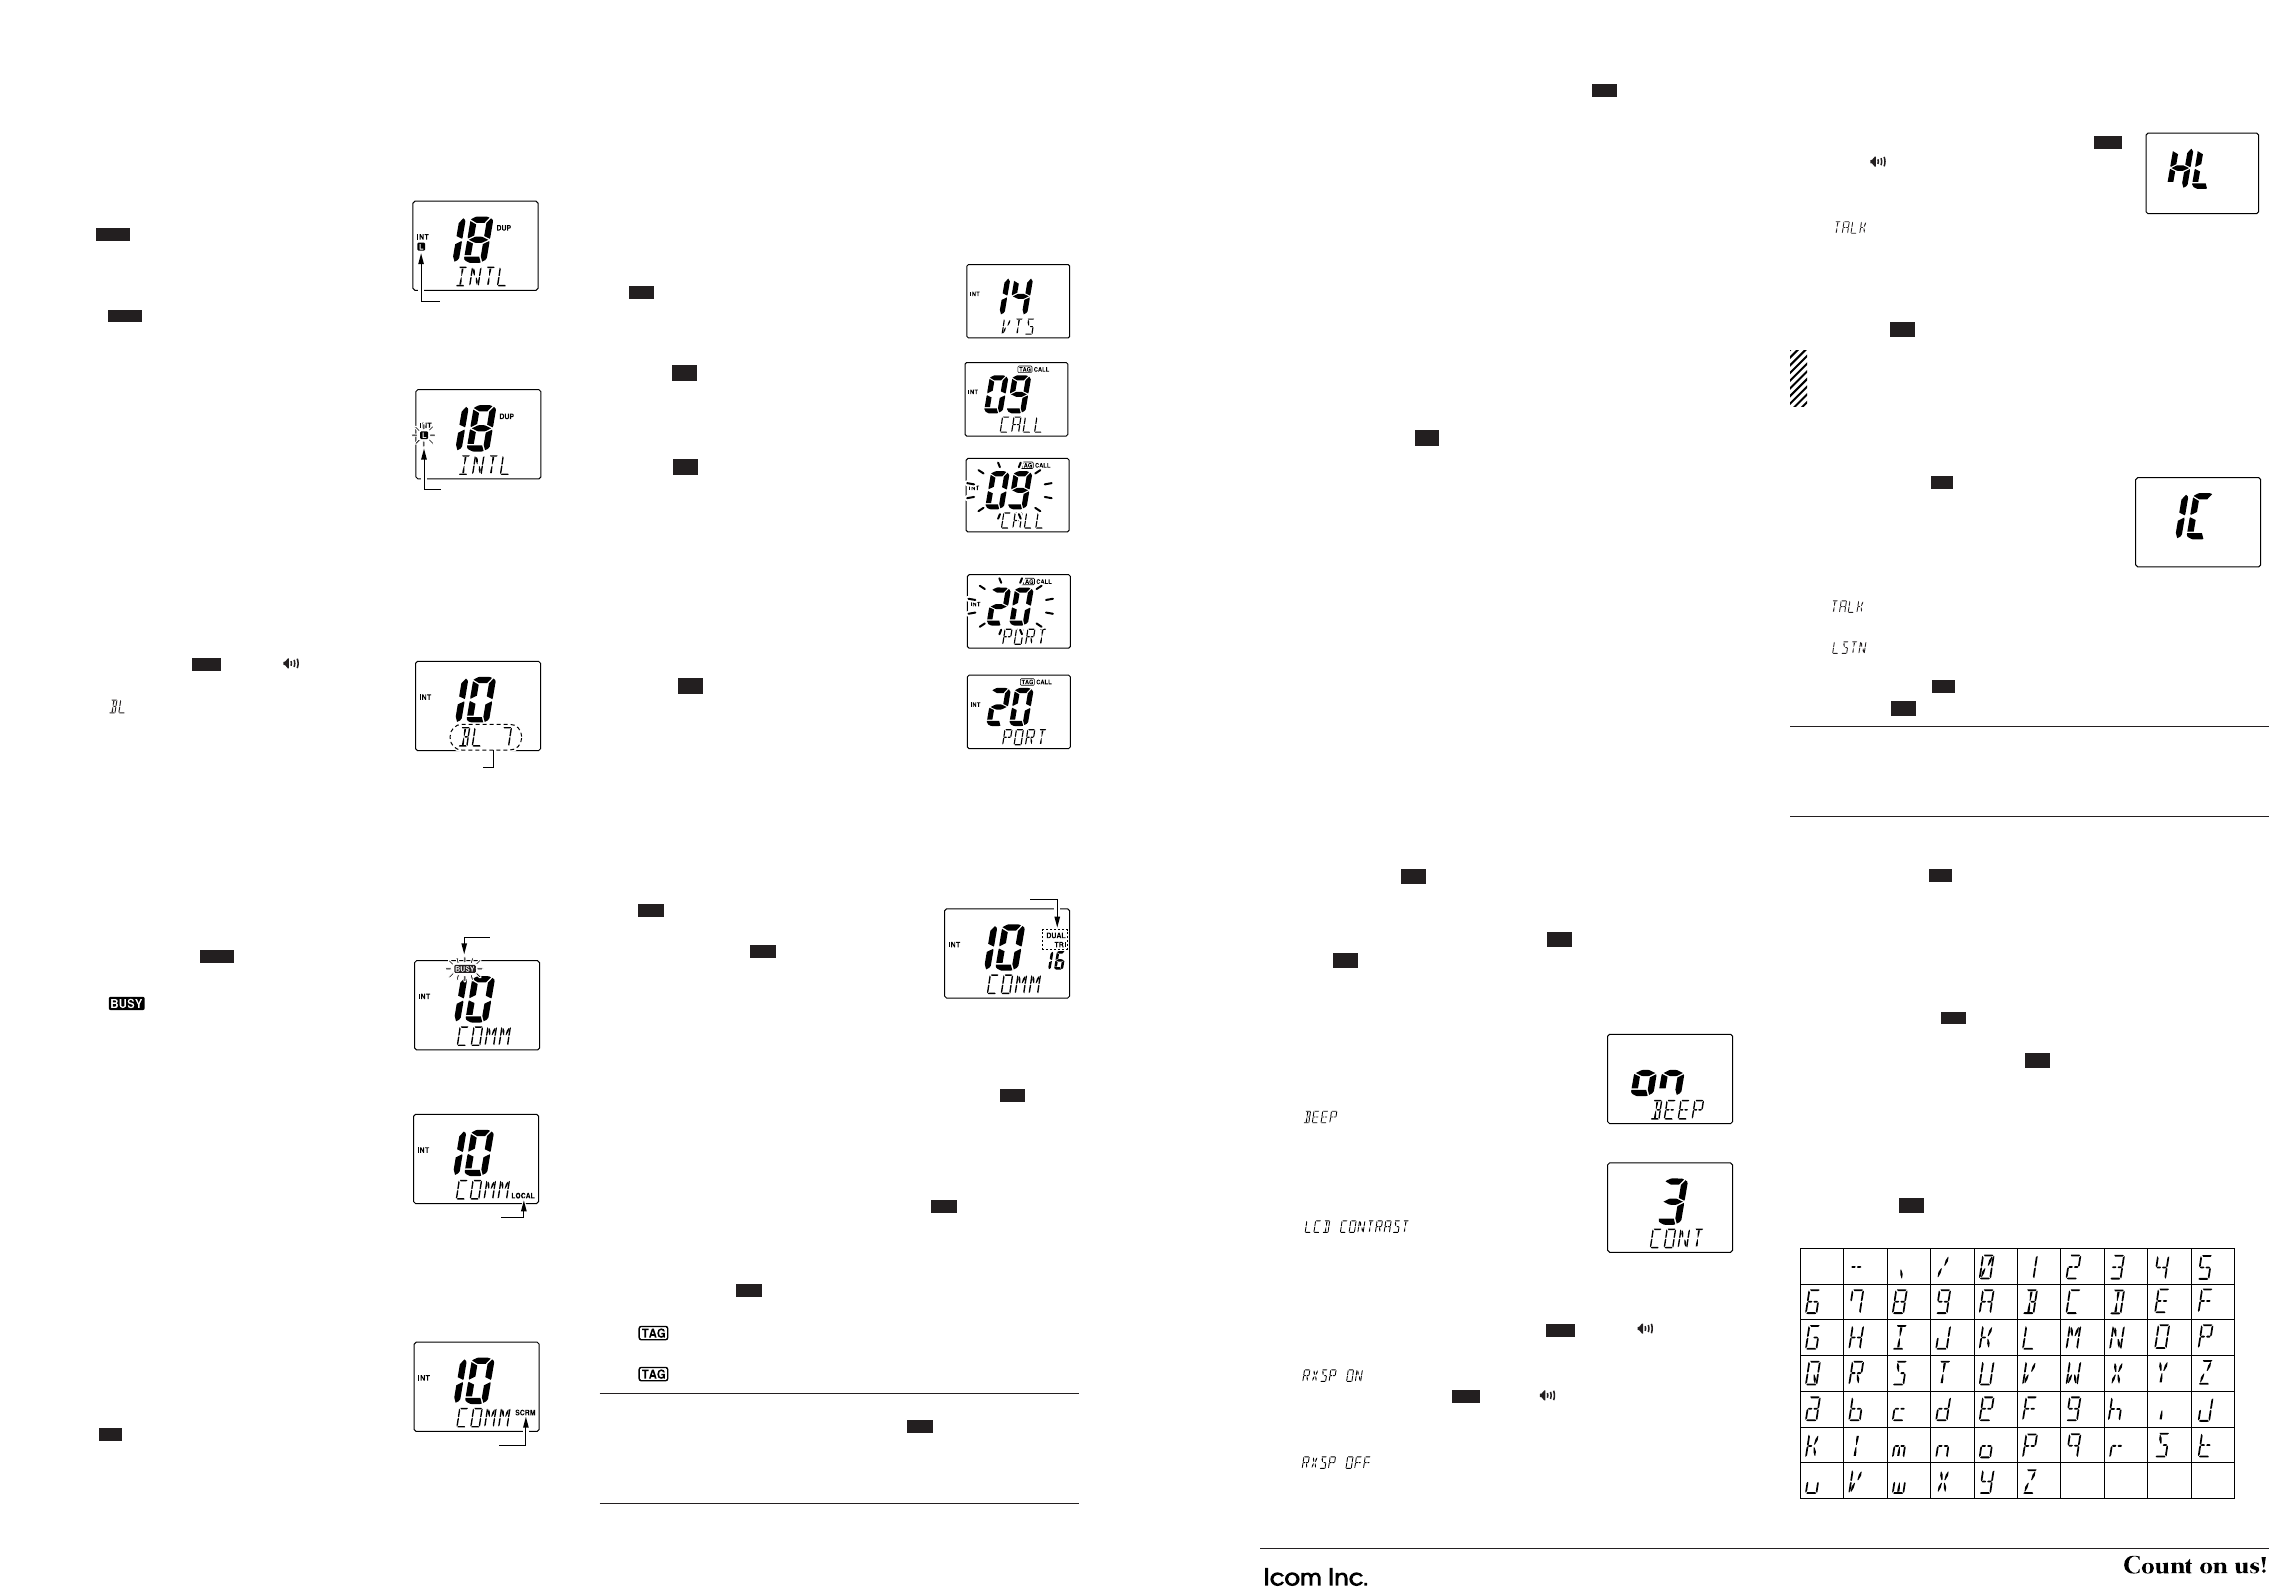
■ Call channel programming
q While pushing
[H/L]
[H/L], push
[
[
CH/WX
CH/WX
]
]
(
(
U/I/C)
U/I/C) several times to select the de-
sired channel group (USA, INT, CAN) to be
programmed.
w Push
[
[
](
](
9
9
)
) for 1 sec. to select call chan-
nel of the selected channel group.
• “CALL” and call channel number appear.
e Push
[
[
](
](
9
9
)
) again for 3 sec. (until a long
beep changes to 2 short beeps) to enter call
channel programming condition.
• The channel number and channel group to
be programmed blinks.
r Push
[
[
YY
YY
]
]
/
[
[
ZZ
ZZ
]
] to select the desired channel.
t Push
[
[
](
](
9
9
)
) to program the displayed
channel as the call channel.
• The channel number and channel group
stops blinking.
• Push
[CH/WX]
[CH/WX] to cancel.
■ Dualwatch/Tri-watch operation
q Select Dualwatch or Tri-watch in Set mode.
w Push
[
[
YY
YY
]
]/
[
[
ZZ
ZZ
]
] to select the desired channel.
• While pushing
[H/L]
[H/L], push
[CH/WX]
[CH/WX]
(
(
U/I/C)
U/I/C) several times to select the
channel group (USA, INT, CAN), if desired.
e Push
[CH/WX](
[CH/WX](
U/I/C)
U/I/C) for 1 sec. to
start Dualwatch or Tri-watch.
• “DUAL” or “TRI” appears during Dualwatch
or Tri-watch, respectively.
•Abeep tone sounds when a signal is received on Channel 16.
•Tri-watch becomes Dualwatch when receiving a signal on the
call channel.
r To cancel Dualwatch or Tri-watch, push
[CH/WX](
[CH/WX](
U/I/C)
U/I/C)
again.
■ Setting TAG channels
q While pushing
[
[
H/L
H/L
]
], push
[
[
CH/WX
CH/WX
](
](
U/I/C)
U/I/C) several
times to select the desired channel group (USA, INT, CAN).
w Push
[
[
YY
YY
]
]
/
[
[
ZZ
ZZ
]
] to select the desired channel to set as a TAG
channel.
e Push
[
[
SCAN
SCAN
](
](
)
) for 1 sec. to set the displayed channel as
a TAG channel.
•“ ” appears in the display.
r To cancel the TAG channel setting, repeat step e.
•“ ” disappears.
Convenient: Clearing (setting) all tagged channels
➥ While pushing
[
[
H/L
H/L
]
], push
[
[
SCAN
SCAN
](
](
)
) for 3 sec. (until a
long beep changes to 2 short beeps) to clear all TAG channels
setting in the channel group.
• Repeat above procedure to set all TAG channels.
TAG
TAG
DW
DW
DW
DW
■ Starting a scan
q While pushing
[
[
H/L
H/L
]
], push
[
[
CH/WX
CH/WX
](
](
U/I/C)
U/I/C) several
times to select the desired channel group (USA, INT, CAN).
w Set TAG channels as described at left below.
e Make sure the squelch is closed to start a scan.
r Push
[
[
SCAN
SCAN
]
] to start Priority or Normal scan.
• “SCAN” appears during Normal scan.
• The priority channel readout indicates “16”, and “P SCAN” indi-
cator appears during Priority scan.
• When a signal is detected, scan pauses until the signal disap-
pears or resumes after pausing 5 sec. according to the Set
mode setting (Channel 16 is still monitored during Priority scan).
•Abeep tone sounds when a signal is received on Channel 16
during Priority scan.
• Push
[
[
YY
YY
]
]
/
[
[
ZZ
ZZ
]
] to check the scanning TAG channels, to change
the scanning direction or resume the scan manually.
t To stop the scan, repeat step r.
• “SCAN” disappears.
• Pushing
[
[
PTT
PTT
]
],
[
[
](
](
9
9
)
) or
[
[
CH/WX
CH/WX
]
] also stops the scan.
■ Set mode programming
Set mode is used to change the condition of the transceiver’s
functions and the microphone’s own functions:
Transceiver’s functions—
Scan type, Scan resume timer, Weather alert, Dual/Tri-watch,
Beep tone*
1
, LCD contrast*
1
, Radio Power, Scrambler Type and
Scramble Code.
Microphone’s own functions—
Beep tone*
2
and LCD contrast*
2
*
1
For transceiver setting
*
2
For microphone setting
In this instructions are for the microphone’s own functions only.
Refer to the transceiver’s instruction for the setting of the other
functions. (Some functions cannot be selected from the HM-157.)
DD
Entering Set mode
q Turn power OFF.
w While pushing
[
[
](
](
9
9
)
), turn power ON.
• After a beep emission, a Set mode item appears at the
channel comment indicator.
e After the display appears, release
[
[
](
](
9
9
)
).
r Push
[
[
](
](
9
9
)
) to select the desired item, if necessary.
t Push
[
[
YY
YY
]
]
/
[
[
ZZ
ZZ
]
] to select the desired condition of the item.
y Turn power OFF, then ON to exit Set mode.
• Beep tone
➥ You can select the silent operation or you
can have confirmation beeps sound at
the push of a key.
• “ ” appears at the channel comment
indicator.
• LCD contrast
➥ The LCD contrast can be adjustable in 4
levels. 1 is the lowest, and 4 is the highest.
• “” scrolls at the channel
comment indicator.
■ RX Speaker function
q While pushing
[H/L]
[H/L], push
[VOL](
[VOL](
P
P
A/RX
A/RX
)
) for 1 sec.
to enter the RX Speaker mode.
•“ ” scrolls at the channel comment indicator.
• While pushing
[VOL](
[VOL](
P
P
A/RX
A/RX
)
), push
[
[
Y
Y
]
] or
[
[
Z
Z
]
] to ad-
just the audio output level.
w To cancel the RX Speaker mode, repeat step q.
•“ ” scrolls at the channel comment indicator.
■ Hailer (Public Address) function
Depends on the connected transceiver, this function is activate
as Hailer or Public Address function.
q While pushing
[H/L]
[H/L], push
[VOL](
[VOL](
P
P
A/RX
A/RX
)
) to enter the Hailer (Public Ad-
dress) mode.
w Push and hold
[PTT]
[PTT] to talk.
•“ ” appears at the channel comment
indicator.
e Release
[PTT]
[PTT] to listen.
•To adjust the audio output level, push
[
[
Y
Y
]
] or
[
[
Z
Z
]
].
r To cancel the Hailer (Public Address) mode, repeat step q.
• Pushing
[
[
]
] also cancels the Hailer (Public Address) function.
While in the Hailer (Public Address) mode, the transceiver
functions (transmit and receive) are interrupted. If the trans-
ceiver is in transmit condition, this function is not available.
■ Intercom operation
q Push
[
[
LO/DX
LO/DX
](
](
SCR)
SCR) for 1 sec. to ac-
tivate the Intercom function.
• “IC” appears in the priority channel read-
out.
• The channel comment disappears.
w Push
[
[
PTT
PTT
]
] to talk.
•“ ” appears in the channel comment indicator.
e Release
[
[
PTT
PTT
]
] to listen.
•“ ” appears in the channel comment indicator when the
transceiver is in talking mode.
r Push
[
[
LO/DX
LO/DX
](
](
SCR)
SCR) to cancel the Intercom function.
• Pushing
[
[
](
](
9
9
)
) also cancels the Intercom function.
For your reference:
In case the Intercom mode is selected with the transceiver while
the microphone power is OFF, the microphone power is auto-
matically turned ON and the Intercom mode is selected.
DD
Intercom beep function
➥ Push
[
[
LO/DX
LO/DX
](
](
SCR)
SCR) for more than 1 sec.
• Emits the Intercom beep while holding.
■ Channel comments
q Push
[
[
YY
YY
]
]
/
[
[
ZZ
ZZ
]
] to select a channel to program a channel com-
ment.
• Push
[
[
CH/WX
CH/WX
](
](
U/I/C)
U/I/C) several times while pushing
[
[
H/L
H/L
]
]
to select the channel group (USA, INT, CAN), if desired.
w While pushing
[
[
H/L
H/L
]
], push
[
[
](
](
9
9
)
).
• The 1st character of the currently programmed comment blinks.
e Push
[
[
YY
YY
]
]
/
[
[
ZZ
ZZ
]
] to select a character.
r Push
[
[
SQL
SQL
]
] to move to forward; then push
[
[
YY
YY
]
]
/
[
[
ZZ
ZZ
]
] to select
a character.
• Push
[
[
VOL
VOL
]
] to move to backward.
t Continue until the desired characters have been selected,
then push
[
[
](
](
9
9
)
) to return to normal operation.
•Available characters