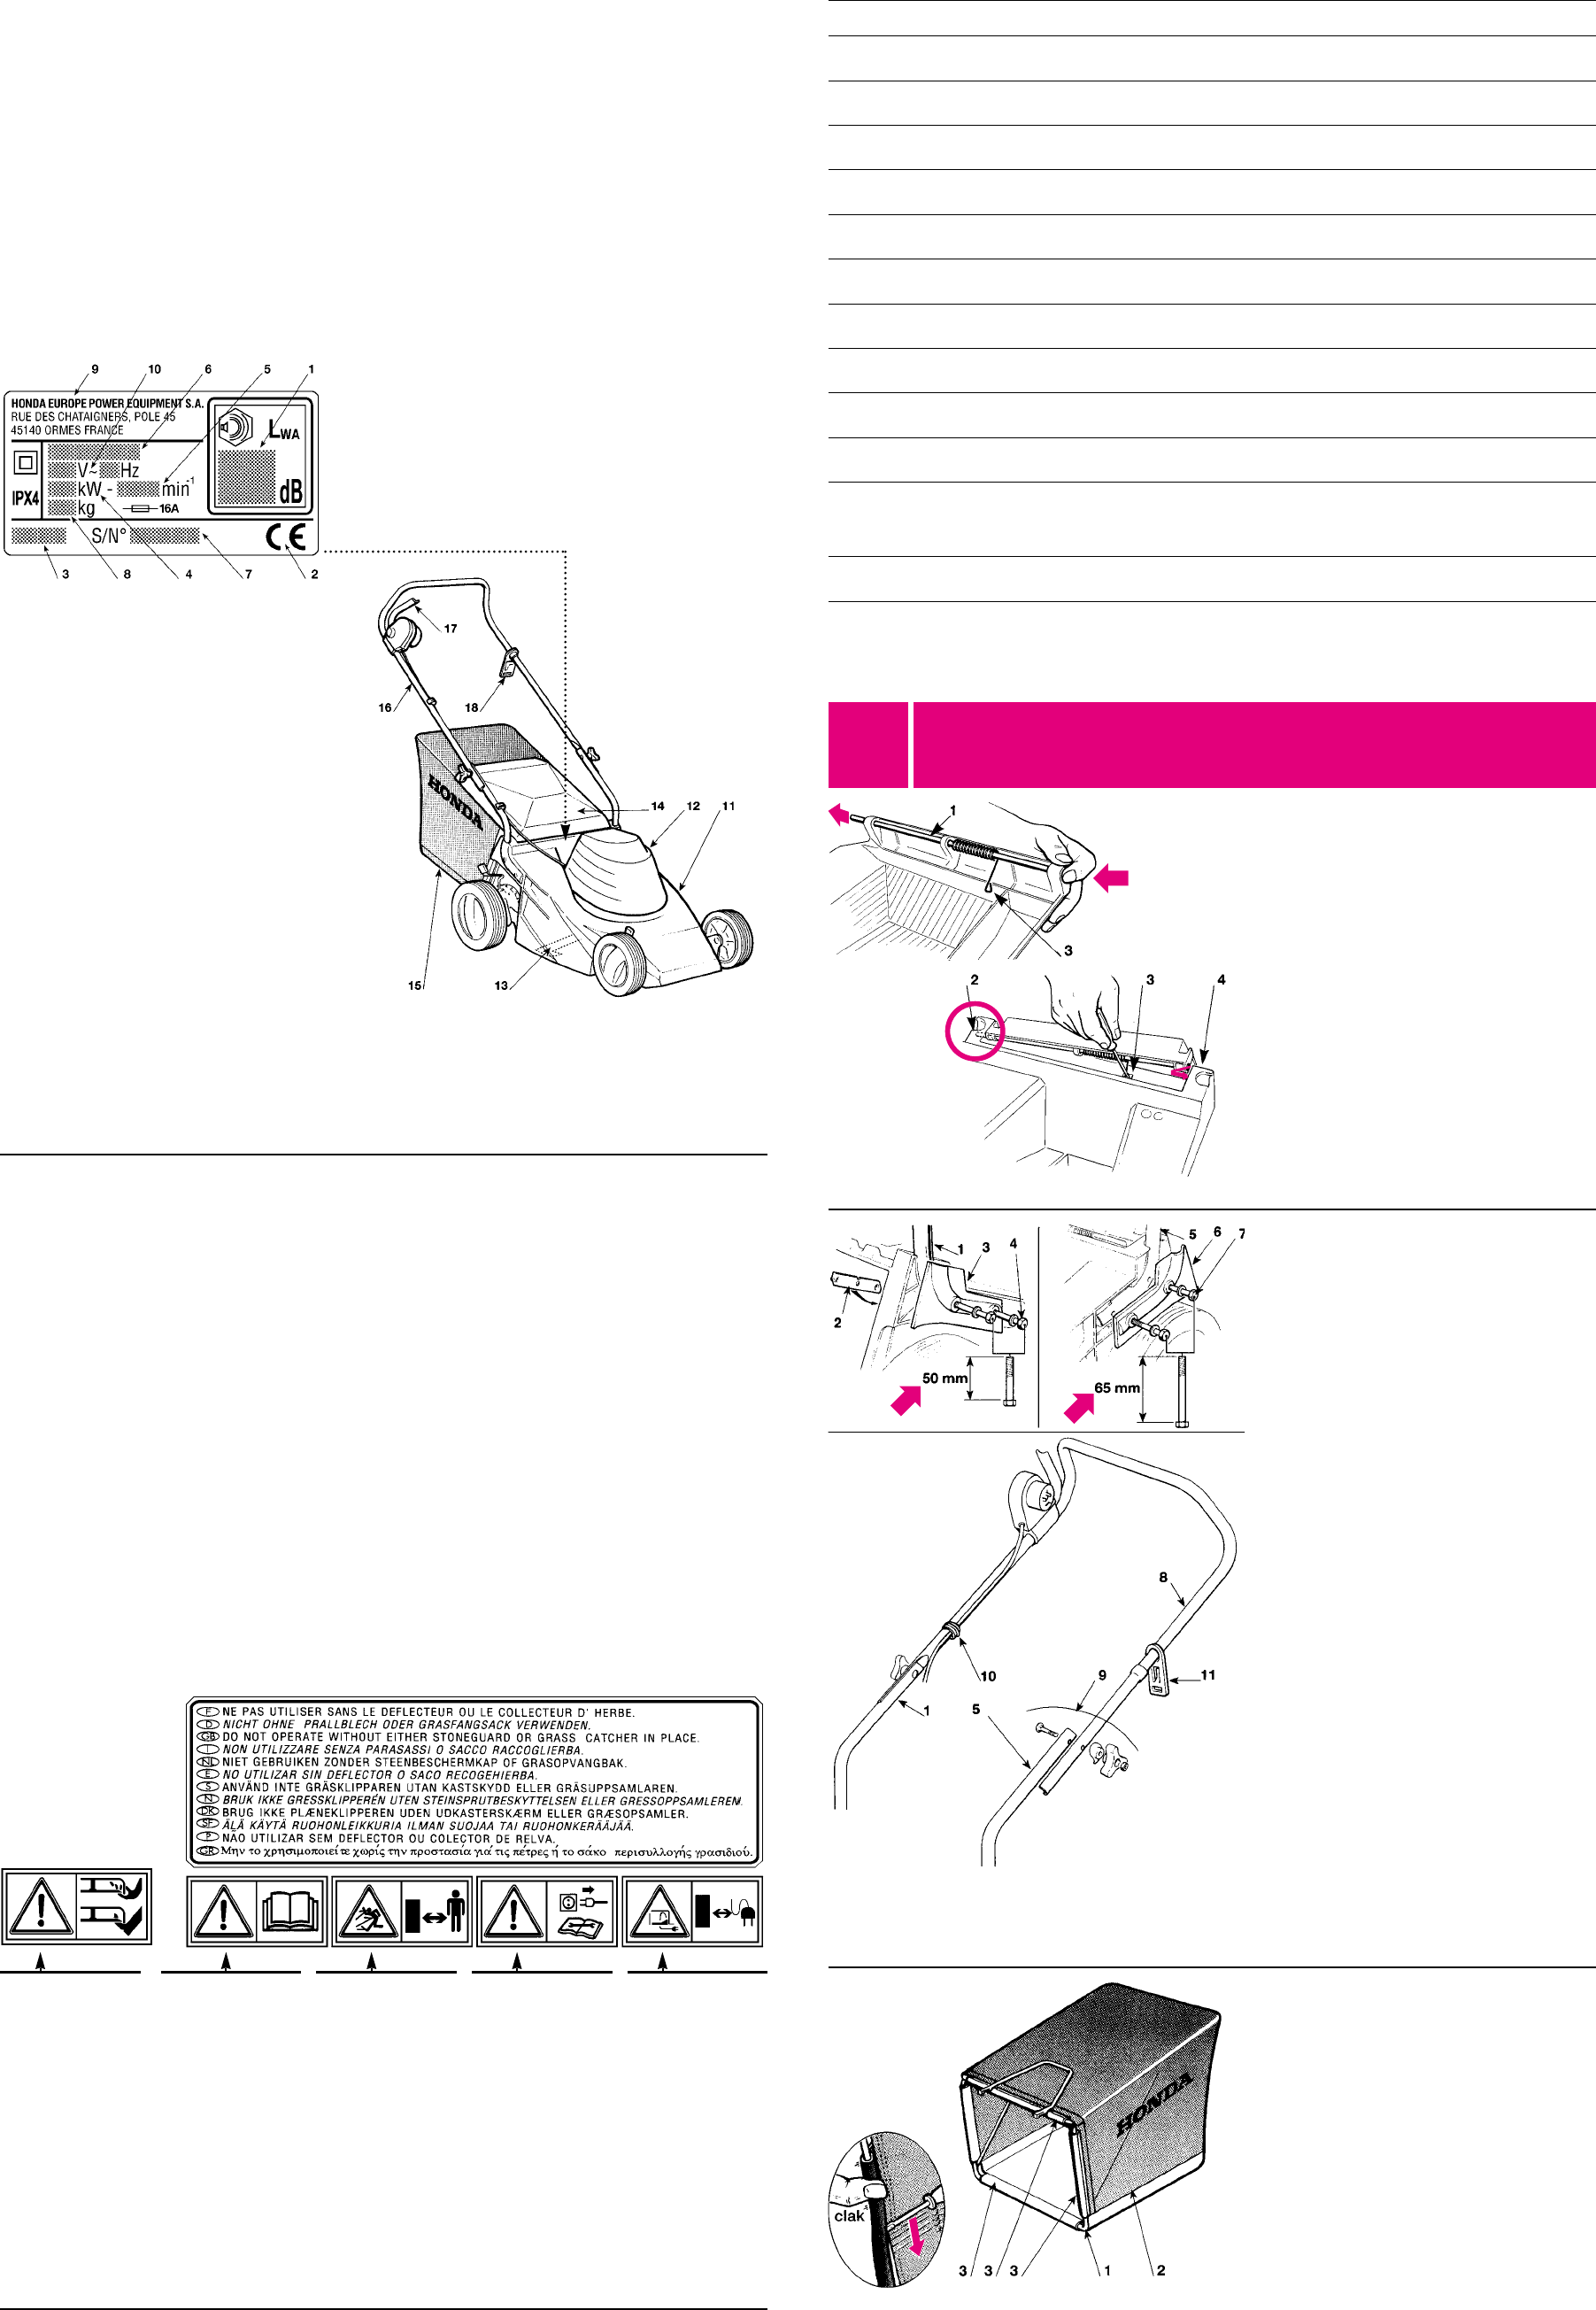
Push the pin (1) towards the right, as shown, and insert
that end into the right hand housing (2) of the chassis.
Using a screwdriver, hook the eyelet end (3) of the
spring and insert into the slot. Lastly, insert the pin’s left
end into its housing (4).
Empujar el perno (1) hacia la derecha como se indica.
Insertar este extremo en el alojamiento derecho (2) del
chasis, enganchar con un destornillador el terminal de
argolla (3) del muelle e introducirlo en la ranura; por últi-
mo, introducir el extremo izquierdo del perno en su
respectivo alojamiento (4).
Empurrar o perno (1) para direita conforme indicado,
enfiar esta extremidade na sede direita (2) do chassis,
por uma chave de parafusos engatar o terminal de ilhó
(3) da mola e indtroduzi-lo na fenda; afinal enfiar a extre-
midade esquerda do perno na respectiva sede (4).
™ÚÒÍÙ ÚÔ˜ Ù· ‰ÂÍÈ¿ ÙÔÓ Â›ÚÔ (1) fiˆ˜ Ê·›ÓÂÙ·È.
¶ÂÚ¿ÛÙ ·˘Ù‹Ó ÙËÓ ¿ÎÚË ÛÙË ‰ÂÍÈ¿ ¤‰Ú· (2) ÙÔ˘
Û·Û›, Á·ÓÙ˙ÒÛÙ Ì ¤Ó· ηÙÛ·‚›‰È ÙÔÓ ·ÎÚÔ‰¤ÎÙË
ÛÙÔ Ì¿ÙÈ (3) ÙÔ˘ ÂÏ·ÙËÚ›Ô˘ Î·È ÂÚ¿ÛÙ ÙÔ ÛÙË
Û¯ÈÛÌ‹. T¤ÏÔ˜ ÂÚ¿ÛÙ ÙËÓ ·ÚÈÛÙÂÚ‹ ¿ÎÚË ÙÔ˘
›ÚÔ˘ ÛÙËÓ ·ÓÙ›ÛÙÔÈ¯Ë ¤‰Ú· (4)
Insert the lower right hand part (1) of the handle into its
housing on the chassis. Hold the plate (2) in position
inside the chassis, mount the right hand cover (3) and
assemble together using the supplied screws (4).
Attach the lower left hand part (5) of the handle and the
left cover (6) using the screws (7), and finally, the upper
part of the handle (8) using the nuts and bolts (9).
Attach the cable clamps (10) as shown. The correct
position for the cable hook (11) is as shown.
Introducir la parte inferior derecha (1) del mango en la
sede respectiva del chasis, mantener en su posición la
placa (2) en el interior del chasis, montar la cobertura
derecha (3) y fijar el conjunto mediante los tornillos (4)
que encontrará en la confección.
Montar la parte inferior izquierda (5) del mango y la
cobertura de la izquierda (6) utilizando los tornillos (7) y,
por último, la parte superior del mango (8) mediante el
conjunto de pernos (9).
Aplicar el sujetacables (10) como se indica. La posición
correcta del enganche del cable (11) es la que se mue-
stra.
Introduzir a parte inferior direita (1) do braço no respec-
tivo alojamento do chassis, manter em posisção a pla-
quinha (2) no interior do chassis, montar a cobertura
direita (3) e fixar o conjunto através dos parafusos (4)
entregues.
Montar a parte inferior esquerda (5) do braço e a cober-
tura de esquerda (6) empregando os parafusos (7) e afi-
nal a parte superior do braço (8) por meio do conjunto
das cavilhas (9).
Aplicar os grampos dos cabos (10) conforme indicado.
A correcta posição do acoplamento do cabo (11) é a
indicada.
¶ÂÚ¿ÛÙ ÙÔ Î¿Ùˆ ‰ÂÍ› ̤ÚÔ˜ (1) ÙÔ˘ ÙÈÌÔÓÈÔ‡ ÛÙËÓ
·ÓÙ›ÛÙÔÈ¯Ë ı¤ÛË ÙÔ˘ Û·Û›, ÎÚ·Ù‹ÛÙ ÙÔ ¤Ï·ÛÌ· (2)
ÛÙÔ ÂÛˆÙÂÚÈÎfi ÙÔ˘ Û·Û›, ÙÔÔıÂÙ›ÛÙ ÙÔ ‰ÂÍ› η¿ÎÈ
(3) Î·È ÛÙÂÚÂÒÛÙ Ì ÙȘ ‚›‰Â˜ (4) Ô˘ Û·˜
·Ú¤¯ÔÓÙ·È.
TÔÔıÂÙ›ÛÙ ÙÔ Î¿Ùˆ ·ÚÈÛÙÂÚfi ̤ÚÔ˜ (5) ÙÔ˘
ÙÈÌÔÓÈÔ‡ Î·È ÙÔ ·ÚÈÛÙÂÚfi η¿ÎÈ (6) ¯ÚËÛÈÌÔÔÈÒÓÙ·˜
ÙȘ ‚›‰Â˜ (7) Î·È Ù¤ÏÔ˜ ÙÔ ¿Óˆ ̤ÚÔ˜ ÙÔ˘ ÙÈÌÔÓÈÔ‡ (8)
Ì ٷ ÌÔ˘ÏfiÓÈ· (9).
EÊ·ÚÌfiÛÙ ÙÔ˘˜ Á¿ÓÙ˙Ô˘˜ (10) fiˆ˜ Ê·›ÓÂÙ·È. H
ÛˆÛÙ‹ ı¤ÛË ÙÔ˘ Á¿ÓÙ˙Ô˘ ηψ‰›Ô˘ (11) Â›Ó·È ÂΛÓË
Ô˘ Ê·›ÓÂÙ·È.
Insert the frame (1) into the sack (2) and attach all the
plastic profiles (3) with the help of a screwdriver, as
shown in the drawing.
Introducir el armazón (1) en el saco (2) y enganchar
todas las fijaciones de plástico (3) con la ayuda de un
destornillador, como muestra la figura.
Introduzir a armação (1) no saco (2) e engatar todos os
perfis de plástico (3), ajudando-se com uma chave de
parafusos conforme indicado na ilustração.
B¿ÏÙ ÙÔ Ï·›ÛÈÔ (1) ÛÙÔ Û¿ÎÔ (2) Î·È Á·ÓÙ˙ÒÛÙ fiÏ·
Ù· Ï·ÛÙÈο ÚÔÊ›Ï (3), ¯ÚËÛÈÌÔÔÈÒÓÙ·˜ ¤Ó·
ηÙÛ·‚›‰È, fiˆ˜ ‰Â›¯ÓÂÈ Ë ÂÈÎfiÓ·.
EQUIPMENT IDENTIFICATION LABEL
ETIQUETA DE IDENTIFICACION DE LA MAQUINA
ETIQUETA DE IDENTIFICAÇÃO DA MÁQUINA
ETIKETA ¶PO™¢IOPI™MOY TOY MHXANHMATO™
1.
Acoustic power level according to EEC directive
2000/14/CE
Nivel de potencia acústica según la directiva
2000/14/CE
Nível de potência acústica conforme a directriz
2000/14/CE
™Ù¿ıÌË ·ÎÔ˘ÛÙÈ΋˜ ›ÂÛ˘ Û‡Ìʈӷ Ì ÙËÓ
Ô‰ËÁ›· 2000/14/CE
2.
Mark of conformity according to EEC directive
98/37
Marca de conformidad según la directiva
98/37/CEE
Marco de conformidade segundo a directriz
98/37/CEE
™‹Ì· Û˘ÌÌfiÚʈÛ˘ Û‡Ìʈӷ ÌÂ
ÙËÓ Ô‰ËÁ›· 98/37/EOK
3.
Year of manufacture
Año de fabricación
Ano de construção
EÙÔ˜ ηٷÛ΢‹˜
4.
Rating
Potencia nominal
Capacidade nominal
OÓÔÌ·ÛÙÈ΋ ÈÛ¯‡˜
5.
Operational motor speed in r.p.m.
Velocidad de funcionamiento del
motor en revoluciones/minuto
Velocidade de funcionamento do
motor em rotações/min
T·¯‡ÙËÙ· ÏÂÈÙÔ˘ÚÁ›·˜ ÙÔ˘ ÎÈÓËÙ‹Ú·
Û ÛÙÚÔʤ˜/ÏÂÙfi
6.
Lawnmower type
Tipo de cortacésped
Tipo de relvadeira
T‡Ô˜ ¯ÏÔÔÎÔÙÈÎÔ‡
11.
Chassis
Chasis
Chassis
™·Û›
12.
Motor
Motor
Motor
KÈÓËÙ‹Ú·˜
13.
Blade
Cuchilla (hoja)
Folha cortante (lâmina)
§Â›‰·
14.
Stone-deflector
Pantalla de protección
Pára-pedras
¶ÚÔÛÙ·Û›· ÁÈ· ¤ÙÚ˜
15.
Grass-catcher
Saco
Saco recolhedor
™¿ÎÔ˜ ÂÚÈÛ˘ÏÏÔÁ‹˜
16.
Handle
Mango
Braço
TÈÌfiÓÈ
17.
Motor switch
Mando interruptor
Comando interruptor
¢È·ÎfiÙ˘ ÏÂÈÙÔ˘ÚÁ›·˜
18.
Electric cable hook
Enganche cable eléctrico
Acoplamento cabo eléctrico
°¿ÓÙ˙Ô˜ ËÏÂÎÙÚÈÎÔ‡ ηψ‰›Ô˘
7.
Serial number
Número de matrícula
Número de matrícula
AÚÈıÌfi˜ ηٷÛ΢‹˜
8.
Weight in Kg. (if over 25
kg.)
Peso en kg (sólo si
superior a 25 kg)
Peso em kg (se superior a
25 Kg)
B¿ÚÔ˜ ÛÂ Kg (·Ó
˘ÂÚ‚·›ÓÂÈ Ù· 25 Kg)
9.
Name and address of
Manufacturer
Nombre y dirección del
Constructor
Nome e direcção do
Construtor
OÓÔÌ· Î·È ‰È‡ı˘ÓÛË ÙÔ˘
K·Ù·Û΢·ÛÙ‹
10.
Supply voltage and
frequency
Tensión y frequencia de
alimentación
Tensão e frequência de ali-
mentação
∆·ÛË Î·È Û˘¯ÓÔÙËÙ·
ÙÚÔıÔ‰ÔÛÈ·Û
POSITIONING OF SAFETY LABELS
Your lawnmower should be used with due care and attention. Therefore, figured labels have been placed on various parts of
the machine to remind you of the main precautions to be taken. Their full meaning is explained later on. These labels are an
integral part of the lawnmower and so, if any of them should become detached or illegible, contact your Supplier for their repla-
cement. You are also asked to carefully read the safety regulations in the applicable chapter of this handbook.
UBICACION DE LAS ETIQUETAS DE SEGURIDAD
Su cortacésped debe ser utilizado con prudencia. Con este fin se han colocado en la máquina una serie de etiquetas semejan-
tes a pictogramas destinadas a recordarle las principales precauciones de uso. Su significado se explica a continuación. Estas
etiquetas se consideran parte integrante del cortacésped. Si una de ellas se desprendiera o se volviera ilegible, contacte a su
Concesionario para su sustitución. Le recomendamos además que lea atentamente las normas de seguridad que hallará en el
capítulo correspondiente del presente libro.
COLOCAÇÃO DAS ETIQUETAS DE SEGURANÇA
E' preciso utilizar com cuidado a sua relvadeira. Para este fim, foram colocadas na máquina algumas etiquetas representantes
pictogramas destinados para lhe lembrar as principais precauções para o uso. O seu significado é explicado aqui em segui-
da. Estas etiquetas são consideradas parte integrante da relvadeira. Se uma delas se despegar ou se tornar ilegível, contacte
o seu Concessionário para a substituir. Recomendamos-lhe, aliás, ler atenciosamente as normas de segurança trazidas no pró-
prio capítulo deste livrete.
ETIKETE™ A™ºA§EIA™
TÔ ¯ÏÔÔÎÔÙÈÎfi Ú¤ÂÈ Ó· ¯ÚËÛÈÌÔÔÈÂ›Ù·È Ì ÚÔÛÔ¯‹. °È' ·˘Ùfi ÙÔ ÛÎÔfi, ¿Óˆ ÛÙÔ Ì˯¿ÓËÌ· ˘¿Ú¯Ô˘Ó ·˘ÙÔÎfiÏÏËÙ˜
ÂÙÈΤÙ˜ Ô˘ Û·˜ ˘ÂÓı˘Ì›˙Ô˘Ó Ù· ΢ÚÈfiÙÂÚ· ÚÔÊ˘Ï·ÎÙÈο ̤ÙÚ· ηٿ ÙË ¯Ú‹ÛË. H ÛËÌ·Û›· ÙÔ˘˜ ÂÍËÁÂ›Ù·È ·Ú·Î¿Ùˆ.
A˘Ù¤˜ ÔÈ ÂÙÈΤÙ˜ ıˆÚÔ‡ÓÙ·È ·Ó·fiÛ·ÛÙÔ Ì¤ÚÔ˜ ÙÔ˘ ¯ÏÔÔÎÔÙÈÎÔ‡. ™Â ÂÚ›ÙˆÛË Ô˘ ÌÈ· ·fi ·˘Ù¤˜ ÍÂÎÔÏÏ‹ÛÂÈ ‹
Á›ÓÂÈ ‰˘Û·Ó¿ÁÓˆÛÙË, ·Â˘ı˘Óı›Ù ÛÙÔ Î·Ù¿ÛÙËÌ· ÒÏËÛ˘ ÁÈ· ÙËÓ ·ÓÙÈηٿÛÙ·Û‹ Ù˘. ™˘ÓÈÛÙ¿Ù·È Â›Û˘ Ó·
‰È·‚¿ÛÂÙ Ì ÚÔÛÔ¯‹ ÙÔ˘˜ ηÓÔÓÈÛÌÔ‡˜ ·ÛÊ·Ï›·˜ Ô˘ ·Ó·Ê¤ÚÔÓÙ·È ÛÙÔ ÂȉÈÎfi ÎÂÊ¿Ï·ÈÔ ÙÔ˘ ·ÚfiÓÙÔ˜ ÂÁ¯ÂÈÚ›‰ÈÔ˘.
Instruction label Etiqueta de prescripciones Etiqueta das normas EÙÈΤٷ Ô‰ËÁÈÒÓ
Important: Read the
instruction handbook
before using the
machine.
Atención: Leer el libro
de instrucciones antes
de usar la máquina.
Cuidado: Antes de
utilizar a máquina ler o
livrete de instruções.
¶ÚÔÛÔ¯‹: ¢È·‚¿ÛÙÂ
ÙȘ Ô‰ËÁ›Â˜ ¯Ú‹Ûˆ˜
ÚÈÓ ¯ÚËÛÈÌÔÔÈ‹ÛÂÙÂ
ÙÔ Ì˯¿ÓËÌ·.
Danger of thrown
objects. Keep other
people at a safe
distance whilst work-
ing.
Riesgo de expulsión.
Mientras se usa, man-
tener a terceras perso-
nas lejos del área de
trabajo.
Risco de expulsão.
Durante a utilização,
afastar as pessoas da
zona de trabalho.
K›Ó‰˘ÓÔ˜
ÂÎÙfiÍ¢Û˘. K·Ù¿ ÙË
¯Ú‹ÛË, ÎÚ·Ù¿ÙÂ Ù·
¿ÙÔÌ· Ì·ÎÚÈ¿ ·fi ÙËÓ
ÂÚÈÔ¯‹ ÂÚÁ·Û›·˜.
Warning: Remove the
power supply cable and read
instructions before carrying
out any repair or maintenan-
ce.
Atención: Desconectar el
cable de la alimentación y
leer las intrucciones antes de
efectuar cualquier operación
de manutención o repara-
ción.
Cuidado: Desligar o cabo
de alimentação e ler as
instruções antes de efectuar
qualquer operação de
manutenção ou concerto.
¶ÚÔÛÔ¯‹: AÔÛ˘Ó‰¤ÛÙ ÙÔ
ηÏÒ‰ÈÔ ÙÚÔÊÔ‰ÔÛ›·˜ ηÈ
‰È·‚¿ÛÙ ÙȘ Ô‰ËÁ›Â˜ ÚÈÓ
ÂÎÙÂϤÛÂÙ ÔÔÈ·‰‹ÔÙÂ
Û˘ÓÙ‹ÚËÛË ‹ ÂÈÛ΢‹.
Keep the power supply
cable away from the
blade.
Tener el cable eléctrico
de alimentacion lejos
de la cucilla.
Manter o cabo eléctri-
co de alimentaçao
longe de lâmina.
∫Ú·Ù¿ÙÂ ÙÔ ËÏÂÎÙÚÈÎfi
ηÏÒ‰ÈÔ
ÙÚÔÊÔ‰ÔÛÈ·˜ Ì·ÎÚÈ·
·fi ÙÔ Ì·¯·›ÚÈ.
Danger of cutting
yourself. Blades in
movement. Do not put
hands or feet near or
under the opening of the
cutting plate.
Riesgo de corte.
Cuchillas en movimiento.
No introducir las manos o
los pies en el alojamiento
de la cuchilla.
Perigos de cortes.
Lâminas em movimento.
Nunca introduzir mãos ou
pés no interior do aloja-
mento da lâmina.
K›Ó‰˘ÓÔ˜ ÎÔ‹˜.
M·¯·›ÚÈ Û ΛÓËÛË. MË
‚¿˙ÂÙ ¯¤ÚÈ· ‹ fi‰È·
ÂÓÙfi˜ ÙÔ˘ ¯ÒÚÔ˘ fiÔ˘
‚Ú›ÛÎÂÙ·È ÙÔ Ì·¯·›ÚÈ
ÎÔ‹˜.
1
FINISH ASSEMBLY
COMPLETAR EL MONTAJE
CONCLUIR A MONTAGEM
TE§EIø™TE TH ™YNAPMO§O°H™H
TECHNICAL DATA CARACTERISTICAS TÉCNICAS
CARACTERISTICAS TÉCNICAS TEXNIKA XAPAKTHPI™TIKA HRE410
Size Dimensões 1330 x 540
Dimensiones ¢È·ÛÙ¿ÛÂȘ x 1090 mm
Unladen weight Peso a vácuo
Peso en vacío µ¿ÚÔ˜ ¯ˆÚ›˜ ÊÔÚÙ›Ô 24 kg
Cutting width Largura de corte
Longitud del corte ¶Ï¿ÙÔ˜ ÎÔ‹˜ 41 cm
Cutting height adjustment Ajuste da altura de corte
Registro altura del corte ƒ‡ıÌÈÛË ‡„Ô˘˜ ÎÔ‹˜ 20 – 70 mm
Front wheel diameter Diâmetro rodas anteriores
Diámetro ruedas anteriores ¢È¿ÌÂÙÚÔ˜ ÌÚÔÛÙÈÓÒÓ ÙÚÔ¯ÒÓ 170 mm
Rear wheel diameter Diâmetro rodas posteriores
Diámetro ruedas posteriores ¢È¿ÌÂÙÚÔ˜ ›Ûˆ ÙÚÔ¯ÒÓ 210 mm
Grass-catcher capacity Capacidade saco recolhedor
Capacidad del saco ÈÚËÙÈÎfiÙËÙ· Û¿ÎÔ˘ ÂÚÈÛ˘ÏÏÔÁ‹˜ 65 lt
MOTOR (Single-phase electric) MOTOR (Eléctrico monofásico)
MOTOR (Eléctrico monofase) Kπ¡∏∆∏ƒ∞™ (∏ÏÂÎÙÚÈÎfi˜ ÌÔÓÔÊ·ÛÈÎfi˜) 1600 W
Operational motor speed (r.p.m.) Velocidade de funcionamento (Rotações/min.)
Velocidad de funcionamiento (Revol./min.) ∆·¯‡ÙËÙ· ÏÂÈÙÔ˘ÚÁ›·˜ (ÛÙÚÔʤ˜/ÏÂÙfi) 2850
Acoustic power level (2000/14/CE) Nível de potência acústica (2000/14/CE)
Nivel de potencia acústica (2000/14/CE) ™Ù¿ıÌË ·ÎÔ˘ÛÙÈ΋˜ ›ÂÛ˘ (2000/14/CE) 95 dB(A)
Acoustic radiation pressure to user's Nível de pressão acústica ao ouvido
ear (EEC 81/1051) do operador (81/1051/CEE)
Nivel de presión acústica en el oido del ™Ù¿ıÌË ·ÎÔ˘ÛÙÈ΋˜ ›ÂÛ˘ ÛÙÔ ·˘Ù›
operador (81/1051/CEE) ÙÔ˘ ¯ÂÈÚÈÛÙ‹ (81/1051/EOK) 80 dB(A)
Vibration level (prEN 1033) Valor das vibrações (prEN 1033)
Valor de las vibraciones (prEN 1033) TÈÌ‹ ÙˆÓ ‰ÔÓ‹ÛÂˆÓ (prEN 1033) 14 m/sec
2