This guide is designed as a reference to help you start using your LCDTV quickly. Please refer to the User's Manual for more detailed installation and safety instructions.
The Setup Wizard is displayed on the screen when you turn on your LCDTV for the first time.
Note: Use the ,to move through the menu. Press OK to select.
1. Select the Language for the
on-screen display (OSD).
2. Select the TV mode.
3. Select the Country.
4. Press OK for channel scan.
5. The channel scan may
take a while to complete.
6. Press Menu when channel
scan is completed.
You can watch cable or broadcast TV,
play DVD or connect to your PC. To display the
Input Source menu, press the INPUT button
on the remote control or the
INPUT button on the LCD TV.
To select the source signal:
Press the numeric buttons
on the remote control; Or
Press the , buttons
to move, then press OK to
select.
Selecting Your Content Source
Press the PS or PT button on
the remote control or the LCD TV to
increase / decrease the program
number; Or
Press the numeric buttons on the
remote control.
Selecting Channels
WatchingYourTV
English
Deutsch
Français
Please select OSD language:
Exit
MENU
MENU
Move
OK
OK
Select
Return
MENU
MENU
Move
OK
OK
Select
Home Mode
Store Mode
Please select TV mode:
Return
MENU
MENU
Move
OK
OK
Select
UK
Germany
France
Please select country:
OK
OK
SelectReturn
MENU
MENU
Start
Now please do channel scan:
Stop
MENU
MENU
Now please do channel scan:
4%Scanning Ch22
Digital channels found:0
Analog signals found:0
Exit
MENU
MENU
Initialized finished !
Exit
INPUT
INPUT
Select
Move
TV
SCART
Composite
Component
HDMI 1
HDMI 2
Computer
1.
2.
3.
4.
5.
6.
7.
Source
ok
ok
1~7
1~7
S_ST28FMMR_Q_EU_V01_H
6
77
1
2
3
4
911756810
Power
Input Select
Menu
Channel Select
Volume Adjust
Remote IR Sensor/
Power Indicator
Speaker
1
2
3
4
5
6
7
SERVICE
(For service only)
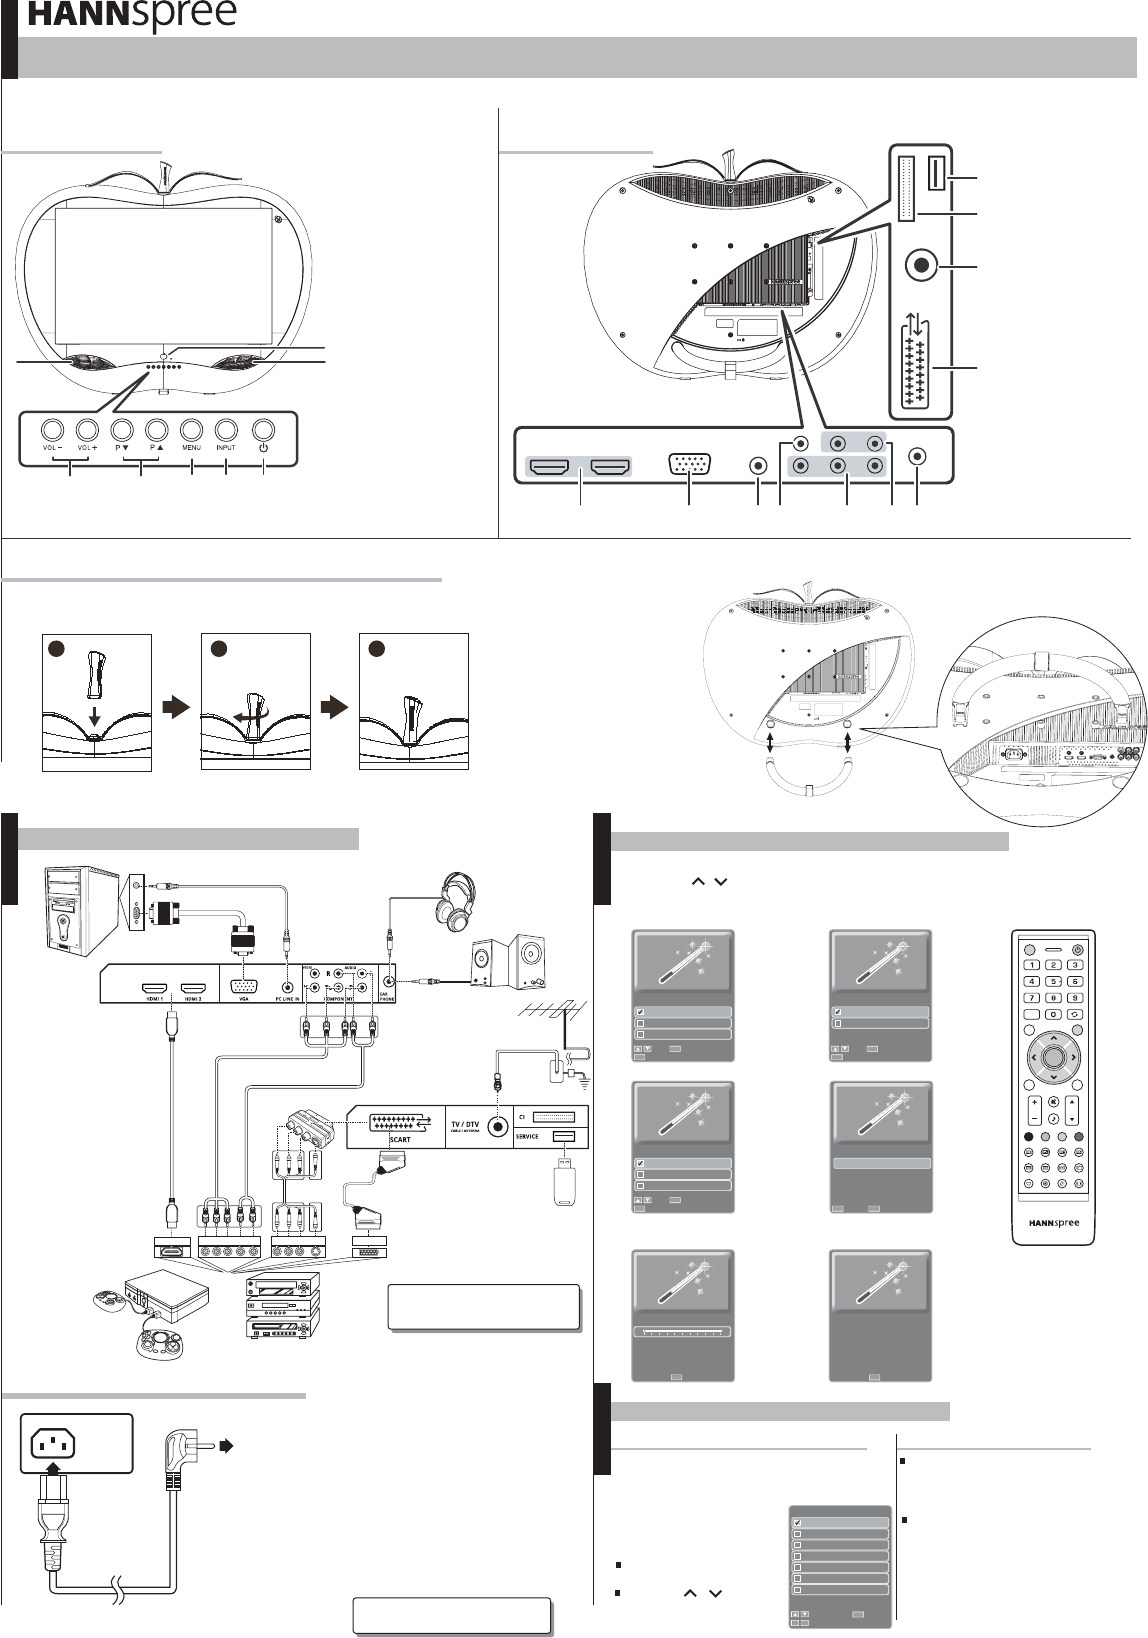
2. Carefully place the TV face down on a soft and flat surface (blanket,foam,cloth,etc) to prevent
and damage to the TV.
3. Press the stand lock on both sides,
insert the stand into the holes.
CI
TV/DTV Input
SCART IN/OUT
Earphone line out
Component/
Composite/
Audio Input
Component Video
Input (HDTV)
AV Input
PC Audio Input
VGA Input (PC)
HDMI Input
1
2
3
4
5
6
7
8
9
10
11
Front View
Rear View
12345
OK
A
BC
Note: the sleeves are for design only and the TV cannot be carried by it.
Assembling the stem & stand base
1. Insert the stem into slot then turn 45 degrees clockwise
to complete installation.
4. If want to dissembling the stand,
press the stand lock on both
sides, remove the stand from
back cover of TV.
Hulp nodig? Stel uw vraag in het forum
Misbruik melden
Gebruikershandleiding.com neemt misbruik van zijn services uitermate serieus. U kunt hieronder aangeven waarom deze vraag ongepast is. Wij controleren de vraag en zonodig wordt deze verwijderd.
Product:
Spelregels forum
Om tot zinvolle vragen te komen hanteren wij de volgende spelregels:
lees eerst de handleiding door;
controleer of uw vraag al eerder door iemand anders is gesteld;
probeer uw vraag zo duidelijk mogelijk te stellen;
heeft u een probleem en al geprobeerd om dit op te lossen, vermeld dit erbij aub;
heeft u een oplossing gekregen van een bezoeker dan horen wij dat graag in dit forum;
wilt u een reactie geven op een vraag of antwoord, gebruik dan niet dit formulier maar klik op de knop 'reageer op deze vraag';
uw vraag wordt direct op de website gezet; vermijd daarom persoonlijke gegevens in te vullen;
Belangrijk! Als er een antwoord wordt gegeven op uw vraag, dan is het voor de gever van het antwoord nuttig om te weten als u er wel (of niet) mee geholpen bent! Wij vragen u dus ook te reageren op een antwoord.
Belangrijk! Antwoorden worden ook per e-mail naar abonnees gestuurd. Laat uw emailadres achter op deze site, zodat u op de hoogte blijft. U krijgt dan ook andere vragen en antwoorden te zien.
Abonneren
Abonneer u voor het ontvangen van emails voor uw Hannspree ST 55F Apple bij:
nieuwe vragen en antwoorden
nieuwe handleidingen
U ontvangt een email met instructies om u voor één of beide opties in te schrijven.
Ontvang uw handleiding per email
Vul uw emailadres in en ontvang de handleiding van Hannspree ST 55F Apple in de taal/talen: Engels als bijlage per email.
De handleiding is 0,59 mb groot.
U ontvangt de handleiding per email binnen enkele minuten. Als u geen email heeft ontvangen, dan heeft u waarschijnlijk een verkeerd emailadres ingevuld of is uw mailbox te vol. Daarnaast kan het zijn dat uw internetprovider een maximum heeft aan de grootte per email. Omdat hier een handleiding wordt meegestuurd, kan het voorkomen dat de email groter is dan toegestaan bij uw provider.
Uw handleiding is per email verstuurd. Controleer uw email
Als u niet binnen een kwartier uw email met handleiding ontvangen heeft, kan het zijn dat u een verkeerd emailadres heeft ingevuld of dat uw emailprovider een maximum grootte per email heeft ingesteld die kleiner is dan de grootte van de handleiding.
Er is een email naar u verstuurd om uw inschrijving definitief te maken.
Controleer uw email en volg de aanwijzingen op om uw inschrijving definitief te maken
U heeft geen emailadres opgegeven
Als u de handleiding per email wilt ontvangen, vul dan een geldig emailadres in.
Uw vraag is op deze pagina toegevoegd
Wilt u een email ontvangen bij een antwoord en/of nieuwe vragen? Vul dan hier uw emailadres in.