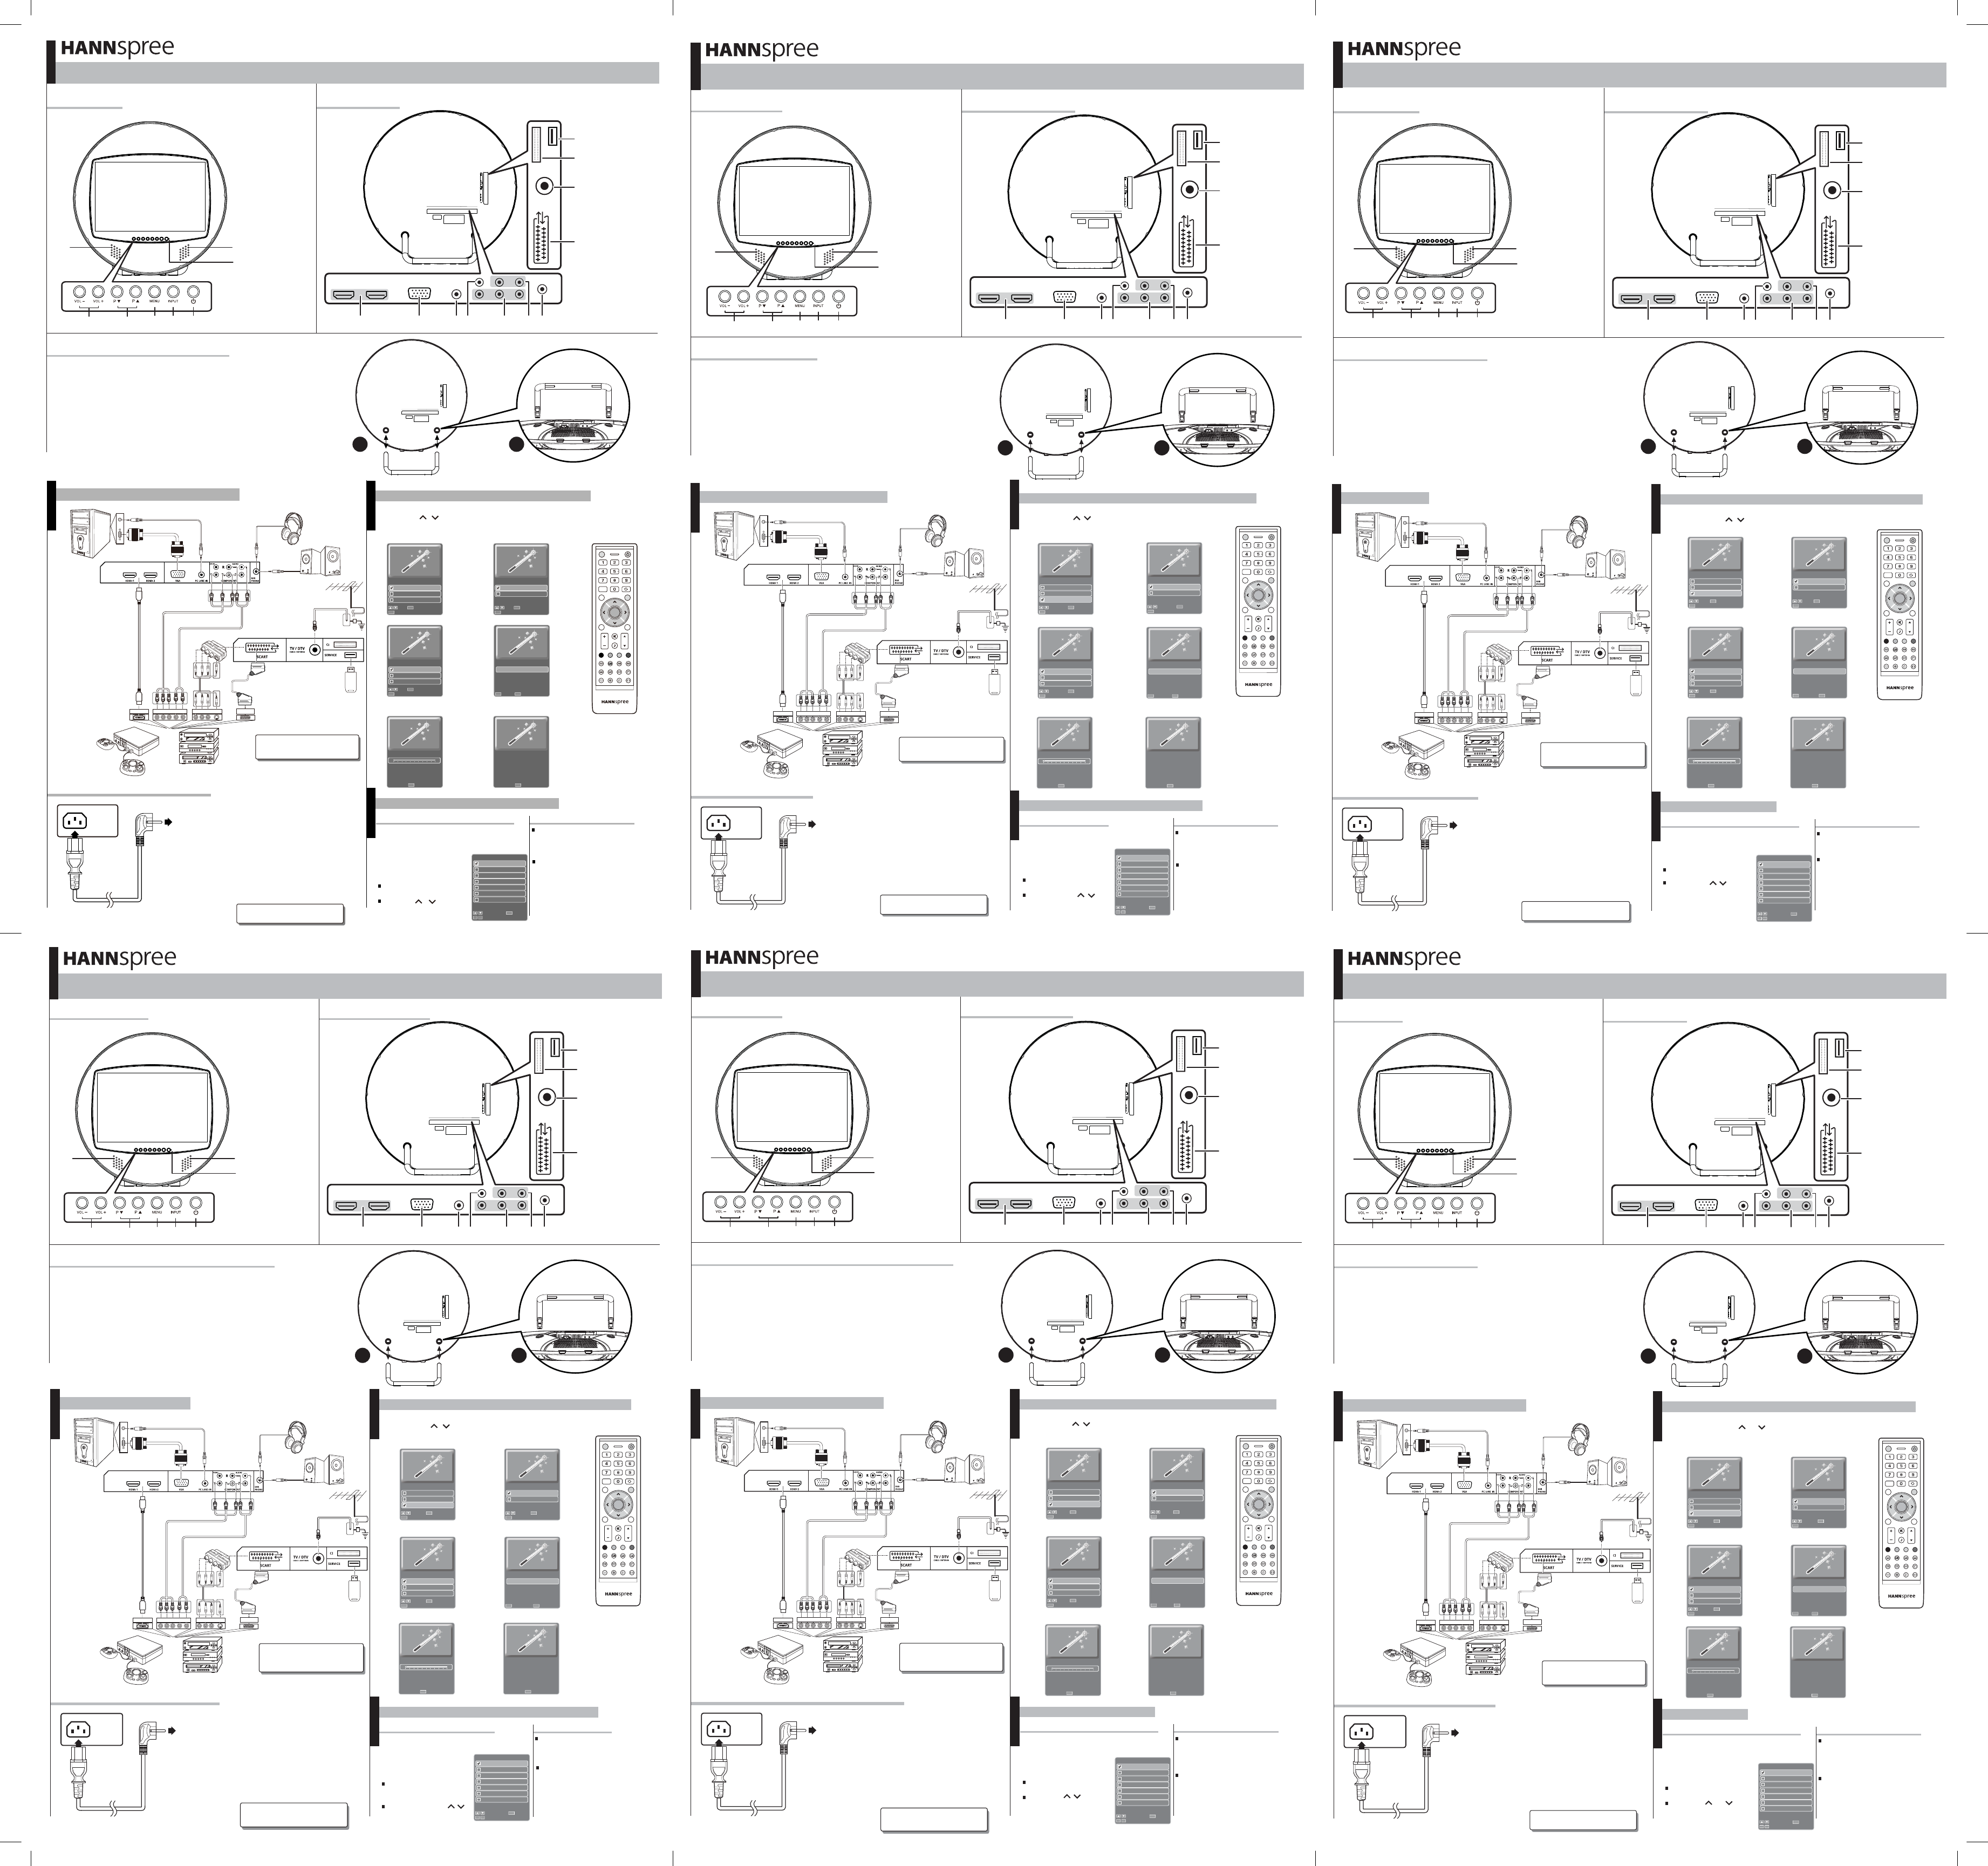
1. Carefully place the TV face down on a soft and flat surface (blanket,foam,cloth,etc)
to prevent and damage to the TV.
2. Press the stand lock on both sides,
CI
TV/DTV Input
SCART IN/OUT
Earphone line out
Component/
Composite/
Audio Input
Component Video
Input (HDTV)
AV Input
PCAudio Input
VGA Input (PC)
HDMI Input
1
2
3
4
5
6
7
8
9
10
11
Quick Start Guide
FrontView
Assembling the stand base
This guide is designed as a reference to help you start using your LCDTV quickly. Please refer to the User's Manual for more detailed installation and safety instructions.
The Setup Wizard is displayed on the screen when you turn on your LCD TV for the first time.
Note: Use the , to move through the menu. PressOKto select.
1. Select the Language for the
on-screen display (OSD).
2. Select the TV mode.
3. Select the Country.
4. Press OK for channel scan.
5. The channel scan may
take a while to complete.
6. Press Menu when channel
scan is completed.
You can watch cable or broadcast TV,
play DVD or connect to your PC. To display the
Input Source menu, press the INPUT button
on the remote control or the
INPUT button on the LCD TV.
To select the source signal:
Press the numeric buttons
on the remote control; Or
Press the , buttons
to move, then press OK to
select.
Selecting Your Content Source
Press the PS or PT button on
the remote control or the LCD TV to
increase / decrease the program
number; Or
Press the numeric buttons on the
remote control.
Selecting Channels
Watching Your TV
English
Deutsch
Français
Please select OSD language:
Exit
MENU
MENU
Move
OK
OK
Select
Return
MENU
MENU
Move
OK
OK
Select
Home Mode
Store Mode
Please select TV mode:
Return
MENU
MENU
Move
OK
OK
Select
UK
Germany
France
Please select country:
OK
OK
SelectReturn
MENU
MENU
Start
Now please do channel scan:
Stop
MENU
MENU
Now please do channel scan:
4%Scanning Ch22
Digital channels found:0
Analog signals found:0
Exit
MENU
MENU
Initialized finished !
Exit
INPUT
INPUT
Select
Move
TV
SCART
Composite
Component
HDMI 1
HDMI 2
Computer
1.
2.
3.
4.
5.
6.
7.
Source
ok
ok
1~7
1~7
● Pour référence● Pour référence
● Pour référence
12
1
77
6
1
2
3
4
911756810
Vue de devant
Assemblage de la base du support
Vue de derrière
2345
Guide de Mise en route
Ce guide est conçu pour vous aider à utiliser rapidement votre téléviseur LCD. Veuillez vous référer au Manuel de l’utilisateur pour des informations plus détaillées sur
l’installation et les consignes de sécurité.
Entrée TV/DTV
CI
Alimentation
Sélection de
l’entrée
Menu
Sélection de la
chaîne
Réglage du volume
Capteur IR de la
télécommande/
Voyant
d’alimentation
Haut-parleur
1
2
3
4
5
6
7
SERVICE
(Pour l’entretien
uniquement)
1. Placez avec précaution le téléviseur face tournée contre une surface douce et
plane (couverture, mousse, tissu, etc.) pour ne pas l’endommager.
2. Appuyez des deux côtés sur le
verrou du support, et insérez le
support dans les trous.
ENTRÉE/
SORTIE PÉRITEL
Sortie ligne
écouteurs
Entrée audio
composante/
composite
Entrée composante
vidéo (HDTV)
Entrée AV
Entrée audio PC
Entrée VGA (PC)
Entrée HDMI
1
2
3
4
5
6
7
8
9
10
11
Remarque :
1. Les images ne figurent dans ce document qu’à
titre d’illustration.
2. Tous les câbles illustrés ci-dessus ne sont pas
fournis par Hannspree.
Remarque :
les illustrations sont à titre informatifs uniquement
et peuvent différer en fonction du modèle ou de la
L’assistant d’installation s’affiche à l’écran lorsque vous allumez votre téléviseur LCD pour la première fois.
Remarque : utilisez , pour vous déplacer dans le menu. Appuyez sur OK pour effectuer une sélection.
1. Sélectionnez la Langue pour l’affichage
du menu à l’écran (OSD).
2. Choisissez du mode TV.
3. Choisissez le Pays.4. Appuyez sur OK pour effectuer une
recherche des chaînes.
5. La recherche des chaînes peut prendre
quelques minutes.
6. Appuyez sur Menu une fois la recherche
des chaînes terminée.
Il est possible de regarder un programme télévisé, de lire un
DVD ou de connecter votre Pc. Pour afficher le menu Source
d’entrée, appuyez sur le bouton
INPUT de la télécommande ou du
téléviseur LCD.
Pour choisir le signal de la source :
Appuyez sur les boutons
numériques de la télécommande ;
ou
Appuyez sur les boutons ,
pour vous déplacer, puis sur OK
pour effectuer une sélection.
Choisir la source du contenu
Appuyez sur le bouton PS ou PT de
la télécommande ou du téléviseur
LCD pour passer à la chaîne suivante /
précédente ; ou
Appuyez sur les boutons numériques
de la télécommande.
Choix des chaînes
Regarder votre téléviseur
Menu
OK
INFO
Pro.LIST
EPG
VOL
P
INDEX
FAV.
HOLD
MIX
FREEZE
REVEAL
SIZE
SLEEP
SOUND
SUBTITLE
ASPECT
PIC
MUTE
I - II
TEXT
LAST
INPUT
MENU
Quitter
INPUT
INPUT
Sélectionner
Déplacer
TV
PÉRITEL
Composite
Composant
HDMI 1
HDMI 2
Ordinateur
1.
2.
3.
4.
5.
6.
7.
Source
ok
ok
1~7
1~7
English
Deutsch
Français
Veuillez choisir la langue de
I’OSD
Quitter
MENU
MENU
Déplacer
OK
OK
Sélectionner
Retour
MENU
MENU
Déplacer
OK
OK
Sélectionner
Mode Maison
Mode Magasin
Veuillez choisir le mode TV :
Retour
MENU
MENU
Déplacer
OK
OK
Sélectionner
R-U
Allemagne
France
Veuillez choisir le pays
Quitter
MENU
MENU
Initialisation terminée !
OK
OK
SélectionnerRetour
MENU
MENU
Commencer
Veuillez maintenant rechercher
les chaînes
Arrêter
MENU
MENU
Veuillez maintenant rechercher
les chaînes
4%Recherche en cours Ch22
Chaînes numériques détectées:0
Signaux analogiques détectés:0
● Per avere un
riferimento
● Per avere un
riferimento
● Per avere un
riferimento
12
Alimentazione
Selezione ingresso
Menu
Selezione canali
Regolazione volume
Sensore IR remoto/
indicatore di
alimentazione
Diffusore
1
2
3
4
5
6
7
SERVICE
(Solo personale
qualificato)
Ingresso TV/DTV
CI
SCART IN/OUT
Uscita linea cuffie
Ingresso audio
component/
composito
Ingresso video
component (HDTV)
Ingresso AV
Ingresso audio PC
Ingresso VGA (PC)
Input HDMI
1
2
3
4
5
6
7
8
9
10
11
Guida rapida
Questa guida serve come riferimento per iniziare ad utilizzare rapidamente il televisore LCD. Per ulteriori istruzioni su installazione e sicurezza, si prega di consultare il
manuale dell'utente.
1. Posizionare il televisore rivolto verso il basso su una superficie soffice e piana
(lenzuola, gommapiuma, panno, ecc.) per evitare che si danneggi.
Si possono guardare i programmi TV via cavo o trasmessi
via etere, DVD oppure si può collegare il PC. Per visualizzare
il menu Origine ingresso, premere il tasto INPUT del
telecomando, oppure il tasto INPUT
del televisore LCD.
Selezione dell'origine del segnale:
Selezionare l’origine dei contenuti
Selezione dei canali
Guardare la TV
Premere il tasto PS o PT del
telecomando o del televisore LCD per
aumentare / diminuire il numero del
canale; oppure
Premere i tasti numerici del telecomando.
OK
INFO
Pro.LIST
EPG
VOL
P
INDEX
FAV.
HOLD
MIX
FREEZE
REVEAL
SIZE
SLEEP
SOUND
SUBTITLE
ASPECT
PIC
MUTE
I - II
TEXT
LAST
INPUT
MENU
Esci
INPUT
INPUT
Seleziona
Sposta
TV
SCART
Composito
Componente
HDMI 1
HDMI 2
Computer
1.
2.
3.
4.
5.
6.
7.
Origine
ok
ok
1~7
1~7
Premere i tasti numerici del
telecomando; oppure
Premere i tasti , per
spostarsi nel menu e poi premere
OK per selezionare.
Deutsch
Français
Italiano
Selezionare lingua OSD
Esci
MENU
MENU
Sposta
OK
OK
Seleziona
Ritorno
MENU
MENU
Sposta
OK
OK
Seleziona
Modalità casa
Modalità negozio
Selezionare la modalitá TV
Ritorno
MENU
MENU
Sposta
OK
OK
Seleziona
Regno Unito
Germania
Francia
Selezionare paese
OK
OK
SelezionaRitorno
MENU
MENU
Inizio
Effettuare ricerca canali ora
Fine
MENU
MENU
Effettuare ricerca canali ora
4%Scansione Ch22
Canali digitali trovati:0
Segnali analogici rilevati:0
Esci
MENU
MENU
Inizializzazione finita !
L’installazione guidata è visualizzata sullo schermo la prima volta che si accende il televisore LCD.
Nota: Usare il tasto , per spostarsi nel menu. Premere OK per selezionare.
● Para referência● Para referência
● Para referência
12
1
77
6
1
2
3
4
911756810
Vista Frontal
Montagem do Suporte
Vista Posterior
2345
Alimentação
Selecção de
Entrada
Menu
Selecção dos
Canais
Ajustamento
do volume
Sensor
Remoto de IV/
Indicador de
Alimentação
Altifalante
1
2
3
4
5
6
7
MANUTENÇÃO
(Exclusivamente
para manutenção)
1. Coloque cuidadosamente a TV voltada para baixo numa superfície macia e lisa
(cobertor, espuma, pano, etc) para evitar danos à mesma.
2. Pressione o suporte de ambos os
lados inserindo-o nos orifícios.
CI
Entrada TV/TVD
Entrada/Saída
SCART
Saída de
auscultadores
Entrada para Áudio
Componente/
Composto
Entrada para Vídeo
Componente
(HDTV)
Entrada AV
Entrada Áudio
de PC
Entrada VGA (PC)
Entrada HDMI
1
2
3
4
5
6
7
8
9
10
11
Guia de Consulta rápida
Este guia destina-se a ajudá-lo a iniciar rapidamente a utilização da sua TV LCD. Consulte o Manual do Utilizador para instruções de instalação e de segurança mais
O Assistente de Configuração é apresentado no ecrã quando liga o TV LCD pela primeira vez.
Nota : Use os botões , para percorrer as opções do menu. Prima OK para seleccionar.
1. Seleccione o Idioma para o menu OSD.2. Seleccione o modo de TV.
3. Seleccione o País.
4. Prima OK para iniciar a pesquisa de
canais.
5. A pesquisa de canais pode demorar
algum tempo a concluir.
6. Prima o botão Menu quando a pesquisa
de canais estiver concluída.
Pode ver televisão por cabo ou transmissões televisivas,
reproduzir DVDs ou conectar ao seu PC. Para visualizar o
menu de Fonte de Entrada, prima o botão INPUT no controlo
remoto ou o botão INPUT na TV LCD.
Para seleccionar a origem do sinal:
Prima os botões numéricos no
controlo remoto; Ou
Prima os botões , para
deslocar e depois prima OK para
seleccionar.
Seleccionar a Fonte de Conteúdo
Seleccionar Canais
Ver Televisão
Configuração inicial
OK
INFO
Pro.LIST
EPG
VOL
P
INDEX
FAV.
HOLD
MIX
FREEZE
REVEAL
SIZE
SLEEP
SOUND
SUBTITLE
ASPECT
PIC
MUTE
I - II
TEXT
LAST
INPUT
MENU
Sair
INPUT
INPUT
Seleccionar
Mover
TV
SCART
Composto
Componente
HDMI 1
HDMI 2
Computador
1.
2.
3.
4.
5.
6.
7.
Origem
ok
ok
1~7
1~7
Prima o botão PS ou PT no controlo
remoto ou na TV LCD para aumentar /
diminuir o número do programa; Ou
Prima os botões numéricos no controlo
remoto.
Regressar
MENU
MENU
Mover
OK
OK
Seleccionar
Modo Casa
Modo Loja
Queira seleccionar o modo TV:
Regressar
MENU
MENU
Mover
OK
OK
Seleccionar
RU
Alemanha
França
Queira seleccionar o país
OK
OK
SeleccionarRegressar
MENU
MENU
Iniciar
Agora, proceda à pesquisa de
canais
Parar
MENU
MENU
Agora, proceda à pesquisa de
canais
4%A Pesquisar Ch22
Canais digitais encontrados:0
Sinais analógicos encontrados:0
Sair
MENU
MENU
Inicializaçäo concluída !
Nederlands
Magyar
Português
Queira seleccionar o idioma do
OSD
Sair
MENU
MENU
Mover
OK
OK
Seleccionar
● Ter referentie● Ter referentie
● Ter referentie
1
77
6
1
2
3
4
911756810
Vooraanzicht
De voet monteren
Achteraanzicht
2345
12
Power
Invoerselectie
Menu
Kanaalselectie
Volume regelen
Externe IR-sensor/
Voedingsindicator
Luidspreker
1
2
3
4
5
6
7
SERVICE
(Alleen voor
onderhoud)
CI
TV/DTV-ingang
SCART-ingang/
uitgang
Oortelefoonuitgang
Component/
Composiet
audio-ingang
Component
video-ingang
(HDTV)
AV-ingang
Pc-audio-ingang
VGA-ingang (pc)
HDMI-ingang
1
2
3
4
5
6
7
8
9
10
11
1. Plaats de tv voorzichtig met de voorzijde omlaag op een zacht en plat oppervlak
(laken, schuim, doek, enz.) om schade aan de tv te voorkomen.
2. Druk de voetvergrendeling aan
beide zijden in en stop de voet
in de openingen.
Snelle gebruikshandleiding
Deze handleiding is bedoeld als referentie om u te helpen zodat u uw LCD-tv snel kunt gebruiken. Raadpleeg de gebruikershandleiding voor meer gedetailleerde
installatie- en veiligheidsinstructies.
Opmerking:
1. De afbeeldingen zijn alleen informatief bedoeld.
2. De hierboven weergegeven kabels worden niet
geleverd door Hannspree.
Opmerking:
de afbeeldingen zijn alleen informatief bedoeld en
De installatiewizard verschijnt op het scherm als u de lcd-televisie voor het eerst inschakelt.
Opmerking: Gebruik , om door het menu te gaan en druk op OK om te selecteren.
1. Selecteer de taal voor de weergave op
het scherm (OSD).
2. Selecteer de TV-modus.
3. Selecteer het land.
4. Druk op OK om kanalen te scannen.
5. Het kan even duren voor het scannen
van kanalen voltooid is.
6. Druk op Menu als het scannen van kanalen
voltooid is.
U kunt kijken naar kabeltelevisie of draadloze televisie, een
dvd afspelen en verbinding maken met de computer. Om de
ingangsbron te kiezen drukt u op de
afstandsbediening of op de televisie
op de knop INPUT.
Het bronsignaal selecteren:
Druk op de cijferknoppen van de
afstandsbediening; Of
Druk op de knoppen , om te
verplaatsen en op OK om te
selecteren.
De inhoud selecteren
Kanalen selecteren
Naar televisie kijken
Druk u op de afstandsbediening of op
de lcd-televisie op de knop PS of PT
om een hoger of lager
programmanummer te kiezen; Of
Druk op de cijferknoppen van de
afstandsbediening.
OK
INFO
Pro.LIST
EPG
VOL
P
INDEX
FAV.
HOLD
MIX
FREEZE
REVEAL
SIZE
SLEEP
SOUND
SUBTITLE
ASPECT
PIC
MUTE
I - II
TEXT
LAST
INPUT
MENU
Afsl.
INPUT
INPUT
Selecteren
Verplaatsen
TV
SCART
Composiet
Component
HDMI 1
HDMI 2
Computer
1.
2.
3.
4.
5.
6.
7.
Bron
ok
ok
1~7
1~7
Italiano
Español
Nederlands
Selecteer de OSD-taal
Afsl.
MENU
MENU
Verplaatsen
OK
OK
Selecteren
Ter ug
MENU
MENU
Verplaatsen
OK
OK
Selecteren
Thuismodus
Opslagmodus
Selecteer de tv-modus:
OK
OK
Selecteren
Ter ug
MENU
MENU
Verplaatsen
VK
Duitsland
Frankrijk
Selecteer het land
Menu
OK
OK
SelecterenTerug
MENU
MENU
Start
Voer nu een kanaalscan uit
Stop
MENU
MENU
Voer nu een kanaalscan uit
4%Scannen Ch22
Digitale kanalen gevonden:0
Analoge signalen gevonden:0
Afsl.
MENU
MENU
Initialisatie voltooid !
● A hivatkozás● A hivatkozás
● A hivatkozás
12
1
77
6
1
2
3
4
911756810
Elölnézet
A talp összeszerelése
Hátulnézet
2345
Gyors üzembe helyezési útmutató
A kézikönyv az LCD TV gyors beüzemelésével és működtetésével kapcsolatos tudnivalókat tartalmazza. A részletes üzembe helyezési és biztonsági utasításokért
forduljon a felhasználói kézikönyvhöz.
Tápfeszültség
Bemenetválasztás
Menü
Csatorna
választása
Hangerő
szabályozása
Távvezérlő
infravörös
érzékelő/
Bekapcsolt
állapotot jelző fény
Hangszóró
1
2
3
4
5
6
7
SZERVIZ
(Csak
szervizeléshez)
1. Óvatosan helyezze a TV készüléket kijelzőpanellel lefelé egy puha és sima felületre
(takaró, hab, kendő stb.) nehogy megsérüljön a TV.
Gebruikershandleiding.com neemt misbruik van zijn services uitermate serieus. U kunt hieronder aangeven waarom deze vraag ongepast is. Wij controleren de vraag en zonodig wordt deze verwijderd.
Product:
Spelregels forum
Om tot zinvolle vragen te komen hanteren wij de volgende spelregels:
lees eerst de handleiding door;
controleer of uw vraag al eerder door iemand anders is gesteld;
probeer uw vraag zo duidelijk mogelijk te stellen;
heeft u een probleem en al geprobeerd om dit op te lossen, vermeld dit erbij aub;
heeft u een oplossing gekregen van een bezoeker dan horen wij dat graag in dit forum;
wilt u een reactie geven op een vraag of antwoord, gebruik dan niet dit formulier maar klik op de knop 'reageer op deze vraag';
uw vraag wordt direct op de website gezet; vermijd daarom persoonlijke gegevens in te vullen;
Belangrijk! Als er een antwoord wordt gegeven op uw vraag, dan is het voor de gever van het antwoord nuttig om te weten als u er wel (of niet) mee geholpen bent! Wij vragen u dus ook te reageren op een antwoord.
Belangrijk! Antwoorden worden ook per e-mail naar abonnees gestuurd. Laat uw emailadres achter op deze site, zodat u op de hoogte blijft. U krijgt dan ook andere vragen en antwoorden te zien.
Abonneren
Abonneer u voor het ontvangen van emails voor uw Hannspree ST 286 Soccer bij:
nieuwe vragen en antwoorden
nieuwe handleidingen
U ontvangt een email met instructies om u voor één of beide opties in te schrijven.
Ontvang uw handleiding per email
Vul uw emailadres in en ontvang de handleiding van Hannspree ST 286 Soccer in de taal/talen: Nederlands, Duits, Engels, Frans, Italiaans, Spaans als bijlage per email.
De handleiding is 6,24 mb groot.
U ontvangt de handleiding per email binnen enkele minuten. Als u geen email heeft ontvangen, dan heeft u waarschijnlijk een verkeerd emailadres ingevuld of is uw mailbox te vol. Daarnaast kan het zijn dat uw internetprovider een maximum heeft aan de grootte per email. Omdat hier een handleiding wordt meegestuurd, kan het voorkomen dat de email groter is dan toegestaan bij uw provider.
Uw handleiding is per email verstuurd. Controleer uw email
Als u niet binnen een kwartier uw email met handleiding ontvangen heeft, kan het zijn dat u een verkeerd emailadres heeft ingevuld of dat uw emailprovider een maximum grootte per email heeft ingesteld die kleiner is dan de grootte van de handleiding.
Er is een email naar u verstuurd om uw inschrijving definitief te maken.
Controleer uw email en volg de aanwijzingen op om uw inschrijving definitief te maken
U heeft geen emailadres opgegeven
Als u de handleiding per email wilt ontvangen, vul dan een geldig emailadres in.
Uw vraag is op deze pagina toegevoegd
Wilt u een email ontvangen bij een antwoord en/of nieuwe vragen? Vul dan hier uw emailadres in.