symbol for waste electrical and electronic equipment
(WEEE).
This product has been manufactured with
high quality parts and materials which
can be reused and are suitable for recy-
cling. Do not dispose of the waste product
with normal domestic and other wastes at
the end of its service life. Take it to the collection
center for the recycling of electrical and electronic
equipment. Please consult your local authorities to
learn about these collection centers.
Compliance with RoHS Directive
The product you have purchased complies with EU
RoHS Directive (2011/65/EU). It does not contain
harmful and prohibited materials specified in the
Directive.
Package information
Packaging materials of the product are
manufactured from recyclable materials in
accordance with our National
Environment Regulations. Do not dispose
of the packaging materials together with the domes-
tic or other wastes. Take them to the packaging mate-
rial collection points designated by the local authori-
ties.
This device is noise-suppressed according to the
applicable EU directives. This product fulfils the
European directives 2014/53/EU and 2011/65/
EU. You can find the CE declaration of conformity
for the device in the form of a pdf file on the Grundig
Homepage
www.grundig.com/downloads/doc
Power supply:
AC 100 - 240 V
~
, 50/60 Hz (adaptor)
Max. power consumption:
< 3 W (operation),
< 1 W (standby)
Output:
USB host (For SCN130 only): 5V power-out
Back up battery:
Back up DC Batt: 1 × 9 V IEC 6 LF22
Frequency bands:
FM 87.5 ...108.0 MHz
Circuit features:
Loudspeaker: 1 1/4 inch
Output Power: 1 W
Dimensions:
W x H x L 166 x 67 x 102 mm
Weight: 350 gr
Technical and design modifications reserved.
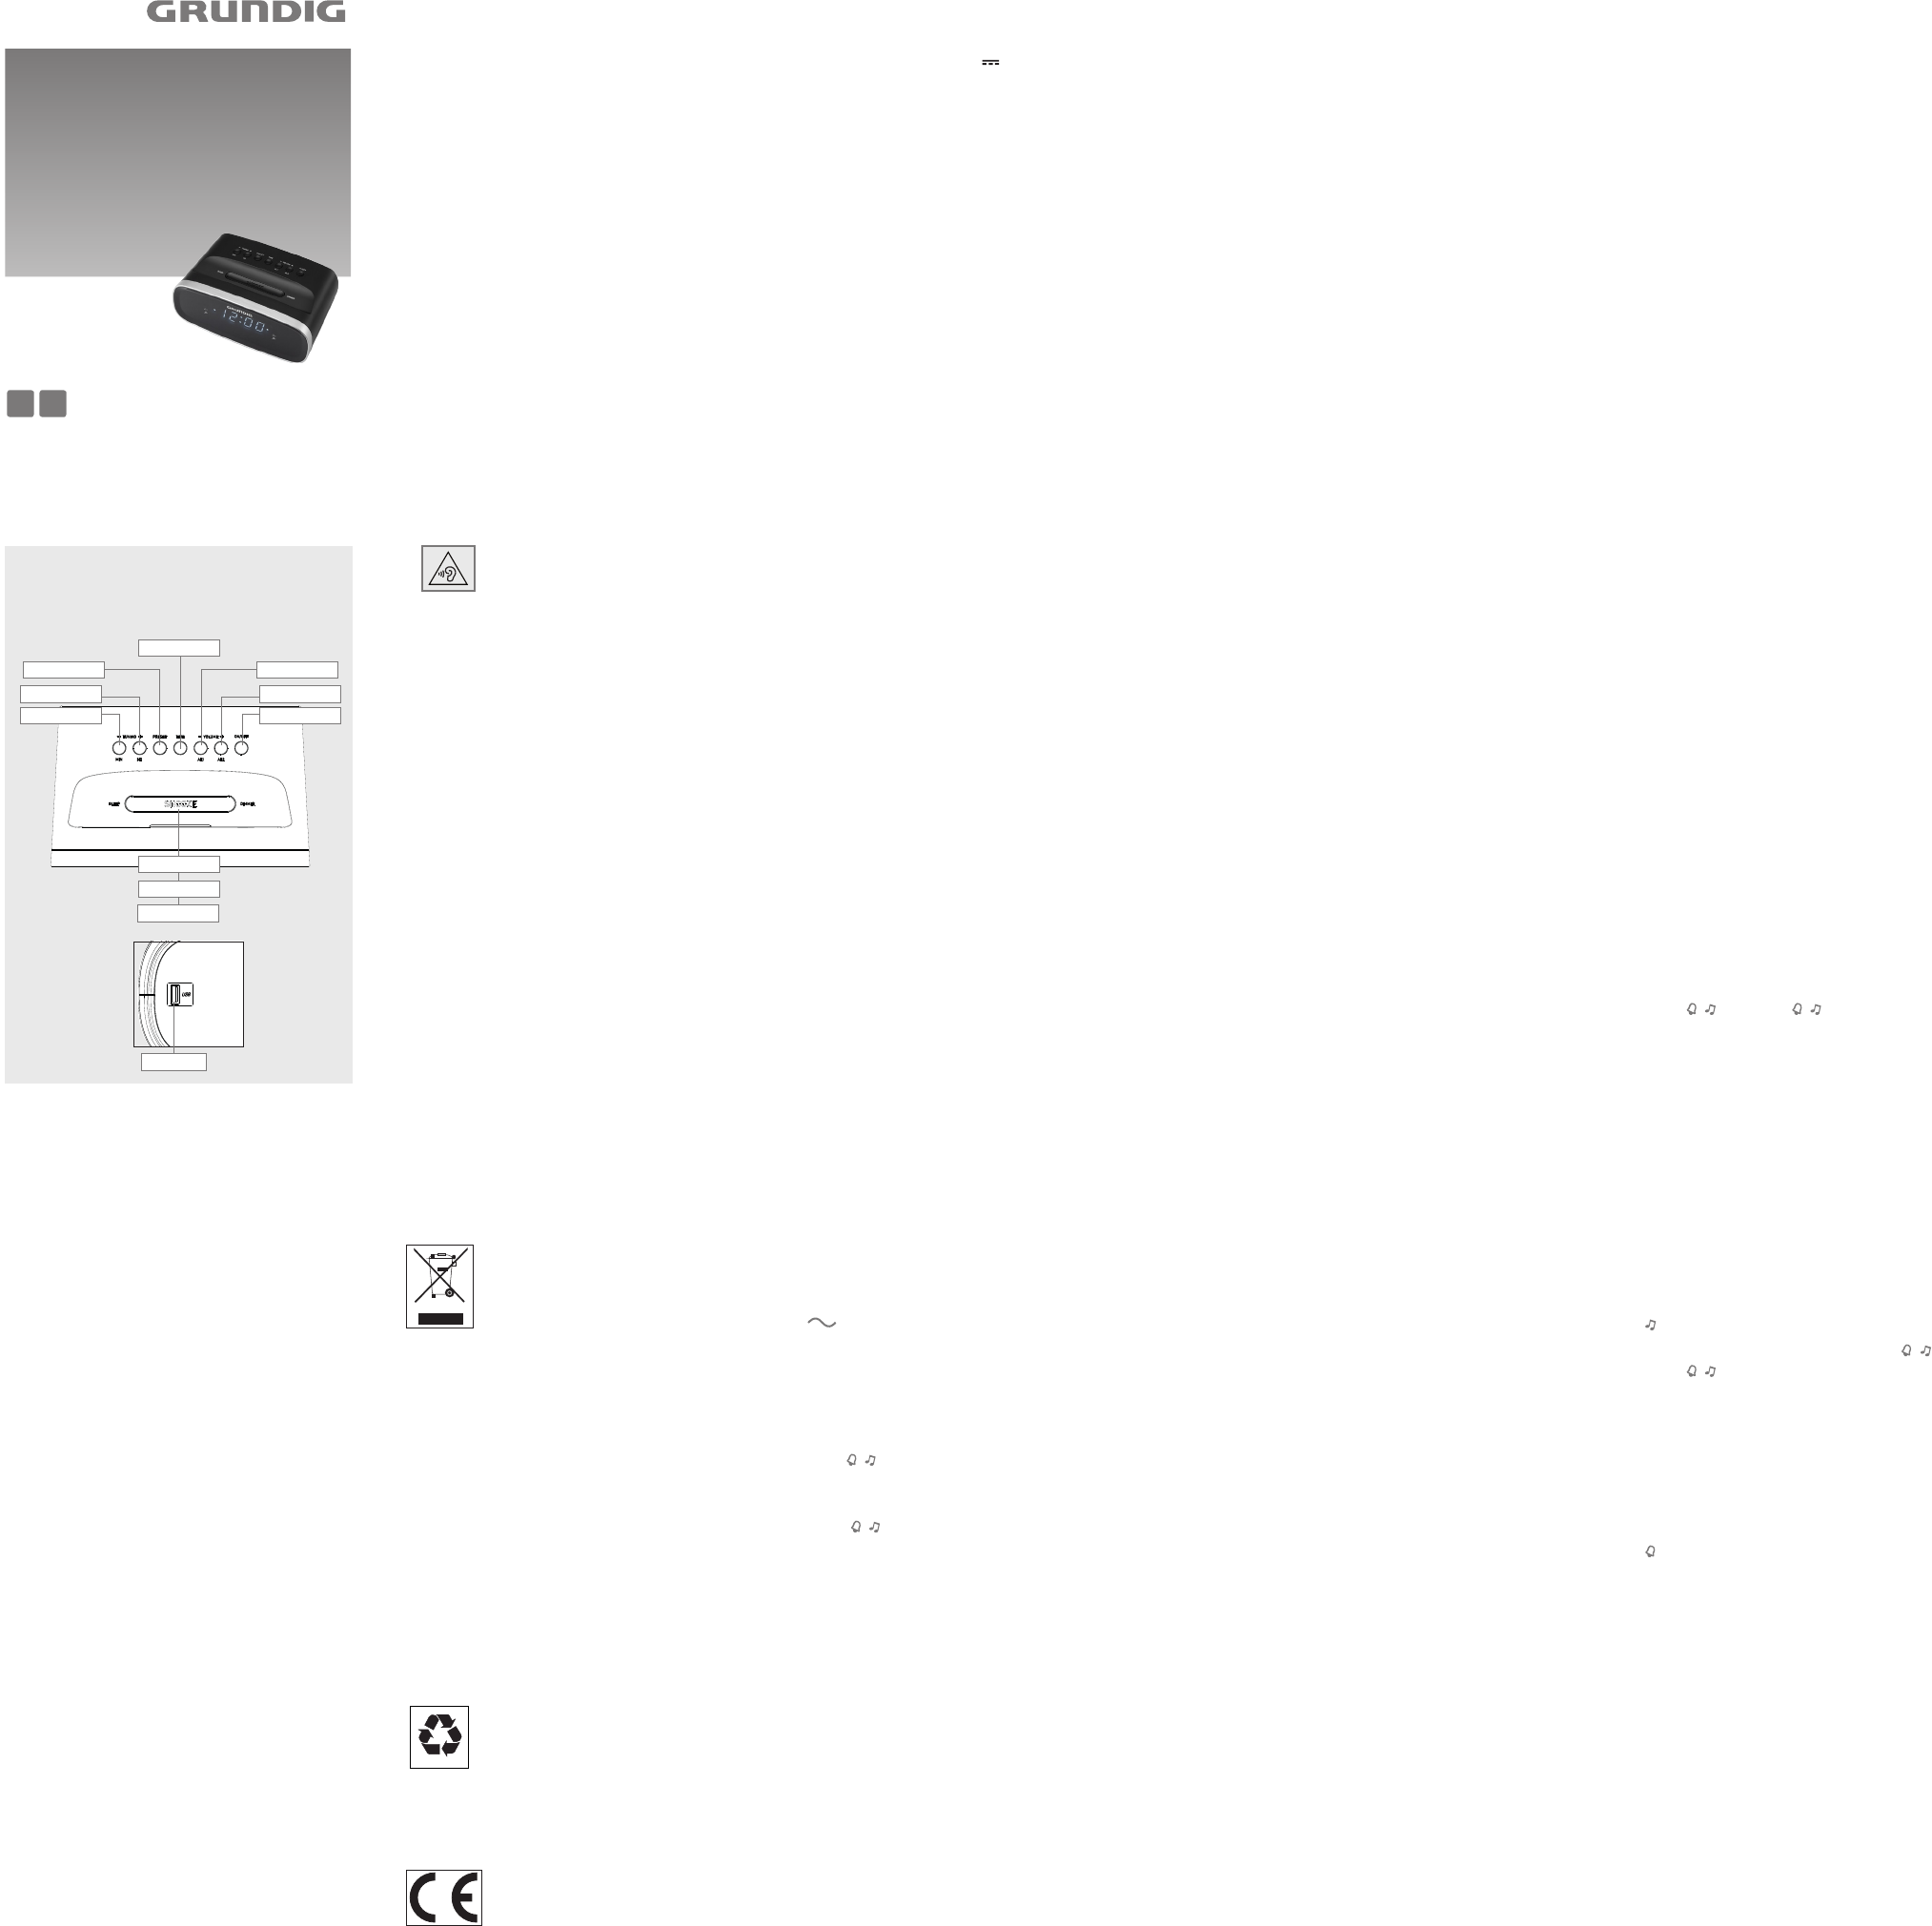
OVERVIEW
See the figure on page 3.
Controls on the top
TUNING-/
MIN
For tuning to radio stations.
For setting the minutes. Press briefly to
change the minutes step-by-step. Hold
down to change the minutes continu-
ously.
TUNING+/
HR
For tuning to radio stations.
For setting the hours. Press briefly to
change the hour step-by-step. Hold
down to change the hour continuous-
ly.
PRESETFor setting favorite radio station.
TIMEPress and hold down: to set the time.
VOLUME -/
AL 1
Indicates that the alarm setting is acti-
vated with alarm time 1.
VOLUME +/
AL 2
Adjusts the volume.
ON/OFF Switches the device on or off.
SLEEP Activates the sleep timer.
To display the current sleep timer set-
ting.
SNOOZE Interrupts the alarm function.
Displays the seconds.
DIMMER Pressing switch, switches the display
between two brightness levels.
Controls on the back
ÜUSB Power-out cable.
Wire antenna for FM reception.
Controls on the bottom
Battery compartment for 2 x 1.5 v UM4 AAA back-
up battery.
The display
AL 1 Displays that the alarm is activated
with a signal tone or radio for alarm
time 1.
AL 2 Displays that the alarm is activated
with a signal tone or radio for alarm
time 2.
POWER SUPPLY
Mains operation
Check that the mains voltage on the type plate (on
the bottom of the device) corresponds to your local
mains supply. If this is not the case, contact your spe-
cialist dealer.
1 Plug the mains cable into the socket (230V
~
,
50/60 Hz).
Caution:
7
The device is connected to the mains with the
power plug. To fully disconnect the device from
the mains, pull out the plug.
7
The mains plug is used to disconnect the device. It
shall remain readily operable and should not be
obstructed during intended use.
Inserting the back-up battery
During mains operation, the back-up battery ensures
that stored settings are not lost in the case of a power
failure or when the device is briefly disconnected
from the mains.
1 Open the battery compartment lid by pressing on
the arrow and pushing down the lid.
2 When inserting the battery (micro batteries, 2 x
1.5 V, LR3/ UM 4/ AAA), observe the polarity
marked on the base of the battery compartment.
Note:
7
Remove the back-up battery when it is flat or when
you know that the device will not be used for a
long period of time.
Environmental note:
7
Batteries, including those which do not contain
heavy metal, should not be disposed of with
household waste. Always dispose of used batter-
ies in accordance with local environmental regula-
tions.
4 Set the day of the week (»1« = Monday, »2«,
»3«, »4«, »5«, »6« or »7« = Sunday) using
»TUNING+/HR« or »TUNING-/MIN«.
– The device saves the selected day of the week
automatically after 5 seconds.
Setting alarm time 1
1 Press and hold »VOLUME -/AL 1«.
– Display: the last alarm time set flash alternately.
2 Press »TUNING+/HR« briefly to set the hours
step-by-step or hold down to run through the
hours continuously.
3 Press »TUNING-/MIN« briefly to set the min-
utes step-by-step or hold down to run through the
minutes continuously.
– The device saves the set alarm time automati-
cally after 10 seconds.
– The device wakes you up at the set time with the
alarm signal of your choice.
Setting alarm time 2
1 Press »VOLUME +/AL 2« three times.
– Display: the last alarm time set flash alternately.
OPERATION
Switching on and off
1 Press »ON/OFF« to switch on the device from
standby mode.
2 Press »ON/OFF« to switch the device to standby
mode.
Radio mode
For the best possible FM (VHF) reception, it is suf-
ficient to align the wire antenna accordingly.
Tuning to radio stations
1 Set the radio station by pressing »ON/OFF«.
– Keep pressing »TUNING+/HR« or
»TUNING-/MIN« until you reach the fre-
quency you want.
– Each time you press the button, the frequency
changes by 100 Hz.
Saving radio stations on program-
places
You can save this radio-program on 10 program
places.
1 Set the radio station by pressing and holding
down »TUNING+/HR« or »TUNING-/MIN«.
– The radio station search starts and stops at the
next station with a good reception signal;
or keep pressing »TUNING+/HR« or
»TUNING-/MIN« until you reach the fre-
quency you want.
– Each time you press the button, the frequency
changes by 100 Hz.
2 Press »PRESET« longer.
3 Select the program-place with »TUNING - /+«.
4 Confirm with»PRESET«.
Adjusting the volume
1 Adjust the volume by pressing »VOLUME -/AL
1« or »VOLUME +/AL 2«.
Viewing the alarm time
1 Press »VOLUME -/AL 1« ones (for alarm time 1)
or press »VOLUME +/AL 2« (for alarm time 2).
– Display: the last set alarm time 1 or 2, the LED
»AL 1 « or »AL 2 «.
Note:
▪
If no other button is pressed, the device switches
back automatically to the current time after
10 seconds.
Alarm with radio station
1 Press »ON/OFF« to switch on the device.
2 Select the radio station using the
»-TUNING+/HR« dial.
3 Set the radio station you want as an alarm signal
(»«), and press »AL1« or »AL 2« twice.
– Display: the corresponding LED »AL 1 « or
»AL 2 « lights up.
4 Press »ON/OFF« to switch off the device.
– The device wakes you up at the set time with the
radio station (alarm duration is 59 minutes).
Alarm with signal tone
1 Press »ON/OFF« to switch off the device.
2 Set the signal tone alarm signal
(»«), and press »AL 1« or »AL 2« once.
– The device wakes you up at the set time with the
signal tone (alarm duration is 59 minutes).
Interrupting the alarm
1 Press »SNOOZE« while the alarm is sounding.
– The alarm signal (radio station or signal tone)
stops.
– The alarm goes on again at
9 minute intervals (alarm duration is 59 minutes).
Cancelling the alarm for the day
1 Press »ON/OFF« while the alarm is sounding.
– The alarm signal (radio station or signal tone)
stops, the alarm remains at the set time for the
next day.
Timer mode
The device has a sleep timer, which switches it off in
radio mode at a preset time. The switch-off time can
be set to between 0 minute and 90 minute and then
stays saved.
Activating the sleep timer
1 Press and hold »SLEEP« to switch on the device.
– Display: the switch-off time »0:59« (for 59 min-
utes).
– You will hear the selected radio station.
2 Set the selected switch-off time with
»SLEEP« step-by-step (press briefly).
– After the selected switch-off time has elapsed,
the device switches off automatically.
3 Display the remaining switch-off time with press
and hold »SLEEP«.
Deactivating the sleep timer
1 To deactivate the sleep timer early, press
»ON/OFF«.
– The device switches to stand-by.
Note:
▪
The device realize the switch-off time and offer
this time for the next using like a preselection.
SETTINGS
Setting time and day of the week
If the device has been switched on for the first time
– »0:00« appears in the display as a sign that the
time has to be set. The same applies after a power
failure or if the device has been disconnected from
the mains supply and no back-up battery has been
inserted.
1 Press »TUNING+/HR« briefly to set the hours
step-by-step or hold down to run through the
hours continuously.
2 Press »TUNING-/MIN« briefly to set the min-
utes step-by-step or hold down to run through the
minutes continuously.
Notes:
▪
When the minute display changes from »59« to
»00«, this does not affect the hour display.
▪
The device saves the set time automatically after
10 seconds.
3 To set the day of the week, press and hold
»TIME/MODE«.
– Display: for example, the day of the week »d1«
= Monday.
SETUP AND SAFETY EN
▪
This device is designed for the
playback of audio signals. Any
other use is expressly prohibited.
▪
Protect the device from moisture
(water drops or splashes). Do
not place any vessels such as
vases on the device. These may
be knocked over and spill fluid
on the electrical components,
thus presenting a safety risk.
▪
Do not place any naked flames
such as candles on the device.
▪
Thunderstorms are a danger to
all electrical devices. Even if the
device is switched off, it can be
damaged by a lightning strike to
the mains cable.
2 Press »TUNING+/HR« briefly to set the hours
step-by-step or hold down to run through the
hours continuously.
3 Press »TUNING-/MIN« briefly to set the min-
utes step-by-step or hold down to run through the
minutes continuously.
– The device saves the set alarm time automati-
cally after 10 seconds.
– The device wakes you up at the set time with the
alarm signal of your choice.
▪
Note, prolonged listening
at loud volumes with the
earphones can damage
your hearing.
▪
Do not expose the back-up bat-
tery to extreme heat, caused for
example by direct sunlight, heat-
ers or fire.
▪
Never open the device casing.
No warranty claims are ac-
cepted for damage caused by
incorrect handling.
▪
The type plate is located on the
bottom of the device.
▪
Do not expose the device to ex-
treme heat, caused for example
by direct sunlight, heator fire.
TUNING+/HRVOL+/AL 2
VOL-/AL 1
TUNING-/MIN
ON/OFF
PRESET
TIME
USB(130)
Always disconnect the mains
cable during a storm.
▪
If malfunctions occur due to
static electricity charges or brief
mains voltage surges, reset the
device. To do this, pull out the
mains adapter and connect it
again after a few seconds.
▪
Make sure the device is ade-
quately ventilated. Do not cover
the ventilation slots with newspa-
pers, table cloths, curtains, etc.
SLEEP
SNOOZE
DIMMER
Hulp nodig? Stel uw vraag in het forum
1
Forum
Grundig-Sonoclock-1000
Zoeken resetten
Goedemiddag, ik zoek een schema van de Grundig Sonoclock 100, dit is een wekkerradio. Kunt u mij daar aan helpen? M.v.g. H.J. Simpelaar Electronicus.
Gesteld op 9-5-2023 om 16:40
Gebruikershandleiding.com neemt misbruik van zijn services uitermate serieus. U kunt hieronder aangeven waarom deze vraag ongepast is. Wij controleren de vraag en zonodig wordt deze verwijderd.
Product:
Spelregels forum
Om tot zinvolle vragen te komen hanteren wij de volgende spelregels:
lees eerst de handleiding door;
controleer of uw vraag al eerder door iemand anders is gesteld;
probeer uw vraag zo duidelijk mogelijk te stellen;
heeft u een probleem en al geprobeerd om dit op te lossen, vermeld dit erbij aub;
heeft u een oplossing gekregen van een bezoeker dan horen wij dat graag in dit forum;
wilt u een reactie geven op een vraag of antwoord, gebruik dan niet dit formulier maar klik op de knop 'reageer op deze vraag';
uw vraag wordt direct op de website gezet; vermijd daarom persoonlijke gegevens in te vullen;
Belangrijk! Als er een antwoord wordt gegeven op uw vraag, dan is het voor de gever van het antwoord nuttig om te weten als u er wel (of niet) mee geholpen bent! Wij vragen u dus ook te reageren op een antwoord.
Belangrijk! Antwoorden worden ook per e-mail naar abonnees gestuurd. Laat uw emailadres achter op deze site, zodat u op de hoogte blijft. U krijgt dan ook andere vragen en antwoorden te zien.
Abonneren
Abonneer u voor het ontvangen van emails voor uw Grundig Sonoclock 1000 bij:
nieuwe vragen en antwoorden
nieuwe handleidingen
U ontvangt een email met instructies om u voor één of beide opties in te schrijven.
Ontvang uw handleiding per email
Vul uw emailadres in en ontvang de handleiding van Grundig Sonoclock 1000 in de taal/talen: Engels als bijlage per email.
De handleiding is 0,31 mb groot.
U ontvangt de handleiding per email binnen enkele minuten. Als u geen email heeft ontvangen, dan heeft u waarschijnlijk een verkeerd emailadres ingevuld of is uw mailbox te vol. Daarnaast kan het zijn dat uw internetprovider een maximum heeft aan de grootte per email. Omdat hier een handleiding wordt meegestuurd, kan het voorkomen dat de email groter is dan toegestaan bij uw provider.
Uw handleiding is per email verstuurd. Controleer uw email
Als u niet binnen een kwartier uw email met handleiding ontvangen heeft, kan het zijn dat u een verkeerd emailadres heeft ingevuld of dat uw emailprovider een maximum grootte per email heeft ingesteld die kleiner is dan de grootte van de handleiding.
Er is een email naar u verstuurd om uw inschrijving definitief te maken.
Controleer uw email en volg de aanwijzingen op om uw inschrijving definitief te maken
U heeft geen emailadres opgegeven
Als u de handleiding per email wilt ontvangen, vul dan een geldig emailadres in.
Uw vraag is op deze pagina toegevoegd
Wilt u een email ontvangen bij een antwoord en/of nieuwe vragen? Vul dan hier uw emailadres in.