ENGLISH ENGLISH ENGLISH ENGLISH ENGLISH ENGLISH ENGLISH ENGLISH ENGLISH ENGLISH ENGLISH ENGLISH ENGLISH ENGLISH ENGLISH ENGLISH ENGLISH ENGLISH ENGLISH ENGLISH ENGLISH ENGLISH ENGLISH ENGLISH ENGLISH ENGLISH ENGLISH ENGLISH ENGLISH ENGLISH ENGLISH ENGLISH ENGLISH ENGLISH ENGLISH ENGLISH ENGLISH ENGLISH
ENGLISH ENGLISH ENGLISH ENGLISH ENGLISH ENGLISH ENGLISH ENGLISH ENGLISH ENGLISH ENGLISH ENGLISH ENGLISH ENGLISH ENGLISH ENGLISH ENGLISH ENGLISH ENGLISH ENGLISH ENGLISH ENGLISH ENGLISH ENGLISH ENGLISH ENGLISH ENGLISH ENGLISH ENGLISH ENGLISH ENGLISH ENGLISH ENGLISH ENGLISH ENGLISH ENGLISH ENGLISH ENGLISH
POLSKI POLSKI POLSKI POLSKI POLSKI POLSKI POLSKI POLSKI POLSKI POLSKI POLSKI POLSKI POLSKI POLSKI POLSKI POLSKI POLSKI POLSKI POLSKI POLSKI POLSKI POLSKI POLSKI POLSKI POLSKI POLSKI POLSKI POLSKI POLSKI POLSKI POLSKI POLSKI POLSKI POLSKI POLSKI POLSKI POLSKI POLSKI POLSKI POLSKI POLSKI POLSKI POLSKI POLSKI POLSKI POLSKI POLSKI POLSKI
POLSKI POLSKI POLSKI POLSKI POLSKI POLSKI POLSKI POLSKI POLSKI POLSKI POLSKI POLSKI POLSKI POLSKI POLSKI POLSKI POLSKI POLSKI POLSKI POLSKI POLSKI POLSKI POLSKI POLSKI POLSKI POLSKI POLSKI POLSKI POLSKI POLSKI POLSKI POLSKI POLSKI POLSKI POLSKI POLSKI POLSKI POLSKI POLSKI POLSKI POLSKI POLSKI POLSKI POLSKI POLSKI POLSKI POLSKI POLSKI
Digital Cable Receiver
KP 07/2012
ModelID: X2
• Slot for Smart Card
• Support of SD/HD (MPEG2 / MPEG4) DVB-C
systems
• High definion video output - HDMI
• Standard resoluon video output - SCART
• High speed USB 2.0 port
• PVR Ready
• Time Shi (pause, rewind)
• Automac Stand-by
• Low power consumpon in Stand-by mode,
below 1W
• Mullingual menu, including English
• Electronic Program Guide - EPG
• 4 digit LED display on front panel
• Mulmedia Player Full HD 1080p
Quick Start
Remote controller
BuonFuncon
POWER -
HDMI
MUTE -
Numeric
buons
LAST -
FAV
INFO
EPG
EXIT
HOME
MAILBOX
PVR
STATUS
AUDIO
TEXT
SUB-T
P- / P+
TV/
/
/
MENU
FIND
SLOW, SKIP-,
SKIP+, REW, FF,
PLAY, PAUSE,
STOP, REC
RED, GREEN,
YELLOW, BLUE,
WHITE, BLACK
OK
Switch receiver on from standby mode.
Select video output resoluon.
Enable or disable the audio.
Switch to the previous channel.
Display informaon bar of current service.
Switch receiver between TV and radio mode.
Move cursor to next or previous page.
Oponal funcon.
Oponal funcon.
Display records list.
Display receiver status window.
Audio channels setup.
Display teletext informaon.
Subtles setup.
Video funcons
(meshi, playing, recording).
Colour buons
(different funcons per menu).
Display Electronic Program Guide on screen.
Cancel the user selecon and return to the
viewing mode from the menu.
Adjust volume level or move cursor le or right
in the menu.
Change channel or move cursor up or down
in the menu.
Enables to find channels by name entered by
numeric buons.
Display channel list on screen.
Select an item in menu.
Select channel or enter programming
parameters.
Switch between Sleep Timer Off
10/30/60/90/120 minutes.
Set receiver to the favourite list mode, display
actual favorite channel list.
Display the Main Menu on the screen or return
to the previous menu or status.
Basic connecon
ENGLISH ENGLISH ENGLISH ENGLISH ENGLISH ENGLISH ENGLISH ENGLISH ENGLISH ENGLISH ENGLISH ENGLISH ENGLISH ENGLISH ENGLISH ENGLISH ENGLISH ENGLISH ENGLISH ENGLISH ENGLISH ENGLISH ENGLISH ENGLISH ENGLISH ENGLISH ENGLISH ENGLISH ENGLISH ENGLISH ENGLISH ENGLISH ENGLISH ENGLISH ENGLISH ENGLISH ENGLISH ENGLISH
ENGLISH ENGLISH ENGLISH ENGLISH ENGLISH ENGLISH ENGLISH ENGLISH ENGLISH ENGLISH ENGLISH ENGLISH ENGLISH ENGLISH ENGLISH ENGLISH ENGLISH ENGLISH ENGLISH ENGLISH ENGLISH ENGLISH ENGLISH ENGLISH ENGLISH ENGLISH ENGLISH ENGLISH ENGLISH ENGLISH ENGLISH ENGLISH ENGLISH ENGLISH ENGLISH ENGLISH ENGLISH ENGLISH
Digital Cable Receiver
KP 07/2012
ModelID: X2
• Slot for Smart Card
• Support of SD/HD (MPEG2 / MPEG4) DVB-C systems
• High definion video output - HDMI
• Standard resoluon video output - SCART
• High speed USB 2.0 port
• PVR Ready
• Time Shi (pause, rewind)
• Automac Stand-by
• Low power consumpon in Stand-by mode,
below 1W
• Mullingual menu, including English
• Electronic Program Guide - EPG
• 4 digit LED display on front panel
• Mulmedia Player Full HD 1080p
Quick Start
1234
Aer purchasing receiver,
unpack it and check if all of
the following items are
included:
• Receiver
• Remote controller
• Quick Start manual
• Baeries - 2x AAA (oponal)
To install baeries in the
remote controller remove the
flap protecng the baery
chamber. If there are used
baeries, they must be
removed. Put new baeries
inside according to polarity
descripon drawn inside. Place
protecng flap on its original
posion.
Connect cable from
DVB-C socket to receiver’s
CABLE IN connector.
Using HDMI cable
connect receiver with flat
panel TV or
Using SCART cable
connect it with classic TV.
At the end connect main
cord to the main socket.
1
2
3
4
Turn on the TV Set. Aer a while on TV Set You should see receiver’s OSD . If
the TV Set is not displaying receiver’s OSD, probably signal source is set
wrong. Check TV Set documentaon for informaon how to change signal
source.
Operang notes
Simple configuraon
Automac Power Down
In accordance with actual European Union requirements, Your receiver is
equipped with funcon “Automac Power Off”. It work by switching the
receiver into standby mode aer a period of 3 hours aer the last acve
use. In pracce this means that if during this me the receiver will not be
given any command by using the remote control or keypad on the front
panel, the receiver turns off. Turning off the receiver will be preceded
(2 minutes previous) by a relevant message on the TV screen. Please also
note that this feature is enabled by deafault, but at Your own request, You
can disable it using the appropriate funcons in the receiver menu.
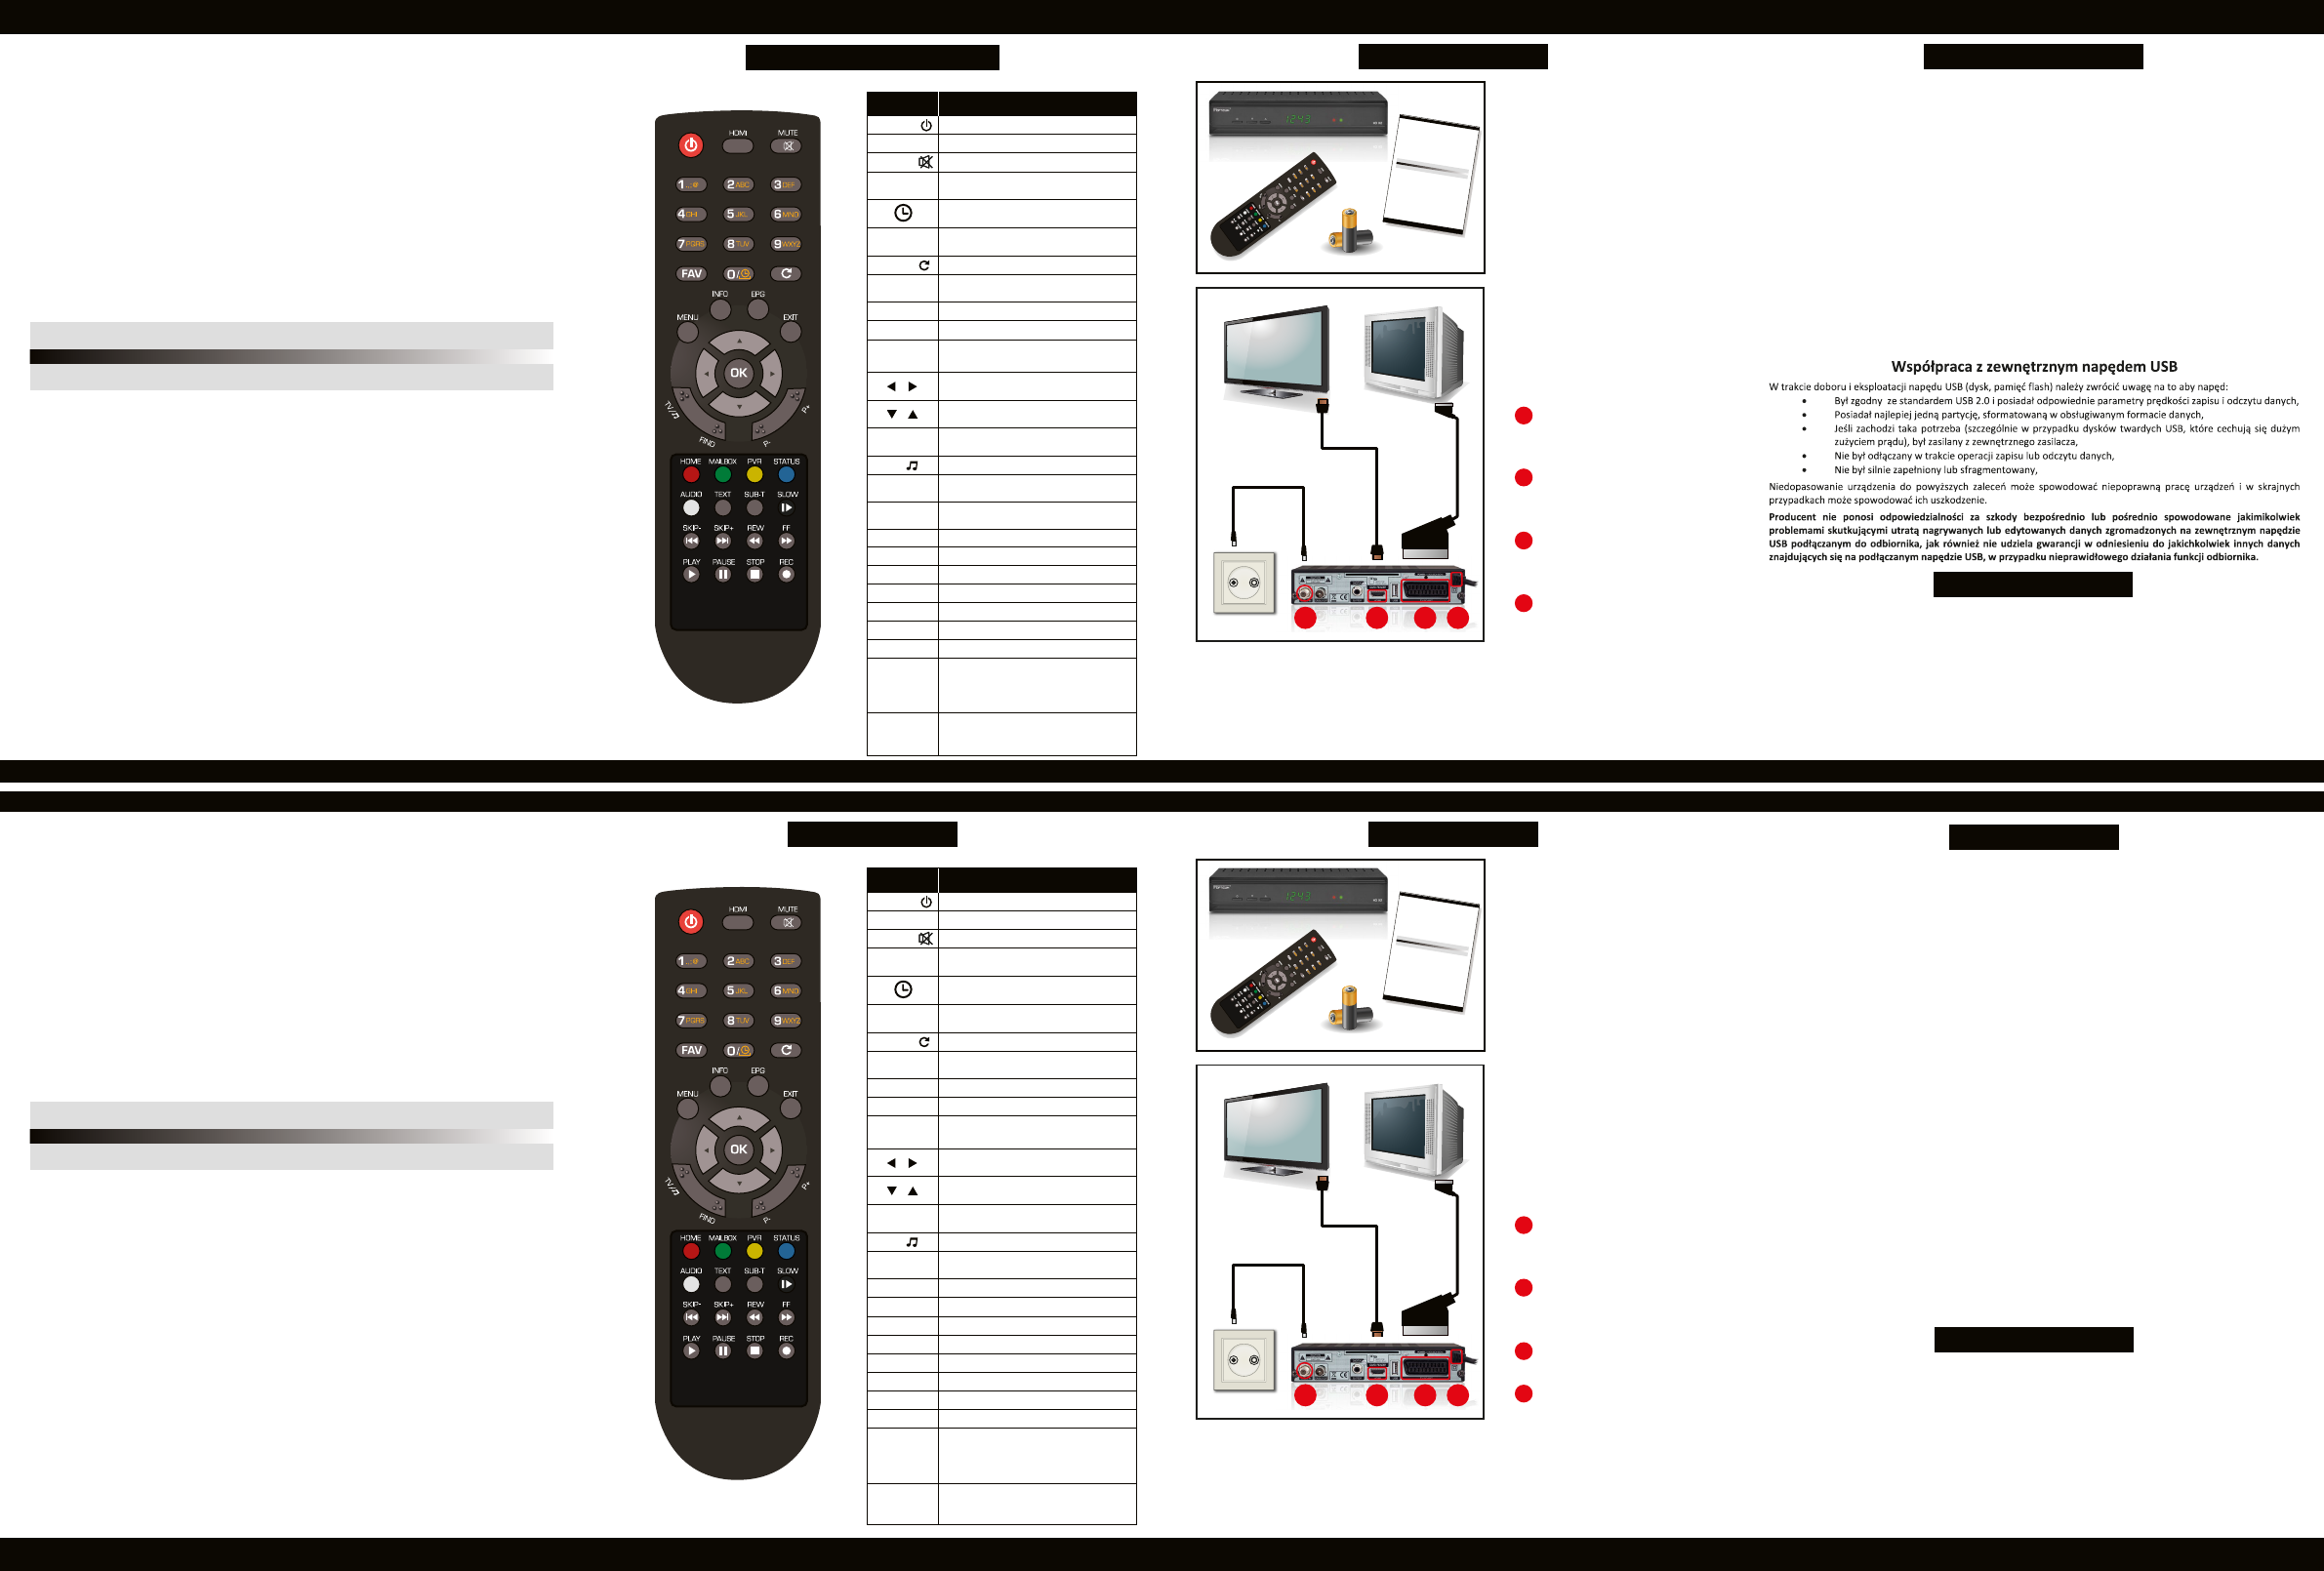
During the selecon and operaon with USB drive (HDD, flash drive), You
should pay aenon to the following issues:
• Drive is compable with USB 2.0 and has appropriate write and read
speed,
• Drive contain one single paron, formaed in suppoerted format,
• If nessesary, drive should be supplied from an external power supply
(especially for USB hard drives),
• Do not disconnect the drive during a write/read data operaon,
• Do not use very full or fragmented drive.
Aer connecng and turning on the receiver, if there is no default channels
list provided by Your Operator, You can choose search sengs and scan
channels to setup Your own channels list.
In the main menu (MENU buon) using arrow buons select Channel Scan
submenu and enter it using OK buon. Use Auto Search or Quick Search to
input parameters depending on Your Operator cable network. If You do not
have the parameters try Blindscan or contact Your Operator.
Working with External USB Drive
Uwagi eksploatacyjne
Prosta konfiguracja
Zgodnie z aktualnie obowiązującymi wymaganiami zawartymi w dyrekty-
wach Unii Europejskiej, zakupiony przez Państwa odbiornik został
wyposażony w funkcję “Automatycznego Wyłączenia Zasilania”. Jej
działanie polega na przełączeniu odbiornika do stanu czuwania po okresie 3
godzin od ostatniego aktywnego użycia. W praktyce oznacza to, że jeżeli w
ciągu tego czasu do odbiornika nie zostanie wydana żadna komenda za
pomocą przycisków pilota zdalnego sterowania lub klawiatury na panelu
przednim, odbiornik wyłączy się. Moment wyłączenia odbiornika zostanie
na ekranie telewizora. Jednocześnie informujemy, że funkcja ta jest
domyślnie aktywna w oprogramowaniu dedykowanym na kraje Unii
Europejskiej, jednak na własne życzenie możecie je Państwo ją wyłączyć za
pomocą odpowiedniej funkcji w menu odbiornika.
Po podłączeniu i włączeniu odbiornika, jeśli nie istnieje gotowa lista
kanałów dostarczona przez Państwa operatora telewizji kablowej, możecie
Państwo ustawić własną listę kanałów.
W głównym menu (przycisk MENU na pilocie) używając przyciski strzałek
wybierz Channel Scan podmenu i wejdź do niego używając przycisku OK.
Używając Automatyczne wyszukiwanie lub Szybkie wyszukiwanie wybierz
parametery zależne od Twojej sieci kablowej. Jeśli nie znasz parametrów,
użyj funckcji Blindscan lub skontaktuj się ze swoim operatorem.
Automatyczne wyłączenie zasilania
Cyfrowy odbiornik telewizji kablowej
KP 07/2012
ModelID: X2
• Czytnik kart dostępu
• Obługa systemów SD/HD (MPEG2 / MPEG4)
DVB-C
• Wyjście video wysokiej rozdzielczości - HDMI
• Wyjście video standardowe - SCART
• Złącze USB w standardzie 2.0
• PVR Ready - nagrywanie na zewnętrzny dysk
• Time Shi (zatrzymywanie i przewijanie obrazu)
• Automatyczny tryb Stand-by
• Niskie zużycie prądu w trybie Stand-by,
poniżej 1W
• Wielojęzyczne menu
• Electroniczny Przewodnik po Programach - EPG
• 4-cyfrowy wyświetlacz LED na przednim panelu
• Odtwarzacz mulmedialny Full HD 1080p
Szybka instalacja
Pilot zdalnego sterowania
PrzyciskFunkcja
POWER -
HDMI
MUTE -
Numeric
buons
LAST -
FAV
INFO
EPG
EXIT
HOME
MAILBOX
PVR
STATUS
AUDIO
TEXT
SUB-T
P- / P+
TV/
/
/
MENU
FIND
SLOW, SKIP-,
SKIP+, REW, FF,
PLAY, PAUSE,
STOP, REC
RED, GREEN,
YELLOW, BLUE,
WHITE, BLACK
OK
Włącza/wyłącza odbiornik z/do trybu czuwania.
Przełącza rozdzielczość wyjścia obrazu.
Włącza/wyłącza dźwięk.
Przełącza na poprzednio oglądany kanał.
Wyświetla pasek informacyjny.
Przełącza między trybami TV i radio.
Przenosi kursor na poprzedni lub kolejny kanał lub
stronę w menu.
Funkcja opcjonalna.
Funkcja opcjonalna.
Wyświetla listę nagrań.
Wyświetla okno statusu odbiornika.
Ustawienia audio.
Wyświetla telegazetę.
Ustawienia napisów.
Funkcje wideo
(meshi, odtwarzanie, nagrywanie).
Przyciski kolorowe
(różne funkcje w zależności od menu).
Wyświetla elektroniczny przewodnik po kanałach.
Anuluje wybór użytkownika. Przechodzi w
menu do poziomu wyżej i trybu oglądania.
Ustawia poziom głośności lub poruszanie się po
menu.
Zmienia kanał lub poruszanie się po menu.
Pozwala znaleźć kanał poprzez wpisanie jego
nazwy.
Wyświetla listę kanałów.
Wybiera element z menu.
Wybiera kanał i pozwala na wprowadzenie
wartości parametró w menu.
Przełącza czas automatycznego przejścia w tryb
czuwania na 10/30/60/90/120 minut.
Przełącza listę kanałów na tryb ulubionych,
wyświetla aktualnie wybraną listę ulubionych.
Wyświetla menu głóne na ekranie; w menu
przechodzi do poprzedniego poziomu.
Proste podłączenie
ENGLISH ENGLISH ENGLISH ENGLISH ENGLISH ENGLISH ENGLISH ENGLISH ENGLISH ENGLISH ENGLISH ENGLISH ENGLISH ENGLISH ENGLISH ENGLISH ENGLISH ENGLISH ENGLISH ENGLISH ENGLISH ENGLISH ENGLISH ENGLISH ENGLISH ENGLISH ENGLISH ENGLISH ENGLISH ENGLISH ENGLISH ENGLISH ENGLISH ENGLISH ENGLISH ENGLISH ENGLISH ENGLISH
ENGLISH ENGLISH ENGLISH ENGLISH ENGLISH ENGLISH ENGLISH ENGLISH ENGLISH ENGLISH ENGLISH ENGLISH ENGLISH ENGLISH ENGLISH ENGLISH ENGLISH ENGLISH ENGLISH ENGLISH ENGLISH ENGLISH ENGLISH ENGLISH ENGLISH ENGLISH ENGLISH ENGLISH ENGLISH ENGLISH ENGLISH ENGLISH ENGLISH ENGLISH ENGLISH ENGLISH ENGLISH ENGLISH
Digital Cable Receiver
KP 07/2012
ModelID: X2
• Slot for Smart Card
• Support of SD/HD (MPEG2 / MPEG4) DVB-C systems
• High definion video output - HDMI
• Standard resoluon video output - SCART
• High speed USB 2.0 port
• PVR Ready
• Time Shi (pause, rewind)
• Automac Stand-by
• Low power consumpon in Stand-by mode,
below 1W
• Mullingual menu, including English
• Electronic Program Guide - EPG
• 4 digit LED display on front panel
• Mulmedia Player Full HD 1080p
Quick Start
1234
Po zakupie odbiornika,
rozpakuj go i sprawdź czy
w opakowaniu znajdują się:
• Odbiornik
• Pilot
• Instrukcja szybkiej instalacji
• Baterie - 2x AAA
(opcjonalnie)
Aby zainstalować baterie
należy najpierw zdjąć klapkę
zabezpieczającą komorę na
baterie w pilocie. Jeśli znajdują
się w niej baterie, należy je
wymienić. Włóż nowe baterie
zgodnie z oznaczeniami polary-
zacji. Załóż z powrotem klapkę.
Podłącz kabel z gniazdka
telewizji kablowej do wejścia
cable-in w odbiorniku.
Używając kabla HDMI
podłącz odbiornik do płaskiego
telewizora lub
Używając kabla SCART
podłącz odbiornik do tradycyj-
nego telewizora.
Na koniec podłącz
odbiornik do prądu.
1
2
3
4
Uruchom telewizor i włącz odbiornik przyciskiem pilota POWER. Po krótkiej
chwili na ekranie telewizora ukaże się interfejs obsługi odbiornika (OSD).
Jeśli telewizor nie wyświetla OSD, źródło sygnału w telewizorze zostało źle
wybrane. Sprawdź dokumentację telewizora w celu sprawdzenia ustawień.
Gebruikershandleiding.com neemt misbruik van zijn services uitermate serieus. U kunt hieronder aangeven waarom deze vraag ongepast is. Wij controleren de vraag en zonodig wordt deze verwijderd.
Product:
Spelregels forum
Om tot zinvolle vragen te komen hanteren wij de volgende spelregels:
lees eerst de handleiding door;
controleer of uw vraag al eerder door iemand anders is gesteld;
probeer uw vraag zo duidelijk mogelijk te stellen;
heeft u een probleem en al geprobeerd om dit op te lossen, vermeld dit erbij aub;
heeft u een oplossing gekregen van een bezoeker dan horen wij dat graag in dit forum;
wilt u een reactie geven op een vraag of antwoord, gebruik dan niet dit formulier maar klik op de knop 'reageer op deze vraag';
uw vraag wordt direct op de website gezet; vermijd daarom persoonlijke gegevens in te vullen;
Belangrijk! Als er een antwoord wordt gegeven op uw vraag, dan is het voor de gever van het antwoord nuttig om te weten als u er wel (of niet) mee geholpen bent! Wij vragen u dus ook te reageren op een antwoord.
Belangrijk! Antwoorden worden ook per e-mail naar abonnees gestuurd. Laat uw emailadres achter op deze site, zodat u op de hoogte blijft. U krijgt dan ook andere vragen en antwoorden te zien.
Abonneren
Abonneer u voor het ontvangen van emails voor uw Globo HD XC2 bij:
nieuwe vragen en antwoorden
nieuwe handleidingen
U ontvangt een email met instructies om u voor één of beide opties in te schrijven.
Ontvang uw handleiding per email
Vul uw emailadres in en ontvang de handleiding van Globo HD XC2 in de taal/talen: Engels als bijlage per email.
De handleiding is 4,95 mb groot.
U ontvangt de handleiding per email binnen enkele minuten. Als u geen email heeft ontvangen, dan heeft u waarschijnlijk een verkeerd emailadres ingevuld of is uw mailbox te vol. Daarnaast kan het zijn dat uw internetprovider een maximum heeft aan de grootte per email. Omdat hier een handleiding wordt meegestuurd, kan het voorkomen dat de email groter is dan toegestaan bij uw provider.
Uw handleiding is per email verstuurd. Controleer uw email
Als u niet binnen een kwartier uw email met handleiding ontvangen heeft, kan het zijn dat u een verkeerd emailadres heeft ingevuld of dat uw emailprovider een maximum grootte per email heeft ingesteld die kleiner is dan de grootte van de handleiding.
Er is een email naar u verstuurd om uw inschrijving definitief te maken.
Controleer uw email en volg de aanwijzingen op om uw inschrijving definitief te maken
U heeft geen emailadres opgegeven
Als u de handleiding per email wilt ontvangen, vul dan een geldig emailadres in.
Uw vraag is op deze pagina toegevoegd
Wilt u een email ontvangen bij een antwoord en/of nieuwe vragen? Vul dan hier uw emailadres in.