USER GUIDE
!!! Please refer to our website
may be important up
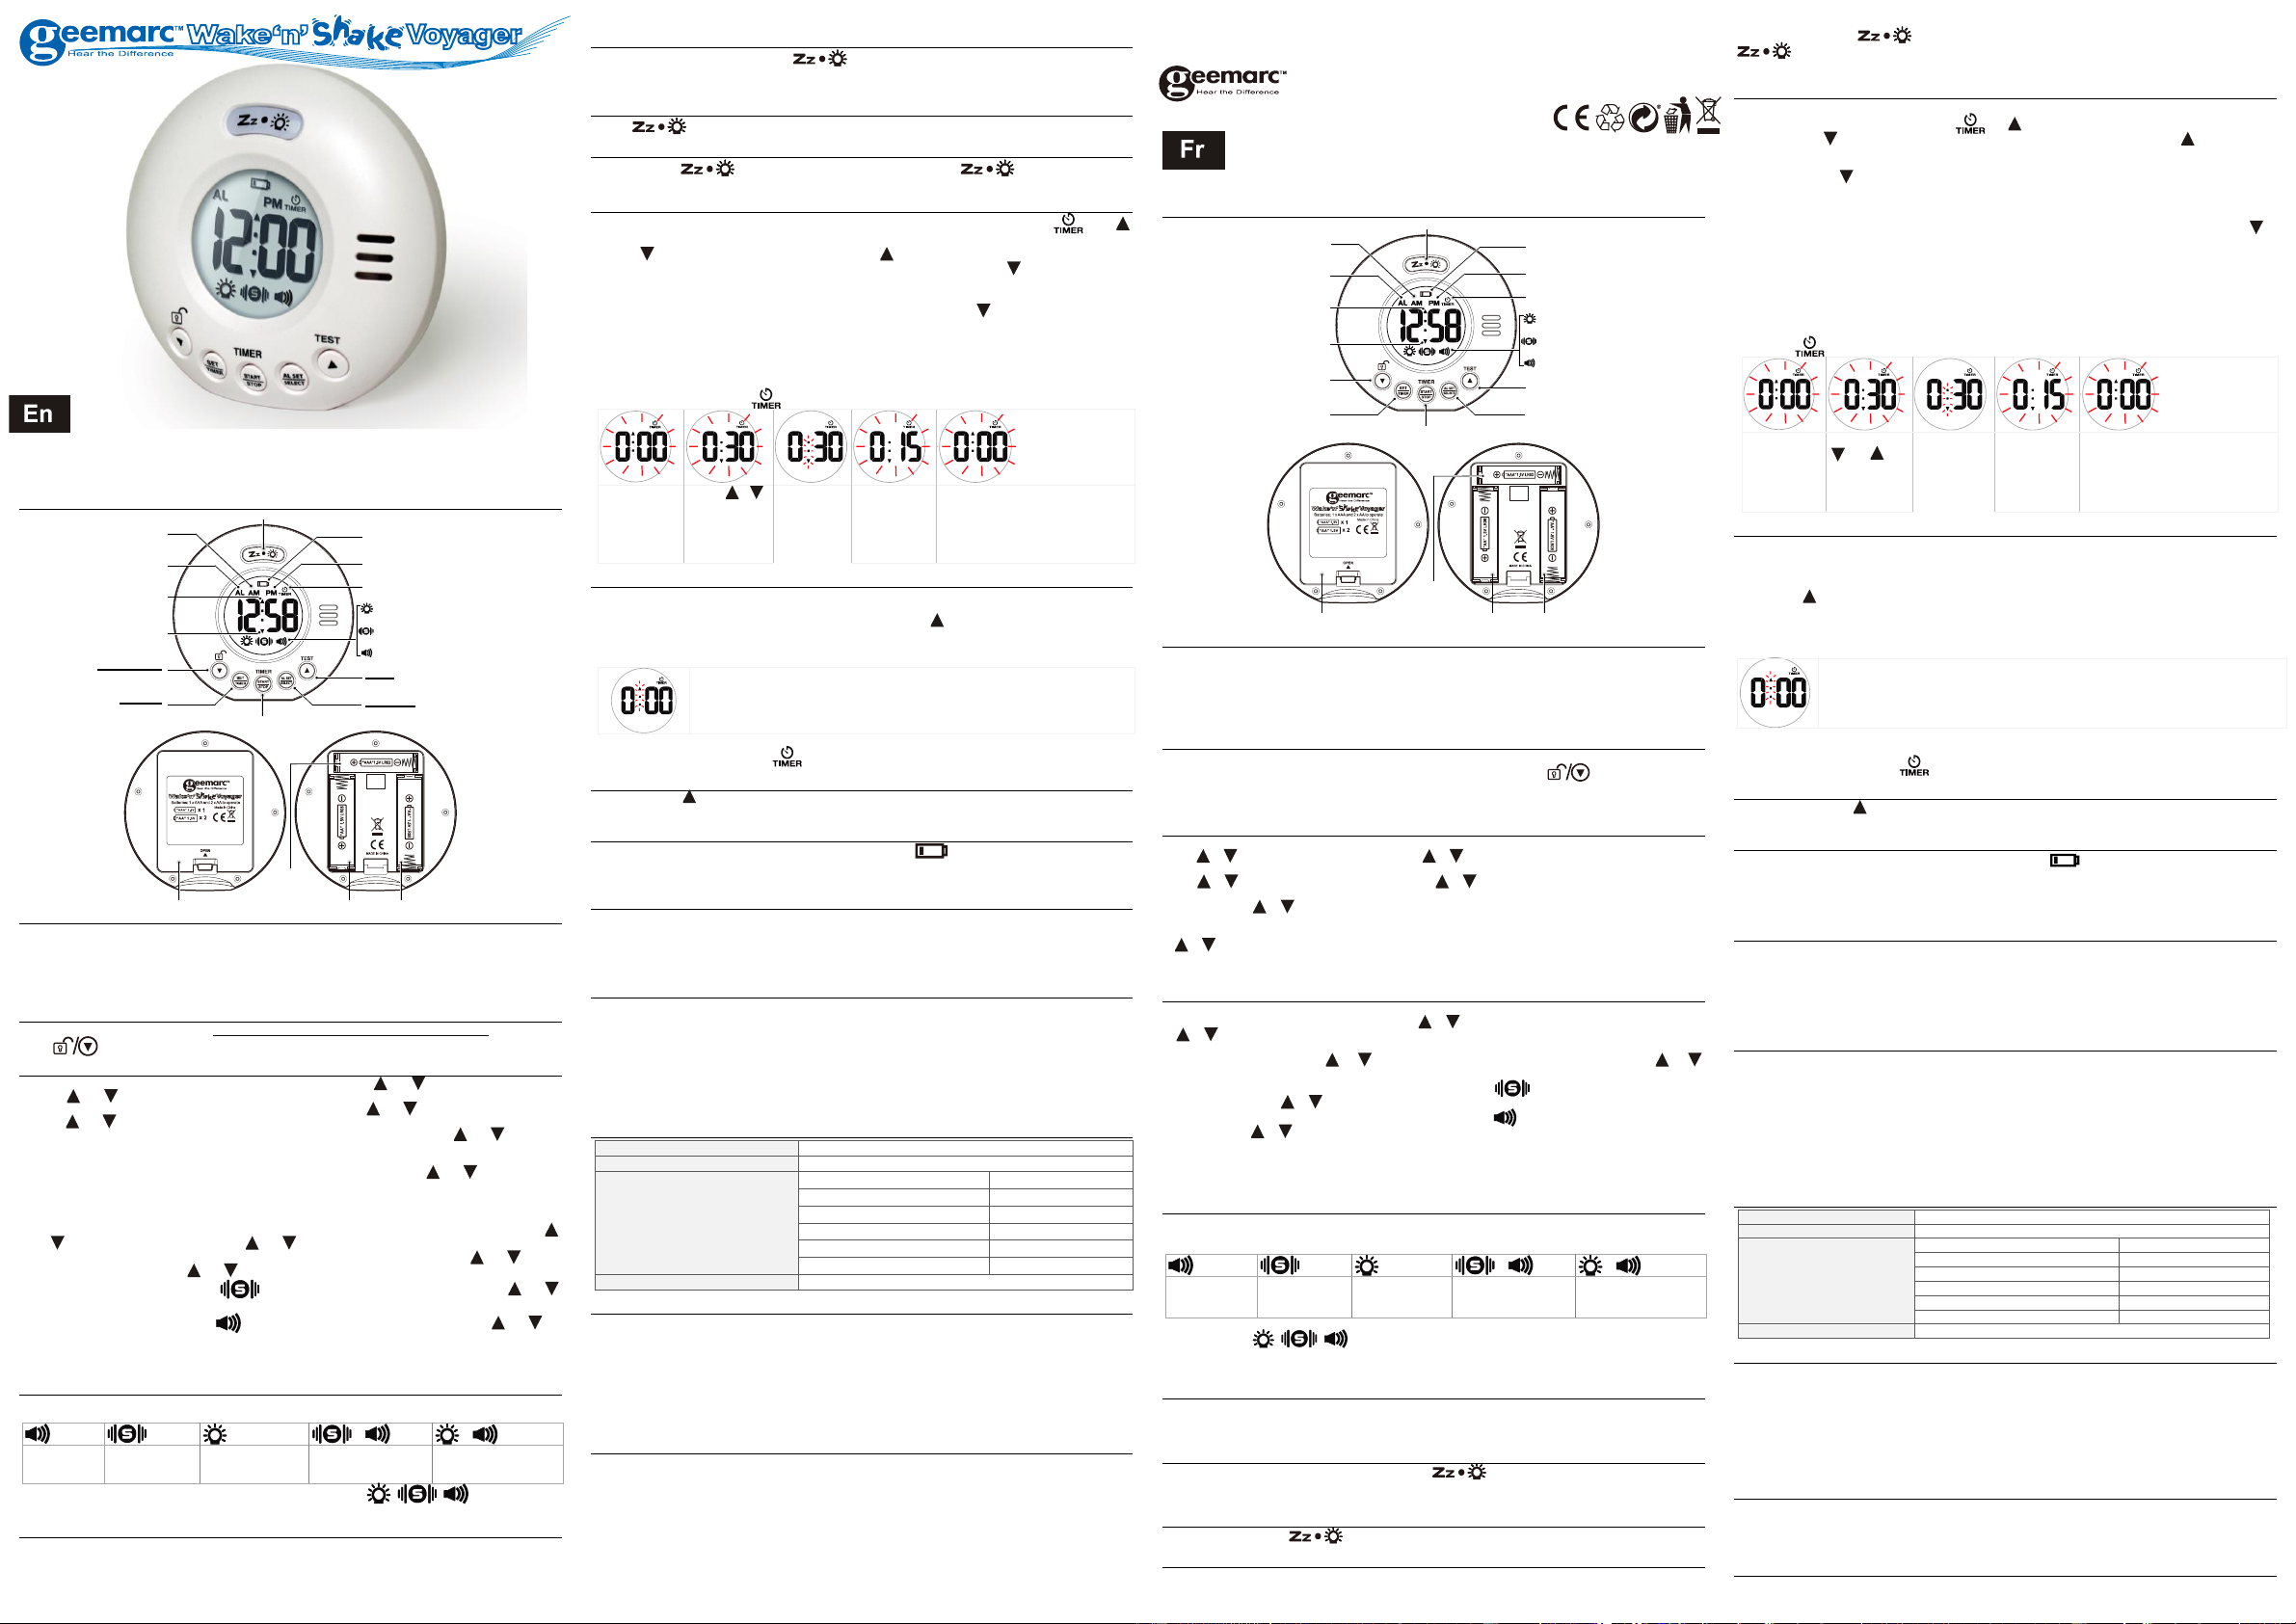
DESCRIPTION OF
BA
Y
1.Place your unit face down o
2.Press the latch and remove t
3.Insert 1 x AAA
correct “+” and “- “polari
4.Replace the battery cover.
AUTO KEY
Auto 1 minute).
hold DOWN button to release the key lock, two soft and short beep to
TO SET
1.Press and hold SET / , the hour d 0 ” or to set the time in hours
(hold or to advance rapidl
2.Press SET again, th00 ” flash. to set
(hold or to advan
3.Press SET T again, the di shows “ 24Hr ” a Press o to
“12Hr ” or “ 24Hr ” time format. The AM icon appears to i PM icon to
indicate the afternoon time.
4.Press SET again, 05 ” or to
snooze time from 5 to 60 mi
5.SE ( o).
THE
1.Press and hold AL SET / SELECT, the AL appea rs a
or to set the alarm in hours. (hold o to advance rapidly).
2.Press AL once . or to
the alarm in minutes. (hold or to advance rapidl
3.Press AL and “ HI ” or
to select “LO ” (vibratineeded..
4.Press AL SET / again, and “ HI ” flash (Sound at or to
select “LO ” (Sound at Low level
5.PA once
AdmSET norm al
TO SELECT
At AL one
correspon
only sound
alarm is
activated
only shaker
alarm is
activated
only strobe light
alarm is activated
both sound and
vibration alarm are
activated
both strobe light and
sound alarm are
activated
Press A on alarm
disappear
TO ST
WhenA once
to
ind
TO USE SNOOZ
When the alarm is sounding, pres s once, the alarm will
the corresponding alarm i
snooze duration is over.
TO USE BACKLIGHT
Press on
TO USE FLASHLIGHT
Pre to ac to de-aate th
flas
TO USE COUNTDOW
1.At normal time diSET / TIMER o and
will appear with ” 0:00 ” flash.
2.P to to
3.Press ST once to start countdown in minutes, then ” : ” and ” ” flash.
4.During S
flashes. Press and hold STA to stop or reset the co
5.Press ST again for continuous counting down. ” : ” and ” ” flash again.
6.the tim0:00” (00 with
stST on
7.Press ST
S
Remark: When timer is active and counting down or up, press the SET / TI can return to the
time display will flash on the nor
Press SET
TIER o
to
mode.
Press or
to set
cou
time
Press
ST
ST o
to
down
Press ST
/ S to
pa
down
When
0:00(0 seconds), th
sou
up
ST on
tim
TO USE COUNT
1.At SET
Press and hold STA to reset timer value to” 0:00” .
2.Press ST once to start count up timer: ” and ” ” flash.
3.During ST
Press and hold STA to stop or reset the counting
4.Press ST once again to continue counting up.
W0:00 (Press and hold ST), press
ST oup.
Remark: When timer iSET / TIMthi is will return
the time display. The t wi
TEST MODE
Press and h / T button, strobe light flashing,
seconds and then stops.
LOW
When the will ap pea r
of the LCD. Replace batteri
Remark: frequent use of the v
TROUBLE SHOOTING
If
di or
ob
Low
batteries with new ones.
CARE OF
1..
2.Protect your furniture wh
cloth or protective material
3.Clean your unit with a soft cloth moistened only with mild soap and water
as Benzene, thinner or simil
is unplugged before cleani
4.If
batteries
dirty
SPECIFICA
Snooze duration Adjust
Count-up / countdown time
GUARANTEE
Fro
yea
expwww..
gua
ta or wh no
Gee
IMYO
PR
Please note: The guarantee
DECLARA
CE : Geemar
the essential requirements and other rel
T
The CE declarawww.geem
Recycling The W
put in place for the products at the e
When
one of the followi
- Remove the batteries a
appropriate W
- Or
Thus if you respect these instr
For product support and help vi ww.geemarc.com
United Kingdom: 5B Swall
Hertfordshire,
telephone 01707 387602 or fa01707 832529
GUIDE D’UTILIS
!!! V
importantes et changement dont vous devez être cons!!!
VUE DE L
INST
V
1.Placez votre appareil face vers l
2.Appuyez sur le loquet et retière de votre appareil
3.Insér
polarit».
4.Remettez le couvercl
VEROUILLAGE
Le v
appuyé sur aucu DOWN (le bouto
plus à
POUR RÉGLER L'HEURE ET LA
DE SONNERIE
1.R,0»
su ou ou
2.Réappuyez suRÉGLA,00 »
su ou ou en
3.Réappuyez RÉGL 24Hr »
Appuyez ou pou r 12Hr »24Hr ». AM
l’heure du matin et PM indiq-midi
4.RÉG l’é05 »
ou
5.Réappuyez sur la touche de RÉGLAGE / MINUTERIE ou ne presse sur aucune to
pendant environ 10 secondes po
POUR RÉGLER L'ALARME (par
1.Maintenez la touche de RÉGL eAL apparaît et les chiffres des
heures de l'alarme cli ou pour régler l
ou enfoncée pour avancer rapi
2.Réappuyez RÉGL ,
clignotent. Appuyez sur ou pour régler l en minutes. (maintene ou
enfoncée pour avancer rapideme
3.Réappuyez sRÉGL , et «HI »
fort). ou pour sélectir « LO » (vibreur plus faibl
4.Réappuyez sur RÉGLAGE , et «HI »
appuyez sur ou pour sélectiLO » (son plus bas) si nécessaire.
5.Réappuyez sur la touche RÉ AL / S ou ne presse sur aucune to
pendant environ 1
sonore, appRÉGLAGE
mode d'affichage standard de l'heure.
POUR SÉLECTIONNER LE MODE
En mode d'affichage standard de l'hRÉGLAGE AL / SÉLECTION ,
une fois
droit de l'affichage de l'heure sera all
seule l'alarme
sonore est
activée
seul le vibreur
est activé
seule l'alarme
clignotante est
activée
les deux alarmes
sonore et vibrante
sont activées
les deux alarmes
clignotante et sonore
sont activées
RéappuyezRÉGLAGE
les disparais ut
verticale,
POUR
PROCHAIN JOUR
Lorsque
touche RÉGL
déclenche le jour suivant.
POUR UTILISER LA
Lorsque ,
et l'indicateur d'alarme
la durée de répétiti
POUR
Appuyez une fois sur pour activer l
POUR L
Maintenez enfoncée
enfoncée pour désactiver l
POUR UTILISER LA
REBOURS)
1.En d’affichage standard, appuyez une fois sur l de RÉGL,
l’écran passe en mode de minuterie, et apparaissent et «0:00 » se met à cli
2.Appuyez s pou pour
minuterie dégressive en minutes.
3.Appuyez une fois sur la touche de DÉBUT / FIN pour démarrer le compte à rebours en
puis sur « : », « » commence à cl
4.Au DÉB po
l’écran se met à clignoter Maintenez e la touche DÉBUT / FIN po arrêter ou
réinitialiser le compte à rebo
5.Réappuyez touche DÉBU à rebours. « : « »
recommencent à cli
6.Lorsque la minuterie atteint « 0:00 » (00 seconde),
Elle
touche DÉBUT / FIN pour arrêter l
7.Réappuyez sur la touche DÉBUT / FI , l'affichage i l dernier compte à rebours et
clignote. Répétez les étapes 2 à 5 po
Remarque:
appuyez RÉGLAGE
minuterie clignote sur l’écran standard d
Appuyez Set
/ Timer une
fois pour
entrer en
mode
chronométre
Appuyez sur
pour ajuster
le temps du
chronométre
Appuyez sur
ST
STOP une
fois pour
décompter
Appu
ST
ST pou
fair
pau
Lorsque le décompteur arrive à
0 :00, le réveil/ Sonne /
Flash et démarre à compter po
montrer le temps écoulé. Pressez
ST une fois pour
arrêter l’al
PO
1.E une RÉGL,
paDÉ en
ré0».
2.Appuyez une fois sDÉBU pour démarre
« : » et « » commencent à cl
3.Pour interrompre DÉBUT / , tout
commence à clDÉBU
la minuterie régressive.
4.Réappuyez sur DÉBUT / FIN po
Lorsque la valeu
la touche (Start /Stop ), pressez la toucSt une fois pou
commencer le comp
Remarque: lorsque la minuter est act et que l compte à rebours l’est également, une
pression RÉGLAGE fait mode
l’heure. L clignotera sur l’écran d’affichage de l’heure nor
MODE TEST
Mainten / TEST enfoncée, la
pendan
ALER
Lorsque le de batterie faibl
partie centrale supérieure de de l'écran LCD. Remplacez l pi par de nouvelles pil
alcalines.
Remarque: l'utilisation fréq
batterie.
DÉP
Si
peu
de la
ser
Le
re
PRENDRE SOIN DE V
1.Placez
chaleur excessive ou d'humidi
2.Protégez vos
enn
3.N doux imbib
agen plus fo tels qu le benzèn des diluan ou des matér sim peu
end
4.Si
les
soigneu
SPÉCIFICA
: Réglable de 5 et 60 minutes
Chrono montant / descendant
GARANTIE
Vcou
tou
fra
www. La n
pièc
agr
IMP VOT FAC F P DE VO GARA ET DOI E
CONSERVÉE ET PRODUITE LORS D'U
V
DÉCLARA
DÉC: Geemarc t
aux
équipements terminaux
La déclaration de conforwww
DIRECTIVE DE RECYCLAGE:
AM
ALARM
COUNTUP
(TIMER)
COUNT-DOWN
(TIMER)
DOWN
UNLOCK
SET
TIMER
LOW BA
PM
TIMER
Wake-to-Flashing LED
Wake-to -V
Wake-to-Buzzer
UP
TEST
A
SELECT
BACK VIEW(BA
Rappel d’alarme / Lampe / Flash
AM
ALARME
Compteur Montant Chrono
ComDescendant
Chrono
BAS/ DEVE
REGLAGE HEURE/
CHRONO
BA
PM
CHRONOMETRE
FLASH A
VIBREUR ACTIVE
SONNERIE ACTIVE
HAUT/ TEST
REGLAGE ALARME /
SELECTE
VUE ARRIERE(COMP