762024
1
Verklein
Vergroot
Pagina terug
1/2
Pagina verder
1 2 3
User Manual
Viso50 MSF(UK)
!!! PLEASE REFER TO OUR WEBSITE: WWW.GEEMARC.COM FOR AN
UP TO DATE USER GUIDE, AS THERE MAY BE IMPORTANT UPDATES
AND CHANGES YOU NEED TO BE AWARE OF !!!
1. Features
- Easy to Read and Understand Time display
- Perpetual Calendar Up to Year 2099
- 14 languages user selectable at the starting
- Day of the week, month, stage of the day and time modes
2. Unit Appearance
Part A - LCD
Part B - Rear part
A1: Day of Week or Month
A2: Stage of the day
A3: Analog Time
A4: Radio Control Icon
B1: “SET/ ”Button
B2: ” Button
B3: ” Button
Part C - Structure
Part D Analog Setting
C1: Hanging Hole
C2: Battery Door
C3: Stand
D1: REC button
D2: Transportation pin
D3: M Set button
D4: Reset button
D5: Battery compartment
Note: Place the clock near a window.
3. ANALOGUE CLOCK(A3)
3.1 GETTING STARTED/POWER SUPPLY
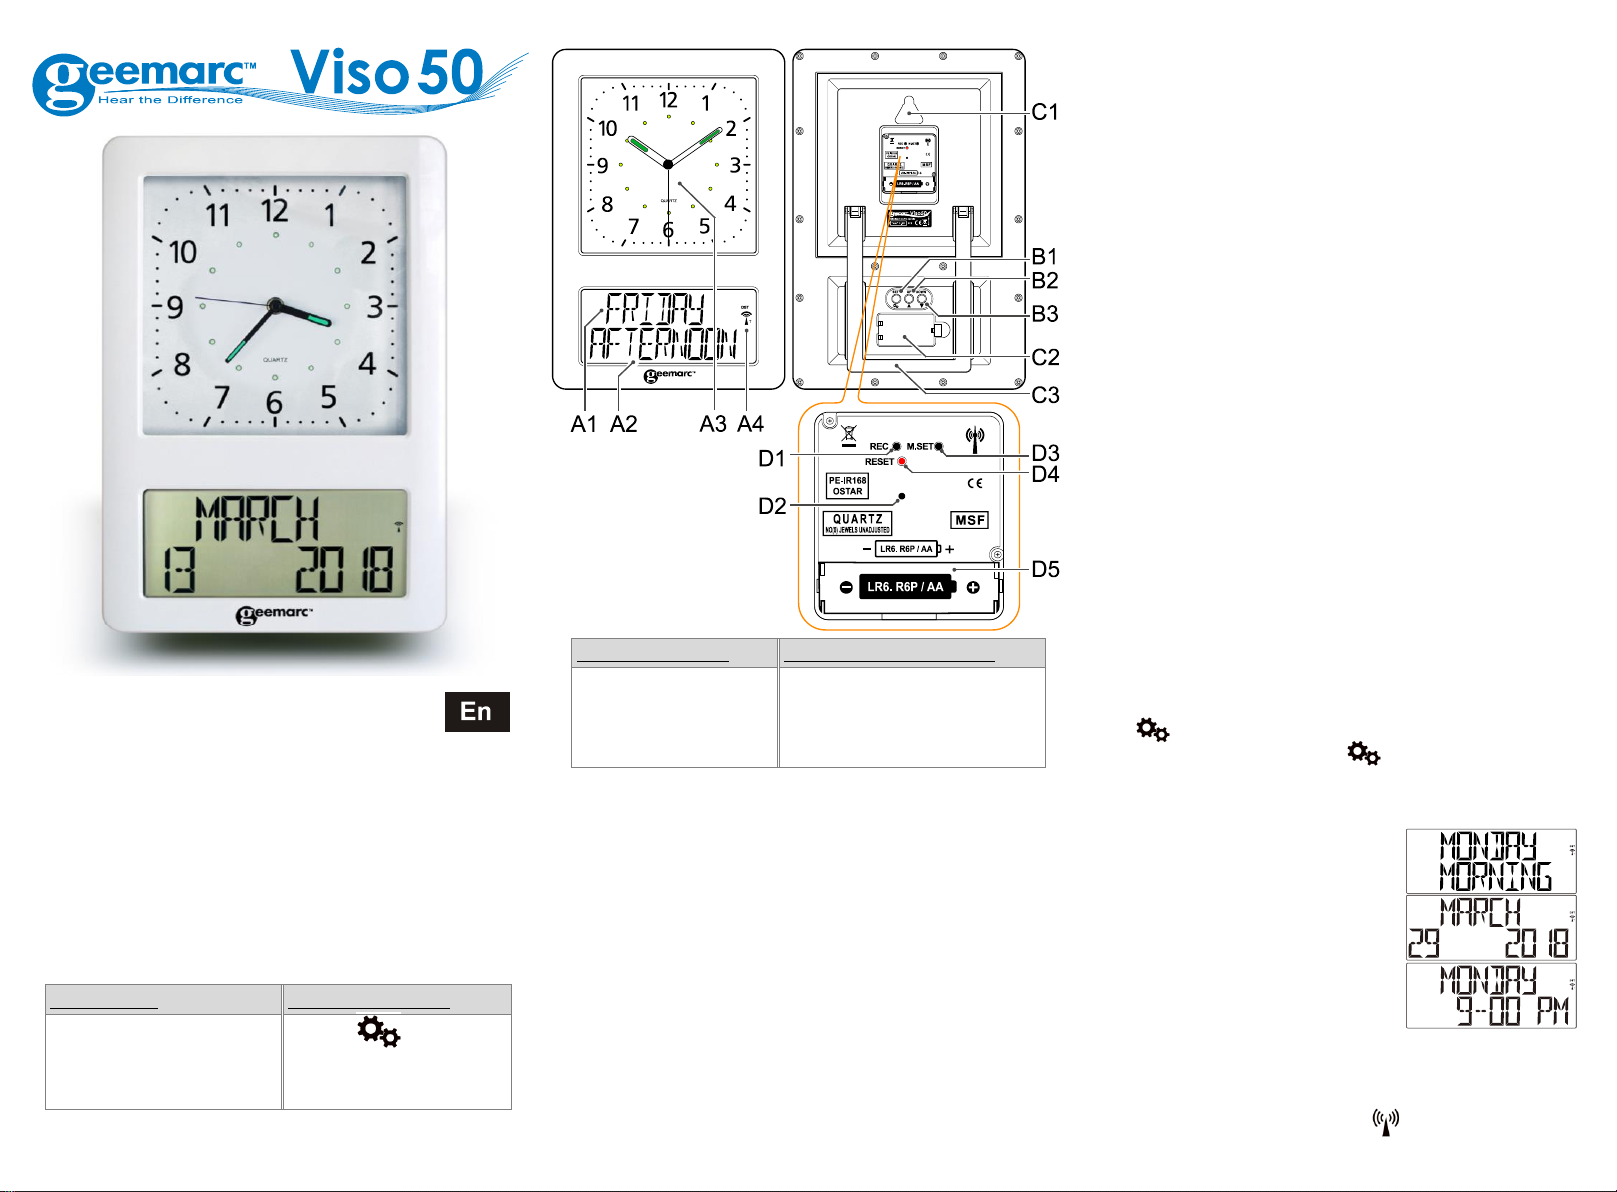
(1) Remove the transportation pin (D2) from the clock movement.
The clock can be operated only after the pin has been removed.
(2) Insert one battery (1.5V, AA/LR6) into battery compartment (D5).
Make sure to place the battery strictly according to the right
polarities (+/-) as shown in the battery compartment.
3.2 TIME SETTING
After the clock has received the MSF time signal the time will be set
according to the Central European time(CET). Summer and winter
time change (and reverse) is also set automatically. Other deviating
times can be set manually only.
3.3 Automatic time setting via MSF time signal
After inserting the battery, the time will be set automatically via MSF
signal. This process may take a few minutes (about 5-7 minutes).
During this process, the clock hands will turn several times and may
pause until they display the right time.
3.4 Initiate to receive the MSF time signal manually
Use this function when automatic summer/winter time change does not
work or the wall clock temporarily receives no time signal.
(1) Press and hold the REC button (D1) for 3 seconds to start manual
search for the MSF signal.
(2) The clock hands will move to their start position (12:00 a.m.)
and the wall clock then tries to receive the signal.
Wait approx. 2-5 minutes until the current time will be displayed.
3.5 Manual time setting
It is necessary to set the time manually in places where no radio signal
is received.
(1) Press and hold the M.SET(D3) button for approx. 3 seconds.
(2) When the minute’s hand starts moving you can set the time manually:
- Press the M.SET(D3) button to set the time in minutes.
- Press and hold the M.SET(D3) button to set the time continuously.
(3) Release M.SET(D3) button to stop manual setting and save the time
automatically. Exit the manual time setting mode.
3.6 Reset
If there is no response from the 2nd hand on the wall clock if or if any
other malfunction occurs perform the following steps.
With this procedure all received data will be deleted.
(1) Press RESET button (D4) with a pointed instrument(e.g. pen).
(2) The clock hand will move to the start position (12:00 a.m.) and the
wall clock will try to receive the signal.
Wait approx. 2-5 minutes until the current time will be displayed.
4. DIGITAL CLOCK
4.1 Getting started:
Open battery Cover (C2).
Insert 2 x AA size batteries observing polarity (+ and ). You will hear
a “click” sound which will confirm the batteries have been inserted
correctly.
Replace battery compartment cover (C2).
4.2 To begin
You have 1 minute to arrange the first setting. The clock displays
English, press ”(B2) or ”(B3) to select your language and press
SET/”(B1) to validate, Press ”(B2) or ”(B3) to choose the
type of display set and press SET/”(B1) to validate (see below
the different display methods).
If you don’t press any keys, after 1 minute the Viso50 will launch the
automatic clock setting.
Note: Place the Viso50 near a window for
the clock to automatically set.
-DP-1 displays the day of the week and the
2nd line the part of the day.
-DP-2 displays the Month and the 2nd line
the date and the year.
-DP-3 displays the day of week and the 2nd
line the time.
-DP-4 rotates between all 3 displays to show the selected information
stored. See chapter 4.5.C for full instructions.
4.3 Radio Controlled Time:
The clock automatically starts to scan the MSF time signal in the
first 10 minutes. (Radio Control Icon “ ” (A4) flashes on LCD).
1

Hulp nodig? Stel uw vraag in het forum

Spelregels
1

Forum

Geemarc-Viso-50

Zoeken resetten

  • Batterijen in de klok gestoken, alles begon te werken zoals in de handleiding, de analoge klok stelde zich prima in tot plots na een paar minuten de secondenwijzer bleef hangen en de analoge klok niet meer werkte... Krijg er geen beweging meer in, ook niet met reset of handmatige instelling. Gesteld op 22-10-2021 om 15:16

    Reageer op deze vraag Misbruik melden
  • Batterijen in de klok gestoken, alles begon vanzelf te werken zoals omschreven in de handleiding, tot plots ne een paar minuten de secondenwijzer bleef hangen en nu werkt de analoge klok niet meer, ook de reset en manuele instelling geeft geen enkele beweging... Gesteld op 22-10-2021 om 15:12

    Reageer op deze vraag Misbruik melden

Misbruik melden

Gebruikershandleiding.com neemt misbruik van zijn services uitermate serieus. U kunt hieronder aangeven waarom deze vraag ongepast is. Wij controleren de vraag en zonodig wordt deze verwijderd.

Product:

Bijvoorbeeld antisemitische inhoud, racistische inhoud, of materiaal dat gewelddadige fysieke handelingen tot gevolg kan hebben.

Bijvoorbeeld een creditcardnummer, een persoonlijk identificatienummer, of een geheim adres. E-mailadressen en volledige namen worden niet als privégegevens beschouwd.

Spelregels forum

Om tot zinvolle vragen te komen hanteren wij de volgende spelregels:

Belangrijk! Als er een antwoord wordt gegeven op uw vraag, dan is het voor de gever van het antwoord nuttig om te weten als u er wel (of niet) mee geholpen bent! Wij vragen u dus ook te reageren op een antwoord.

Belangrijk! Antwoorden worden ook per e-mail naar abonnees gestuurd. Laat uw emailadres achter op deze site, zodat u op de hoogte blijft. U krijgt dan ook andere vragen en antwoorden te zien.

Abonneren

Abonneer u voor het ontvangen van emails voor uw Geemarc Viso 50 bij:


U ontvangt een email met instructies om u voor één of beide opties in te schrijven.


Ontvang uw handleiding per email

Vul uw emailadres in en ontvang de handleiding van Geemarc Viso 50 in de taal/talen: Engels als bijlage per email.

De handleiding is 1,29 mb groot.


U ontvangt de handleiding per email binnen enkele minuten. Als u geen email heeft ontvangen, dan heeft u waarschijnlijk een verkeerd emailadres ingevuld of is uw mailbox te vol. Daarnaast kan het zijn dat uw internetprovider een maximum heeft aan de grootte per email. Omdat hier een handleiding wordt meegestuurd, kan het voorkomen dat de email groter is dan toegestaan bij uw provider.

Andere handleiding(en) van Geemarc Viso 50

Geemarc Viso 50 Gebruiksaanwijzing - Deutsch - 2 pagina's

Geemarc Viso 50 Gebruiksaanwijzing - Français - 2 pagina's


Uw handleiding is per email verstuurd. Controleer uw email

Als u niet binnen een kwartier uw email met handleiding ontvangen heeft, kan het zijn dat u een verkeerd emailadres heeft ingevuld of dat uw emailprovider een maximum grootte per email heeft ingesteld die kleiner is dan de grootte van de handleiding.

Er is een email naar u verstuurd om uw inschrijving definitief te maken.

Controleer uw email en volg de aanwijzingen op om uw inschrijving definitief te maken

U heeft geen emailadres opgegeven

Als u de handleiding per email wilt ontvangen, vul dan een geldig emailadres in.

Uw vraag is op deze pagina toegevoegd

Wilt u een email ontvangen bij een antwoord en/of nieuwe vragen? Vul dan hier uw emailadres in.


Info