66
7
1
4
5
7
6
9 12
11
14
13
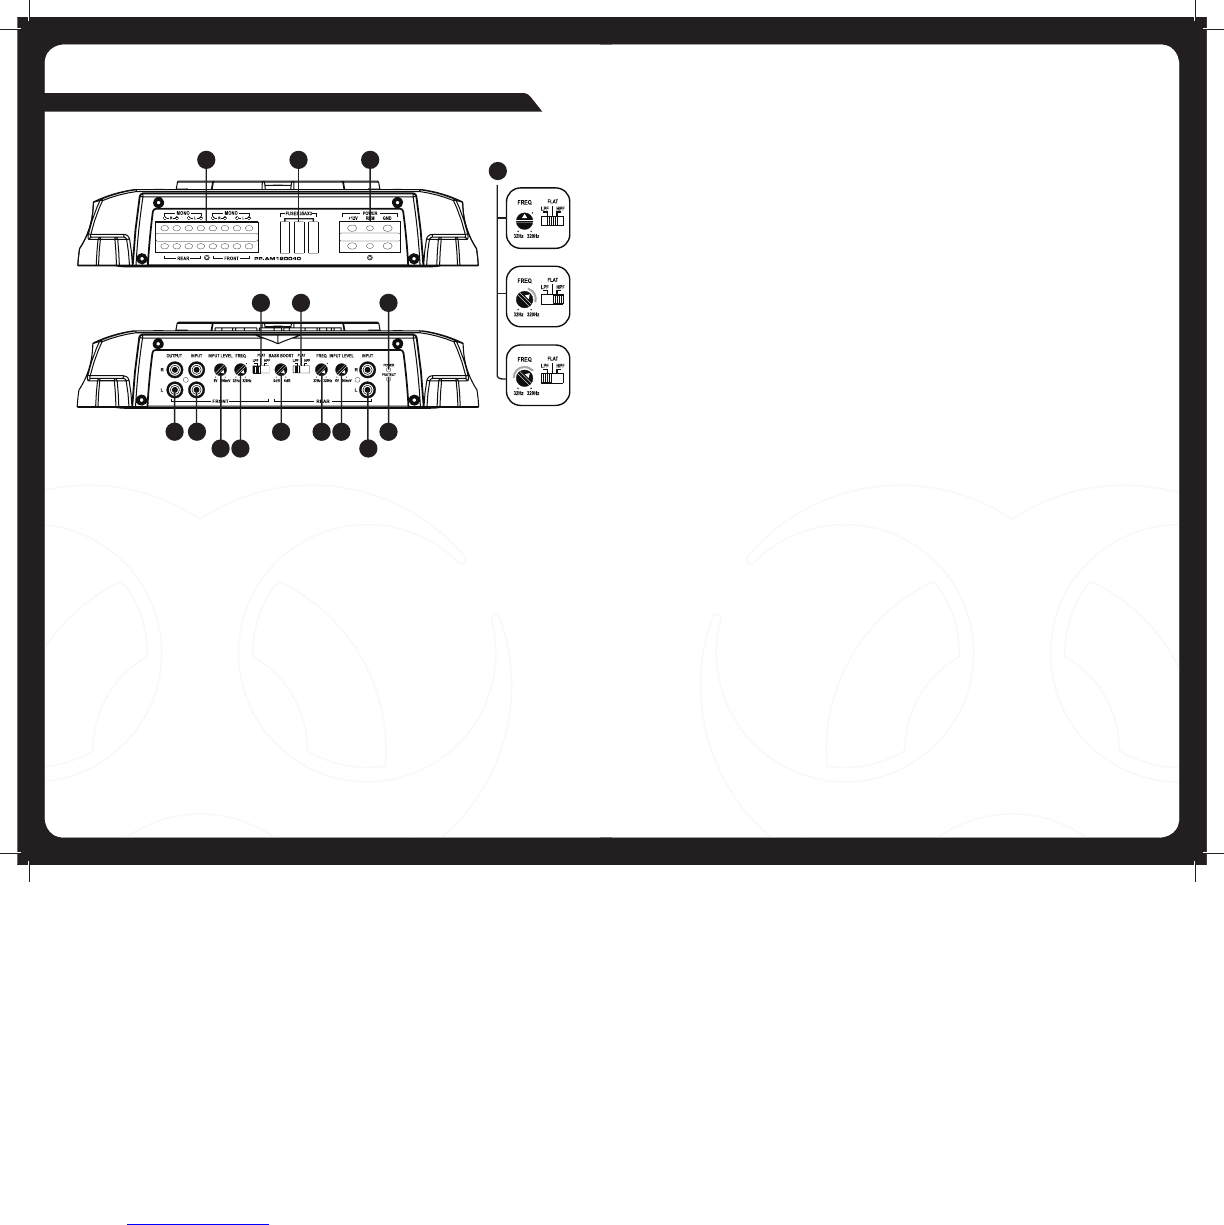
2 3
6. Front Input Level
This control is used to match the input level of the amplifier to the output level of your source unit
1. Turn the amplifier level to zero.
2. Turn the volume of the source unit to ¾ and the bass and treble to zero.
3. Adjust the level control until the desired maximum volume is achieved without distortion.
4. Failure to follow these steps may cause permanent damage to the audio system.
7. Frequency Control – Front X-Over
12dB/Octave crossover, variable from 32Hz to 320Hz. (For adjustment procedure see 16.)
8. Filter Selector – Front X-Over
LPF – Select for subwoofer(s).
Flat – Select for full range speakers.
HPF – Select for mid/full range speakers when using a subwoofer in the system.
9. Bass Boost Control
Adjust the Bass Boost to the desired level.
10. Filter Selector – Rear X-Over
LPF - Select for subwoofer(s).
Flat – Select for full range speakers.
HPF – Select for mid/full range speakers when using a subwoofer in the system.
11. Frequency Controller – Rear X-Over
12dB/Octave crossover, variable from 32Hz to 320Hz.
For adjustment procedure see 16.
12. Rear Input Level
This control is used to match the input level of the amplifier to the output level of your head unit
1. Turn the amplifier level to zero.
2. Turn the volume of the head unit to ¾ and the bass and treble to zero.
3. Adjust the level control until the desired maximum volume is achieved without distortion.
4. Failure to follow these steps may cause permanent damage to the audio system.
13. Power ON LED
Amplifier is operational when illuminated.
14. Protection LED
When illuminated the amplifier is in protection mode due to any of the following fault conditions.
Short Circuit, Thermal, Output Short, DC Offset.
15. Rear Input Connectors
Choose the correct length RCA interconnects and run them to the RCA outputs of the
source unit. Avoid running beside other looms and or power cable.
16. Setting the Crossover
a. Diagram for crossover settings for 5” or larger full range speakers.
b. Diagram for crossover settings for mid/full range speakers when using a subwoofer in
your system.
c. Diagram for crossover settings for subwoofers.
NB: The gray section indicates acceptable frequency ranges.
8 10
15
1. Speaker Output Connections
Ensure that the speakers are connected observing correct polarity.
2 Ohm minimum speaker impedance for stereo operation
4 Ohm minimum speaker impedance for bridged operation
2. Fuses
Ensure fuses are replaced with the same type and rating.
3. Power
FUSION amplifiers should be connected directly to the 12V battery terminal with an inline fuse or
circuit breaker as close to the battery as possible.
Ground
When grounding/earthing your amplifier ensure that the location is a good source of ground
(preferably the floor pan). Make sure the metal is clean of paint etc, as a poor earth could
damage your audio system.
Remote Turn On
This connection turns the amplifier ON and should be connected to the remote turn on lead from
the Head Unit. If one is not available a switched 12V source must be used.
4. Output Connectors
Line level output for connection to an additional amplifier
5. Front Input Connectors
Choose the correct length RCA interconnects and run them to the RCA outputs of the source
unit. Avoid running beside other looms and or power cable.
a.
b.
c.
16
FOUR CHANNEL AMPLIFIER
PP-AM120040