Friedland EvoHome and Garden Kit - D426E Handleiding
1
Verklein
Vergroot
Pagina terug
1/1
Pagina verder
7.
Automatic Programming of bell push transmitter(s)
The first time the chime unit is powered up, the sounds
available are demonstrated. Press the door push until
the chime responds with a tune.
You can leave this tune or change it to the desired tune
by using button A (Fig 7)(see Sound Selection for Tunes)
To program a second push, press the push button until
the chime sounds.
Press the button until the chime sounds, then use button
B to change the tune if required. Programming is now
completed.
If more than 5 minutes has elapsed, you will have to
reset the chime programming by pressing and holding
buttons A and B until the chime
sounds, this takes approximately 5 seconds.
The chime can then be
programmed to 1 or 2 pushes.
200m Chime Sound Variety:
1. Big Ben 2 Note (Default Tune for 1st Push)
2. Mini Bell 4 Note w/ Echo (Default Tune for 2nd Push)
3. Clarinet
4. Altosax
50m Plug-in Chime Sound Variety:
1. Tone Bar 2 Note (Default Tune for 1st Push)
2. Bass clarinet (Default Tune for 2nd Push)
Fig 3
Fig 5
Fig 6
Fig 7
Fig 4
Fig 2
-
+
+
-
+
-
Instructions
– Please retain these instructions for future reference
You will require:
3 x LR6 (AA) alkaline batteries for the Portable Door Chime.
Only long-life alkaline batteries must be used.
A small crosshead and flathead screwdriver, a ø5 masonry drill
Installation
Please note: The stated range of this product is
measured in open field conditions. Walls, ceilings and
the positioning the bell push or door chime on or near
metal structures or reinforced PVC doors or
doorframes will reduce the transmission range.
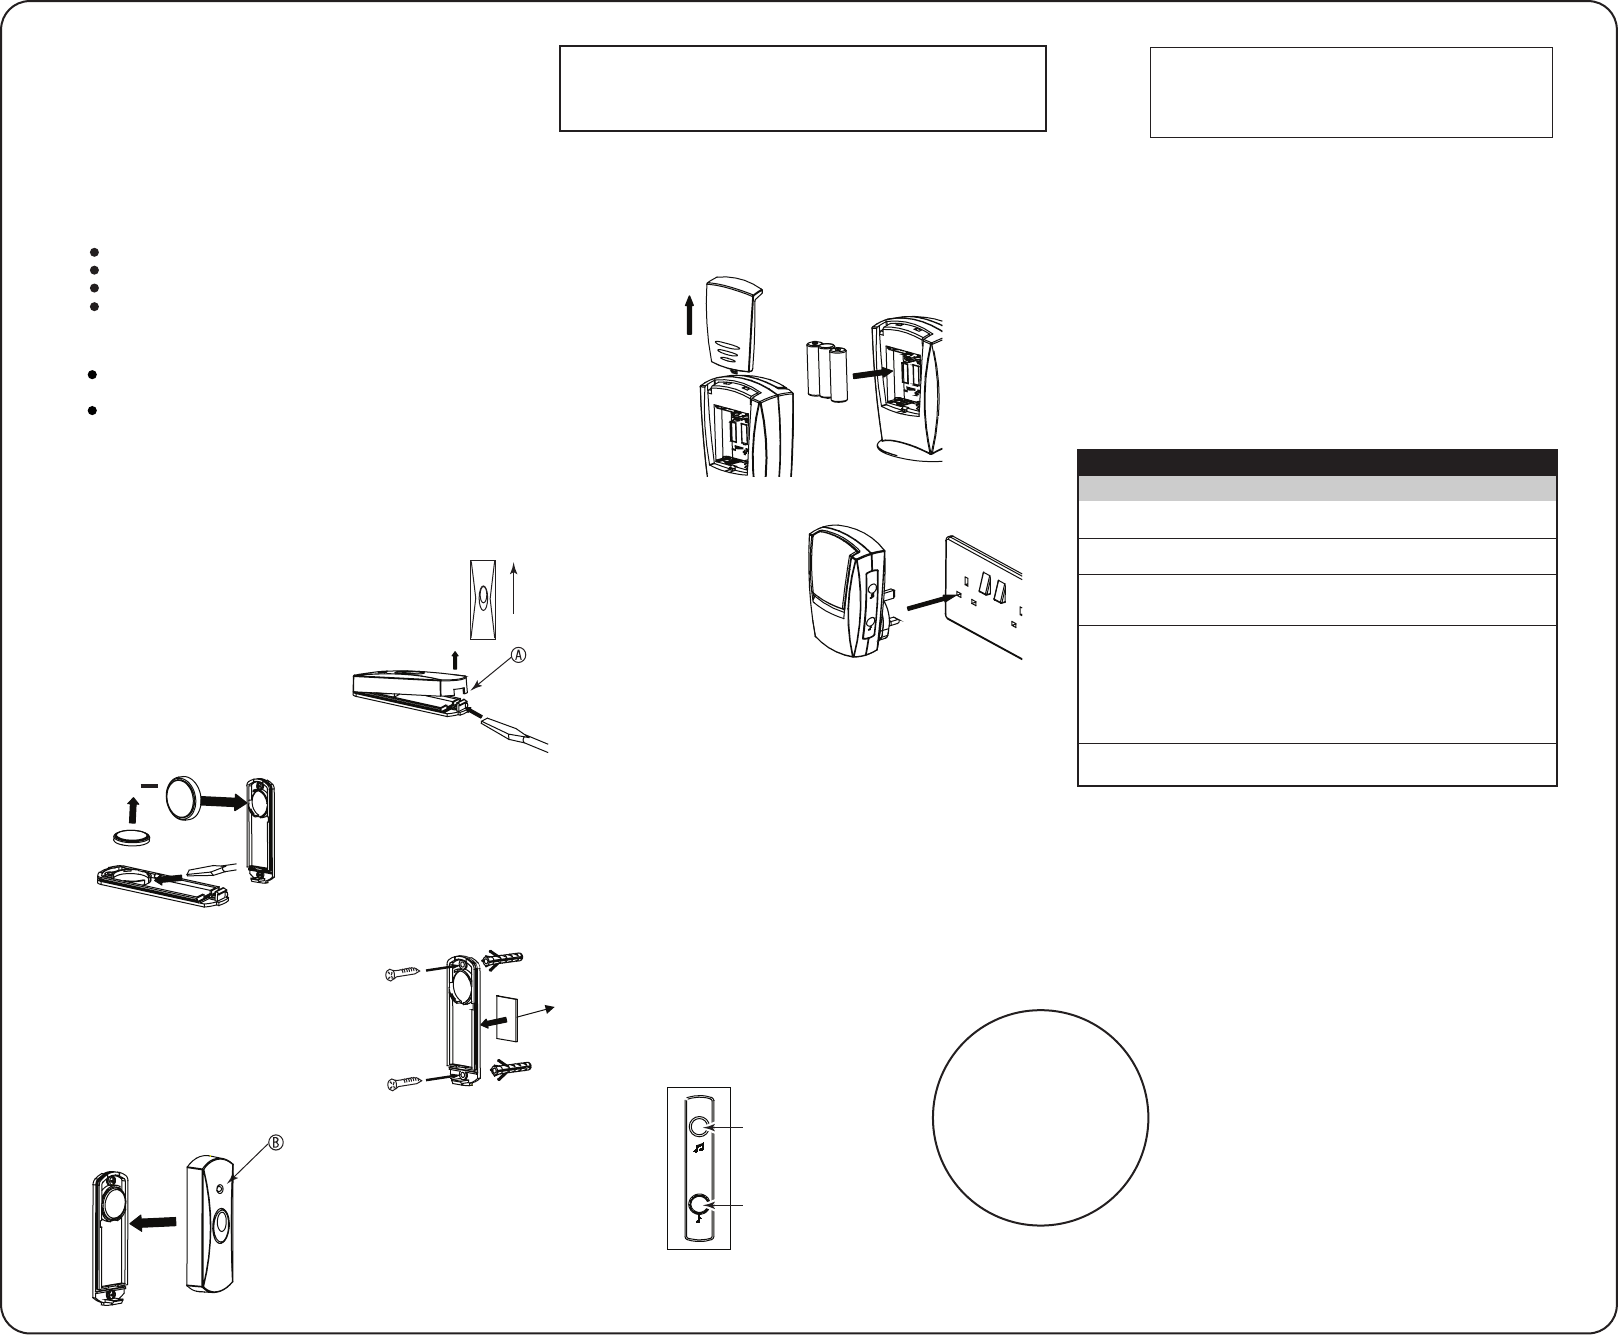
1. Open the bell push
To open the front cover carefully
insert a flat bladed screw driver,
into the slot and twist gently (A).
When refitting the front cover
to ensure the weather proofing
is maintained, always mount the
bell push in the upright position
and replace the cover securely. (Fig 1)
2. To fit or replace the battery
Open the front cover and insert
the CR 2032 Lithium coin cell
battery into the base as shown
in Fig 2. Any debris created
during installation must be
removed from the base before
fitting battery, to ensure
good contact.
3. Mount the bell push
Ensure the wall surface is clean
and dry. Mount using either the
double sided sticky pad on a
smooth surface, or the screws
and wall plugs provided,
See Fig 3. Do not mount the push
on or near (< 30cm) large metal
objects, as it will block signals from the push.
4. Test the bell push
When the bell push button is
pressed,the confidence light (B)
in Fig 4, will illuminate to reassure
the caller that the bell push is
working.
The light will
flash 5 times when the
battery needs replacing.
5. Fitting or replacing the batteries into the door-chime
Remove battery compartment cover and insert three
LR6 (AA) alkaline batteries as shown in Fig 5.
Refit the battery compartment cover.
6. Use of door-chime
Plug the chime into any
220-240V BS 1363 Socket,
as shown in Fig 6.
installed in a clean dry
environment, situated
within transmission
range of the bell push(es).
200m* Door chime
50m* Plug-in Door chime
8. Sound Selection
A = Main push sound selection
B = Second push sound selection
Chime tune options are as follows:
Declaration
Novar ED&S hereby declares that this Wirefree chime kit is in compliance with
the essential requirements and other relevant provisions of the Radio and
Telecommunications Terminal Equipment ( R & TTE ) directive, 1999/5/EC
Fig 1
Evo Home & Garden Kit
Pack contents:
50m* Plug-in Chime
200m* Portable Chime
Bell push with CR2032 Lithium coin cell battery
Adhesive pad, 2 x screws (ø3x20mm) 2 x wall plugs (ø5x25mm)
for mounting the bell push
Friedland guarantees this product for 3 years from date of purchase.
Proof of purchase is required, this does not affect your statutory rights.
If you require further information about our products, call the Friedland
helpline on 01268 563066.
Friedland a Novar business, Novar ED&S, The Arnold Centre,
Paycocke Road, Basildon, Essex, SS14 3EA, England
www.friedland.co.uk
+
A
B
Trouble Shooting
Chime not Sounding
Batteries may not be inserted correctly
Check all batteries have been inserted correctly
Chime may be positioned out of range of the bell pushMove
your chime closer to the bell push
A metallic object may be blocking the signal from bell push position
Experiment with the location of the chime to see if you can move
it in a more suitable place
The battery in the bell push may need replacing
Press the bell push. If the confidence light (B) flashes 5 times
after being pushed, replace the battery.
Note: In cold conditions, poor location or environment, operating
at maximum range it is advisable to replace the battery more
frequently before the indicator light flashes
(i.e every 12 - 18 months) to maintain optimum performance
Your bell push and chime haven't been programmed
Do the automatic programming of your chime and bell push
*
The stated transmission range of this product is measured in open field conditions.
Walls ceilings, and metal structures will reduce the maximum range.
Hulp nodig? Stel uw vraag in het forum
Misbruik melden
Gebruikershandleiding.com neemt misbruik van zijn services uitermate serieus. U kunt hieronder aangeven waarom deze vraag ongepast is. Wij controleren de vraag en zonodig wordt deze verwijderd.
Product:
Spelregels forum
Om tot zinvolle vragen te komen hanteren wij de volgende spelregels:
lees eerst de handleiding door;
controleer of uw vraag al eerder door iemand anders is gesteld;
probeer uw vraag zo duidelijk mogelijk te stellen;
heeft u een probleem en al geprobeerd om dit op te lossen, vermeld dit erbij aub;
heeft u een oplossing gekregen van een bezoeker dan horen wij dat graag in dit forum;
wilt u een reactie geven op een vraag of antwoord, gebruik dan niet dit formulier maar klik op de knop 'reageer op deze vraag';
uw vraag wordt direct op de website gezet; vermijd daarom persoonlijke gegevens in te vullen;
Belangrijk! Als er een antwoord wordt gegeven op uw vraag, dan is het voor de gever van het antwoord nuttig om te weten als u er wel (of niet) mee geholpen bent! Wij vragen u dus ook te reageren op een antwoord.
Belangrijk! Antwoorden worden ook per e-mail naar abonnees gestuurd. Laat uw emailadres achter op deze site, zodat u op de hoogte blijft. U krijgt dan ook andere vragen en antwoorden te zien.
Abonneren
Abonneer u voor het ontvangen van emails voor uw Friedland EvoHome and Garden Kit - D426E bij:
nieuwe vragen en antwoorden
nieuwe handleidingen
U ontvangt een email met instructies om u voor één of beide opties in te schrijven.
Ontvang uw handleiding per email
Vul uw emailadres in en ontvang de handleiding van Friedland EvoHome and Garden Kit - D426E in de taal/talen: Engels als bijlage per email.
De handleiding is 0,26 mb groot.
U ontvangt de handleiding per email binnen enkele minuten. Als u geen email heeft ontvangen, dan heeft u waarschijnlijk een verkeerd emailadres ingevuld of is uw mailbox te vol. Daarnaast kan het zijn dat uw internetprovider een maximum heeft aan de grootte per email. Omdat hier een handleiding wordt meegestuurd, kan het voorkomen dat de email groter is dan toegestaan bij uw provider.
Uw handleiding is per email verstuurd. Controleer uw email
Als u niet binnen een kwartier uw email met handleiding ontvangen heeft, kan het zijn dat u een verkeerd emailadres heeft ingevuld of dat uw emailprovider een maximum grootte per email heeft ingesteld die kleiner is dan de grootte van de handleiding.
Er is een email naar u verstuurd om uw inschrijving definitief te maken.
Controleer uw email en volg de aanwijzingen op om uw inschrijving definitief te maken
U heeft geen emailadres opgegeven
Als u de handleiding per email wilt ontvangen, vul dan een geldig emailadres in.
Uw vraag is op deze pagina toegevoegd
Wilt u een email ontvangen bij een antwoord en/of nieuwe vragen? Vul dan hier uw emailadres in.