4
How to Trim and Edge
WARNING: The use of eye protection is recommended.
Do not lean over the trimmer whilst trimming or edg-
ing, objects may be thrown by the cutting line. Do not
allow cutting head to rest on the ground. Do not over-
load your trimmer. Overloading can be avoided by
making sure the motor speed does not drop unduly.
Disconnect from the mains electricity supply before
attempting any maintenance or adjustment.
BEFORE USE: Make sure that the line is fed out (if 2
lines are fitted, make sure both are fed out).
Make sure motor is up to full speed before trimming
or edging.
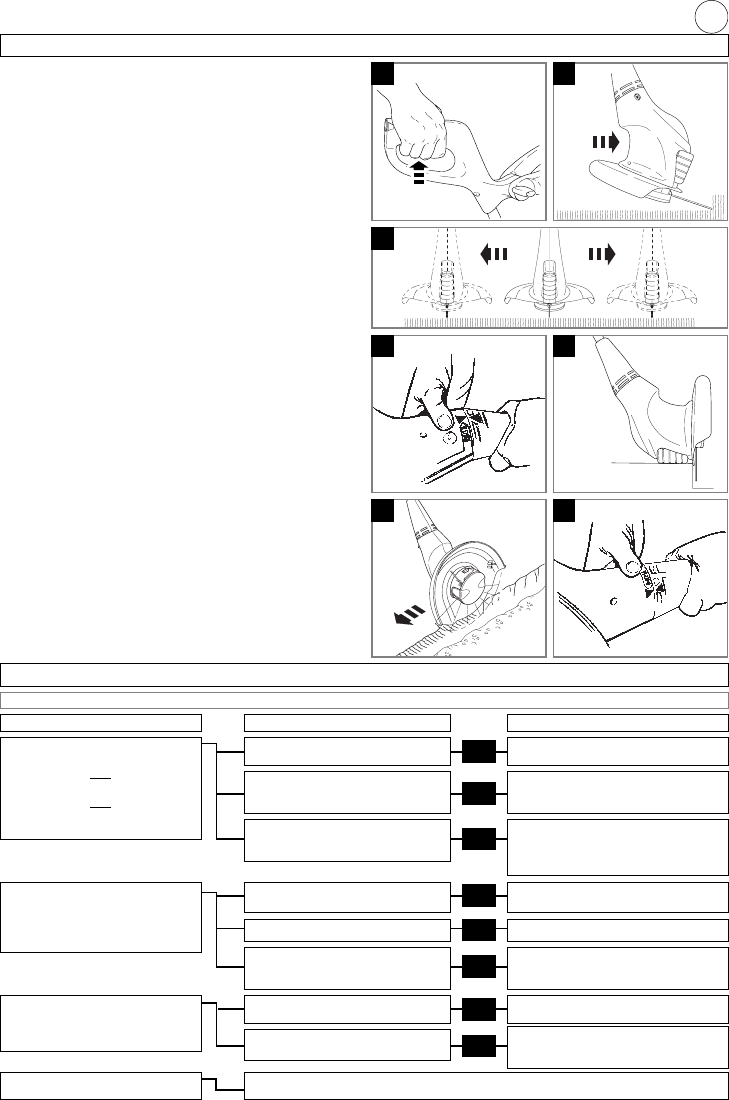
How to trim
1. Hold as illustrated in Fig K.
2. To start, squeeze the switch lever.
3. Cut with nylon line at an angle using the tip. See Fig L
4. Swing trimmer in and out of the cutting area taking
small cuts (M)
5. Line is fed out automatically every time the trimmer
head stops rotating and returns to operating speed.
• Extra line can be fed out manually as described on
page 5.
6. To stop your trimmer release the switch lever.
How to edge
1. To convert to edging mode, depress locking button
and twist head anti-clockwise until arrow lines up
with "EDGE". An audible "click" will confirm that the
head is locked. Ensure the button has returned to its
original position. See Fig N.
2. Hold as illustrated in Fig K.
3. To start, squeeze the switch lever.
4. Rest edger on roller/skid plate for extra stability and line up
with edge of lawn. see fig P. Edge in direction indicated in
Fig Q. so that debris is thrown away from you.
5. To return to trimming mode, depress locking button and
twist head clockwise until arrow lines up with "TRIM" An
audible "click" will confirm that the head is locked. See Fig
R. Ensure the button has returned to its original position.
Please note: Depending on which model you have
purchased, your trimmer may be fitted with a roller
or a skid plate.
L
M
K
PN
RQ
Fault Finding Chart
WARNING Disconnect from the mains electricity supply before attempting any maintenance or adjustment.
FAULT CHECK ACTION
Is the automatic line feed work-
ing?
Manually feed out line.
SEE “MANUAL LINE FEED”
Is the line fed out and visible?
(Check for both lines if 2 lines
are fitted)
Remove cap and spool, free line
and re-fit spool and cap. SEE
“SPOOL CAP AND NYLON LINE”
The line may be jammed on the
spool. Rewind line to remove crossed
loops. (Check that line is in correct
section of spool if 2 lines are fitted)
Is the manual line feed working?
Has too much line been fed out?
SEE “MANUAL LINE FEED”
Contact your local approved Service
Centre or Electrolux Outdoor
Products Customer Service.
Is the line cutter missing from
the safety guard?
Contact Electrolux Outdoor Products Customer Service
Telephone : 01325 300303
No
No
No
Yes
Yes
LINE NOT FEEDING
OR
LINE TOO SHORT
OR
TRIMMER VIBRATES
CONTINUOUS
CLATTERING NOISE
LINE SNAPS CONTINUOUSLY
IF NONE OF THE ABOVE
OR IF FAULT PERSISTS
Has the motor reached full
speed before use?
No
Allow the motor to reach full speed
before use
Are you using the trimmer cor-
rectly?
?
Only use tip of nylon line to trim.
SEE “How to trim and edge”
Is the line jamming on the
spool?
Yes
Rewind the line on the spool, if
symptoms still persist, change
spool and line.