382947
4
Verklein
Vergroot
Pagina terug
1/6
Pagina verder
BEFORE USING THE SAW
Ensure the saw is unplugged from mains before
making adjustments, mounting accesories or chan-
ging blades.
CHANGING/FITTING SAW BLADES
Refer to illustration below
- Depress the spindle lock lever (6) and keep it pressed,
then use the 13mm box spanner (2) provided to turn
the blade-retaining bolt anticlockwise.
- Remove the bolt, washer and blade if fitted. Make sure
the flange is present on the shaft and is the right way up.
- Open the blade guard with lever (1) and replace or fit
the saw blade with the teeth facing the same way as the
riving knife (4) - the teeth face towards the front of saw.
- Fit the washer and bolt (clockwise) hand tight.
- Depress the spindle lock lever and keeping it pressed,
tighten the bolt securely with the box spanner.
- Check that the blade guard is free to revolve and that
the blade does not touch any part of the casing or guard.
- After fitting a new blade it may be necessary to adjust
the riving knife.
ADJUSTING THE RIVING KNIFE
Refer to illustration below.
- Use a suitable screwdriver (not supplied) to loosen
both screws (2)
- Rotate Blade guard with lever (1) and keep open while
adjusting the riving knife. Refer to the illustration for
minimum and maximum distances.
- Tighten both screws securely.
- Check that the riving knife is in the correct position and
is in line with the blade.
- Release the blade guard.
MOUNTING THE PARALLEL GUIDE
Referring to the illustration below.
- Loosen thumbscrew (1)
- Slide the parallel guide (2) into slots with the fence
facing downwards.
- Set guide to the required position
- Tighten thumbscrew.
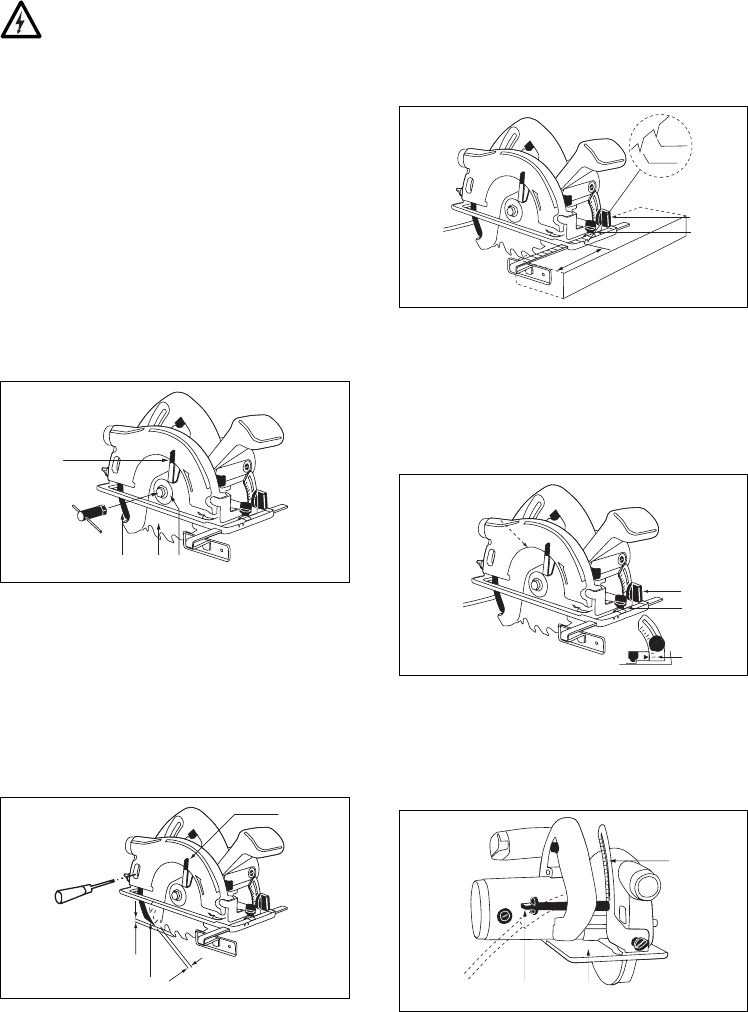
ADJUSTING THE CUTTING ANGLE
Referring to the illustration below.
- Loosen (anticlockwise) the thumbscrew (1) on the
angle quadrant and the locking lever (rotate anti-
clockwise) located at the rear of blade.
- Set the shoe to the desired angle 0-45 degrees.
- The cutting angle is indicated by the pointer (3)
- Securely tighten the thumbscrew and the locking lever.
ADJUSTING THE DEPTH OF CUT
Referring to the illustration below.
- Loosen locking lever (1) anticlockwise.
- Move the shoe (2) downwards to required depth
marked on quadrant (3)
- Securely tighten locking lever clockwise.
1 2
3
1
3
2
45
30
0
1
2
80
A=45
B=90
max 5 mm
max 5 mm
3
2
1
1
4 3 5
2
4 Ferm Ferm 9
4

Hulp nodig? Stel uw vraag in het forum

Spelregels

Misbruik melden

Gebruikershandleiding.com neemt misbruik van zijn services uitermate serieus. U kunt hieronder aangeven waarom deze vraag ongepast is. Wij controleren de vraag en zonodig wordt deze verwijderd.

Product:

Bijvoorbeeld antisemitische inhoud, racistische inhoud, of materiaal dat gewelddadige fysieke handelingen tot gevolg kan hebben.

Bijvoorbeeld een creditcardnummer, een persoonlijk identificatienummer, of een geheim adres. E-mailadressen en volledige namen worden niet als privégegevens beschouwd.

Spelregels forum

Om tot zinvolle vragen te komen hanteren wij de volgende spelregels:

Belangrijk! Als er een antwoord wordt gegeven op uw vraag, dan is het voor de gever van het antwoord nuttig om te weten als u er wel (of niet) mee geholpen bent! Wij vragen u dus ook te reageren op een antwoord.

Belangrijk! Antwoorden worden ook per e-mail naar abonnees gestuurd. Laat uw emailadres achter op deze site, zodat u op de hoogte blijft. U krijgt dan ook andere vragen en antwoorden te zien.

Abonneren

Abonneer u voor het ontvangen van emails voor uw Ferm fks 180 bij:


U ontvangt een email met instructies om u voor één of beide opties in te schrijven.


Ontvang uw handleiding per email

Vul uw emailadres in en ontvang de handleiding van Ferm fks 180 in de taal/talen: Engels als bijlage per email.

De handleiding is 0,41 mb groot.


U ontvangt de handleiding per email binnen enkele minuten. Als u geen email heeft ontvangen, dan heeft u waarschijnlijk een verkeerd emailadres ingevuld of is uw mailbox te vol. Daarnaast kan het zijn dat uw internetprovider een maximum heeft aan de grootte per email. Omdat hier een handleiding wordt meegestuurd, kan het voorkomen dat de email groter is dan toegestaan bij uw provider.

Andere handleiding(en) van Ferm fks 180

Ferm fks 180 Gebruiksaanwijzing - Nederlands, Deutsch, Français - 24 pagina's


Uw handleiding is per email verstuurd. Controleer uw email

Als u niet binnen een kwartier uw email met handleiding ontvangen heeft, kan het zijn dat u een verkeerd emailadres heeft ingevuld of dat uw emailprovider een maximum grootte per email heeft ingesteld die kleiner is dan de grootte van de handleiding.

Er is een email naar u verstuurd om uw inschrijving definitief te maken.

Controleer uw email en volg de aanwijzingen op om uw inschrijving definitief te maken

U heeft geen emailadres opgegeven

Als u de handleiding per email wilt ontvangen, vul dan een geldig emailadres in.

Uw vraag is op deze pagina toegevoegd

Wilt u een email ontvangen bij een antwoord en/of nieuwe vragen? Vul dan hier uw emailadres in.


Info