ADJUSTING THE CUTTING ANGLE
Refer to the trim saw illustration page 2.
- Loosen (anticlockwise) the thumbscrew (7) on the
angle quadrant.
- Set the shoe to the desired angle 0-45o
- The cutting angle is indicated on the quadrant.
- Securely tighten the thumbscrew
ADJUSTING THE DEPTH OF CUT
Refer to the trim saw illustration page 2.
- Loosen the thumbscrew (12) (anticlockwise).
- Move the shoe (3) downwards to required depth
marked on quadrant.
- Securely tighten the thumbscrew.
USING THE SAW
This saw is intended for use on wood and wood deri-
ved products only.
BEFORE OPERATING
- Check you have the correct type of saw blade for the
machine, that it suitable for the spindle speed of the
saw and that it is mounted correctly. Do not use parts
other than supplied with the machine to make the
blade fit properly.
- Check you have a blade suitable for the material being
cut and that it is in good condition. If any teeth are
missing or the blade shows cracks or other damage -
replace immediately.
- Do not use blades made from high-speed steel.
- Do not use blades that are thicker than the riving
knife.
- Run idle for 30 seconds - if there is any abnormal vib-
ration or other fault – switch off, inspect and rectify
before continuing
OPERATION
Refer to the trim saw illustration page 2.
- Put battery into saw.
- Be aware that this machine has a powerful motor and
needs two hands to operate it safely.
- To switch the saw ON Depress the safety button
(11) with your thumb and keep it pressed in. Depress
trigger switch (10) to start saw. Once the saw has
started release the safety button. Do not attempt to
override the safety button.
- To switch OFF release the trigger switch.
DURING USE
- Avoid saw kickback.
- Place the shoe gently but firmly onto the work piece
and let the blade come to full speed before cutting the
work piece – this is a powerful machine and will kick if
the blade is pressed too hard or jammed in the cut.
- Always use two hands to control the machine.
- Keep the shoe in firm contact with the work piece.
- Support large panels. They can twist and jam the
blade.
- Avoid overhead cuts. The workpiece can sag and jam
the blade.
- Never reverse a rotating blade out of a cut, it can
cause the saw to violently climb out of the cut.
- Do not force the saw. Move gently and steadily along
the line of cut, if it starts to wander, switch off remove
the blade and start a new cut.
- Check material for foreign bodies
- For example check for nails, screws, clamps etc in line
with the cut.
- Check for services. Make sure that there no electri-
cal wires, water or gas pipes in the material being cut.
- Cut the material best side downwards so you have a
clean cut on that face.
- Clamp material properly. Do not use hand or foot to
support the work piece. Saw away from yourself.
- Use constant gentle pressure.
- If the blade seizes in the cut, switch off, unplug and
open the cut with a suitable tool before pulling the
blade out – never switch the saw on with the blade
jammed.
- Do not override the retractable blade guard. It will
open automatically as the saw advances. Check that
thin or small off cuts do not jam the retractable blade
guard.
- Do not put the machine down with the motor still
running.
- Do not put the machine down on a dusty surface –
dust will get into the air vents and damage the motor.
- Regularly inspect the blade (remove battery first)
during use for signs of damage or wear and replace
when required. Do not touch the blade after sawing
until it has cooled down.
- Do not press blade lock button while blade is rota-
ting.
- Switch the machine off before removing the plug
from the mains socket.
- Be careful. Do not point the saw at yourself or other
people. Keep your hands away from the blade. Saw
away from yourself.
POCKET CUTTING
Pocket cutting is starting a cut without sawing in from an
edge, for example starting a cut in the middle of a line.
When making a pocket cut use extreme caution.
- With the saw switched off, tilt the saw forward and
put the front edge only of the shoe firmly on to the
workpiece.
- Retract the blade guard and lower the blade so the
teeth are almost touching the workpiece.
- Release the blade guard.
- Hold the saw with both hands and switch the saw on,
slowly tilt the blade downwards and cut into the
material until the whole shoe is in contact with the
workpiece.
- Keep the shoe in firm contact with the workpiece and
complete the cut in a forward direction. Never saw in
a backwards direction.
- Let the blade stop completely before removing the
saw from the pocket.
Ferm 5
BEFORE USING THE SAW
Ensure the battery is removed from the saw.
- Check that the voltage marked on the charger is sui-
table for use with your mains supply.
- The output voltage on the charger is suitable to use
with the saw battery.
- The battery voltage is suitable for the saw.
The battery supplied with the saw is not fully char-
ged.
CHARGING THE BATTERY
- Place the battery charger (13) on a level surface,
check it is connected correctly and the air vents on
the charger are not blocked, and then put the battery
into the charger.
- Make sure the terminals on the battery tongue line up
with the + and – terminals on the charger. The red
light (14) on the charger indicates the battery is being
fast charged.
- When charging is finished the red light will go out and
the green light (15) will light, indicating that the bat-
tery is ready for use
- The first charge will take 1-2 hours; the battery will
reach maximum performance after it has been char-
ged 4-5 times.
- Only use the charger between +100 and +40o C in
dry conditions.
DISCHARGING THE BATTERY
Discharging the battery is as important as charging it.
- Use the saw until it becomes less powerful and does
not reach maximum speed, the battery is now ready
to be recharged. Do not discharge the battery com-
pletely – if this happens you will damage the battery
and it will not be able to be recharged.
- If the saw is not going to be used for a long period,
recharge the battery from time to time to prevent it
running down. Store the battery separately in the
plastic case.
- Do not use the battery charger to charge batteries
other then the one provided with saw.
- Never open or incinerate a battery this can be dange-
rous and will cause risk of explosion, pollution or
other health hazards
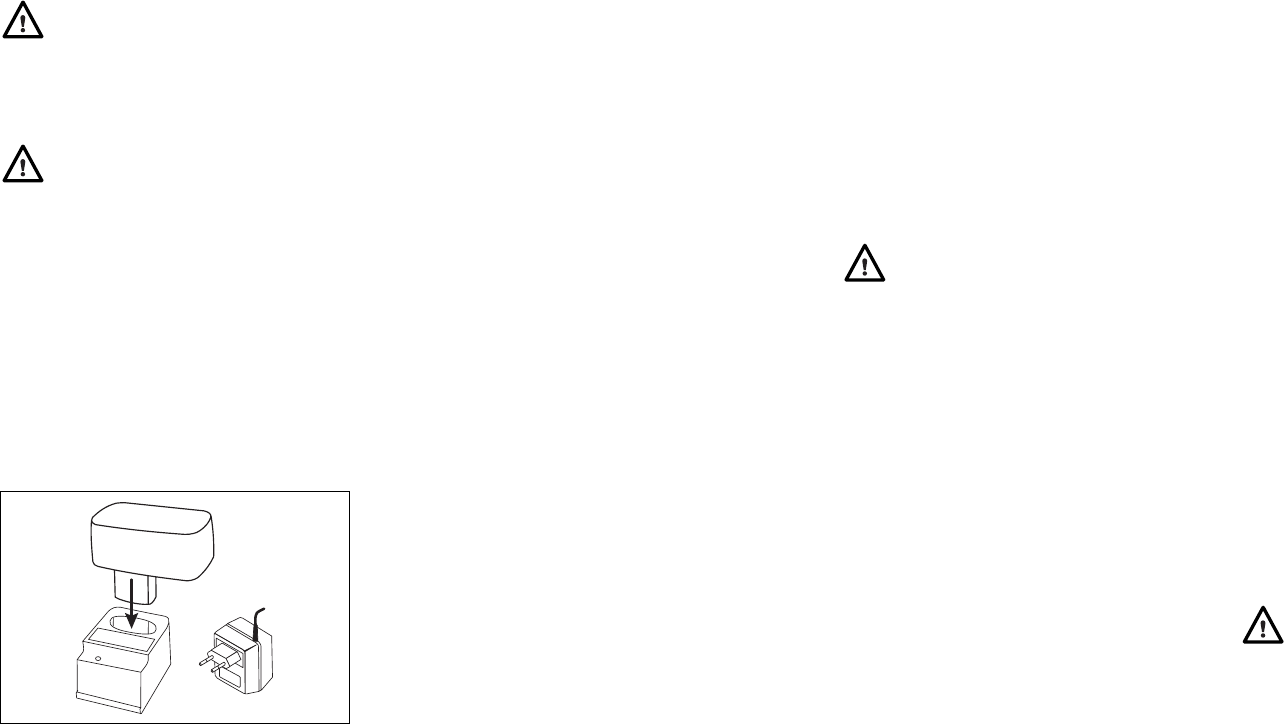
INSERT/REMOVE BATTERY
- Make sure your finger is off the trigger and safety
switch so that the saw does not start unexpectedly.
- Place the battery in the end of the handgrip, it can only
go in one way and will click when in place.
- To remove battery, push the tabs (1) in on either side
of the battery with finger and thumb and pull out of
handgrip.
CHANGING/FITTING SAW BLADES
Refer to trim saw illustration page 2.
- Depress the blade lock lever (9) and keep it pressed,
then use the 4mm Allen key provided to turn the
blade-retaining bolt anticlockwise.
- Remove the bolt, washer and blade if fitted. Make
sure the flange (inner blade washer) is present on the
shaft and is the right way up.
- Open the blade guard with lever (2) and replace or fit
the saw blade with the teeth facing the same way as
the riving knife - the teeth face towards the front of
saw.
- Fit the washer and bolt (clockwise) hand tight.
- Depress the blade lock button (9) and keeping it
pressed, tighten the bolt securely with the Allen key.
- Release the spindle lock button and stow the Allen
key in the holder.
- Check that the blade guard is free to revolve and that
the blade does not touch any part of the casing or
guard.
REPLACEMENT BLADES
Replacement blades are available from your dealer, DIY
outlets, tool stores and hardware shops; take your old
blade with you to make sure the new one is compatible.
The critical dimensions of the blade are:
- Maximum blade diameter 139mm.
- Arbour or shaft size is 10mm diameter.
After fitting a new blade it may be necessary to adjust the
riving knife.
ADJUSTING THE RIVING KNIFE
Refer to trim saw illustration page 2.
- Using the Allen key, which you will find in a holder at
the front of the motor housing, loosen the riving knife
retaining bolt.
- Rotate Blade guard with lever (2) and keep open
while adjusting the riving knife.
- Maximum gap between teeth and knife 5mm. Maxi-
mum projection below blade 5mm.
- Tighten the bolt securely.
- Check that the riving knife is in the correct position
and is in line with the blade.
- Release the blade guard.
- Stow the Allen key in the holder.
MOUNTING THE RIP FENCE
Refer to trim saw illustration page 2.
- Loosen the two thumbscrews on the front of the
shoe (3).
- Slide the rip fence (5) into slots with the fence facing
downwards.
- Set guide to the required position.
- Tighten thumbscrews.
4 Ferm