Damit eine gute Belüftung im Einbauzustand gewährleistet ist, müssen die Backöfen unter Einhaltung der in den Abb.1-2 auf Seite 3 gezeigten Abstände installiert werden.
Zur Sicherung einer guten Belüftung ist das Entfernen der hinteren Wandplatte des Einbauraums vorzunehmen. Ausserdem muss die Auflagefläche über einen hinteren Freiraum
von wenigstens 70mm verfügen.
Hinweis: Für die mit Kochflächen kombinierten Backöfen sind unbedingt die Anweisungen zu beachten, die in der Betriebsanleitung enthalten sind, die zusammen mit den
Kochflächen geliefert wird.
WICHTIG
Damit eine einwandfreie Funktion des Einbaugerätes gewährleistet wird, muss der Schrank unbedingt über die entsprechenden Eigenschaften verfügen.
Die Platten die an den Backöfen angrenzenden Schränke müssen aus wärmebeständigem Material sein. Insbesondere bei Schränken aus Furnierholz müssen die verwendeten
Klebstoffe Temperaturen bis zu 120°C widerstehen: halten die Plastikmaterialien oder Kleber solchen Temperaturen nicht stand, dann sind Verformungen und Entleimungen die Folge.
Nach dem Einbau des Gerätes dürfen entsprechend den Sicherheitsnormen, eventuelle Berührungen mit elektrischen Teilen, nicht möglich sein.
Sämtliche, der Sicherheit dienenden Teile müssen so angeordnet sein, daß sie sich ohne die Zuhilfenahme von Werkzeugen nicht entfernen lassen.
Abb. 6
VERSORGUNGSANSCHLUSS
DER ANSCHLUSS DES GERÄTS MUSS DURCH QUALIFIZIERTES PERSONAL, NACH DEN VORSCHRIFTEN IN KRAFT, AUSGEFÜHRT WERDEN.
Es ist die elektrische Belastung der Anlage und Steckdosen zu überprüfen um festzustellen, ob diese für die auf dem Leistungsschild angegebene maximale Leistung geeignet sind.
Den Stecker in die Stromsteckdose einsetzen, die mit einem einwandfrei funktionierenden dritten Erdleiterkontakt ausgerüstet sein muß. In Deutschland ist der Ofen direkt an die
Erdanschluß-Steckdose durch Fachpersonal zu montieren. Bei den Modellen, die ohne Stecker geliefert werden, einen genormten Stecker an das Kabel montieren, der für die auf
dem Leistungsschild angegebene Belastung geeignet ist. Der Erdleiter ist durch die gelb-grüne Farbe gekennzeichnet. Diese Arbeit muss durch qualifiziertes Personal (Elektroinstallateur)
ausgeführt werden. Passt der Gerätestecker nicht in die Steckdose, dann ist der Stecker durch einen anderen, für die Steckdose geeigneten zu ersetzen. Auch diese Arbeit darf
nur vom Elektroinstallateur ausgeführt werden. Letztgennanter soll auch insbesondere feststellen, ob der Kabelquerschnitt der Steckdose für die vom Geräte aufgenommene Leistung
geeignet ist. Das Anschlußkabel muß einen Querschnitt, wie nach der Tabelle Abb.6, haben. Es kann auch der direkte Anschluß an das Netz vorgenommen werden, indem zwischen
dem Gerät und dem Versorgungsnetz ein der Last entsprechender, genormter Mehrfachschalter mit Mindestabstand von 3 mm zwischen den Kontakten eingebaut wird. Das gelb-
grüne Erdungskabel darf durch den Schalter nicht unterbrochen werden. Die für den Anschluß verwendete Steckdose oder der Mehrfachschalter müssen bei dem eingebauten
Haushaltsgerät jederzeit leicht zugänglich sein. Wichtig: Bei der Installation ist darauf zu achten, daß das Versorgungskabel so gelegt wird, daß bei Raumtemperatur in keinem
Punkt desselben Temperaturen von über 50° erreicht werden. Das Gerät entspricht den Sicherheitsvorschriften der Normanstalten. Die elektrische Sicherheit dieses Gerätes ist
nur dann gewährleistet, wenn es richtig an einen einwandfrei funktionierenden Erdleiter angeschlossen ist, in Übereinstimmung mit den für die elektrische Sicherheit geltenden
Normen. Wichtig: der Hersteller ist von jeder Verantwortung für eventuell auftretende Schäden an Personen und Sachen befreit, die auf das Fehlen eines Erdleiters zurückzuführen
sind.
2017
A
U
T
O
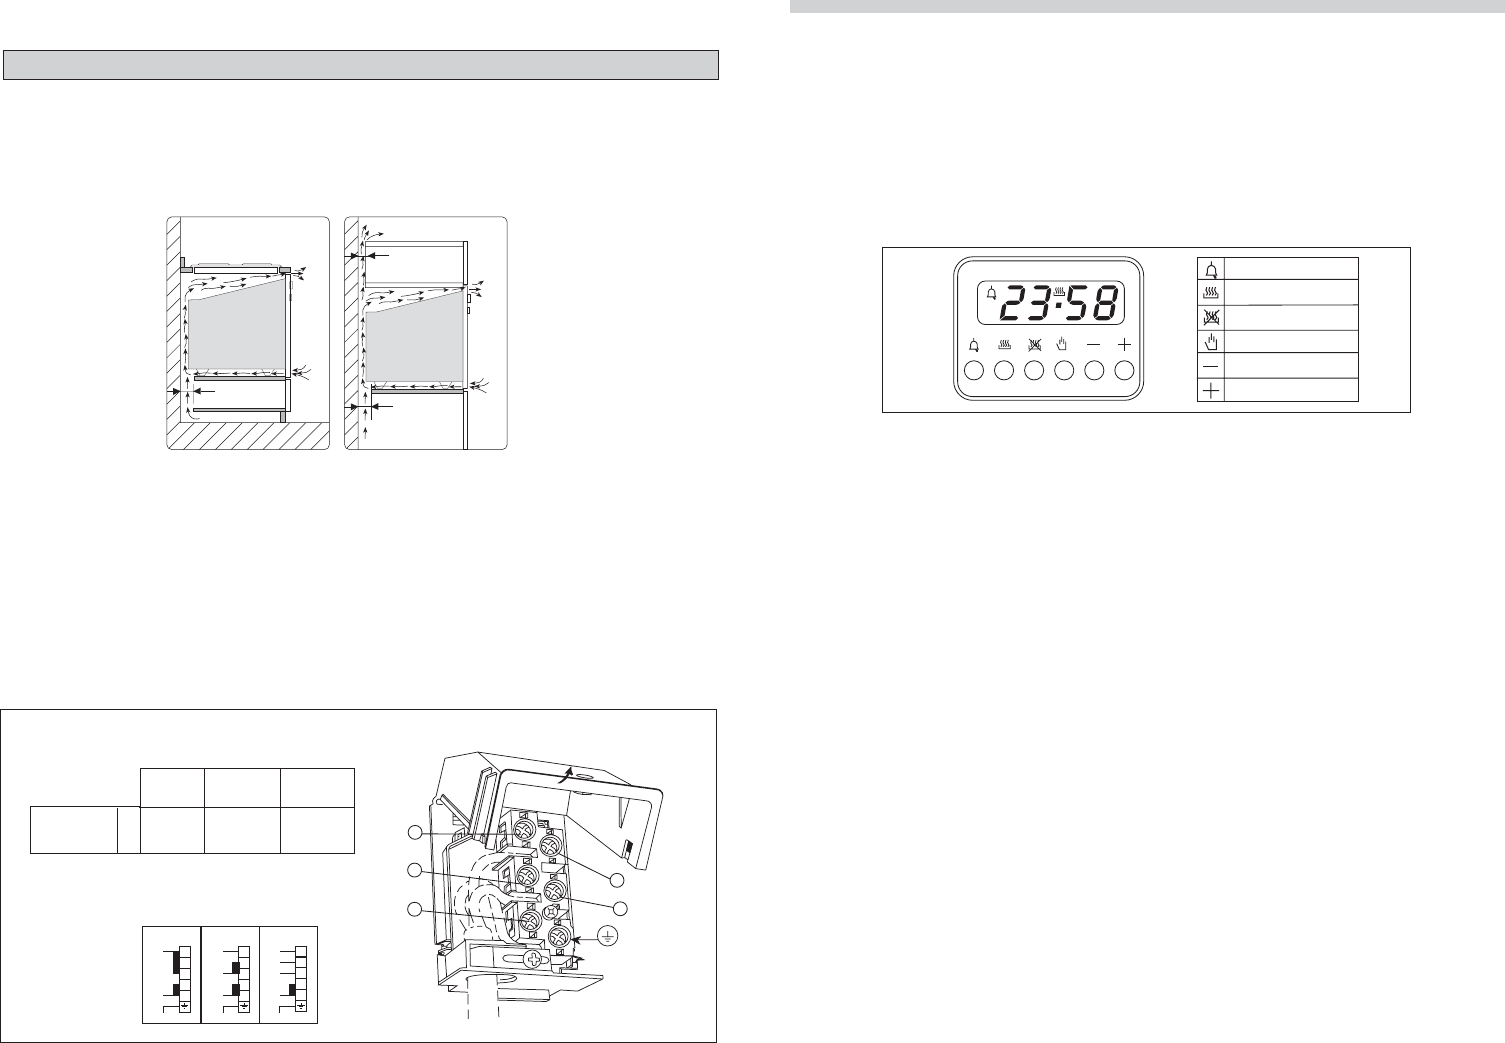
«LED» PROGRAMMER Mod. A 6310
Features
24 hours clock with automatic programme and minutes counter.
Functions
Cooking time, cooking end time, manual position, clock, minutes counter, times to be set up to 23 hours 59 minutes.
Display
4-figures, 7-segments diplay for cooking times and time of day.
Cooking time and manual function= saucepan symbol
Automatic function= AUTO
Minutes counter = bell symbol
The symbols light up when the corresponding functions are selected.
Setting
To set, press and release the desired function, and within 5 seconds set the time with + and - buttons.
Minutes counter
Cooking time
End time
Manual
Subtract time
Add time
Tasto + e -
+ and - buttons.
The + and - buttons increase or decrease the time at a speed depending on how long the button is pressed.
Setting the time
Press any two buttons (cooking time, end time, minutes counter) at the same time, and + or - button to set the desired time. This deletes any previously set programme. The
contacts are switched off and the AUTO symbol flashes.
Manual use
By pressing the manual button the relay contacts switch on, the AUTO symbol switches off and the saucepan symbol lights up.
Manual operation can only be enabled after the automatic programme is over or it has been cancelled.
Automatic use
Press the cooking time or end time button to switch automatically from the manual to the automatic function.
Semi-automatic use with cooking time setting
Press the cooking time button and set the desired time with + or -. The AUTO and cooking time symbols light up continuously. The relay switches on immediately. When the
cooking end time corresponds to the time of day, the relay and cooking time symbol switch off, the sound signal rings and the AUTO symbol flashes.
Semi-automatic use with end time setting
Press the end time button. The time of day appears on the display. Set the cooking end time with + button. The AUTO and cooking time symbols light up continuously. The relay
contacts switch on. When the cooking end time corresponds to the time of day, the relay and the cooking time symbol switch off. When the cooking time is up, the AUTO symbol
flashes, the sound signal rings and both the relay and the cooking time button switch off.
Automatic use with cooking time and end time setting
Press the cooking time button and select the length of the cooking time with + or - button. The AUTO and cooking time symbols light up continuously. The relay switches on. By
pressing the cooking end time button the next cooking end time appears on the display. Set the cooking end time with + button. The relay and the cooking time symbol switch
off. The symbol lights up again when the time of day corresponds to the cooking start time. When the cooking time is up, the AUTO symbol flashes, the sound signal rings, the
cooking time symbol and the relay switch off.
Minutes counter
Press the minutes counter button and set the cooking time with + or - button.
The bell symbol lights up when the minutes counter is operating. When the set time is up, the sound signal rings and the bell symbol switches off.
Sound signal
The sound signal starts at the end of a programme or of the minutes counter function and it lasts for 15 minutes.
To stop it, push any one of the functions buttons.
Start programme and check
The programme starts 4 seconds after it has been set. The programme can be checked at any time by pressing the corresponding button.
Setting error
A setting error is made if the time of day on the clock falls within the cooking start and end times. To correct the setting error, change the cooking time or cooking end time. The
relays switch off when a setting error is made.
Cancelling a setting
To cancel a setting, press the cooking time button and then press the - button untill 00 00 appears on the display. A set programme will automatically cancel on completion.
Abb. 4
Abb. 5
70
70
70
VERSORGUNGSART
Verschiedene Anschlüsse erfolgen durch die einfache Verschiebung der
Verbindungsbrücken auf dem Klemmbrett.
Die Backöfen, die über dieses Klemmbrett verfügt sind, sind ohne Versorgungskabel
ausgerüstet.
Auf Grund der Versorgungsart, benutzen Sie einen Kabel nach der folgenden Tabelle.
230V~230V 3~400V 3N~
400V 2N~
H05RR-F
Ø3 x 4 mm
2
*4 x 2,5 mm
2
*5 x 1,5 mm
2
H05RN-F
* Unter Berücksichtigung des Gleichzeitigkeits-Faktor 0,75.
Gebruikershandleiding.com neemt misbruik van zijn services uitermate serieus. U kunt hieronder aangeven waarom deze vraag ongepast is. Wij controleren de vraag en zonodig wordt deze verwijderd.
Product:
Spelregels forum
Om tot zinvolle vragen te komen hanteren wij de volgende spelregels:
lees eerst de handleiding door;
controleer of uw vraag al eerder door iemand anders is gesteld;
probeer uw vraag zo duidelijk mogelijk te stellen;
heeft u een probleem en al geprobeerd om dit op te lossen, vermeld dit erbij aub;
heeft u een oplossing gekregen van een bezoeker dan horen wij dat graag in dit forum;
wilt u een reactie geven op een vraag of antwoord, gebruik dan niet dit formulier maar klik op de knop 'reageer op deze vraag';
uw vraag wordt direct op de website gezet; vermijd daarom persoonlijke gegevens in te vullen;
Belangrijk! Als er een antwoord wordt gegeven op uw vraag, dan is het voor de gever van het antwoord nuttig om te weten als u er wel (of niet) mee geholpen bent! Wij vragen u dus ook te reageren op een antwoord.
Belangrijk! Antwoorden worden ook per e-mail naar abonnees gestuurd. Laat uw emailadres achter op deze site, zodat u op de hoogte blijft. U krijgt dan ook andere vragen en antwoorden te zien.
Abonneren
Abonneer u voor het ontvangen van emails voor uw Etna A6310 bij:
nieuwe vragen en antwoorden
nieuwe handleidingen
U ontvangt een email met instructies om u voor één of beide opties in te schrijven.
Ontvang uw handleiding per email
Vul uw emailadres in en ontvang de handleiding van Etna A6310 in de taal/talen: Nederlands, Duits, Engels, Frans als bijlage per email.
De handleiding is 0,53 mb groot.
U ontvangt de handleiding per email binnen enkele minuten. Als u geen email heeft ontvangen, dan heeft u waarschijnlijk een verkeerd emailadres ingevuld of is uw mailbox te vol. Daarnaast kan het zijn dat uw internetprovider een maximum heeft aan de grootte per email. Omdat hier een handleiding wordt meegestuurd, kan het voorkomen dat de email groter is dan toegestaan bij uw provider.
Uw handleiding is per email verstuurd. Controleer uw email
Als u niet binnen een kwartier uw email met handleiding ontvangen heeft, kan het zijn dat u een verkeerd emailadres heeft ingevuld of dat uw emailprovider een maximum grootte per email heeft ingesteld die kleiner is dan de grootte van de handleiding.
Er is een email naar u verstuurd om uw inschrijving definitief te maken.
Controleer uw email en volg de aanwijzingen op om uw inschrijving definitief te maken
U heeft geen emailadres opgegeven
Als u de handleiding per email wilt ontvangen, vul dan een geldig emailadres in.
Uw vraag is op deze pagina toegevoegd
Wilt u een email ontvangen bij een antwoord en/of nieuwe vragen? Vul dan hier uw emailadres in.